Evaluate and notate symptoms (all installed browsers, common malware, installed programs, customer stated symptoms, etc) on the ticket.
2. Disable Antivirus
Disable Antivirus
Generally, just right mouse click on the AV icon in the system tray and use the AV's menu to disable active scanning. Make sure that the AV is disabled for the duration of the service.
Disabling Major Anti-Virus Software
Disabling Kaspersky (which should no longer be used) and Trend Micro AVs will sometimes cause the AV to lock the screen in a way that cannot be approved remotely. You must get the customer or Store Agent to complete the disabling process with these AVs.
Avast
Avast does not have a timed disable function - you must re-enable the AV at the end of the service.Avast
Right Mouse click on the red umbrella icon in the system tray.
Uncheck AntiVir Guard enable.
Windows Defender/MSE
Windows Defender does not have a timed disable function - you must re-enable the AV at the end of the service.
MSE
If the green MSE icon exists the in the system tray:
Right click the icon.
Open.
Settings.
Real-time protection.
Uncheck "Turn on real time protection".
Save .
Win10
Control panel.
Windows Defender.
Settings.
Switch Real-time Protection off.
WinXP-7
Control panel.
Windows Defender.
Tools.
Options.
Uncheck "Use real-time protection".
Save.
McAfee
Right click the red M icon in the system tray.
Real-time scanning.
Change settings.
Turn off.
Select a duration close to the amount to time to deliver this ticket (do not choose "Until next reboot" as you will have to repeat this process each reboot).
Symantec/Norton
Right click on the Norton icon in the system tray (almost always a black on yellow icon).
Click "Disable Auto-Protect".
Select a duration close to the amount to time to deliver this ticket (do not choose "Until next reboot" as you will have to repeat this process each reboot).
Click OK.
3. Run SSC
Run SDC_SSC
One of the most time-consuming functions that you can do is check for malware on a computer where no symptoms exist. Customers may suspect they’ve been attacked or infected in some way that isn’t apparent to them. When we encounter customers who have this issue, they may ask us, could you please just check my system for malware? This can be extremely time-consuming. If you run the entire malware removal procedure on certain older machines, this could be a 20 to a 40-minute investment of time. Most of the time, you’ll find nothing.
In order to speed this process and in order to get to an understanding of whether a computer is properly infected or not, there is a short procedure called Simple Symptoms Check, also known as SSC. The easiest way to run SSC on a customer PC is to push the SDC_SSC application. It is on the Approved Tools list as well as within Cloud, shown as “SDC SCC†in the Push Dropdown List. This deploys Process Explorer, AutoRuns, and appwiz, and will allow us to check the computer very quickly for the presence of malware on the system.
SDC_SSC will automatically download AR, PE, and launch appwiz.cpl. The tools will also be automatically configured for optimal use (signature verification enabled in AR/PE, DLL view in PE).
If the customer's issue can be solved by using only SSC tools, then there is no need to deploy other tools (SysPrep, STK/GPfw/etc. Using additional tools to look for an infection that isn't present will only increase handle time.
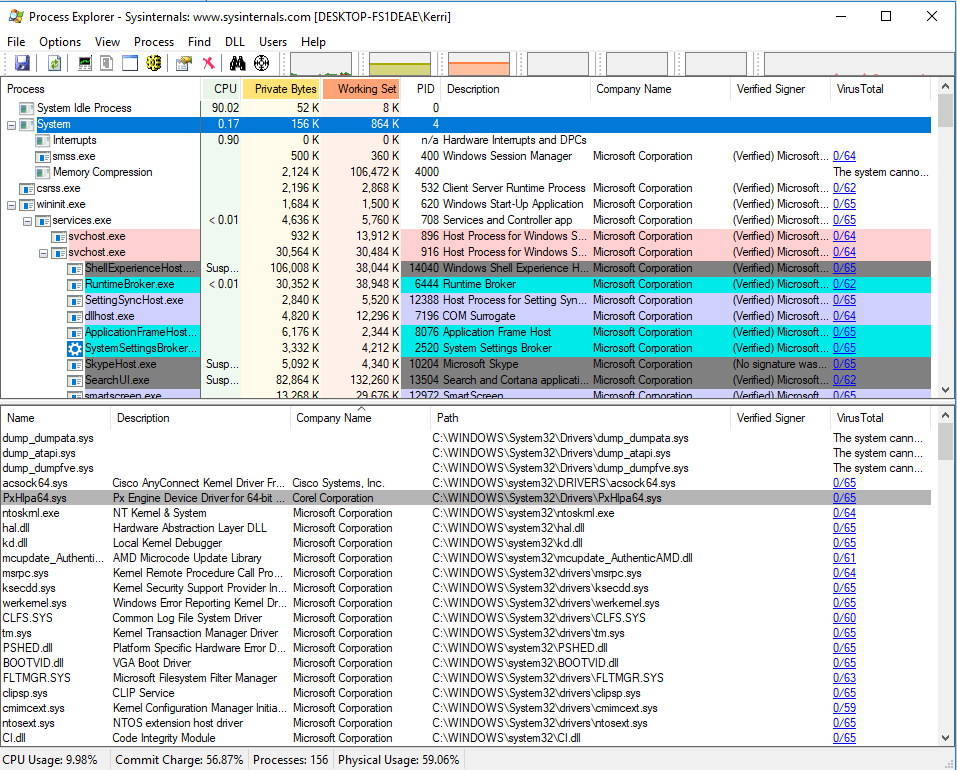
4. SSC Malware Check - Process Explorer
Malware Check - Process Explorer
Launch PE.
Maximize the PE window.
Check DLLs windows for anything suspicious for each of the major components in the upper section.
Check DLLs for CHILD internet browser processes.
Examine running processes for symptoms of malware as instructed in training.
One of the most prevalent places for malware to hang out is under System in Process Explorer. This should be the first place that you go and visit. Normally, a few seconds after you start, it will populate the bottom section of the window. Wait for it to finish. Sort by company name, and the important thing you’re looking for here are files marked not as Microsoft. As long as they say verified beside it, they can be ignored.
VirusTotal is not definitive. A zero score on VT does not mean that a file is not malware. You will miss infections if you assume that VT is correct when it reads 0/56. VT will only show you infections that it knows about. If a brand new infection came out that day, or if there is a polymorphic infection, it will not know about it. What you should be looking for are applications that do not have verification, a company name, and a file name where the name seems to be a random number of characters.
Occasionally, random Chinese AV companies associated with VT will flag items as false positives. This is normal and usually indicated when you see hits of 1-3/56. If you see multiple detections of 5+, then that may be a good reason to run a full malware scan.
The files dump_dumpdata.sys, dump_atapi.sys, dump_dumpfve.sys should always be ignored
Look for potential browser hijacks where you see multiple instances of a browser, E.G. chrome.exe running in the background, but the browser appears to not be running for the user. Terminate these instances in PE and look for the system to relaunch them.
Perform quick research on files that are not digitally signed to determine if they are known bad.
5. Run Sysprep
Run SDC_Sysprep
The purpose of SysPrep is to save time by automating three functions we should be running on all malware based tickets. When you start it, it'll start three programs in order and cause each of them to start scanning:
SDC_PreClean (clean out the temp files)
MBAM (download our version, install in a separate folder from 2.2 (if it's installed), update to latest virus database, start an automatic scan)
In order to automate MBAM for scanning in SysPrep, we are manually updating the virus database. This database lags behind the daily update by a few days (almost always less than a week). The automatic scan with this slightly old database is perfectly acceptable for our processes. There is no need to manually update the database and re-scan as that will only add an unacceptable amount of time to the ticket.
SDC_Sysprep will automatically download and run SDC_PreClean. Click 'Close' when done.
SDC_Sysprep will automatically download and run MBAM.
Remove PUPs:
Go through the STK's Installed Programs or AppWiz.cpl and remove all PUPs from the system. Consult http://shouldiremoveit.com if unsure of a particular entry.
If a PUP is not uninstalling from the program’s uninstaller, then skip to removal by MBAM and return afterwards to verify whether it is still an issue.
MBAM Configuration, Run, Review, and Cleanup
Configuration - MBAM 2.0 should only be used in the rare circumstance that it already exists on the system. In all other cases we should be installing MBAM 1.75, and declining the upgrade to 2.0 during installation. Whether 1.75 or 2.0 is being used, the definitions must be updated prior to initiating scan. If 2.0 is accidentally upgraded to, it must be uninstalled and the correct version installed.
Run – Only Quick Scan should be used.
Review – Review the MBAM results to verify that there are no false-positives or other issues with the quarantining and removal of results.
6. Run Sysprep - Post
Post-SDC_Sysprep Steps
MBAM:
If applicable, quarantine unwanted results but do not reboot at this time.
Quarantine / removal may take extra time depending on PC specs and amount of items found. If you find that MBAM is unable to perform the cleanup then look at the log and evaluate what you could remove manually. For example, a PUP with many files can be uninstalled via appwiz.cpl, or a folder with a ton of .log files could be purged manually, etc.
If removal had to be performed in MBAM then a reboot is necessary. If clean then no reboot is required.
7. Post Reboot Cleanup - MBAM
Post Reboot Cleanup for MBAM
Open MBAM and empty/delete the quarantined entries.
Attach logs from both tools to the ticket.
8. Browser - Open All
Launch All Internet Browsers
Open all browsers (for example Internet Explorer, Firefox, Chrome, Edge, Safari). This is necessary for the next steps.
9. Malware Check - Process Explorer
Malware Check - Process Explorer
Launch PE.
Set up PE as instructed in training.
Maximize the PE window.
Check DLLs windows for anything suspicious for each of the major components in the upper section.
Check DLLs for CHILD internet browser processes.
10. Advanced Malware Removal/Escalate
Use Advanced Malware Removal Techniques/Escalate
If your scope prevents use of manual removal techniques, escalate at this time
Use advanced malware removal techniques in order to remove the infections found. Use any applicable tool like Process Explorer, Autoruns, cacls and so on.
If you are unable to find a fix, or if a fix fails then complete this step and continue on.
11. Browser - Verification
Browser Verification
Check Internet Explorer and other browsers for possible browser hijacks and redirects. Open multiple tabs to ensure we haven't missed anything. Clean up the browser if necessary. See below.
Internet Explorer
Make sure all IE windows are closed (verify in PE if necessary).
Open the Run box by pressing WIN + R.
Copy and paste the following and press ENTER: inetcpl.cpl
Go to the 'Connections' tab.
Click on 'LAN Settings'.
Uncheck all boxes, then click 'OK'.
Go to the 'Security' tab.
Click 'Reset all zones to default level'. The button is grayed out when the settings are already default.
Click 'Trusted sites' then click the 'Sites' button.
Highlight and Remove any harmful websites listed. Leave helpful websites in the list.
Hit 'Close' when done.
Click 'Restricted' sites then click the 'Sites' button.
Highlight and Remove any helpful websites listed. Leave harmful websites in the list.
Hit 'Close' when done.
Go to the 'Programs' tab.
Click the 'Manage add-ons' button.
Click the 'Toolbars and Extensions' tab.
Click the show drop-down box and select 'All add-ons'. Review all entries.
Click the show drop-down box and select 'Currently Loaded'. Review all entries.
Click the show drop-down box and select 'Run Without Permission'. Review all entries.
Click the 'Search Providers' tab.
Review search providers for any PUPs or malicious entries that need to be removed.
Click the 'Accelerators' tab.
Review search providers for any PUPs or malicious entries that need to be removed.
Click 'OK'.
Go to the 'General' tab.
Verify Homepage is not malicious. If you do not recognize the website, google search it first.
Click 'OK'.
Open IE and verify shortcut opens successfully.
Right mouse click on any browser shortcut and go to 'Properties'.
Verify that the Target only contains the path to the EXE and nothing else.
"C:\Program Files\Internet Explorer\iexplore.exe" with nothing after it.
Verify a new tab can be opened successfully, and go to an approved site to validate browser functionality. Verify adverts on site are non-malicious by checking the link to the ad and verifying that the options in the upper right are available.
Run a search for an approved search term through both the omnibox (built-in search) and through http://google.com, and click on the first search result to verify you arrive at the expected site.
Verify ad results using the approved Ad site.
Firefox
Enter 'about:plugins' into address bar and hit enter.
Review plug-ins and remove any that are malicious.
Check 'settings'.
Remove any malicious extensions.
Remove any malicious services.
Verify Homepage is not malicious.
Right mouse click on any browser shortcut and go to 'Properties'.
Verify that the Target only contains the path to the EXE and nothing else.
"C:\Program Files (x86)\Mozilla Firefox\firefox.exe" with nothing after it.
Open Firefox and verify shortcut opens successfully.
Verify a new tab can be opened successfully, and go to an approved site to validate browser functionality. Verify adverts on site are non-malicious by checking the link to the ad and verifying that the options in the upper right are available.
Run a search for an approved search term through both the omnibox (built-in search) and through http://google.com, and click on the first search result to verify you arrive at the expected site.
Verify ad results using the approved Ad site.
Chrome
Enter 'chrome://extensions' into address bar and hit Enter.
Review plug-ins and remove any that are malicious.
Check Settings.
Remove any malicious extensions.
Verify Homepage is not malicious.
Click on Manage Search Engines and verify no search hijackers are present.
Open Chrome and verify shortcut opens successfully.
Right mouse click on any browser shortcut and go to 'Properties'.
Verify that the Target only contains the path to the EXE and nothing else.
"C:\Program Files (x86)\Google\Chrome\Application\chrome.exe" with nothing after it.
Verify a new tab can be opened successfully, and go to an approved site to validate browser functionality. Verify adverts on site are non-malicious by checking the link to the ad and verifying that the options in the upper right are available.
Run a search for an approved search term through both the omnibox (built-in search) and through http://google.com, and click on the first search result to verify you arrive at the expected site.
Verify ad results using the approved Ad site.
Edge
Verify Edge shortcut:
Right mouse click on Edge shortcut
Right mouse click on 'Microsoft Edge' and look at the options presented.
If you see Properties, immediately click Unpin from Taskbar.
To re-add the Edge shortcut
search for Edge via the Start Menu
Right click on 'Microsoft Edge' and click 'Pin to taskbar'.
Open Edge.
Check settings (In Edge, click '...' then Settings.)
Verify homepage settings. Start, New and Previous pages are fine. If a specific page is selected, make sure it isn't malicious.
Scroll down and click 'View advanced settings'.
Check for any possible bad Extensions
Settings
Extensions
Verify proxy settings
Click 'Open proxy settings'
Turn all options Off.
Close the Network & Internet page and return to Edge.
Scroll down to 'Search in the address bar with' and verify not malicious. Click Change button if changes need to be made.
Verify a new tab can be opened successfully, and go to an approved site to validate browser functionality. Verify adverts on site are non-malicious by checking the link to the ad and verifying that the options in the upper right are available.
Run a search for an approved search term through both the omnibox (built-in search) and through http://google.com, and click on the first search result to verify you arrive at the expected site.
Verify ad results using the approved Ad site.
12. Reboot
Reboot
Reboot with the RANG toolbar.
13. Confirm Malware Removed
Confirm Malware Removed
Confirm no more malware symptoms.
14. Issue Resolved
Issue Successfully Resolved
The system is now working as intended. Issue resolved.
15. Do Some Research
Research
Take a moment to research for a possible quick fix for the issue. Use resources such as:
If you are unable to find a fix, or if a fix fails then complete this step and continue on.
16. Switch Paths / Send - System Restore (Windows)
Switch Paths / Send
Click the button below to be brought to the 'System Restore' guided path. Please use the switch paths feature to switch back here to resume where you left off.
Clicking this shortcut will mark this step as "Completed," and if you complete the next Guided Path, this Guided Path will be completed automatically
OSRI
Advise customer a Windows Repair or OS reinstall is required to resolve the issue. Please see the OSRI Guided Path for your appropriate tenant.
19. Exit: Escalate to PTE
If you are a PST, follow the Escalation Process to PTE.
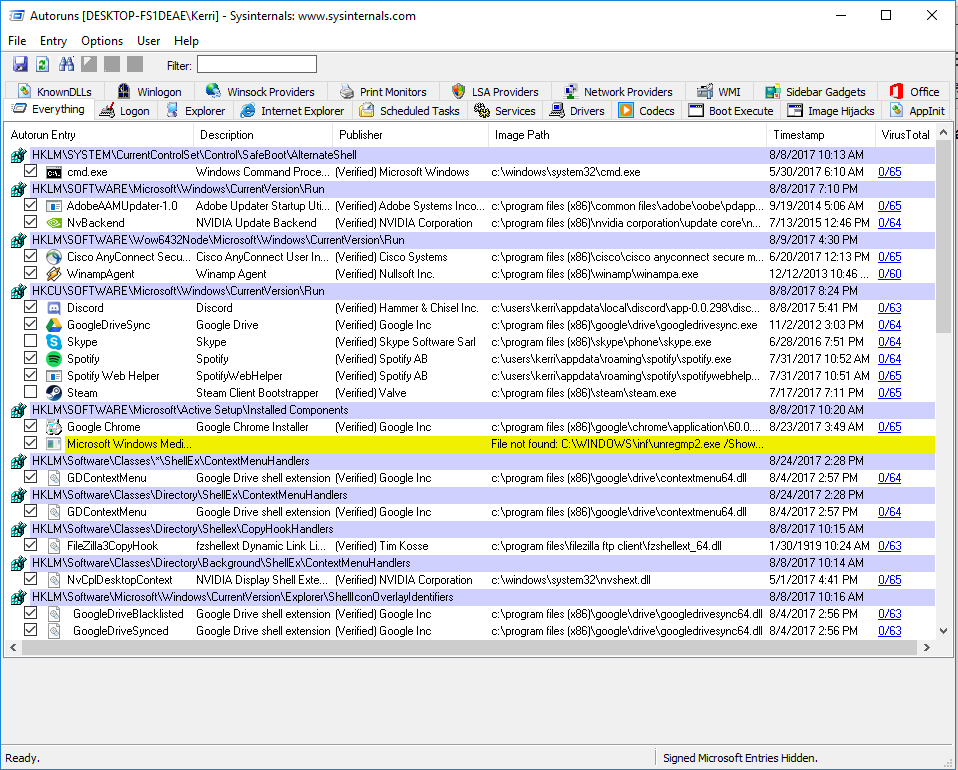
20. Malware Check - AutoRuns
Malware Check - Autoruns
Launch AR.
Set up AR as instructed in training.
Maximize the AR window.
Review entries in the Everything tab first. You may check the other tabs only after reviewing the Everything tab.
21. Disable malware/PUP autostart in AR
Disable Malware/PUP Autostart in AR
Disable the malware or PUP in AR.
DO NOT DELETE entries.
You must not ignore entries not flagged by VT. Virustotal can be a good indication of malware however it is not fool proof.
22. Switch Paths / Send - Tool Issues
Switch Paths / Send
Click the button below to be brought to the 'Tools Issues' guided path. Please use the switch paths feature to switch back here to resume where you left off.
Clicking this shortcut will mark this step as "Completed," and if you complete the next Guided Path, this Guided Path will be completed automatically
23. Rootkit - Requested Resource In Use
The Requested Resource Is In Use Rootkit
Signs & Symptoms
"The requested resource is in use" error when running most malware removal tools (MBAM, etc.), System Restore, and so on.
PE may show ndistpr64.sys or NetUtils2016.sys loading under System.
AR may show Dataup or windowsmanagementservice services.
Windows Defender is disabled by group policy. An update and scan is possible if you remove the group policy but currently doesn't help with removal.
The Advanced Boot Menu will not function.
MBAM/Etc:
Process Explorer (PE)
Autoruns (AR):
Fix Steps
Stop work as soon as you see "the requested resource is in use" error as no further troubleshooting is required.
There is currently no known fix. An OS reinstall should be recommended.
24. SSC Malware Check - AutoRuns
Malware Check - Autoruns
Launch AR.
Maximize the AR window.
Review entries in the Everything tab first. You may check the other tabs only after reviewing the Everything tab.
25. SSC Malware Check - appwiz.cpl
Review appwiz.cpl for any simple PUPs (E.G. Mindspark, browser addons/toolbars, registry "optimizers", etc) that can be removed. Uninstall them, notating what was uninstalled in your ticket notes, and wrap up the service.
shouldiremoveit.com is a good source to know if the particular name of something is an item that needs attention.
.png)