Setting up your Apple MacBook is an exciting process that ensures you have a fully functional laptop ready for use. This comprehensive guide will walk you through the steps to perform a basic setup for your MacBook, including initial connections, software configuration, and essential settings.
1. Unboxing and Inspecting Your MacBook:
Carefully unbox your MacBook and inspect the contents to ensure everything is included and undamaged.
2. Connecting Your MacBook:
Connect the power cable to your MacBook and plug it into a power outlet.
Connect any accessories or peripherals you have, such as a mouse, keyboard, or external display.
3. Powering On Your MacBook:
Open your MacBook's lid or press the power button (located on the top-right corner of the keyboard) to turn it on.
Follow the on-screen instructions.
4. Initial Software Configuration:
Choose your language and region.
Select a keyboard layout.
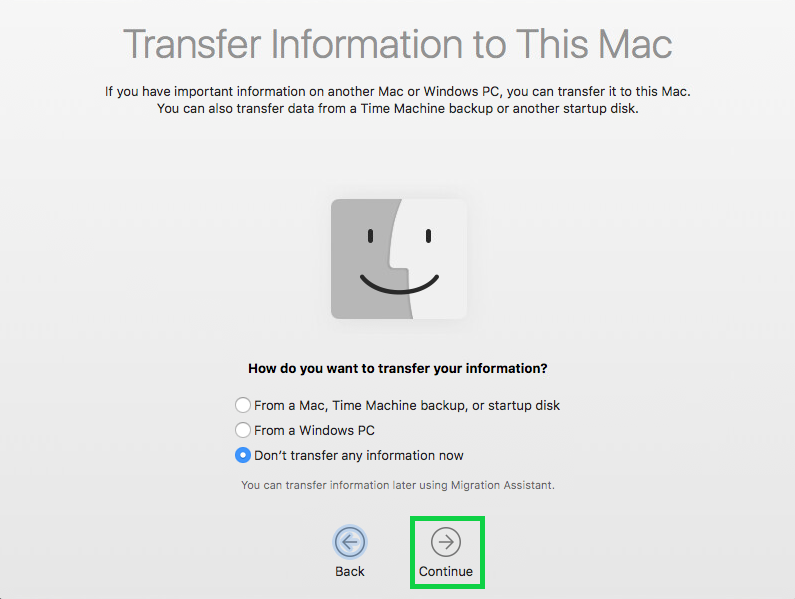
Choose whether you want to transfer data from another Mac, a Time Machine backup, or start fresh.
5. Creating or Signing in to Your Apple ID:
If you have an Apple ID, sign in to access iCloud, the App Store, and other Apple services.
If you don't have an Apple ID, you can create one during setup.
6. Setting Up iCloud:
Choose whether to use iCloud Drive, iCloud Photos, Find My Mac, and other iCloud features.
7. Configuring Your User Account:
Create a user account with a password.
Choose whether to enable FileVault disk encryption.
8. Adjusting System Preferences:
Customize your MacBook's settings, including display, sound, energy saver, privacy, and security preferences.
9. Installing Software and Updates:
Use the App Store to install apps and software you need.
Check for system updates to ensure your MacBook has the latest features and security patches.
10. Customizing Your Desktop:
Personalize your desktop by changing the wallpaper, arranging icons, and adding widgets.
11. Troubleshooting Common Setup Issues:
If you encounter issues during setup, consult Apple's online support or visit an Apple Store for assistance.
With this comprehensive guide, you should be able to perform a basic setup for your Apple MacBook. Enjoy your new laptop and explore the powerful features and capabilities it offers for productivity and creativity.
Contact Support.Com
If you are still having trouble, refer to the Step-By-Step Guide below, or Contact Support.Com for Personalized Assistance.
1. Introduction: Apple MacBook: Basic Setup
Congratulations on your MacBook purchase. This guide will show you how to setup your new laptop.
Information needed for setup:
Wireless Network Name (SSID)
Wireless Password (Security Key)
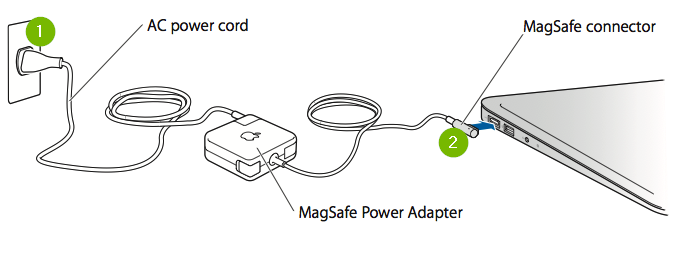
2. MacBook: Connect Power
Connect one end of the power adapter to your wall.
Connect the other end to your MacBook.
3. MacBook: Power On
Press the power button on the keyboard to power on the Laptop
4. macOS: OSX Setup Assistant
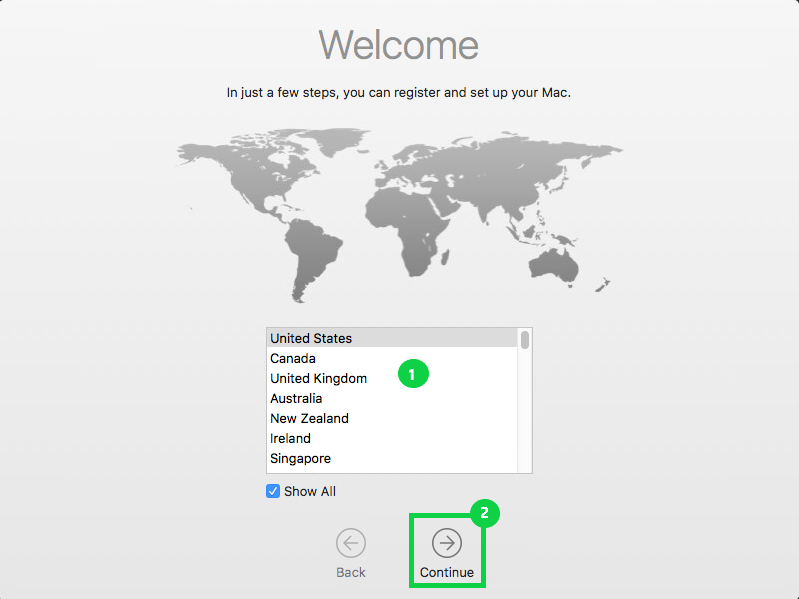
Choose your country from the list and click Continue.
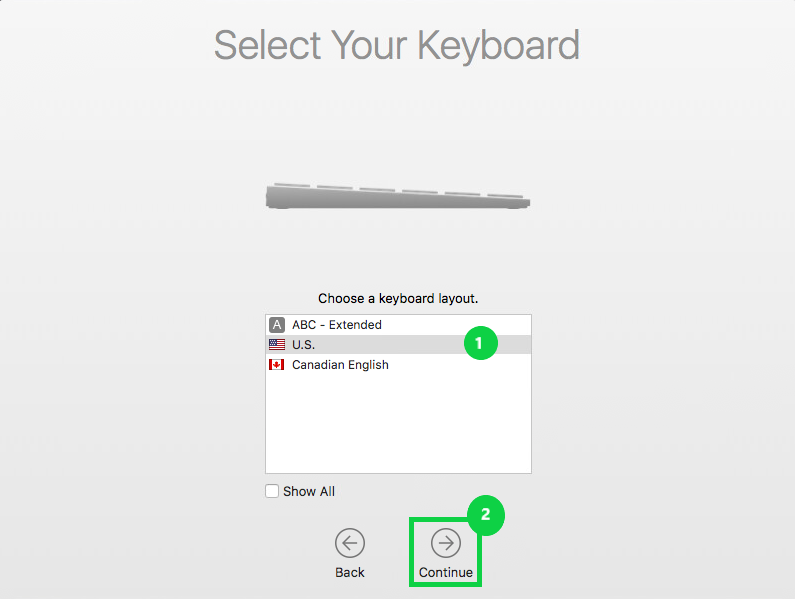
Choose your Keyboard Layout and click on Continue.
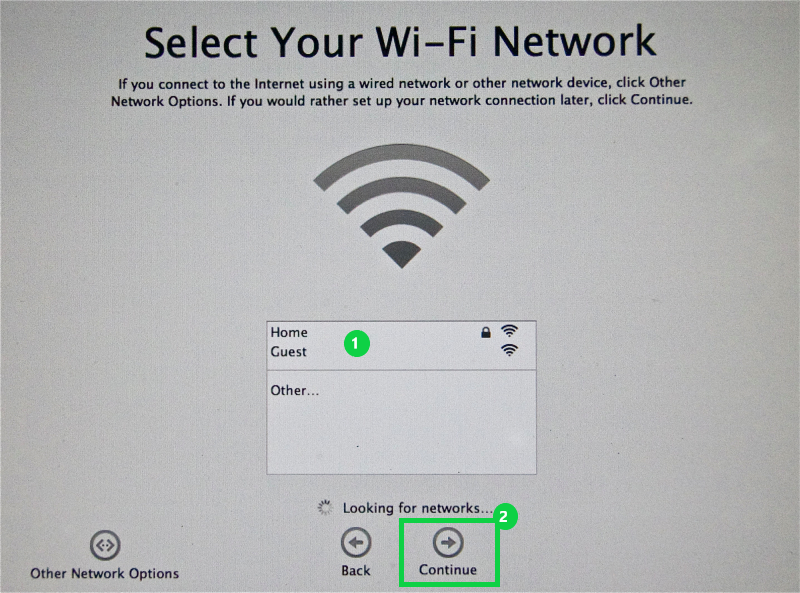
Select your Network Name (SSID) and select Continue.
Most networks are secured. If you are connecting to a secured network you will be prompted to enter your WiFi Password (Security Key).
This step will let us transfer information from another computer or from a Backup. For now we will skip this step. It can be done after setup of your Mac. Please select Don't transfer any information now and click Continue.
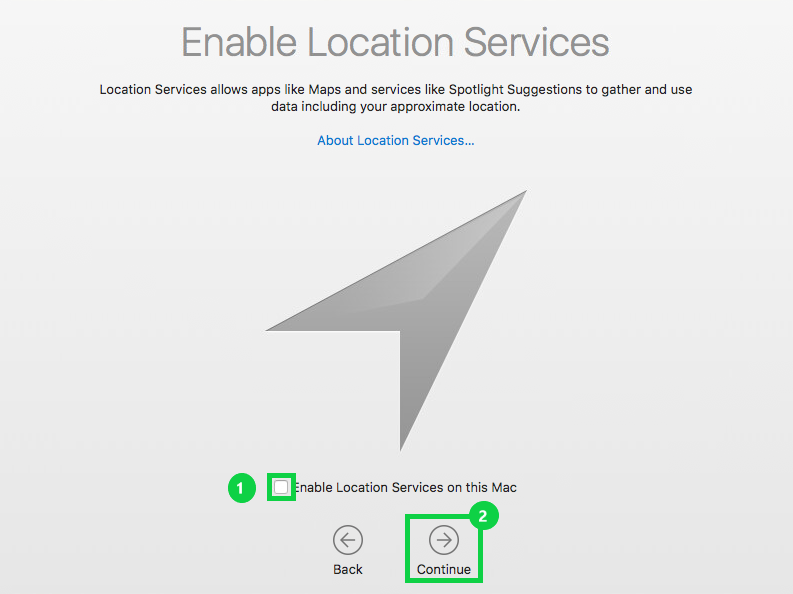
Choose whether or not to enable Location Services and click Continue.
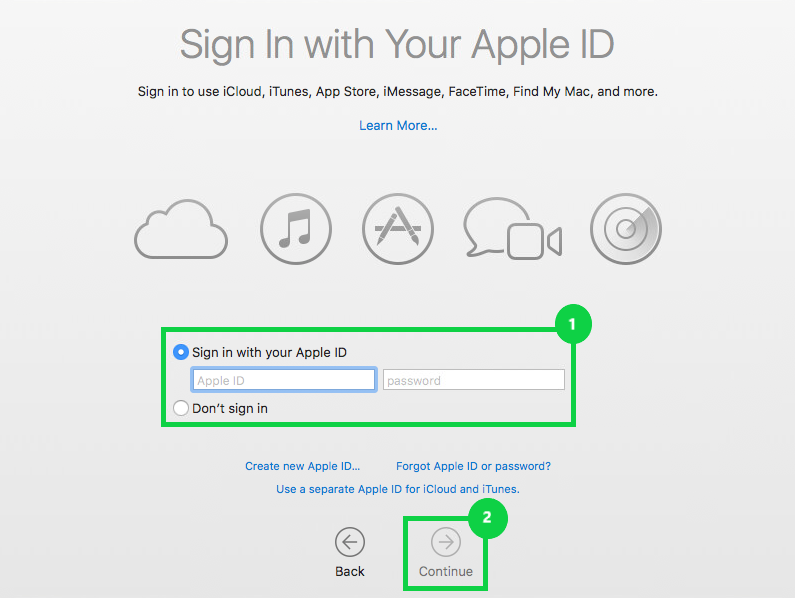
If you have an Apple ID, you can sign in here and click Continue.
If you do not wish to sign in with an Apple ID, please skip to step 8. You may do this later after setup is completed.
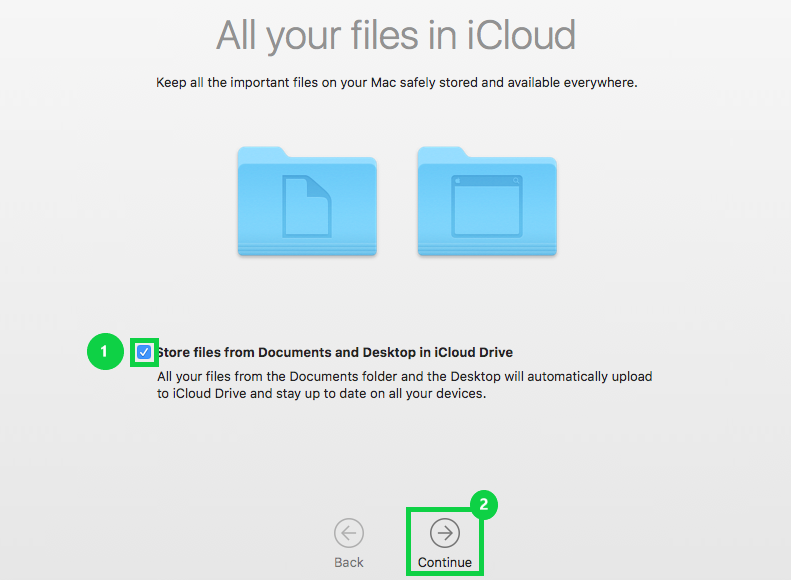
Choose whether you wish to backup your files to iCloud and click Continue.
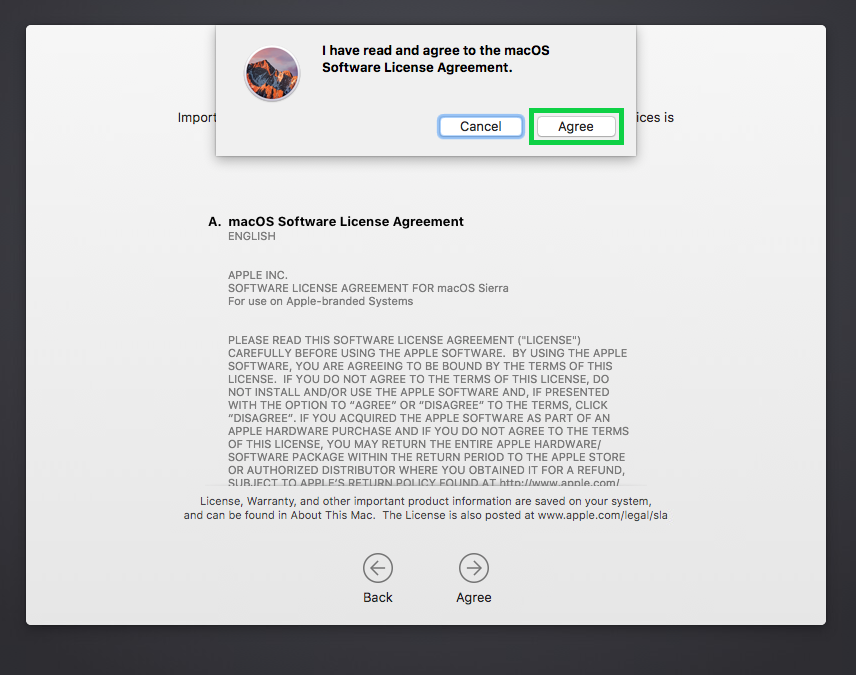
Read through and Agree to the Terms and Conditions.
Confirm that you Agree with the Terms of Service
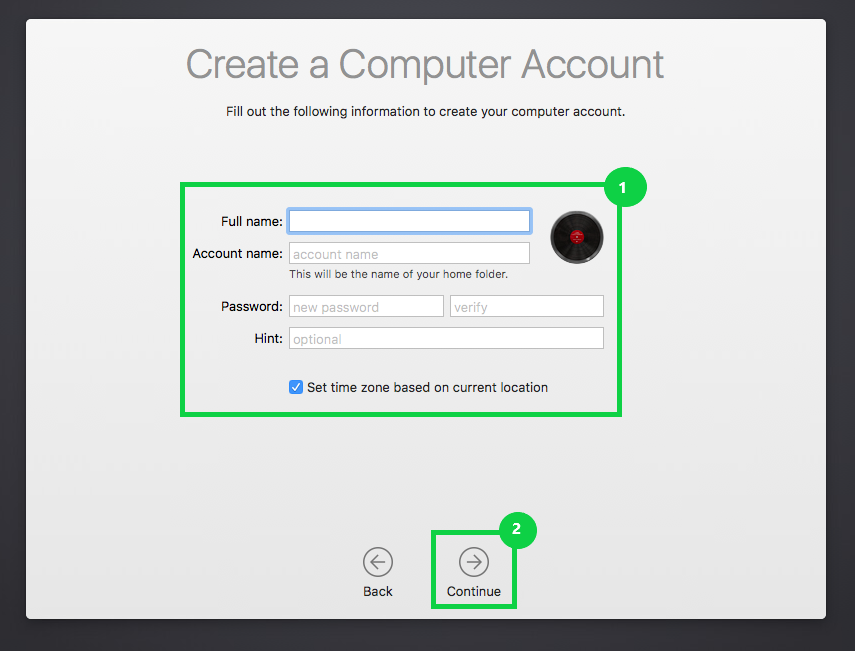
Lets create your account by entering the following:
Your Name
Your Account Name
Your Account Password
A Password Hint
Click Continue once done.
Be sure to take note of your Account Name and Password. If you forget this information you may end up getting locked out of your computer.
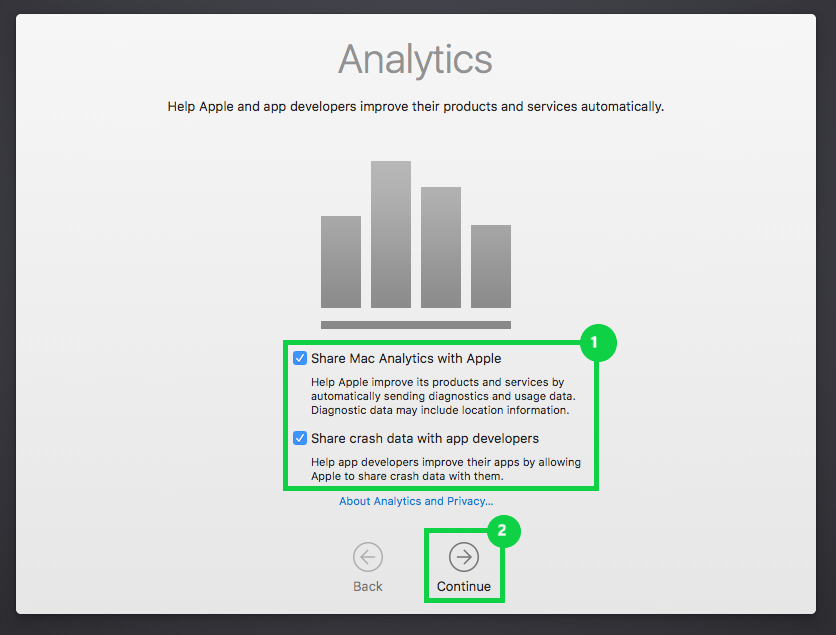
Choose what information you would like to share with Apple and app developers and then select Continue.
5. macOS: Check for Updates
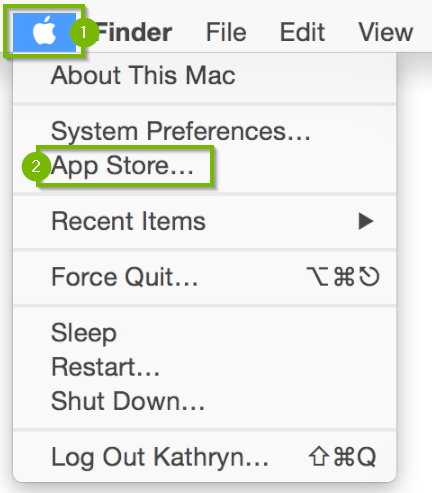
Click the Apple menu, then click onApp Store.
Select Updates on the bar at the top.
Any pending updates for your Mac will be listed here. Select Update All to apply these updates.
MacBook, MacBook Pro, and MacBook Air must have the power adapter plugged in to automatically download updates.
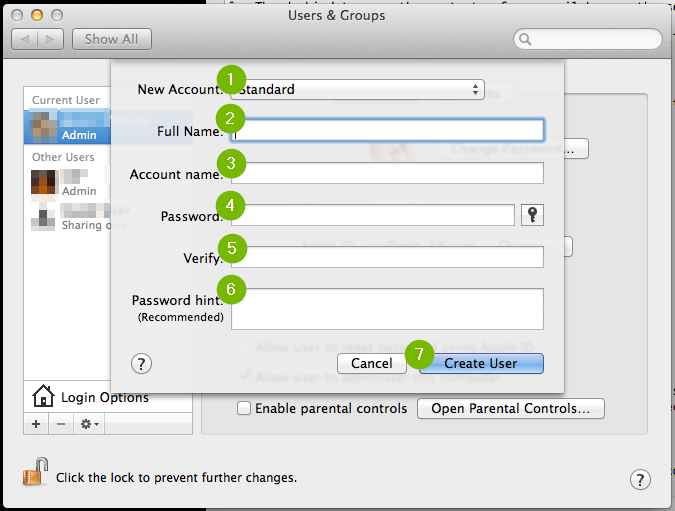
6. macOS: Create New User Profile
Choose Apple menu > System Preferences.
Click Users & Groups.
Click the lock icon to unlock it, then enter an administrator name and password.
Click the Add button below the list of users.
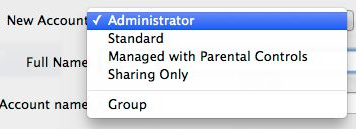
Click the New Account pop-up menu, then choose a type of user.
Administrator: An administrator can add and manage other users, install apps, and change settings. The new user you create when you first set up your Mac is an administrator. Your Mac can have multiple administrators. You can create new ones, and convert standard users to administrators. Don't set up automatic login for an administrator. If you do, someone could simply restart your Mac and gain access with administrator privileges. To keep your Mac secure, don't share administrator names and passwords.
Standard: Standard users are set up by an administrator. Standard users can install apps and change their own settings, but can't add other users or change other users' settings.
Managed with Parental Controls: Users who are managed with parental controls can access only the apps and content specified by the administrator managing the user. The administrator can restrict the user's contacts and website access, and place time limits on computer use.
Sharing Only: Sharing-only users can access shared files remotely, but can't log in to or change settings on the computer. To give the user permission to access your shared files or screen, you may need to change settings in the File Sharing, Screen Sharing, or Remote Management panes of Sharing preferences.
Enter a full name for the new user. An account name is generated automatically. To use a different account name, enter it now as you can't change it later.
Enter a password for the user, then enter it again to verify. Enter a password hint to help the user remember their password.
Click Create User.
Click the user you just created.
Depending on the type of user you create, you can also do any of the following:
For an administrator, select "Allow user to administer this computer."
For a child or other managed user, select "Enable parental controls." Click Open Parental Controls, then set up restrictions for the user.
Use Sharing preferences to specify whether the user can share your files and share your screen.
The new user is now ready to be used. Log off and then log back in to get started.
Remove Hidden Spyware In Minutes For Free
Detect and remove spyware, keyloggers, tracking cookies, and other
threats that slow down your PC or steal your data.
65+ Million Downloads
Spyware scanner with AI-powered detection engine + database
.png)