Keeping your Mac computer up to date with the latest macOS and software updates is essential for performance, security, and compatibility. However, sometimes update issues may arise. This comprehensive guide will help you troubleshoot and resolve common update problems on your Mac.
1. Understanding Mac Update Types:
Learn about the different types of updates, including macOS updates, App Store app updates, and updates for third-party software.
2. Checking for Available Updates:
Go to the Apple menu > "About This Mac."
Click "Software Update" to check for macOS updates.
Open the App Store and go to "Updates" for app updates.
3. Troubleshooting Common Update Issues:
If you encounter update problems:
Ensure your internet connection is stable.
Check for sufficient storage space.
Restart your Mac.
Sign out and back into the App Store or iCloud.
Disable any third-party firewall or antivirus software temporarily.
Try updating from a different network.
4. Updating macOS Manually:
If automatic updates fail, download and install macOS updates manually from Apple's support website.
5. Clearing Update Cache:
Use Terminal to clear the update cache: sudo rm -rf /Library/Updates.
Restart your Mac and check for updates again.
6. Resetting the NVRAM/PRAM:
Shut down your Mac.
Turn it on and immediately press and hold Option, Command, P, and R keys.
Keep holding until you hear the startup sound again.
Release the keys and check for updates.
7. Booting into Safe Mode:
Restart your Mac and hold the Shift key until the Apple logo appears.
Release the key when you see the login screen.
Check for and install updates in Safe Mode.
8. Dealing with Software Conflicts:
Sometimes, third-party software can interfere with updates. Temporarily uninstall or disable non-essential third-party software and try updating again.
With this comprehensive guide, you should be better equipped to troubleshoot and resolve update issues with your Mac. Regularly updating your macOS and software ensures that your computer remains secure and performs optimally.
Contact Support.Com
If you are still having trouble, refer to the Step-By-Step Guide below, or Contact Support.Com for Personalized Assistance.
1. Introduction: macOS: Update Issues
Your Mac will do its best to keep up-to-date on its own. If it's a laptop, it will automatically check and update whenever it is plugged in to charge.
If it is having problems, or you just want to double-check, this guide will walk you through how to do so, as well as some common things to try if problems arise.
2. macOS: Software Updates
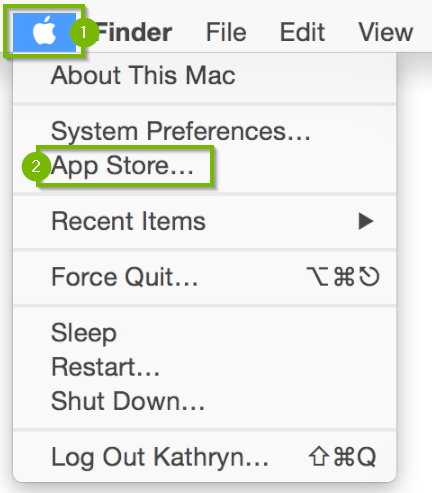
Click on the Apple Menu and click on App Store.
Click Updates on the top-right.
Click Update All to perform your software updates.
3. MacOS: Reset NVRAM
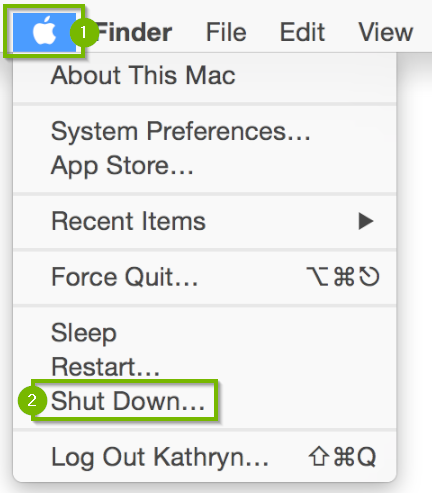
NVRAM (nonvolatile random-access memory) is a cache of settings specific to your Mac. Resetting NVRAM is safe, however you will need to reset some of your minor customizations, such as volume, time zone, or screen resolution.
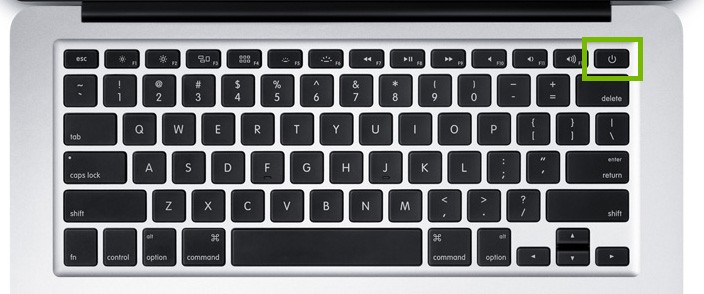
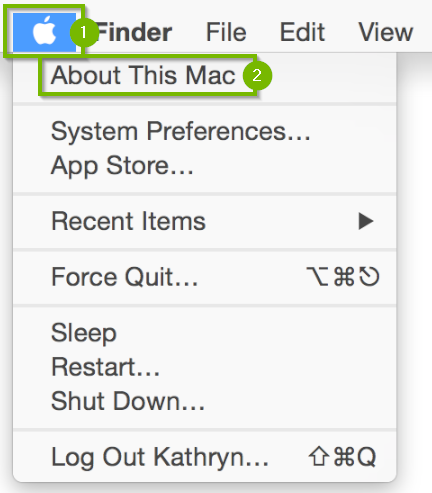
From the menu bar across the top of the screen, select the Apple menu (1), then select Shut Down... (2).
Wait for your computer to shut down, and turn off.
Turn your Mac back on by pushing the Power button.
Immediately push and hold the option, command ⌘, P, and R keys on your keyboard.
If your Mac plays a startup sound, release the keys after the second time it plays.
If there is no startup sound, release the keys after the second time the Apple logo disappears.
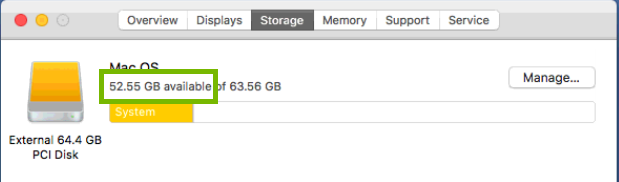
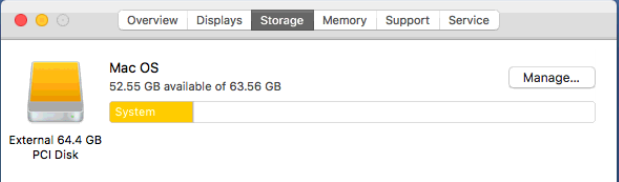
4. macOS: Check Drive Space
Click the Apple menu, then click on App Store.
Click the Storage tab.
Free space is the first number you see below the name of your hard drive.
Disk space needs will vary depending on how you use your computer. In general, if you have over 15 GB of free space, you should be fine for updates and upgrades. Only proceed if you have less than 15 GB of free space.
Click Manage... to the right of your hard drive.
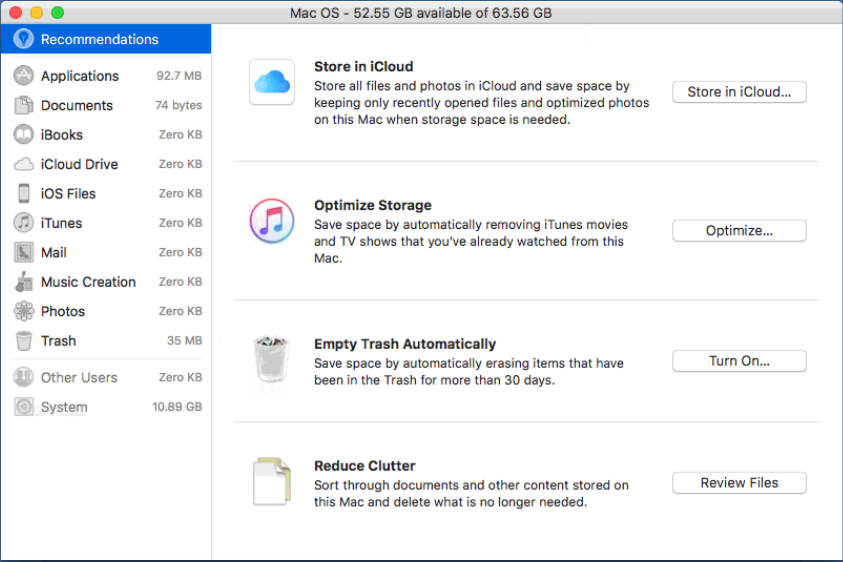
Under Recommendations on the left, you'll see some very easy-to-use tools to help optimize and clean up your disk space, such as optimizing the files already stored in iCloud, removing items from iTunes you've already watched or listened to, emptying the Trash automatically, and reviewing the files stored on your Mac to delete unused or old ones.
5. macOS: Software Updates
Click on the Apple Menu and click on App Store.
Click Updates on the top-right.
Click Update All to perform your software updates.
6. Mac: Connect to Wired
Sometimes, the wireless signal is too weak, and a wired connection will provide better service.
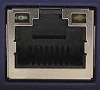
Not every Mac has an Ethernet port. It's okay if you do not see one.
Look on the side and back of your Mac, and see if there's a port that looks like this, it will have a <···> symbol next to it.
Acquire an Ethernet cable. It looks like the picture below.
Take one end of the cable and plug it into your router/modem's Ethernet port.
Plug the other end of the cable into your device's Ethernet port.
Your Mac will automatically switch to this connection.
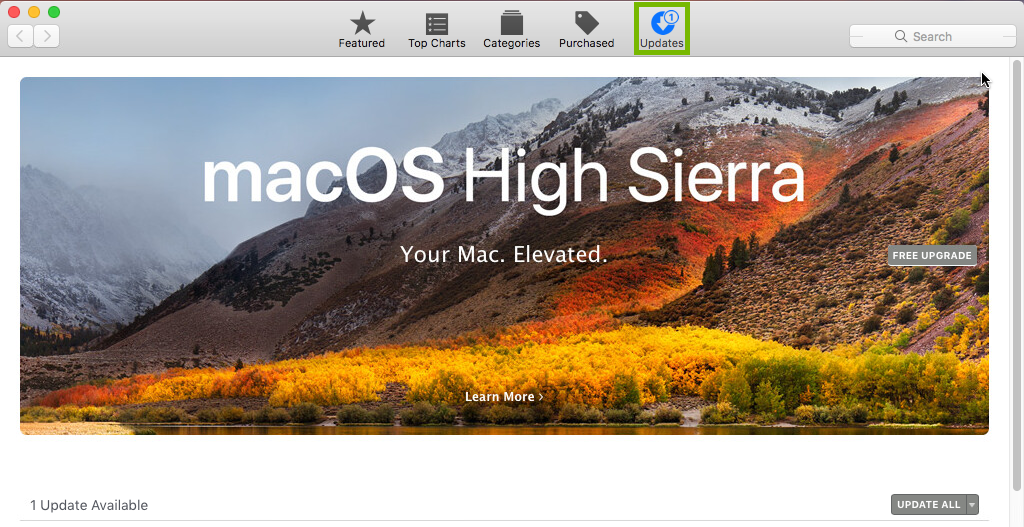
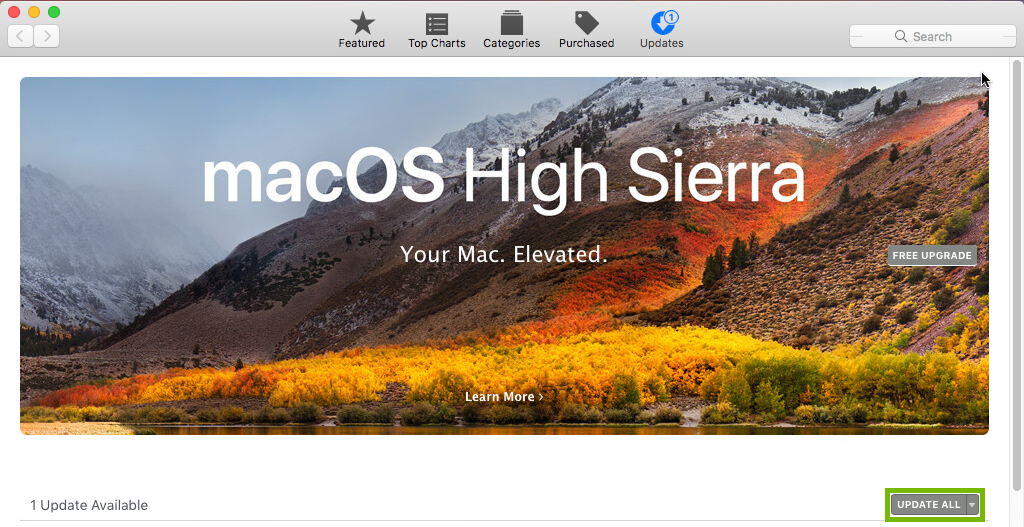
7. macOS: Software Updates
Click on the Apple Menu and click on App Store.
Click Updates on the top-right.
Click Update All to perform your software updates.
8. What's next?
9. macOS: OS X High Sierra Compatibility Check
In general, if your Mac was made after late 2009, it should be compatible. We can confirm using the following steps:
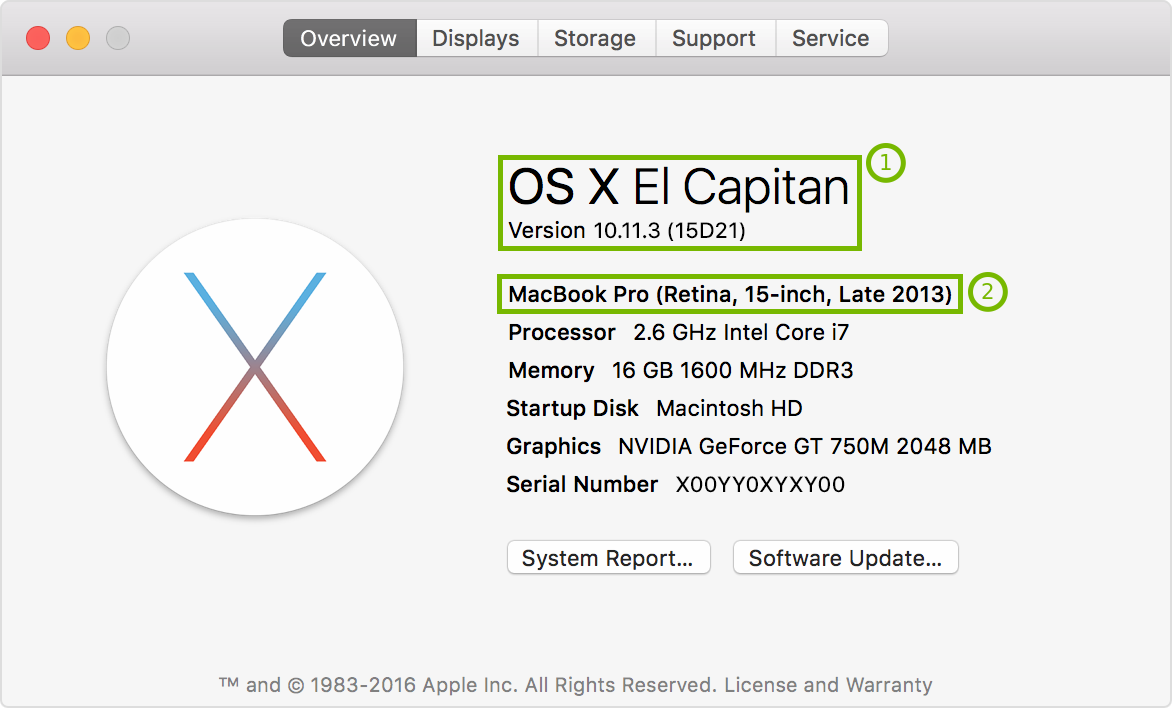
Choose Apple menu > About This Mac.
Check the OS version.
Compare what it says here to the table below to make sure your Mac is compatible with macOS High Sierra: Mac ModelOS Version
iMac models from late 2009 or later
MacBook models from late 2009 or later
MacBook Pro models from mid 2010 or later
MacBook Air models from late 2010 or later
Mac mini models from mid 2010 or later
Mac Pro models from mid 2010 or later
macOS Sierra
OS X El Capitan
OS X Yosemite
OS X Mavericks
OS X Mountain Lion
10. macOS: Check Drive Space
Click the Apple menu, then click on App Store.
Click the Storage tab.
Free space is the first number you see below the name of your hard drive.
Disk space needs will vary depending on how you use your computer. In general, if you have over 15 GB of free space, you should be fine for updates and upgrades. Only proceed if you have less than 15 GB of free space.
Click Manage... to the right of your hard drive.
Under Recommendations on the left, you'll see some very easy-to-use tools to help optimize and clean up your disk space, such as optimizing the files already stored in iCloud, removing items from iTunes you've already watched or listened to, emptying the Trash automatically, and reviewing the files stored on your Mac to delete unused or old ones.
11. macOS: Backup Check
It is important that, from here on out, you have a recent backup copy of your computer's contents. While none of these steps should cause problems, they can. Having a backup in place provides peace of mind, should anything go wrong.
12. macOS: Upgrade to High Sierra
Choose Apple menu > App Store....
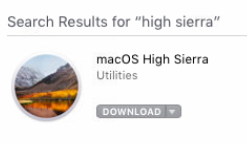
Search the App Store for macOS High Sierra in the top-right corner.
Choose macOS High Sierra from the search list.
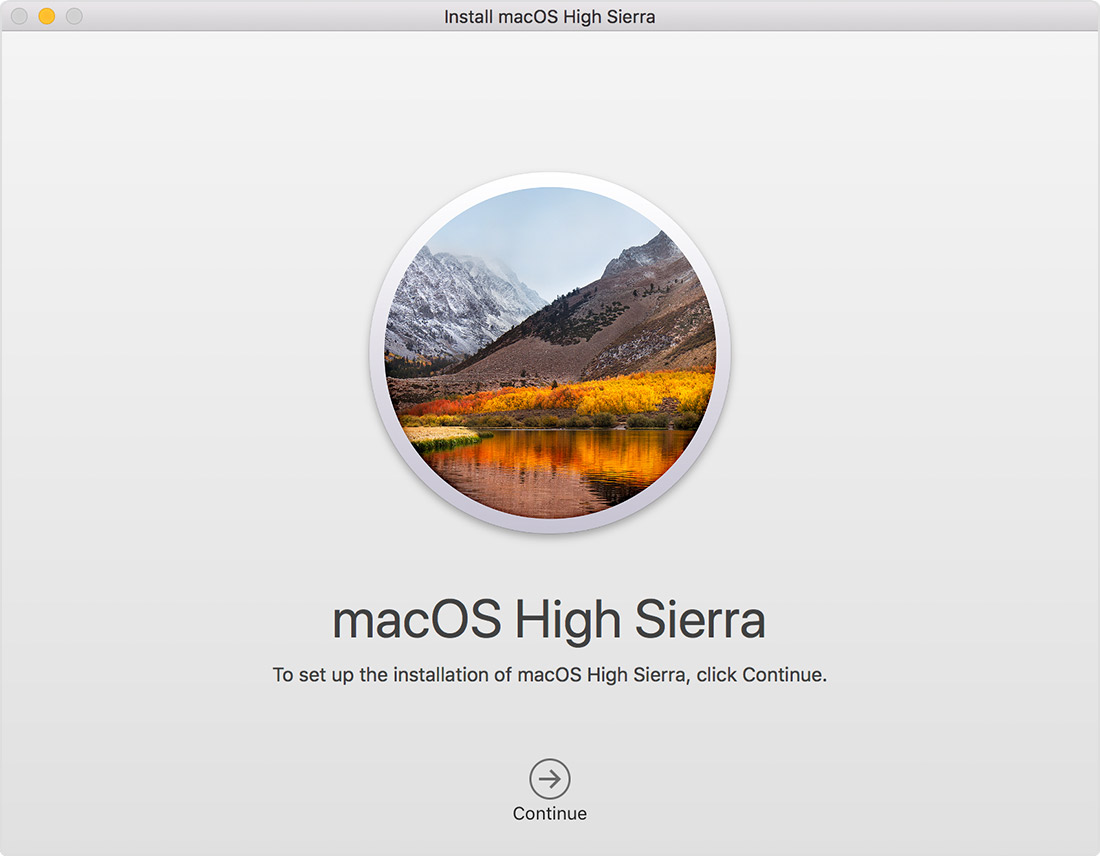
Click the Download button on the High Sierra page. A file named Install macOS High Sierra downloads to your Applications folder.
After download is complete, the installer opens automatically. Click Continue and follow the onscreen instructions.
You may be asked to sign in with an administrator name and password to install a helper tool, then click Add Helper to continue. This is usually the username and password you use to sign on to your Mac, or the one you created when you first setup your Mac.
13. MacOS: Reset NVRAM
NVRAM (nonvolatile random-access memory) is a cache of settings specific to your Mac. Resetting NVRAM is safe, however you will need to reset some of your minor customizations, such as volume, time zone, or screen resolution.
From the menu bar across the top of the screen, select the Apple menu (1), then select Shut Down... (2).
Wait for your computer to shut down, and turn off.
Turn your Mac back on by pushing the Power button.
Immediately push and hold the option, command ⌘, P, and R keys on your keyboard.
If your Mac plays a startup sound, release the keys after the second time it plays.
If there is no startup sound, release the keys after the second time the Apple logo disappears.
14. macOS: Upgrade to High Sierra
Choose Apple menu > App Store....
Search the App Store for macOS High Sierra in the top-right corner.
Choose macOS High Sierra from the search list.
Click the Download button on the High Sierra page. A file named Install macOS High Sierra downloads to your Applications folder.
After download is complete, the installer opens automatically. Click Continue and follow the onscreen instructions.
You may be asked to sign in with an administrator name and password to install a helper tool, then click Add Helper to continue. This is usually the username and password you use to sign on to your Mac, or the one you created when you first setup your Mac.
15. macOS: Reboot to Safe Mode
From the menu bar across the top of the screen, select the Apple menu (1), then select Restart... (2).
Immediately press and hold the Shift key on your keyboard.
Release the Shift key when you see the login window.
16. Mac: Connect to Wired
Sometimes, the wireless signal is too weak, and a wired connection will provide better service.
Not every Mac has an Ethernet port. It's okay if you do not see one.
Look on the side and back of your Mac, and see if there's a port that looks like this, it will have a <···> symbol next to it.
Acquire an Ethernet cable. It looks like the picture below.
Take one end of the cable and plug it into your router/modem's Ethernet port.
Plug the other end of the cable into your device's Ethernet port.
Your Mac will automatically switch to this connection.
17. macOS: Upgrade to High Sierra
Choose Apple menu > App Store....
Search the App Store for macOS High Sierra in the top-right corner.
Choose macOS High Sierra from the search list.
Click the Download button on the High Sierra page. A file named Install macOS High Sierra downloads to your Applications folder.
After download is complete, the installer opens automatically. Click Continue and follow the onscreen instructions.
You may be asked to sign in with an administrator name and password to install a helper tool, then click Add Helper to continue. This is usually the username and password you use to sign on to your Mac, or the one you created when you first setup your Mac.
18. What's next?
19. macOS: Backup
Purchase an external hard drive at least as large as how much information you have to back up. To see approximately how much space you'll need:
Choose Apple menu > About This Mac.
Click the Storage tab.
Connect the external hard drive to your computer, and power the drive, if required.
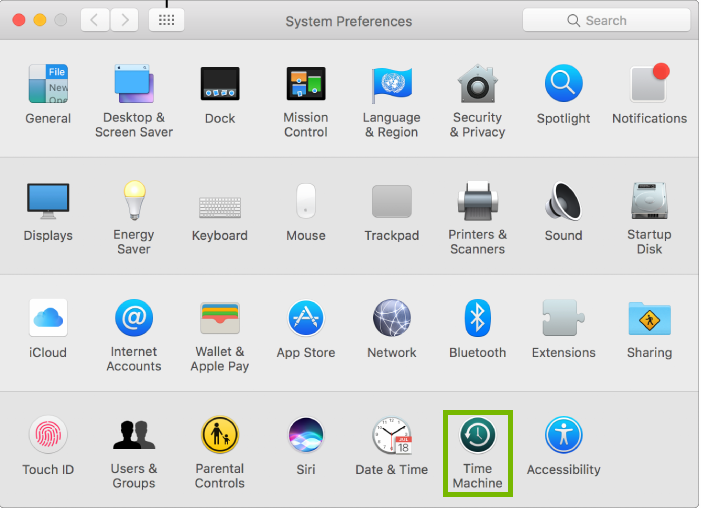
Choose Apple menu > System Preferences.
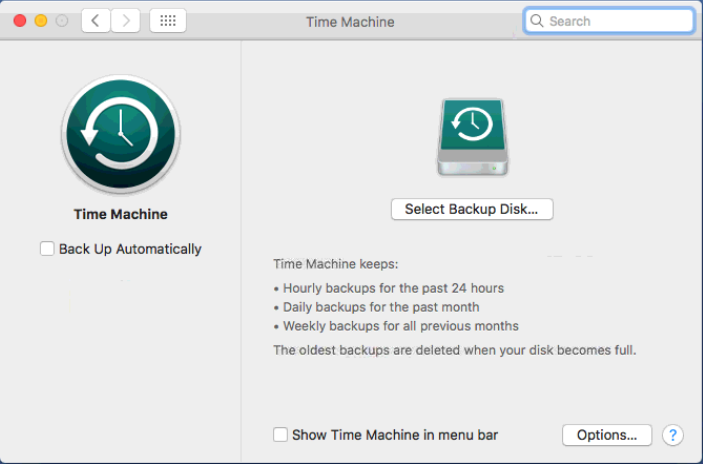
Click Time Machine.
Click Select Backup Disk, Select Disk, or Add or Remove Backup Disk.
Select a backup disk from the list, then click Use Disk.
Click the Time Machine
icon on the top-right side of your Mac, and choose Back Up Now.
Your initial backup will take a while to complete. Do not turn off your Mac, but you may continue using your Mac. A message will pop-up in the top-right corner letting you know when the backup is complete.
You can check the status of the backup by clicking on the Time Machine
icon in the top-right.
20. Mac: High Sierra Not Compatible
Your Mac is not compatible with macOS High Sierra.
You may choose to continue using what you have, or contact Apple about upgrading to a new Mac.
.png)