"Emergency Calls Only" Error Fix for Android Phone
Authored by: Support.com Tech Pro Team
"Emergency Calls Only" Error Fix
If your Android phone shows an "Emergency Calls Only" error, follow these steps to resolve it:
Restart Your Phone:
Press and hold the power button.
Select "Restart" from the options. If there is no restart option, power off the phone and then turn it back on.
Check SIM Card:
Turn off your phone.
Remove the SIM card and inspect it for any damage.
Reinsert the SIM card, ensuring it is properly seated in the tray.
Toggle Airplane Mode:
Swipe down from the top of the screen to access the Quick Settings menu.
Tap the "Airplane Mode" icon to enable it, wait a few seconds, then tap it again to disable it.
Select Network Manually:
Go to Settings > Connections > Mobile Networks > Network Operators.
Select "Search networks" and choose your carrier from the list.
Update Carrier Settings:
Ensure your phone has the latest carrier settings by going to Settings > About phone > Software Update.
Check for any updates and install them.
Reset Network Settings:
Go to Settings > General Management > Reset > Reset Network Settings.
Confirm the reset and restart your phone.
Check for Software Updates:some text
Go to Settings > Software Update > Download and Install.
Ensure your phone is running the latest software.
Contact Your Carrier:
If the problem persists, contact your carrier to ensure there are no outages or account issues.
Factory Reset (Last Resort):
If none of the above steps work, consider performing a factory reset.
Backup your data, then go to Settings > General Management > Reset > Factory Data Reset.
Confirm the reset and set up your phone again.
Contact Support.Com
If you are still having trouble, refer to the Step-By-Step Guide below, or Contact Support.Com for Personalized Assistance.
1. Introduction
One issue your Android phone can have is a message stating your phone can only make emergency calls.
While this is usually due to a problem with your account with your cellular provider, it can be caused by a few problems with the software on the device itself. This guide will walk you through making sure your device is functioning as best as possible.
2. Restart
Hold down the power button on your Android device. Depending on the manufacturer and model of Android device you have, the location of the power button will vary.
A prompt will appear on-screen. Select Restart.
If the Restart option doesn't show up, tap Power Off instead. Press and hold the power button to turn the device back on.
If the menu doesn't show up, continue holding the power button until the device will turns off.
3. Toggle Airplane Mode
Sometimes, toggling Airplane mode on, which disconnects your smartphone from all cellular network connections, then back off forces it to 're-register' with your provider, and fixes this issue.
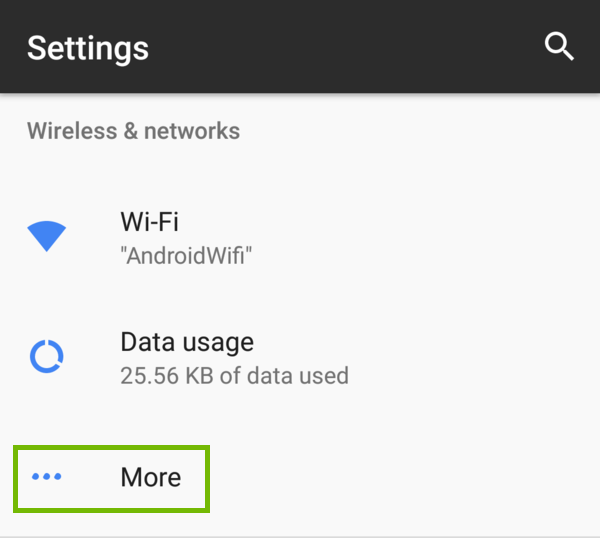
Open Settings on your phone or tablet.
Under Wireless & networks, select More.
Switch Airplane Mode to On.
Wait 30 seconds.
Turn Airplane Mode back Off.
4. Power Cycle
Turn off your phone. Push and hold the power button, then select Power off from the menu.
Wait 30 seconds.
Turn your phone back on by pressing and holding the Power button for a few seconds, until the screen lights up.
5. Auto Network Mode
Enabling your Android device to automatically connect to a preferred network allows your smartphone to choose what network it connects to according to your installed SIM Card.
Open Settings on your phone or tablet.
Under Wireless & networks, select More.
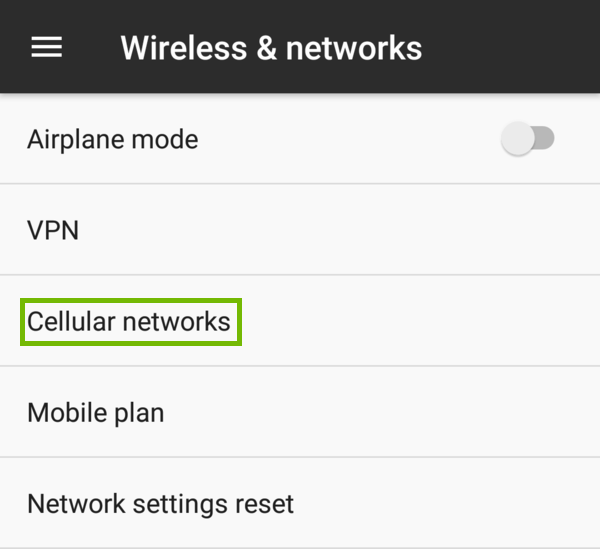
First, make sure Airplane mode is Off.
Select Cellular networks.
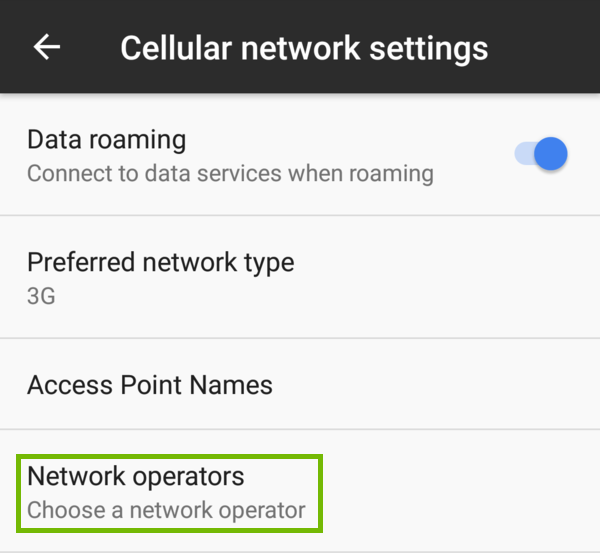
Select Network operators.
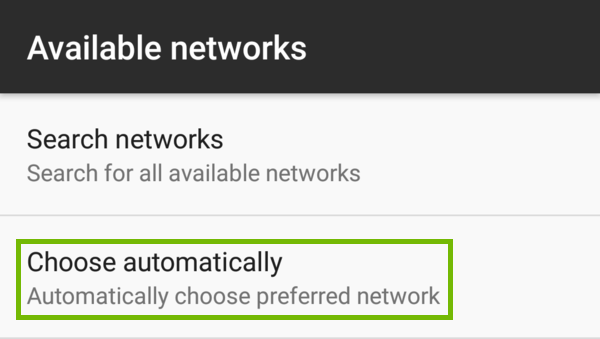
Select Choose automatically, so your phone will pick your network provider based on what is indicated on your SIM card.
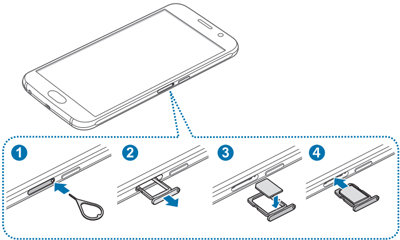
6. Reseat SIM Card
The next step is to re-seat the SIM card your phone uses to get information on how to access your cell provider's network.
If you are not comfortable reseating your sim card, or do not have the SIM eject tool skip the step and answer as such at the bottom.
Eject and re-seat the SIM Card.
Use the SIM eject tool to eject the tray.
Carefully pull the tray out.
Re-seat the SIM, making sure the notch lines up properly with the spot for it.
Push the SIM tray back in till it's flush with the edge of your phone.
Press and hold the power button untill your phone turns back on.
.png)