Fix Problem with this Website's Security Certificate
Authored by: Support.com Tech Pro Team
1. Introduction
While you're surfing the web, your browser does many things behind the scenes to make sure the websites you're accessing aren't putting you at risk. Granted, while there is only so much your browser can do to keep you safe, it's a good idea to pay attention to any warnings it sends your way.
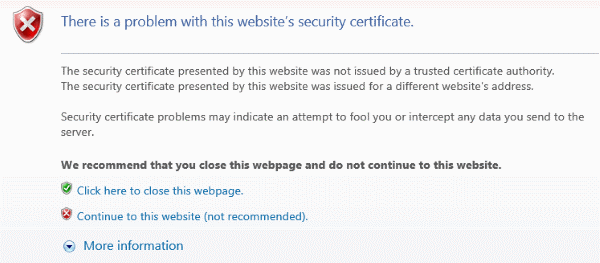
One of the errors you may encounter while using Internet Explorer is a "There is a problem with this website's security certificate" warning. Initially, this may seem concerning as its wording implies that your security is at risk. However, this error can appear even on websites we know to be 100% secure and are confident in. Many times, these warnings are not the fault of your computer or your web browser at all. These certificates are what websites use to prove they are who they say they are on the internet, and if your browser detects an issue with a certificate or even the absence of one, it will issue a warning.
This guide will help you determine whether this warning is being triggered by incorrect settings on your computer or web browser, or if the issue is with the website itself.
Tools You'll Need:
A paperclip
iPhone charging cable
Access to a computer with iTunes installed
Any other non-consumable tools needed
Comment out tools section if no tools are necessary
-->
Supplies You'll Need:
Zip ties
Any other consumable supplies
Comment out supplies section if no supplies are necessary
-->
Before You Begin:
You must have access to a computer with iTunes installed.
You must have that thing for the other thing so you can do the thing.
Each individual prereq should have its own box like this. Not all will contain multiple links.
Comment out prerequisites section if no prereqs are necessary
-->
Windows
Windows runs on computers produced by multiple companies, such as Lenovo, Asus, Dell, Toshiba, Hewlett Packard, Acer, and Sony.
macOS
Apple is the only company that makes macOS computers.
-->
2. Verify the Date and Time in Windows
Security certificates are used by our web browsers and computers to make sure a particular site is safe. Think of it as a form of ID. A website having a valid security certificate lets your browser know that the website claiming to be your bank is actually your bank, and so on. Just like our own government issued IDs have expiration dates, so do security certificates. If your computer has the wrong date and time set, this can cause certificates to appear invalid & your web browser will begin to issue security warnings.
If you notice that the Date and Time is continually incorrect even after manual adjustment, your machine may need to be serviced to replace its CMOS battery.
Verify the Date and Time in Windows
Look at the date and time shown in the system tray. This is usually in the bottom right corner of the screen.
If the date or time are wrong, it can cause issues. To fix:
For computers running Windows 10
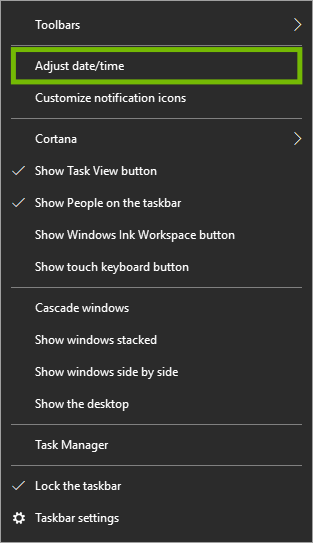
Right-click on the date and time.
Select Adjust date/time.
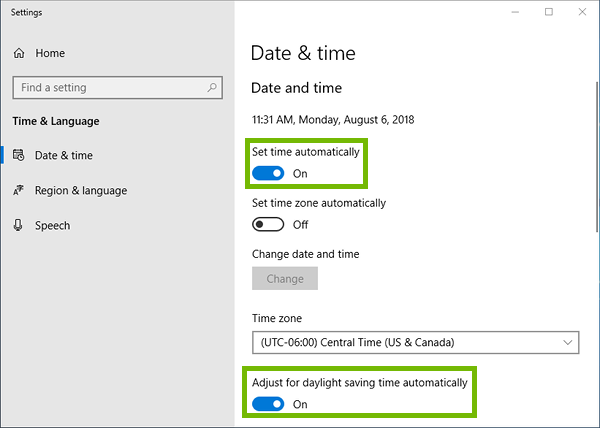
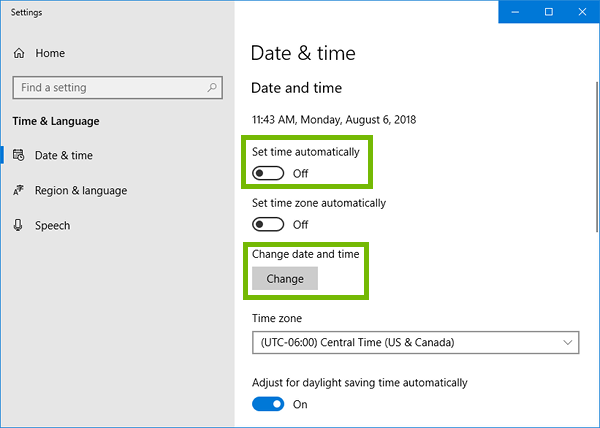
For most, letting Windows manage the date and time, as well as automatically setting it is the best choice.
Make sure Set time automatically and Adjust for daylight saving time automatically are both turned On.
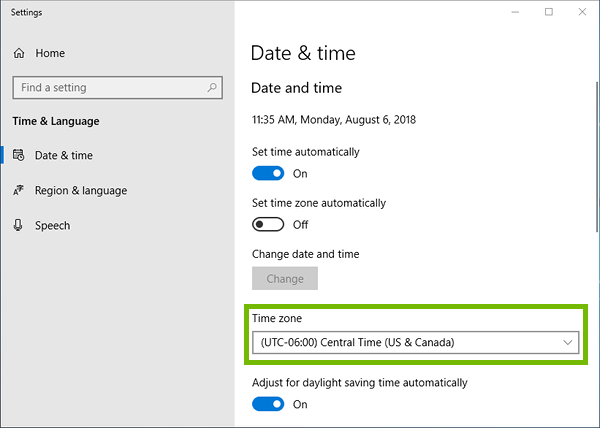
Make sure your time zone is selected for Time zone.
If you want, you can manually set the Date and time.
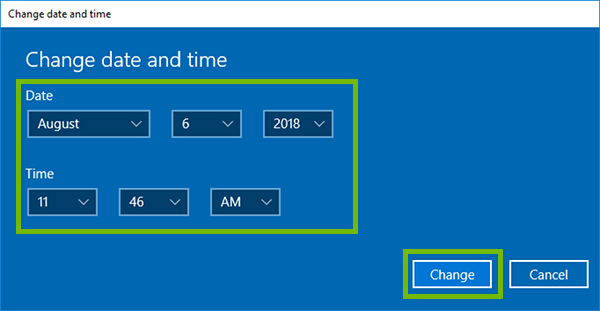
Make sure Set time automatically is set to Off, then select Change for Change date and time.
Set the Date and Time correctly, then select Change.
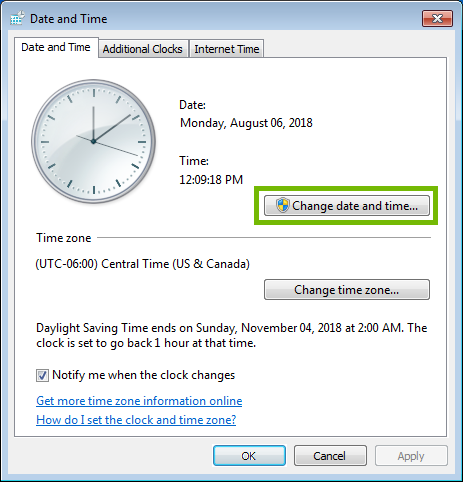
For all other versions of Windows
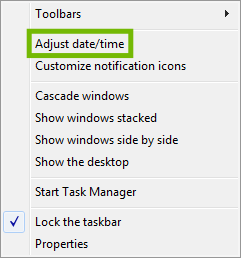
Right-click on the date and time.
Select Adjust date/time.
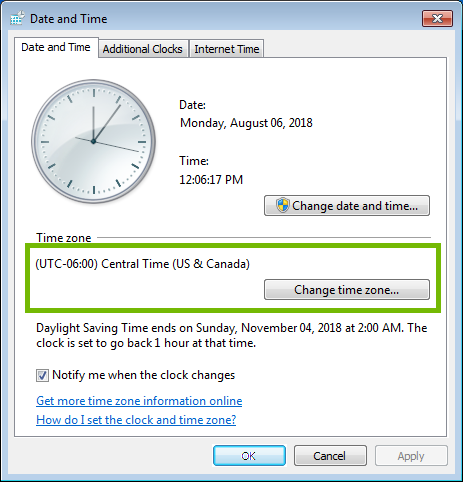
Make sure the proper Time zone is selected.
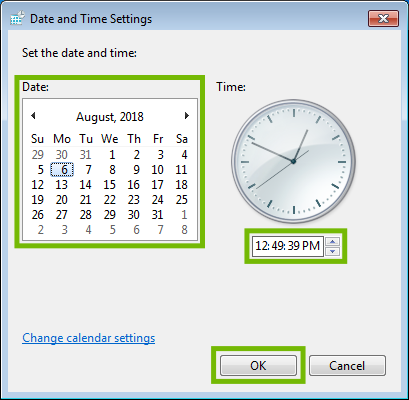
Select Change date and time.
Correct the Date and Time, then select OK.
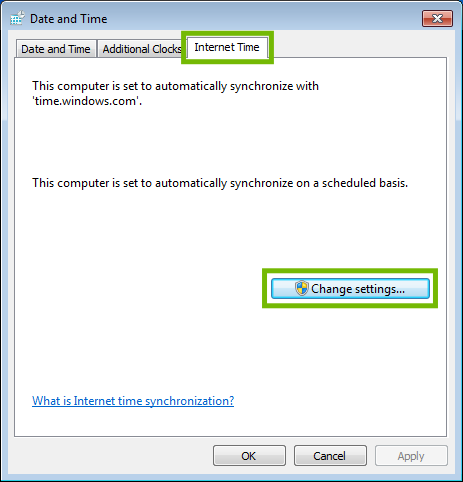
You may wish to have Windows set the date and time for you in the future.
Select the Internet Time tab at the top, then select Change settings.
Make sure Synchronize with an Internet time server is checked, then select OK.
3. Clear Internet Cache and History
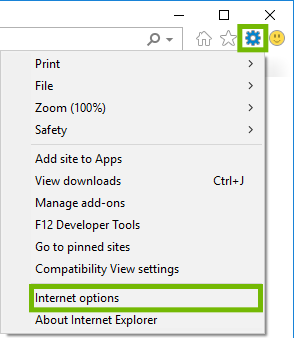
Open Internet Explorer.
Select the Gear icon in the top right corner, then select Internet options.
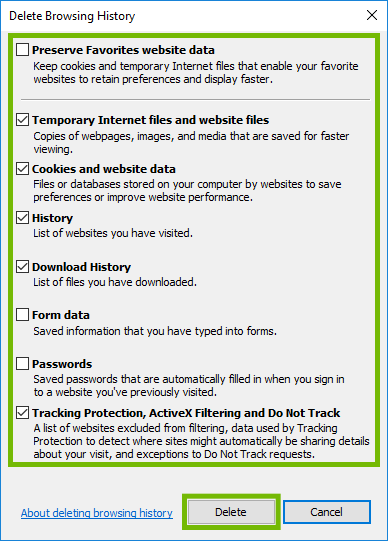
Under Browsing history, select Delete.
Go through the list of options here, to ensure the proper items are cleared. Once you have chosen your options, select Delete.
SettingCheckboxPreserve Favorites website dataUncheckedInternet Explorer segments out pages you have marked as favorites. We need to be sure to clear all data, not just some of it.Temporary Internet files and website filesCheckedThis clears your cache, making your browser get a new copy of the webpage, images, etc. It's important to clear this to get a fresh copy the next time you visit, as the copy your browser has may simply be corrupt.Cookies and website dataCheckedCookies are how websites 'know' you when you visit them multiple times. This file can become corrupt, and simply downloading a new one can fix many problems.
You will have to log back into any pages you use, such as mail or social media.
HistoryCheckedWhile you browse Your browser will keep track of every page you visit, to try to make it easier to return. This can become corrupt due to modern active web pages.Download HistoryPersonal ChoiceThese are a list of files you've downloaded recently. It is entirely safe to delete, or keep this list, as it won't affect pages. Checking this option does not delete the files you've downloaded, just the list the browser keeps.Form DataUncheckedInformation from entering forms online, such as your name, address, or other filled in information. This does not affect how a page loads, and can slow you down on your most commonly used pages.PasswordsUncheckedYour browser will save your passwords while you browse, making it easier to log into your most common websites later. This does not affect how a page loads, and can slow you down on your most commonly used pages.Tracking Protection, ActiveX filtering and Do Not TrackPersonal ChoiceA number of pages will track your use of those pages, and if you've opted out of such tracking. This setting tends not to be well respected from page to page, and some pages simply do not give you the option. While it can affect how a page is displayed, it will only do so in the advertising or other 'personalized content' on that page; not the page itself. It is okay to check or uncheck this option.
When complete, a message will open at the bottom of your browser letting you know the history has been deleted.
It can take quite a while to delete the cache and history, please be patient.
4. Security-Related Settings
There are multiple settings in Internet Explorer that protect you from malicious activity. While these settings should already be in the state we're advising you they should be in, it's always prudent to make sure these settings are correct, on the off-chance they were previously changed in the past.
Open Internet Explorer.
Select the Gear icon in the top-right corner, then select Internet options.
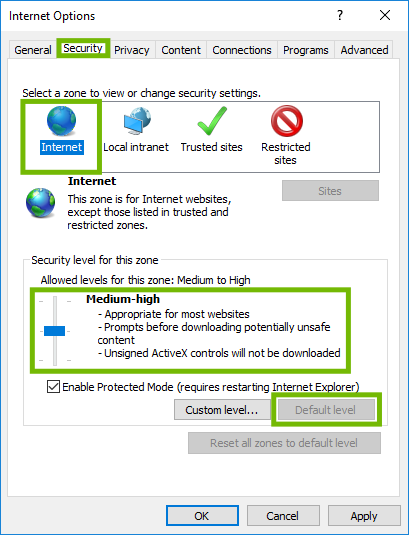
Select the Security tab at the top. Then, make sure Internet is selected for zone, and choose the Default level of Medium-high.
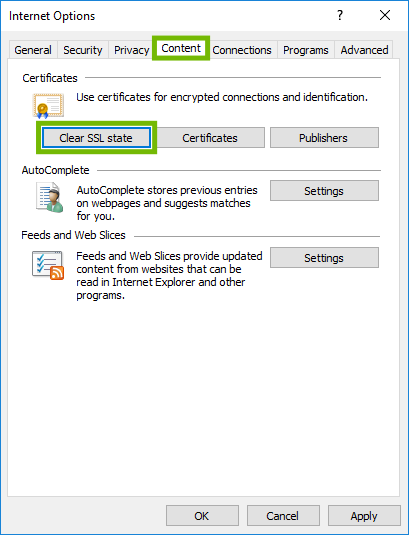
Select the Content tab at the top. Then, select Clear SSL state.
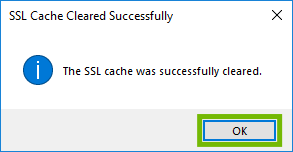
A box will open letting you know the SSL cache was cleared. Select OK.
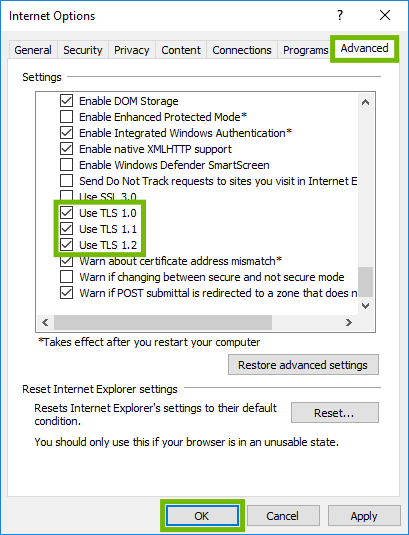
Select the Advanced tab at the top. Scroll to the bottom of the long list of settings. Make sure Use TLS 1.0, Use TLS 1.1, and Use TLS 1.2 are checked. Then, select OK.
5. Try the Webpage Again
With your browser's website data removed, try to visit the website again. If you still receive security warnings, the issue is with the website itself, and not your device or its web browser. In this case, there is nothing you can do to resolve the error. Once the website owner/manager resolves the issue, you will stop receiving security warnings when you visit the website.
Remove Hidden Spyware In Minutes For Free
Detect and remove spyware, keyloggers, tracking cookies, and other
threats that slow down your PC or steal your data.
65+ Million Downloads
Spyware scanner with AI-powered detection engine + database
.png)