.png)
Authored by: Support.com Tech Pro Team
Adding contacts to your iPhone, iPad, or iPod Touch allows you to easily communicate with friends, family, and colleagues. In this comprehensive guide, we'll walk you through the steps to add, edit, and manage contacts on your iOS device.
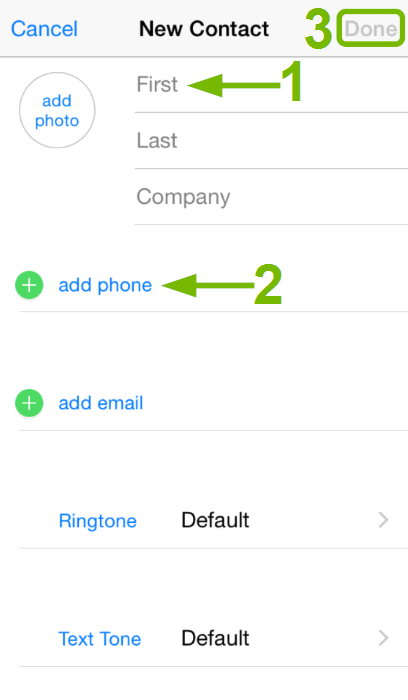
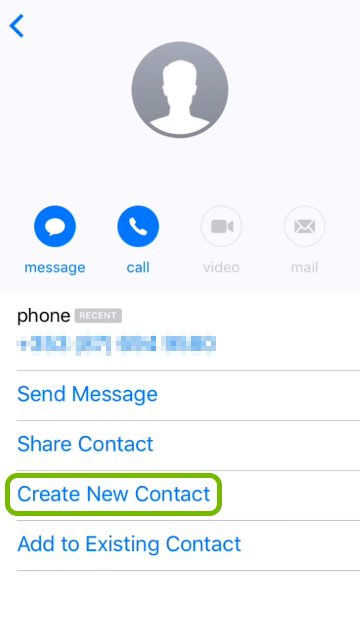
Open Contacts App: Locate and tap the "Contacts" app on your device's home screen. The app icon typically resembles a silhouette of a person.
Add New Contact: Tap the "+" (plus) icon in the top right corner or the "Add Contact" button, depending on your iOS version.
Enter Contact Details: Fill in the contact's information, including their name, phone number, email address, and other relevant details. You can add multiple phone numbers, email addresses, and notes.
Add Photo: To add a contact photo, tap the silhouette icon or the photo area and choose a picture from your gallery or take a new one.
Assign to a Group: You can assign the contact to an existing group or create a new one. Groups help you organize your contacts.
Save the Contact: Tap "Done" or "Save" in the top right corner to save the contact.
You can import contacts from various sources, such as your email accounts or other devices. Here's how:
Open Settings: Go to "Settings" on your iOS device.
Scroll Down and Select Contacts: Scroll down and tap "Contacts."
Accounts: Tap "Accounts" and select the account (e.g., iCloud, Google) from which you want to import contacts.
Toggle Contacts On: Ensure that the "Contacts" switch is turned on for the selected account. Contacts from that account will sync with your iOS device.
Open Contacts App: Launch the "Contacts" app on your device.
Select Contact: Tap the contact you want to edit from your contacts list.
Edit Contact Information: Tap the "Edit" button in the top right corner to make changes to the contact's details. You can modify their name, phone numbers, email addresses, and more.
Save Changes: Tap "Done" or "Save" to save the edited contact.
Open Contacts App: Launch the "Contacts" app.
Select Contact: Tap the contact you want to delete.
Scroll Down and Delete: Scroll down to the bottom of the contact's details page, then tap "Delete Contact."
Confirm Deletion: Confirm the deletion when prompted.
Open Contacts App: Launch the "Contacts" app.
Tap "Groups": At the top left, tap "Groups."
Create a New Group: Tap "Create New Group" and give it a name.
Add Contacts to the Group: To add contacts to the group, tap the group name, then tap "Add Contact" and select the contacts you want to include.
Save Changes: Tap "Done" or "Save" to save the new group.
Using Favorites
Open Contacts App: Launch the "Contacts" app.
Select a Contact: Tap a contact you want to mark as a favorite.
Add to Favorites: Tap "Add to Favorites" to place the contact in your Favorites list for quick access.
iCloud Backup (Recommended): Enable iCloud Backup in "Settings" > [Your Name] > iCloud > iCloud Backup. This automatically backs up your contacts along with other data to iCloud.
Export to VCF File: In the Contacts app, you can export your contacts to a VCF (vCard) file. To do this, tap "Share Contact" on an individual contact, then choose to export the contact as a VCF file.
By following these comprehensive steps, you can efficiently add, edit, and manage contacts on your iPhone, iPad, or iPod Touch. Organizing your contacts and keeping them up to date ensures that you can easily communicate with your network of friends, family, and colleagues.
In This Guide
You'll Learn:


Support.com is committed to your privacy
We do not share or sell your data to third parties. We do use cookies and other third-party technologies to improve our site and services. The California Consumer Privacy Act (CCPA) gives you the ability to opt out of the use of cookies, third-party technologies and/or the future sale of your data. Do not sell my personal information.

Support.com is committed to your privacy
Read our Privacy Policy for a clear explanation of how we collect, use, disclose and store your information
