We all like taking photos of great moments with the family, fun times with friends, beautiful sceneries or silly pets. However, it can be quite annoying when we discover that many of the photos we've taken have turned out to be blurry. There are many reasons why this would happen and we will talk about the most common ones.
Things You'll Need:
No extra tools or supplies are needed.
-->
Before You Begin:
No extra instructions.
-->
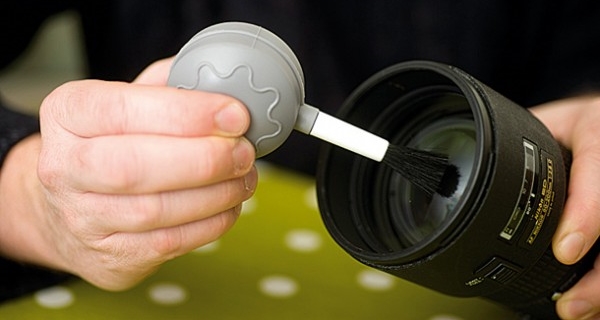
2. Keep the Camera Lens Clean
If you walk into a humid indoor environment, your lens may mist up, producing a blurry, soft-focus effect. It's a similar thing if you go from somewhere nice and warm and then go straight into somewhere cold, you'll experience the same thing. Other causes of blur are greasy smears and fingermarks - so check the front of your lens before anything else.
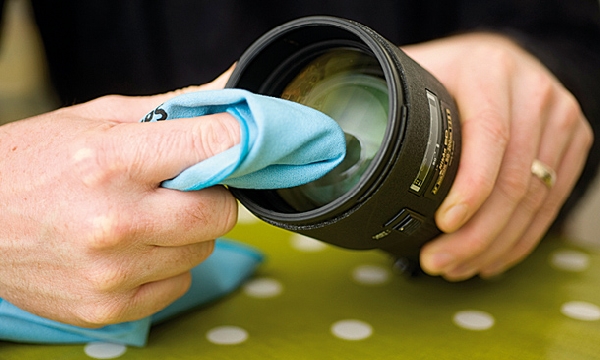
It's recommended that you use a lens cleaning kit. Here is a simple, three-step process for effective lens cleaning:
Remove as much dust and dirt as possible from the lens with an air blower or soft-bristled brush.
Apply a few drops of lens cleaning solution to a lens tissue or microfiber cloth.
Using a circular motion, gently remove oil, fingerprints, and grime from the lens surface, working from the center outward.
3. Keep the Image in Focus
Sometimes, when your photos turn out blurry, it's because the image is out of focus. These days, with cameras having the Auto Focus feature, it's unlikely that the whole image will be out of focus. If your camera has set the focus point on the wrong part of the image, you'll end up with one part of the image crisp and clear, and other parts (including your subject) will be out of focus.
To avoid getting your photos blurry due to poor focus, try taking the shot this way:
First, point your camera towards your subject.
Depress the shutter button half way down to force the camera to lock focus on your subject.
Now move the camera so your subject is where you want it to be in the photo.
Fully press the shutter button to take the photo.
4. Adapt to Moving Subjects
Anytime you take a photo of a moving subject, you can end up with some parts of the subject looking crisp while others looking blurry. This can happen if the subject was moving while the camera's shutter was open. If the whole subject ends up looking blurry while the area around it (that was not moving) is crisp then it means the subject was moving too fast.
When you take photos in low light (especially indoors or at night), your camera adjusts for the darker conditions by opening its shutter for longer. This lets more light into the camera so the image is correctly exposed (bright enough) but also increases the chance of your subject moving while the shutter is open.
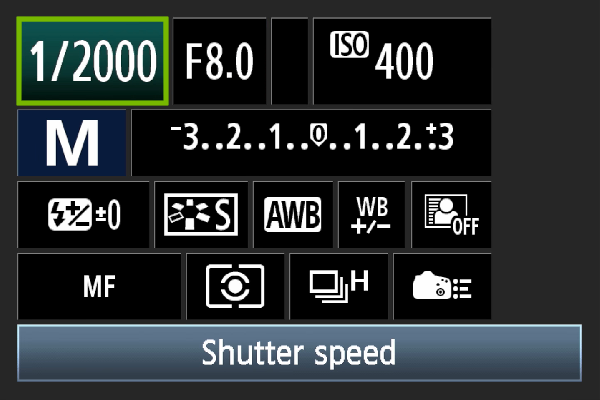
Since not all subjects can be held still, such as vehicles, athletes, children, pets or wildlife, the simplest solution to avoid getting blurry photos is to increase the camera's shutter speed. You can do this in three ways:
Find the shutter speed setting in your camera and change it. Shutter speeds are expressed in fractions of a second.
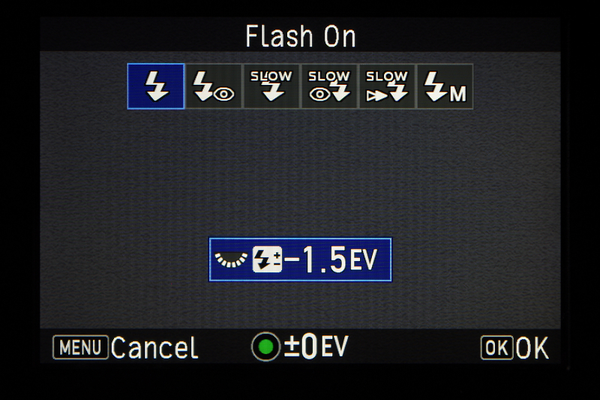
Turn on the flash. This will throw more light on the subject for the split second that the shutter is open so the camera won't need to leave it open for as long. Using the flash does have some disadvantages though. First, if your subject is close to a wall, you'll see a distinct and sometimes unsightly shadow. A flash also tends to wash out the warm look of natural lighting.
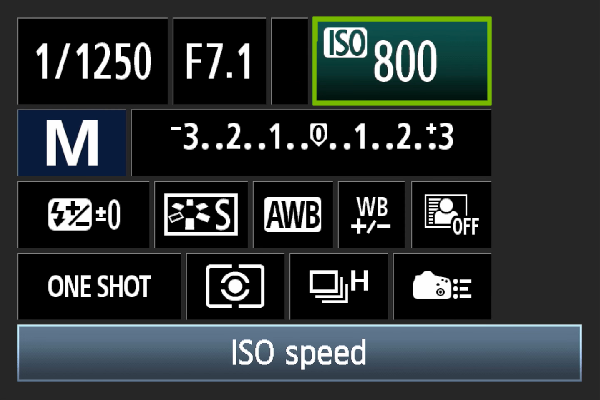
Increase the ISO setting (exposure index rating). The ISO tells the camera how sensitive the image sensor is to light. When you increase the ISO, your camera will know the sensor needs less light so will automatically increase the shutter speed. Because the shutter speed is faster, there is less chance that the shutter will be open while the subject or camera is moving. However, you don't want to increase the ISO too far. As the ISO gets higher, the camera's sensor also becomes more sensitive to noise. It's best you set the ISO value to the second highest setting allowed by your camera. This will help to increase the shutter speed, but at the same time will make sure that not too much image noise gets into your photo.
5. Hold the Camera Steady
If your camera is moving while the shutter is open you will end up with photos that are entirely blurred out. The smallest movements of the camera such as your breathing, your hands shaking or releasing your finger from the shutter button can cause this.
There are two ways to solve this problem. One way is to increase the camera's shutter speed like we explained above or to hold the camera steady while you're taking the shot. The best way to prevent camera movement (and the resulting blurry images) is to use a tripod. But if you don't have one, or it's inconvenient to use, try the following:
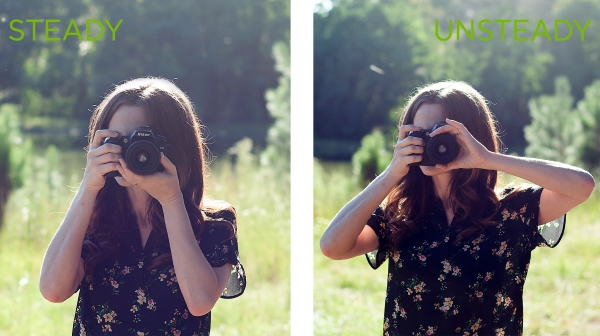
Hold the camera in both hands, resting it in the palm of one hand with your thumb pointing upward instead of resting it on your thumb, and keep both elbows close to your side to give your camera the most stability. This is also a safer way to hold your camera and you'll be less likely to accidentally drop it.
Bring the camera close to your face and use the optical viewfinder (if your camera has one) to compose the shot rather than the screen. This way, your camera is steadied by your body.
If your camera doesn't have an optical viewfinder, use the screen to compose and then bring the camera to your face. Or keep your elbows close to your body and move the camera a foot away from your face. This way your camera is still supported and you can also see the screen.
Look for some extra stability by leaning against a post or wall. You'll be surprised how much this can reduce blurry images.
Just before you take the shot, take a breath. Hold it while taking the shot.
6. Adjust Depth of Field
Depth of Field is the name given to that great effect of cameras where your subject is in focus but the background and foreground are out of focus. It makes the subject stand out because that's the only thing you can see clearly.
Using the preset scene modes of your camera (or the Aperture setting), you can change how much of the image is in focus, and how much is out of focus. If the depth of field is too shallow, not all of your subjects will be in focus. The easiest way to make all your subjects sharp is to move further away from them. This will increase the range of depths that are in focus. Don't zoom in however, as this will negate the benefits of physically moving further away. Another way to fix that is by changing the Aperture setting on your camera:
If you have only one subject you want to take a shot of, then set your camera to Portrait Mode.
For more subjects:
Start with setting the camera in Portrait Mode and take a shot.
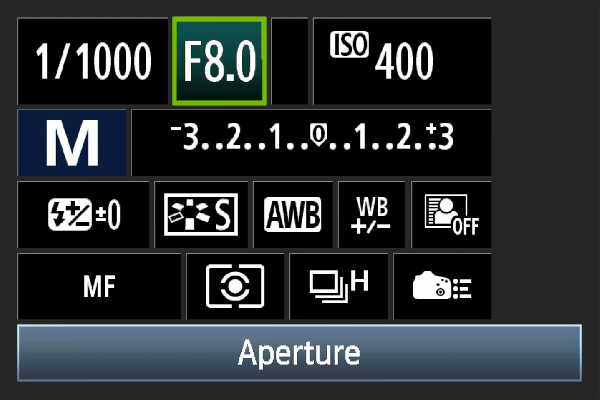
Find out the Aperture your camera used to take this first shot. Aperture values are expressed in F-stops.
Change the camera to Aperture Priority mode rather than Portrait Mode. This is a more advanced mode of your camera that gives you finer control.
Set the aperture two settings higher and take another shot.
Look at the screen of the shot. You should see more of your subjects in focus. If not all subjects are in clear focus, increase the aperture setting one more and try again.Changing the aperture like this also decreases the shutter speed (to compensate for less light getting into the camera). If you are also in a low light environment you should take some steps to steady your camera as well.
Remove Hidden Spyware In Minutes For Free
Detect and remove spyware, keyloggers, tracking cookies, and other
threats that slow down your PC or steal your data.
65+ Million Downloads
Spyware scanner with AI-powered detection engine + database
.png)