How to Avoid Taking Too Dark/Light Photos on Camera
Authored by: Support.com Tech Pro Team
1. Introduction
We all like taking photos of great moments with the family, fun times with friends, beautiful sceneries or silly pets. However, It can be quite annoying when we discover that many of the photos we've taken look very dark and dull or very light and washed out. We will talk about what causes this and how to avoid it.
Things You'll Need:
No extra tools or supplies are needed.
-->
Before You Begin:
No extra instructions.
-->
2. The Trinity of Photography
If you find your photos to be too dark or too light it's because of incorrect exposure. Exposure is the amount of light that gets into your camera and produces the picture on the image sensor. If a photo is too dark it means it has been underexposed and if it is too light it has been overexposed.
Some areas are okay to be underexposed or overexposed if they aren't the main focus of the picture. You may purposely do that for dramatic or artistic flair.
There are three components that a camera takes into account to determine the exposure of your photos:
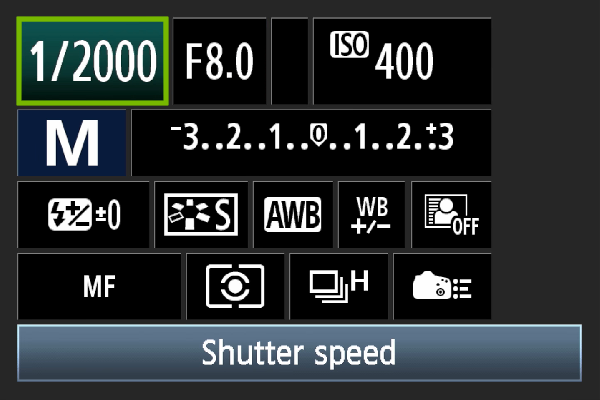
The Shutter Speed is the length of time a camera shutter is open to expose light into the image sensor. Slow shutter speeds allow more light into the image sensor and are used for low-light and night photography, while fast shutter speeds help to freeze motion. It is expressed in fractions of a second.
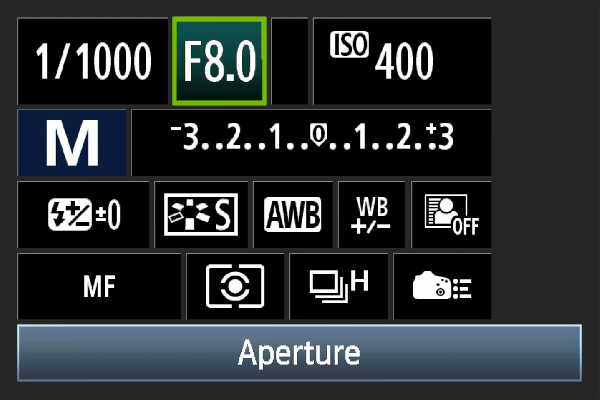
The Aperture is the adjustable hole within the lens through which light is being exposed into the image sensor. The aperture can be open wide letting lots of light in but keeping less elements in focus, or tiny allowing only a small amount of light in while keeping more elements in focus. Aperture values are expressed in F-stops.
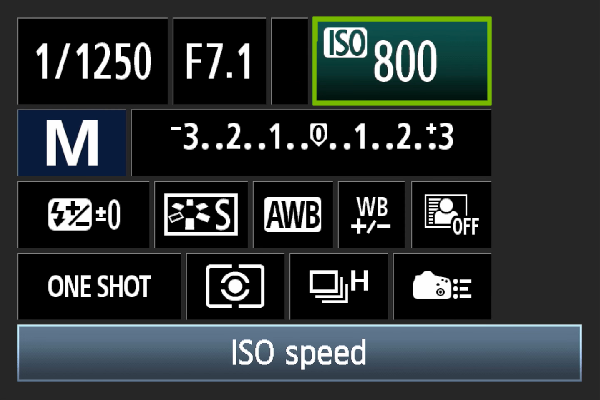
The ISO Setting tells the camera how sensitive the image sensor is to light. It is a way to brighten your photos if you can’t use a longer shutter speed or a wider aperture.
These three components work together, and if you alter one the others may be changed too. In order to take a photo that is properly exposed - not too dark nor too light - these three components must be balanced.
If you shoot in Auto Mode, your camera is choosing the shutter speed, aperture and ISO setting for you. You do not have control over the exposure of the photo. In many situations the camera does a great job metering the light and choosing a combination that results in a good exposure. In other cases your camera will not expose the photo correctly. There are a few ways to expose a photo correctly at the time the shot is taken:
Adjusting the Exposure Value
Using the Scene Modes
Using the Advanced Modes
Using Fill Flash
Using lens filters
Sometimes you can tell whether a photo has been exposed properly just by looking at the camera screen. Other times it may be more difficult to tell. Either way, you can make use of the histogram tool of your camera to help you in that matter in conjunction with the exposure correction methods.
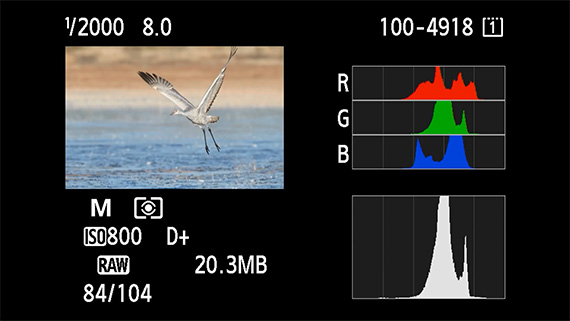
3. Use the Histogram
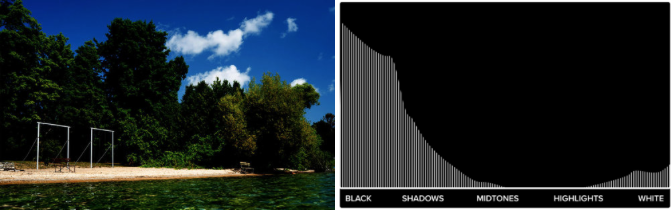
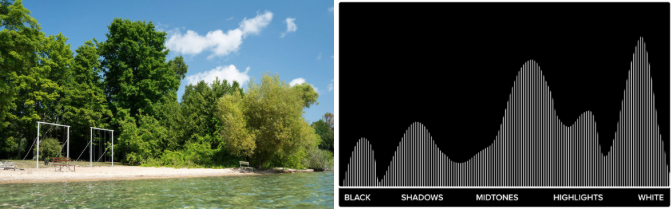
Most cameras will display the histogram for every photo in review mode, while some cameras with an electric view finder (EVF) will display it in real time. The histogram is designed to give you a snapshot of all the different brightness levels in your photo. It shows you graphically how many dark, medium and bright elements are in your shot. Whenever you have too many of one tone, your photo's histogram will appear unbalanced. For most photos, what you don't want to see are tall vertical lines to the far left or far right.
To figure out whether a photo was overexposed or underexposed, take a look at the histogram right after you took the shot:
if the photo is underexposed, you'll see a huge bump on the far left of the histogram.
If the photo is overexposed, you'll see the same bump on the far right of the histogram.
If the photo is properly exposed, you'll see the dark, medium and bright tones spread across the histogram.
If you've determined that your photo is exposed incorrectly, you can apply some adjustments within the camera settings to obtain the correct exposure. Once you've made the adjustments, take another shot and look at the histogram again to see if it needs further adjustment.
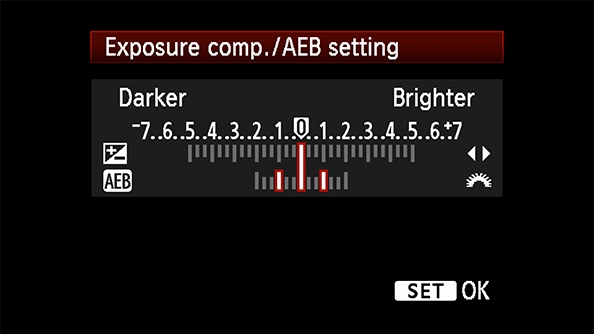
4. Adjust the Exposure Value
Almost all digital cameras have an Exposure Value (EV) Compensation setting that allows you to adjust the automatically calculated brightness for your photo. This is an easy way to correct an incorrectly exposed photo in small increments. When you take a picture and still are not quite satisfied the brightness of the final image, this tool allows you to make fixes quickly on the fly.
Depending on your digital camera's make and model, the Exposure Value Compensation may work with all or some exposure/shooting modes of the camera.
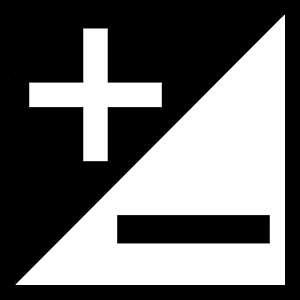
To recognize or access this feature look for the +/- symbol on the camera screen or any of the buttons.
If you adjust exposure in the negative direction, the next photo you take will be darker without making any additional adjustments and if you adjust the exposure in the positive direction, the next photo you take will be lighter.
Some cameras may also have an additional feature called Automatic Exposure Bracketing (AEB) which allows you to automatically take three shots one after the other but each with a different Exposure Value. The first will be normally exposed, the second will be underexposed and the third will be overexposed. This can improve the quality of your photos by letting you choose and keep the shot that is best looking.
5. Use the Scene Modes
The Scene Modes of a digital camera help you get the correct exposure for your photos in different types of sceneries and lighting situations. The exposure is calculated automatically by the camera depending on the mode you choose. You can find them either on the mode dial or in the mode menu. We will cover the most common of these modes that you may find in digital cameras:
Depending on the make of your camera, the mode icons may vary slightly.
Portrait Mode
Portrait Mode works by opening up the aperture as much as the camera will allow. This causes more light to get into the camera and will result in a less sharper photo but draws attention to your subject and makes the objects in front of or behind the subject to appear blurry.
Landscape Mode
Landscape Mode (Scenery) is the exact opposite of Portrait Mode. It works by closing your camera’s aperture to a tiny hole. This causes less light to get into the camera and will result in a sharper photo which is ideal for this mode as it lets you see far and wide. The shutter speed will tend to decrease which can cause blurriness in the photo. Use of a tripod is recommended to steady the camera.
Close-Up Mode
Close-Up Mode (Macro) makes it easier to take pictures of bugs or flowers from a very up close perspective. It works by changing the focusing distance on the camera’s lens to be able to get right next to the objects while keeping them in focus. This also brings a little more magnification out of the subjects. With this mode, the camera will tend to open the aperture wider than in Portrait Mode. Without much breathing room, the slightest movement can render the subject out of focus, hence use of a tripod is recommended as.
Action Mode
Action Mode (Sports, Kids & Pets) increases the shutter speed of the camera in order to freeze action. As this happens, the aperture is sometimes opened wider to let in a little more light. The subject is kept in focus and will appear sharp. This mode is good for sports, fast cars, moving children or animals, and anything that requires you to freeze action.
Night Mode
Night Mode (Night Portrait, Night Scenery) will use the flash and decrease the shutter speed to capture the surroundings and background lighting with a pleasant motion blur effect.
6. Use the Advanced Modes
The Advanced Modes of a digital camera give you partial or full control to get the correct exposure for your photos in different types of sceneries and lighting situations. You can find them either on the mode dial or in the mode menu. We will cover the most common of these modes that you may find in digital cameras:
Depending on the make of your camera, the mode shortcuts may be labeled differently.
Programmed Mode (P) automatically adjusts the aperture and shutter speed of your camera, but allows you to manually adjust the ISO setting and other parameters to create the proper exposure for your photos.
Shutter Priority Mode (S or Tv) allows you to set the shutter speed and the camera automatically adjusts the aperture and other parameters to values that will work with the shutter speed you’ve chosen.
Aperture Priority Mode (A or Av) allows you to set the aperture and the camera automatically adjusts the shutter speed other parameters to values that will work with the aperture you’ve chosen.
Manual Mode (M) gives you full control over the shutter speed, aperture, ISO setting and all other parameters to create the proper exposure for your photos.
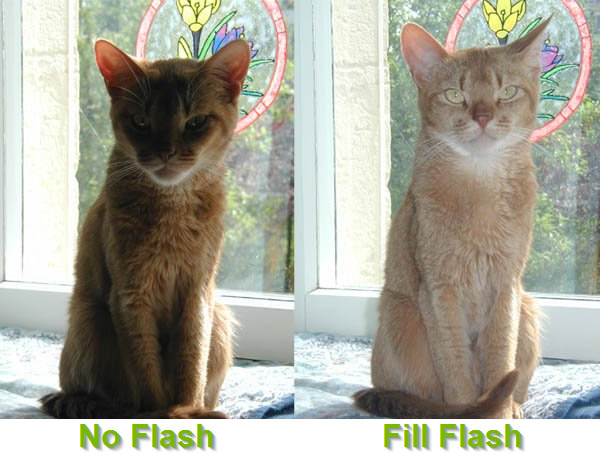
7. Use Fill Flash
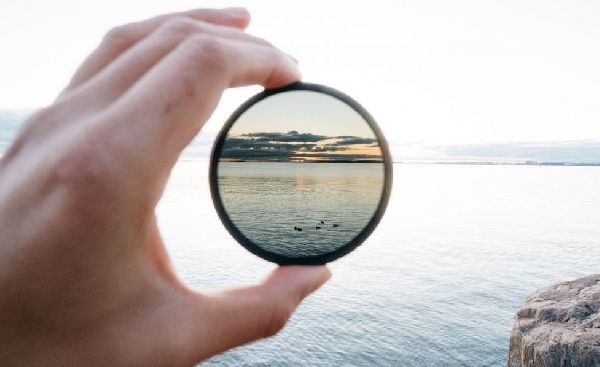
8. Use Lens Filters
Remove Hidden Spyware In Minutes For Free
Detect and remove spyware, keyloggers, tracking cookies, and other
threats that slow down your PC or steal your data.
65+ Million Downloads
Spyware scanner with AI-powered detection engine + database
.png)