How to Factory Reset an iPhone, iPad, or iPod Touch
Authored by: Support.com Tech Pro Team
A factory reset, also known as a "hard reset" or "reset to factory settings," is a process that erases all the data and settings on your iPhone or iPad, restoring it to its original, out-of-the-box condition. You might want to perform a factory reset when you're selling or giving away your device, facing persistent software issues, or simply starting fresh.
Factory Reset an iPhone or iPad
Note: Performing a factory reset will erase all data on your device, including apps, settings, and personal files. Make sure to back up any important data before proceeding.
Method 1: Factory Reset from Settings
This method works for most iPhone and iPad models and is the easiest way to perform a factory reset:
Backup Your Data (Optional)
Before proceeding with the factory reset, consider backing up your data to avoid losing important information. To do this:
Go to "Settings."
Tap on your name at the top (Apple ID, iCloud, iTunes & App Store).
Select "iCloud."
Scroll down and tap on "iCloud Backup."
Tap "Back Up Now" to initiate a manual iCloud backup. Make sure your device is connected to Wi-Fi and plugged in, or has sufficient battery life.
Perform the Factory Reset
Open the "Settings" app on your iPhone or iPad.
Scroll down and select "General."
Scroll to the bottom and tap "Reset."
Choose "Erase All Content and Settings."
If prompted, enter your device's passcode.
Confirm that you want to erase all data and settings on your device.
Your device will begin the reset process, which may take some time. Once completed, your device will reboot, and you'll be presented with the initial setup screen.
Method 2: Factory Reset Using iTunes (for older models)
If you have an older iPhone or iPad that is not running iOS 15 or later, you can perform a factory reset using iTunes. Here's how:
Backup Your Data (Optional)
Before proceeding with the factory reset, consider backing up your data using iTunes. To do this:
Connect your device to your computer using a USB cable.
Open iTunes on your computer.
Select your device when it appears in iTunes.
Click "Back Up Now" to create a backup of your device's data.
Perform the Factory Reset
Keep your device connected to your computer.
In iTunes, click on your device when it appears.
Click "Restore iPhone" or "Restore iPad."
Confirm that you want to restore your device to factory settings.
iTunes will download and install the latest iOS or iPadOS version on your device and erase all data and settings.
Once the process is complete, your device will reboot, and you'll be presented with the initial setup screen.
Method 3: Factory Reset Using Find My (for iOS 15 and later)
With iOS 15 and later, you can perform a factory reset using the Find My app:
Access “Find My”
Open the "Find My" app on another iOS device or visit the Find My website (icloud.com/find) on a computer.
Sign in with your Apple ID.
Select your iPhone or iPad from the list of devices.
Erase Your Device
Tap on "Erase This Device."
Confirm the action.
Your iPhone or iPad will be remotely wiped and reset to its factory settings the next time it connects to the internet.
Performing a factory reset on your iPhone or iPad can help resolve various issues and prepare your device for a new owner. Be cautious, as this process erases all data, and it cannot be undone. Make sure to back up any important data before proceeding. Choose the method that best suits your device and follow the steps carefully to reset your iPhone or iPad successfully.
Contact Support.Com:
If you are still having trouble, refer to the Step-By-Step Guide below or consider seeking personalized assistance from Support.Com.
1. Introduction
This guide will assist you in performing a factory reset on your iOS device. You may need to perform a factory reset if you've forgotten your passcode and have locked yourself out of your device, as part of a troubleshooting step, or if you plan to sell or give away your iOS device.
Performing a factory reset on your iOS device erases everything from it. Be sure you have all appropriate data that you do not wish to lose backed up before proceeding further.
2. Factory Reset
Before we begin, select a method to factory reset your device.
Performing a factory reset on your iOS device erases everything from it. Be sure you have all appropriate data that you do not wish to lose backed up before proceeding further.
If you are performing this factory reset because you forgot your passcode, there is no way to back up your device's data before proceeding.
3. Factory Reset
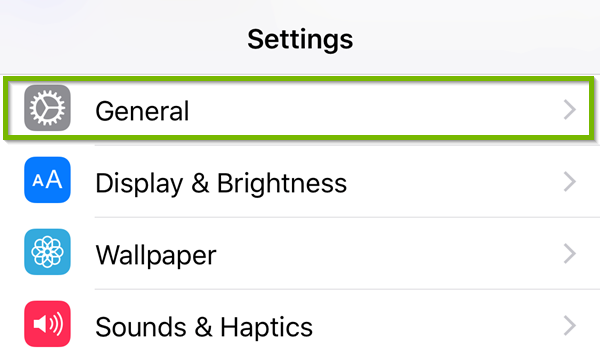
Select Settings.
Select General.
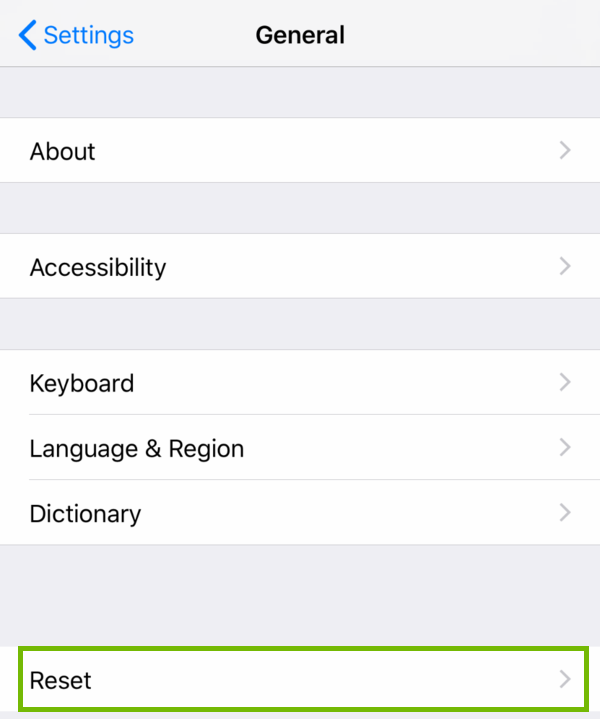
Select Reset.
Select Erase All Content and Settings, and enter your iPhone's passcode (if prompted).
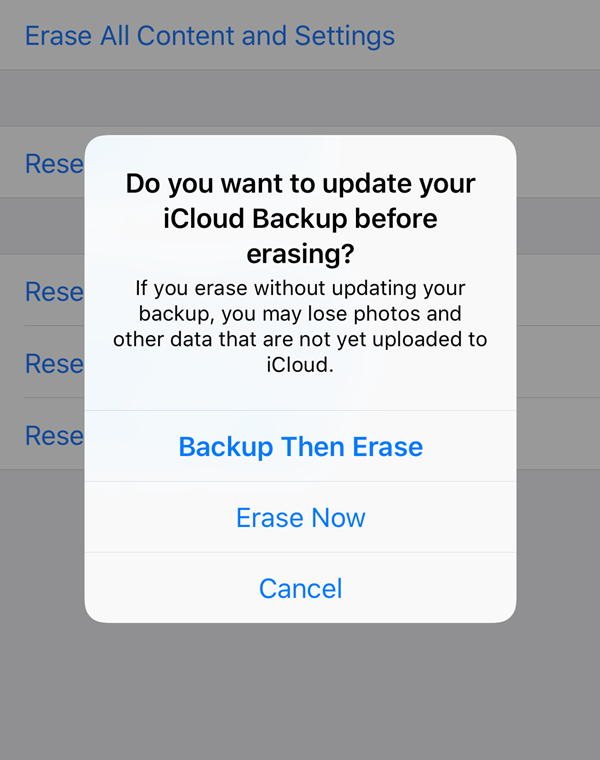
You will receive a confirmation prompt offering to Backup Then Erase or Erase Now. If you would like to back up your device's information before erasing, select Backup Then Erase. Otherwise, select Erase Now.
Your iPhone will now wipe all data and reset back to factory defaults. When completed, you will be presented with the Welcome screen you saw when you took your iPhone out of the box for the first time.
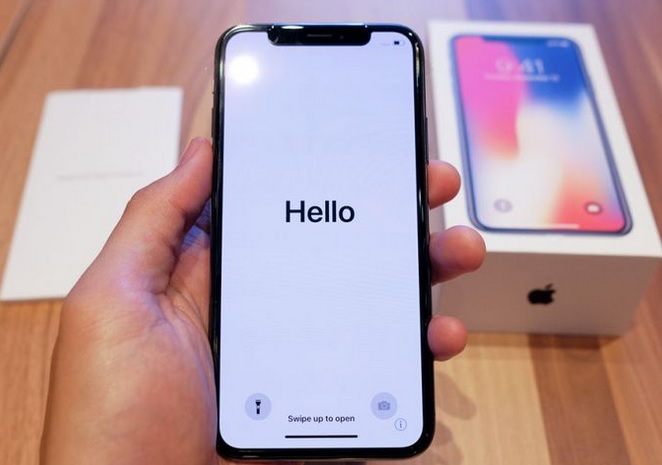
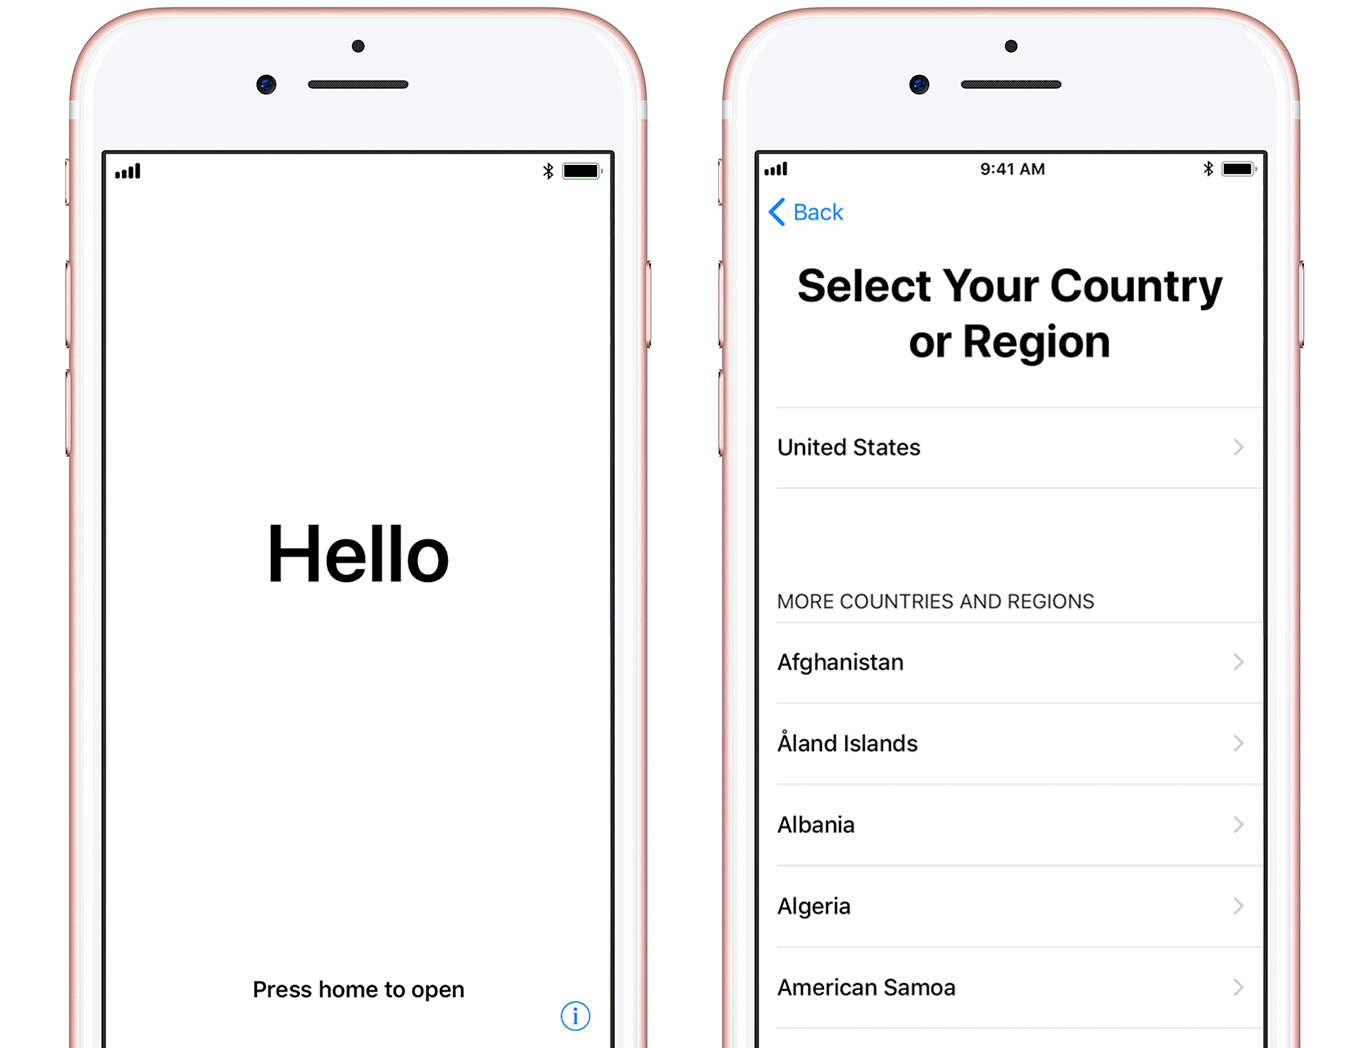
4. Set up
Turn on your device You'll see "Hello" in many languages.
If you have any vision impairments, you can turn on Voice Over or Zoom from the Hello screen.
When asked, choose your language.
Then tap your country or region. This affects how information looks on your device, including date, time, contacts, and more.
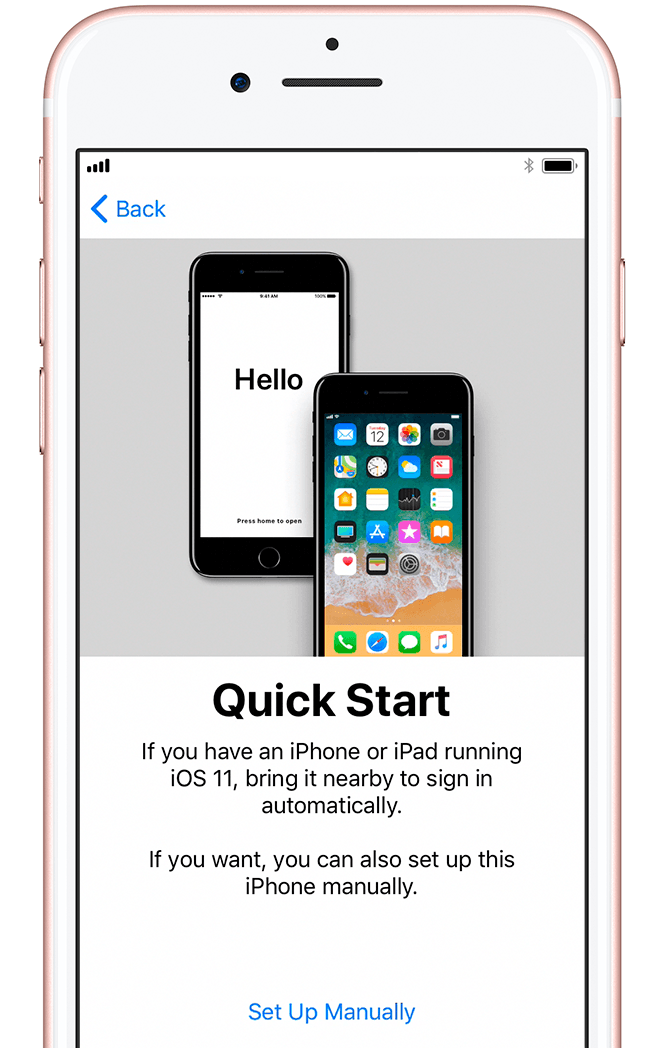
5. Set up with Quick Start
This guide will focus on the manual setup.
If you have another device on iOS 11, use Quick Start
If you have another device that's running iOS 11, you can use it to automatically set up your new device with Quick Start.
Bring the two devices close together, and then follow the instructions.
If you don’t have another iOS 11 device, tap Set Up Manually to continue.
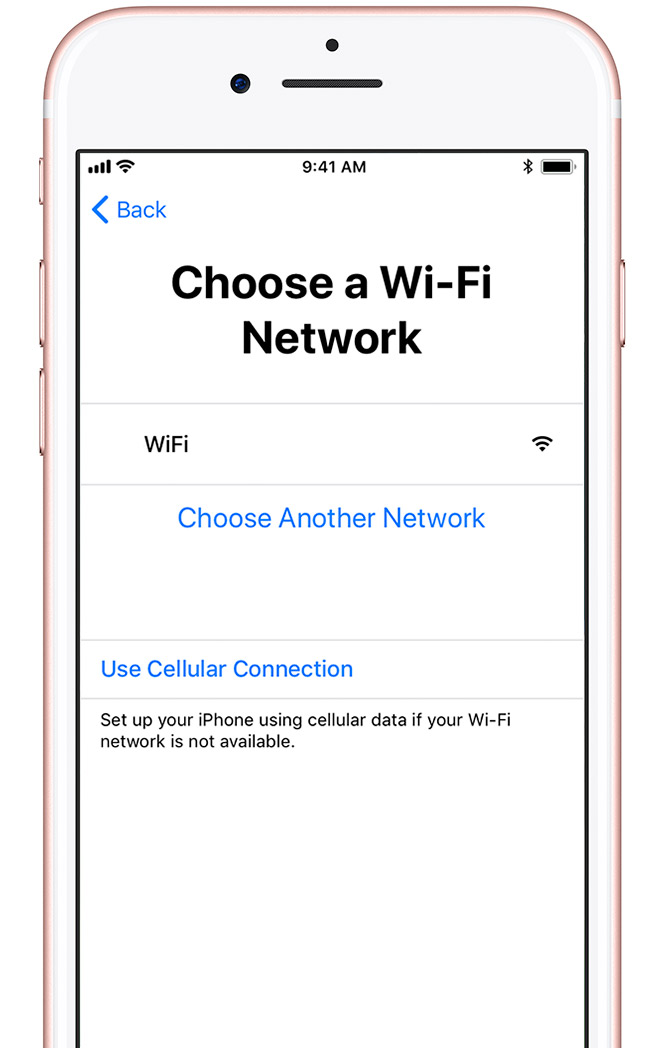
6. Activate
You need to connect to a Wi-Fi network, a cellular network, or iTunes to activate and continue setting up your device.
Tap the Wi-Fi network that you want to use or select a different option.
If you're setting up a new iPhone or iPad (Wi-Fi + Cellular), you might need to insert a SIM card first (if your carrier requires it).
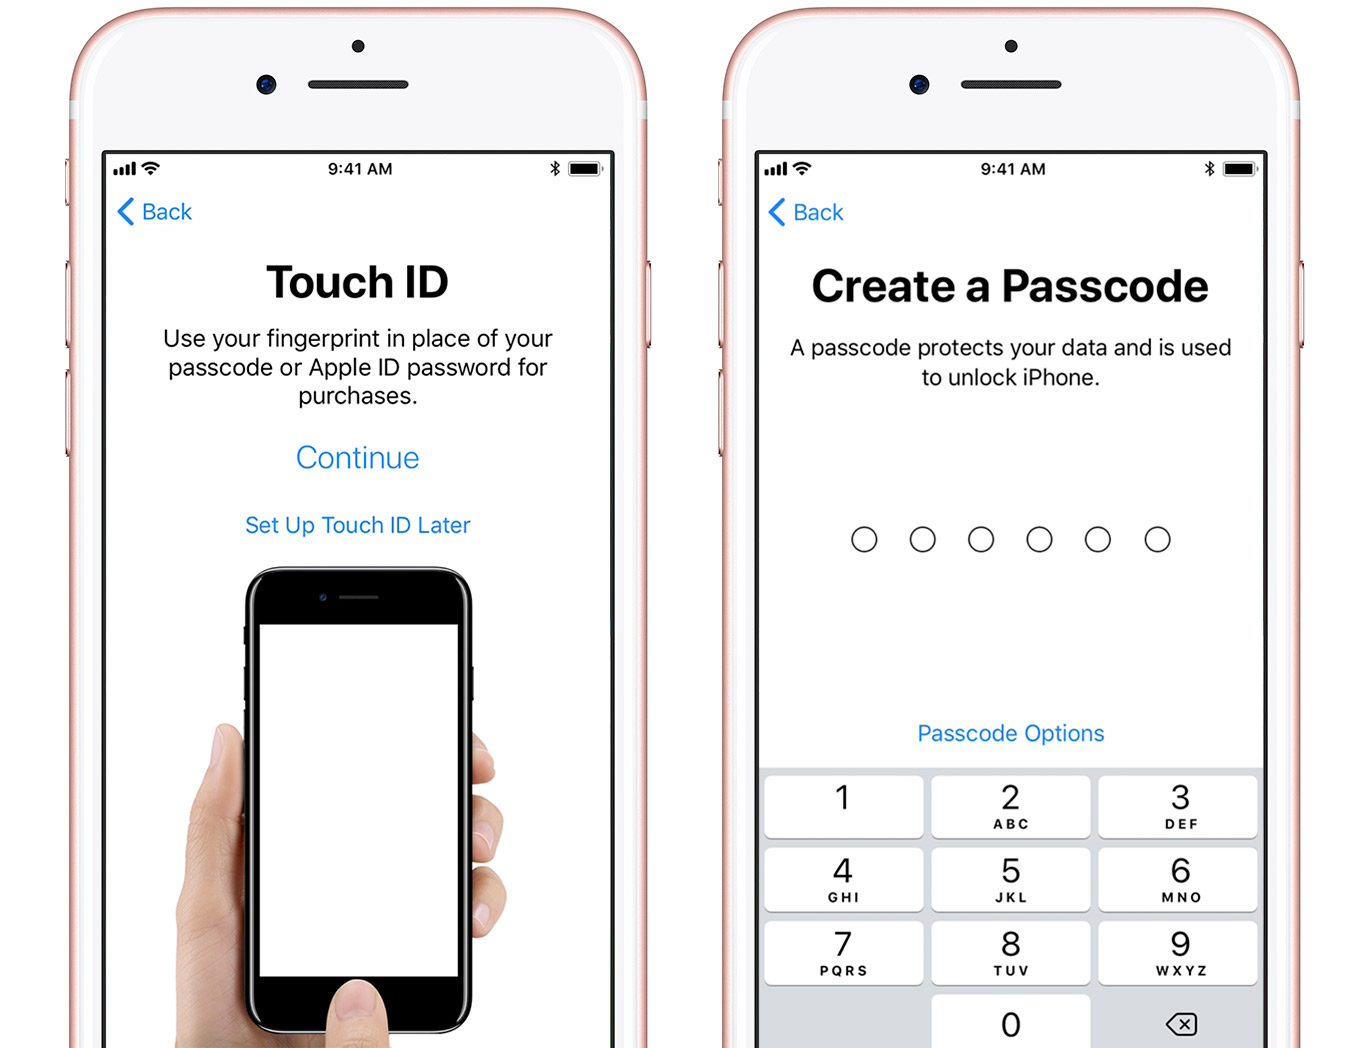
7. Set up Touch ID and Create Passcode
On some devices, you can set up Touch ID. With this feature, you can use your fingerprint to unlock your device and make purchases.
Tap Continue and follow the instructions, or tap Set Up Touch ID Later.
Next, set a six-digit passcode to help protect your data. You need a passcode to use features like Touch ID and Apple Pay.
If you'd like a four-digit passcode, custom passcode, or no passcode, tap Passcode Options.
8. Back up and Restore
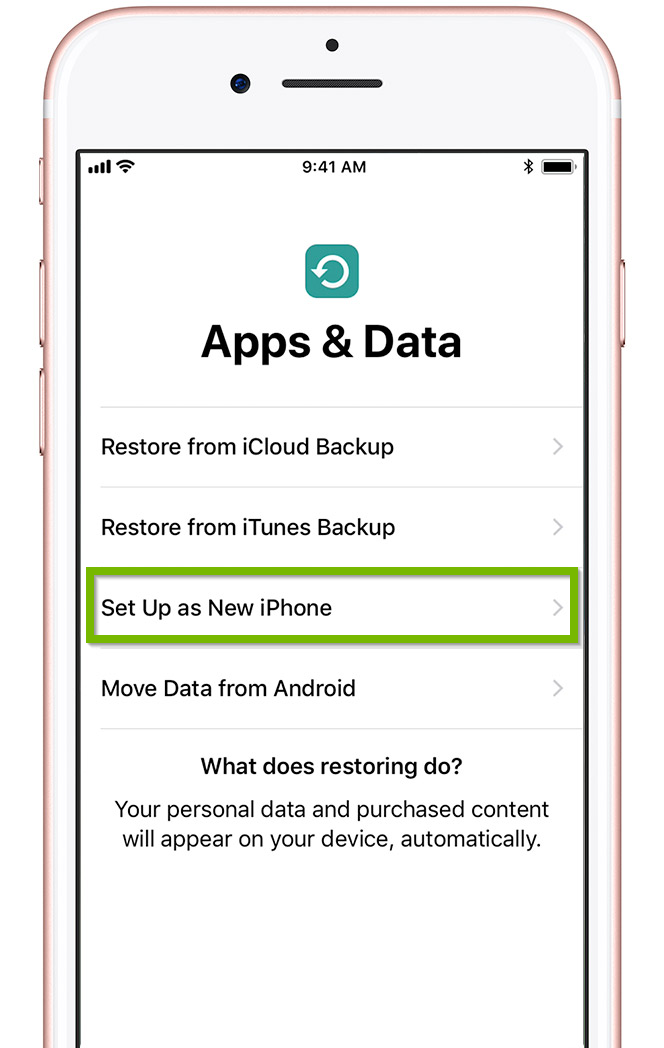
If you have an iCloud or iTunes backup, or an Android device, you can restore or transfer your data from your old device to your new device.
If you don't have a backup or another device, select Set Up as New [Device].
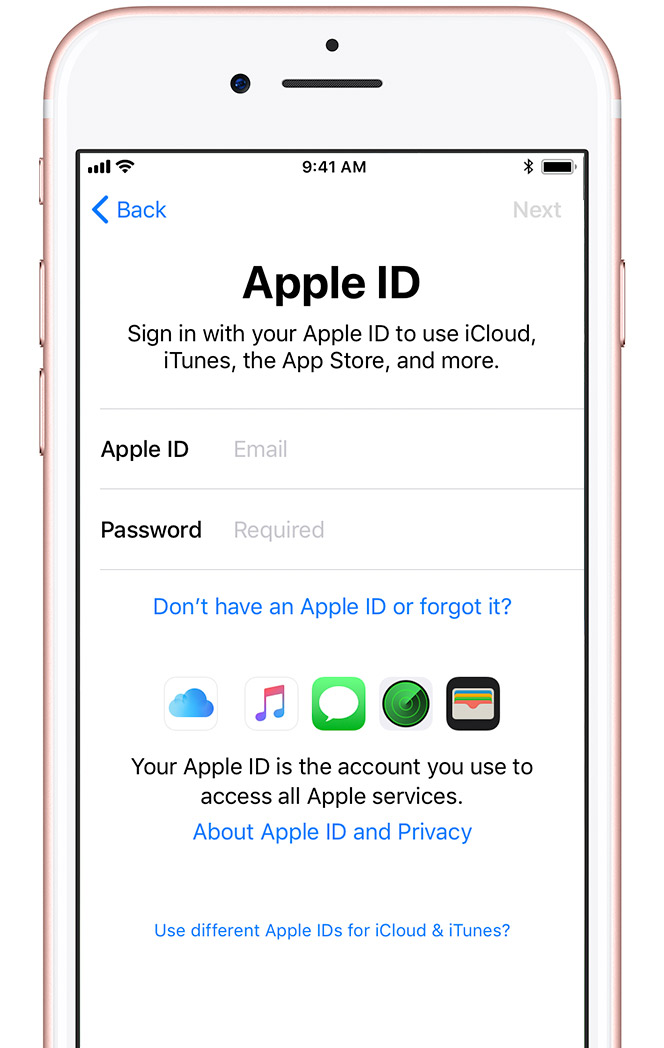
9. Apple ID Sign in
Enter your Apple ID and password, or tap Don't have an Apple ID or forgot it.
From there, you can recover your Apple ID or password, create an Apple ID, or set it up later.
If you use more than one Apple ID, tap Use different Apple IDs for iCloud and iTunes.
Next, accept the iOS Terms and Conditions and turn on Location Services, a feature you need for apps like Maps and Find My Friends.
If you signed in with your Apple ID, follow the steps to set up Apple Pay and iCloud Keychain.
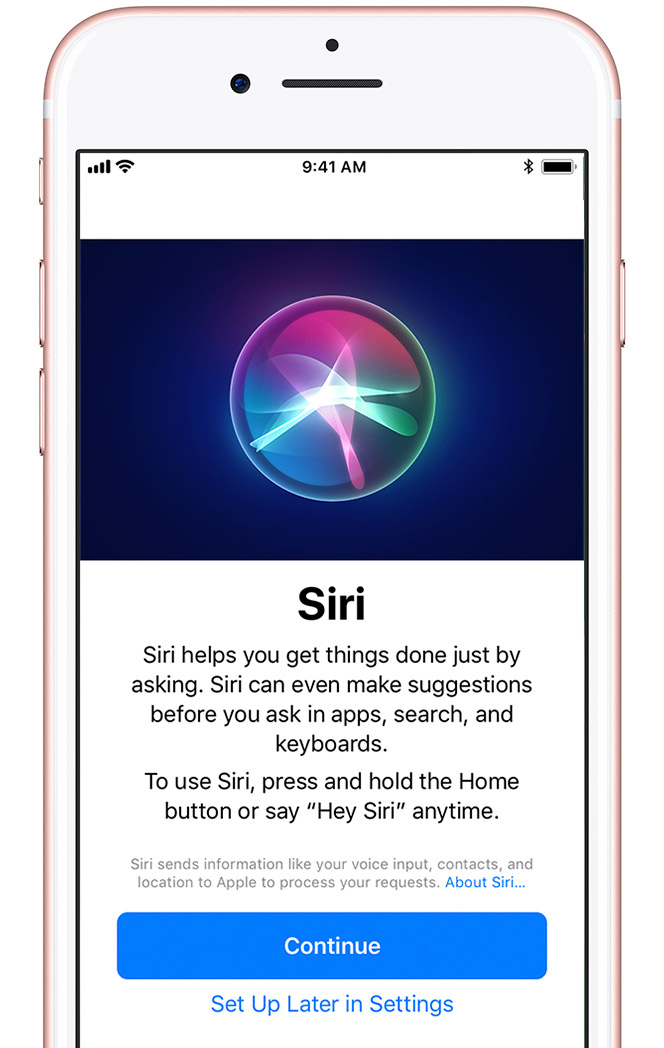
10. Siri Set up
Tap Continue if you would like to use Siri. On some devices, you'll be asked to speak some phrases so that Siri can get to know your voice. Choose Settings for app analytics, True Tone, and home button.
Decide whether to share information with app developers. Next, turn on True Tone display if your iPhone or iPad supports it. True Tone adjusts the color and intensity of your display to make images appear more natural.
If you have an iPhone 7, iPhone 7 Plus, iPhone 8, or iPhone 8 Plus, you can then adjust your home button's click.
Tap an option, then press the Home button to give it a try. To set the one you like best, tap Next.
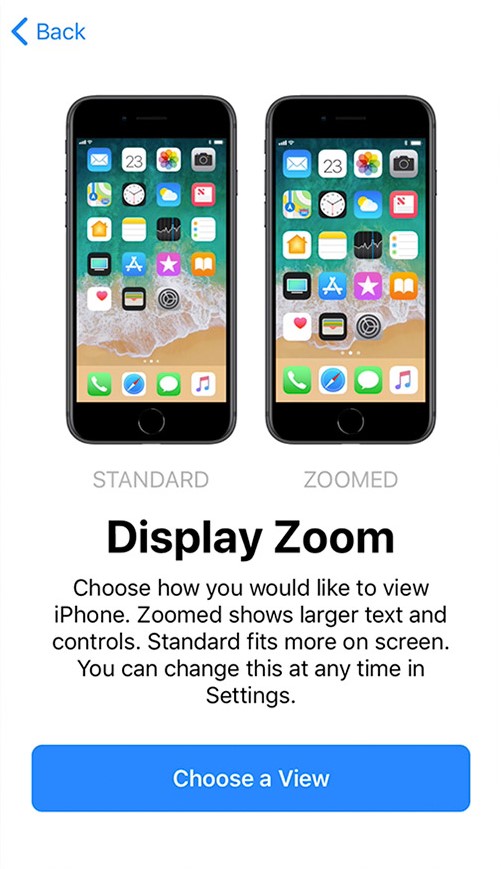
11. Display Resolution
If you have an iPhone 6 Plus or later, you may be asked to choose between two display resolutions.
The Standard display mode shows more on your screen, while the Zoomed display mode uses larger text and icons.
Tap Next to continue.
Finish up and Tap Get Started to begin using your device.
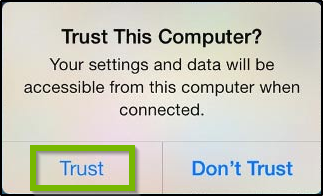
12. Factory Reset with iTunes
Connect your device to the computer you synced with.
Open iTunes. If asked for a passcode, enter it to unlock your device.
If asked, tap Trust to allow your device to trust the machine it's been connected to.
Wait for iTunes to sync your device and make a backup.
After the sync and backup have finished, click Restore [your device].
13. Set up
Turn on your device You'll see "Hello" in many languages.
If you have any vision impairments, you can turn on Voice Over or Zoom from the Hello screen.
When asked, choose your language.
Then tap your country or region. This affects how information looks on your device, including date, time, contacts, and more.
14. Set up with Quick Start
This guide will focus on the manual setup.
If you have another device on iOS 11, use Quick Start
If you have another device that's running iOS 11, you can use it to automatically set up your new device with Quick Start.
Bring the two devices close together, and then follow the instructions.
If you don’t have another iOS 11 device, tap Set Up Manually to continue.
15. Activate
You need to connect to a Wi-Fi network, a cellular network, or iTunes to activate and continue setting up your device.
Tap the Wi-Fi network that you want to use or select a different option.
If you're setting up a new iPhone or iPad (Wi-Fi + Cellular), you might need to insert a SIM card first (if your carrier requires it).
16. Set up Touch ID and Create Passcode
On some devices, you can set up Touch ID. With this feature, you can use your fingerprint to unlock your device and make purchases.
Tap Continue and follow the instructions, or tap Set Up Touch ID Later.
Next, set a six-digit passcode to help protect your data. You need a passcode to use features like Touch ID and Apple Pay.
If you'd like a four-digit passcode, custom passcode, or no passcode, tap Passcode Options.
17. Back up and Restore
If you have an iCloud or iTunes backup, or an Android device, you can restore or transfer your data from your old device to your new device.
If you don't have a backup or another device, select Set Up as New [Device].
18. Apple ID Sign in
Enter your Apple ID and password, or tap Don't have an Apple ID or forgot it.
From there, you can recover your Apple ID or password, create an Apple ID, or set it up later.
If you use more than one Apple ID, tap Use different Apple IDs for iCloud and iTunes.
Next, accept the iOS Terms and Conditions and turn on Location Services, a feature you need for apps like Maps and Find My Friends.
If you signed in with your Apple ID, follow the steps to set up Apple Pay and iCloud Keychain.
19. Siri Set up
Tap Continue if you would like to use Siri. On some devices, you'll be asked to speak some phrases so that Siri can get to know your voice. Choose Settings for app analytics, True Tone, and home button.
Decide whether to share information with app developers. Next, turn on True Tone display if your iPhone or iPad supports it. True Tone adjusts the color and intensity of your display to make images appear more natural.
If you have an iPhone 7, iPhone 7 Plus, iPhone 8, or iPhone 8 Plus, you can then adjust your home button's click.
Tap an option, then press the Home button to give it a try. To set the one you like best, tap Next.
20. Display Resolution
If you have an iPhone 6 Plus or later, you may be asked to choose between two display resolutions.
The Standard display mode shows more on your screen, while the Zoomed display mode uses larger text and icons.
Tap Next to continue.
Finish up and Tap Get Started to begin using your device.
21. Factory Reset with Recovery Mode
This operation will completely wipe all data and info from your device. If your device was logged into iCloud, you will be prompted to enter your iCloud credentials before you can use your device after the factory reset has completed.
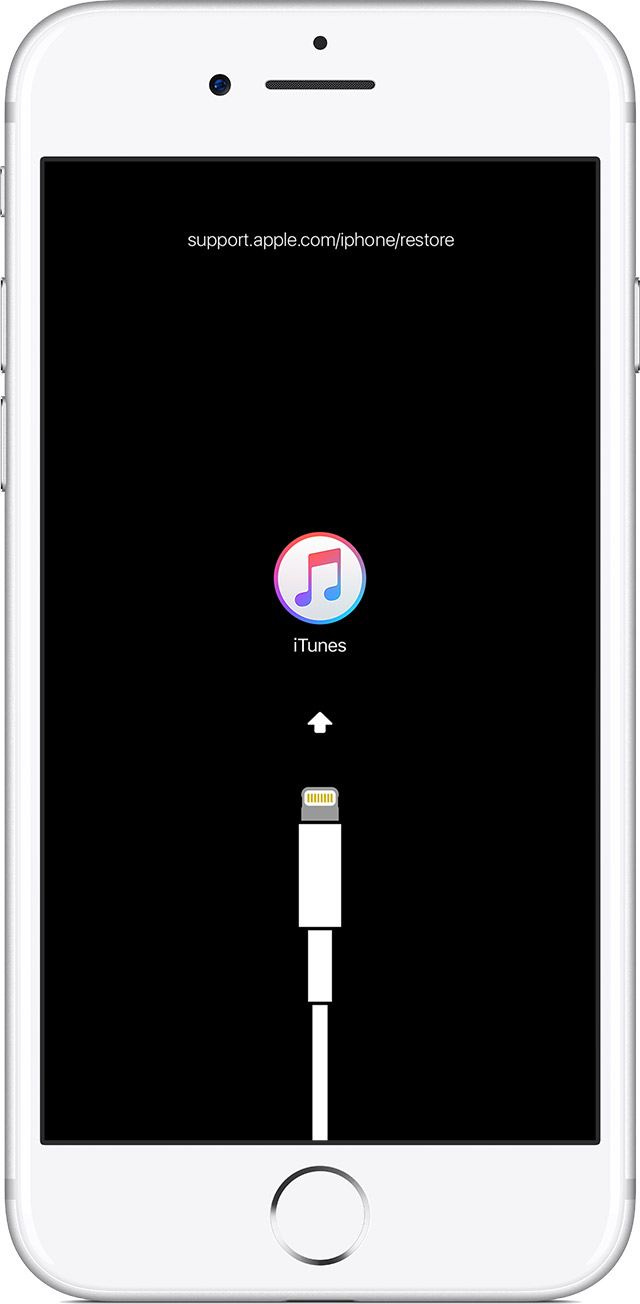
Connect your iOS device to your computer and open iTunes. If you don't have a computer, borrow one from a friend, or go to an Apple Retail Store or Apple Authorized Service Provider.
While your device is connected, force restart it:
On an iPhone 8 or iPhone 8 Plus: Press and quickly release the Volume Up button. Then press and quickly release the Volume Down button. Finally, press and hold the Side button until you see the recovery mode screen.
On an iPhone 7 or iPhone 7 Plus: Press and hold both the Side and Volume Down buttons at the same time. Keep holding them until you see the recovery mode screen.
On an iPhone 6s and earlier, iPad, or iPod touch: Press and hold both the Home and the Top (or Side) buttons at the same time. Keep holding them until you see the recovery mode screen.
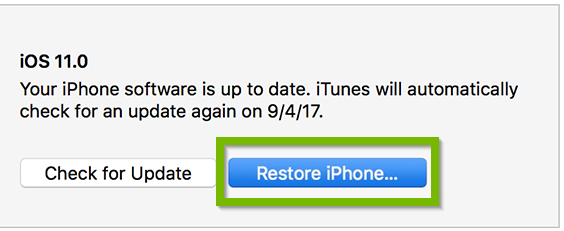
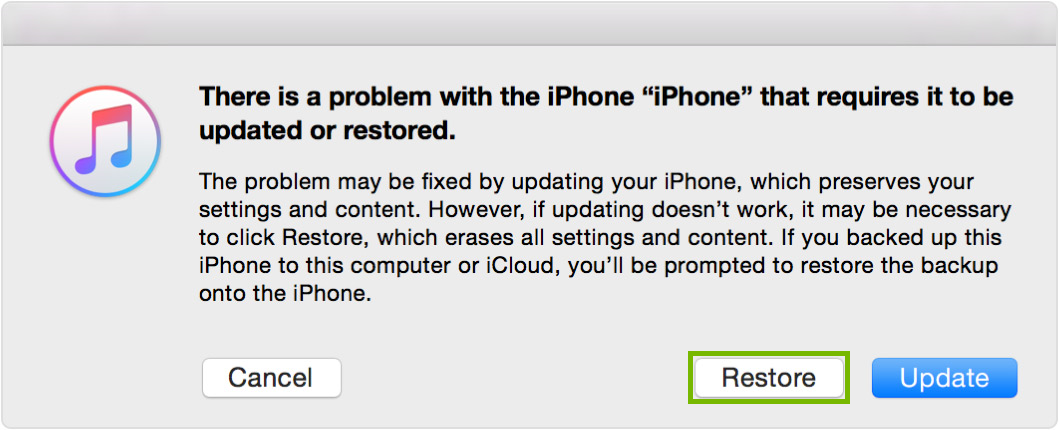
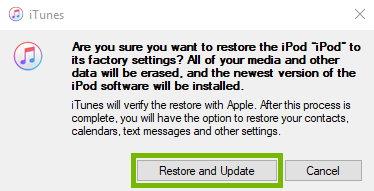
Once in recovery mode, iTunes will prompt you to Restore or Update, choose Restore.
Click on Restore and Update.
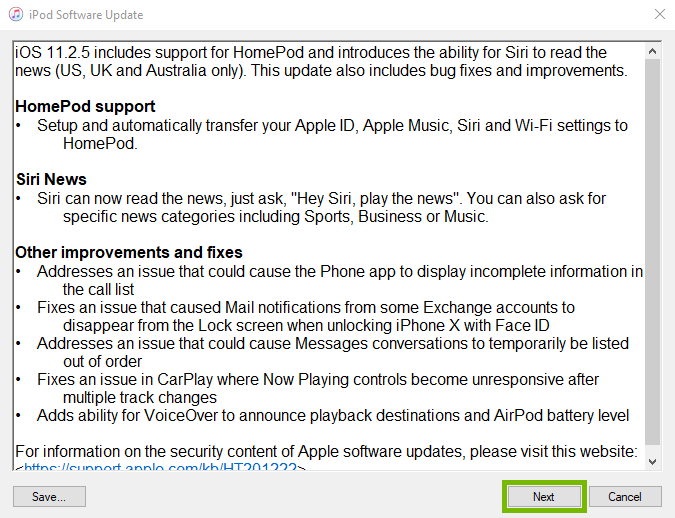
You will be prompted to download the firmware image if it does not already exist on your computer. Click Next.
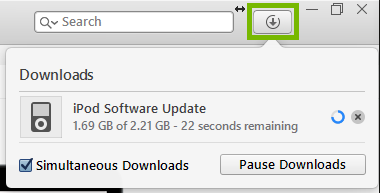
The download will start. Leave your device plugged in and once the download finishes it will start the restore. You can view your progress of the download by clicking the downloads button that appears while downloading is in progress.
The firmware files are large in size (typically over 2GB). It may take a long time depending on your internet connection to complete the download. If your device leaves recovery mode during this step, wait for the download to complete before attempting to place your device in recovery mode again. This way the download will not have to start over.
22. Set up
Turn on your device You'll see "Hello" in many languages.
If you have any vision impairments, you can turn on Voice Over or Zoom from the Hello screen.
When asked, choose your language.
Then tap your country or region. This affects how information looks on your device, including date, time, contacts, and more.
23. Set up with Quick Start
This guide will focus on the manual setup.
If you have another device on iOS 11, use Quick Start
If you have another device that's running iOS 11, you can use it to automatically set up your new device with Quick Start.
Bring the two devices close together, and then follow the instructions.
If you don’t have another iOS 11 device, tap Set Up Manually to continue.
24. Activate
You need to connect to a Wi-Fi network, a cellular network, or iTunes to activate and continue setting up your device.
Tap the Wi-Fi network that you want to use or select a different option.
If you're setting up a new iPhone or iPad (Wi-Fi + Cellular), you might need to insert a SIM card first (if your carrier requires it).
25. Set up Touch ID and Create Passcode
On some devices, you can set up Touch ID. With this feature, you can use your fingerprint to unlock your device and make purchases.
Tap Continue and follow the instructions, or tap Set Up Touch ID Later.
Next, set a six-digit passcode to help protect your data. You need a passcode to use features like Touch ID and Apple Pay.
If you'd like a four-digit passcode, custom passcode, or no passcode, tap Passcode Options.
26. Back up and Restore
If you have an iCloud or iTunes backup, or an Android device, you can restore or transfer your data from your old device to your new device.
If you don't have a backup or another device, select Set Up as New [Device].
27. Apple ID Sign in
Enter your Apple ID and password, or tap Don't have an Apple ID or forgot it.
From there, you can recover your Apple ID or password, create an Apple ID, or set it up later.
If you use more than one Apple ID, tap Use different Apple IDs for iCloud and iTunes.
Next, accept the iOS Terms and Conditions and turn on Location Services, a feature you need for apps like Maps and Find My Friends.
If you signed in with your Apple ID, follow the steps to set up Apple Pay and iCloud Keychain.
28. Siri Set up
Tap Continue if you would like to use Siri. On some devices, you'll be asked to speak some phrases so that Siri can get to know your voice. Choose Settings for app analytics, True Tone, and home button.
Decide whether to share information with app developers. Next, turn on True Tone display if your iPhone or iPad supports it. True Tone adjusts the color and intensity of your display to make images appear more natural.
If you have an iPhone 7, iPhone 7 Plus, iPhone 8, or iPhone 8 Plus, you can then adjust your home button's click.
Tap an option, then press the Home button to give it a try. To set the one you like best, tap Next.
29. Display Resolution
If you have an iPhone 6 Plus or later, you may be asked to choose between two display resolutions.
The Standard display mode shows more on your screen, while the Zoomed display mode uses larger text and icons.
Tap Next to continue.
Finish up and Tap Get Started to begin using your device.
.png)