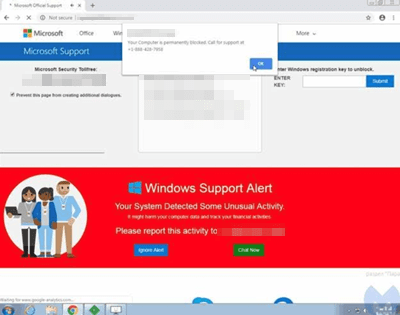
Browser hijacking or 'pop-up phishing' involves fraudulent messages that unexpectedly pop up for users when they are surfing the web. In many cases, cyber criminals infect otherwise legitimate websites with malicious code that causes these messages to appear when people visit them.
The content of these messages themselves is what makes them so effective. Often, they present the unsuspecting website visitor with some kind of fraudulent warning from a well-known reputable company, typically about the security of their computer. Then they either prompt the visitor to download some tool to fix the problem, such as an antivirus application which turns out to be malware itself, or to call a fraudulent phone number for "support." The abnormal behavior of the message itself and the inability to close or navigate away from them, makes the fraudulent messages appear to be somewhat credible.
This guide will demonstrate how to rid yourself of the worrisome pop-up message, and then perform some simple operations to get Google Chrome back to normal.
Tools You'll Need:
A paperclip
iPhone charging cable
Access to a computer with iTunes installed
Any other non-consumable tools needed
Comment out tools section if no tools are necessary
-->
Supplies You'll Need:
Zip ties
Any other consumable supplies
Comment out supplies section if no supplies are necessary
-->
Before You Begin:
You must have access to a computer with iTunes installed.
You must have that thing for the other thing so you can do the thing.
To continue, we need to know what Operating System your computer is using.
There are 2 main Operating Systems for personal computers currently available, Microsoft Windows and Apple macOS.
Microsoft WindowsApple macOSMicrosoft Windows runs on computers produced by multiple companies, such as Lenovo, Asus, Dell, Toshiba, Hewlett Packard, Acer, and Sony.Apple is the only company that makes macOS computers.
3. Terminate Browser
The following steps can be used to terminate any browser, but the examples below will demonstrate using Internet Explorer.
Open the Windows Task Manager.
Using the Taskbar
Using your right mouse button, right-click on your Taskbar. Then select Task Manager from the menu.
Using a Keyboard Shortcut
On your keyboard use Ctrl+Shit+Esc.
Using the Lock Screen
You can do Ctrl+Alt+Del on your keyboard, then click on Task Manager.
Select your browser, then select End Task.
Basic View
Advanced View
When you next open your browser, if you are asked to restore a session, select No, or close the message.
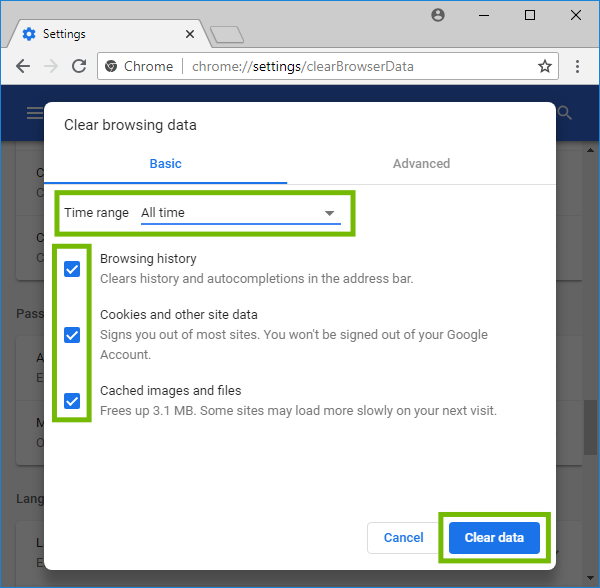
4. Clear Browser History
Open Google Chrome.
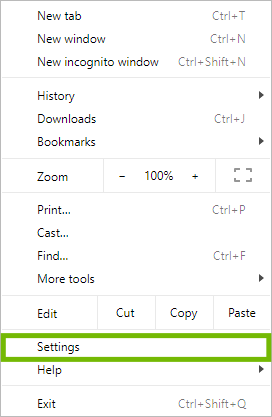
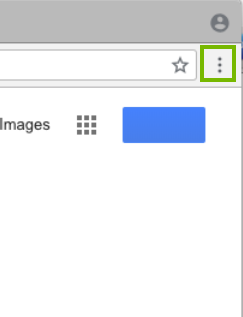
Select the Menu button located in the top right corner of the window.
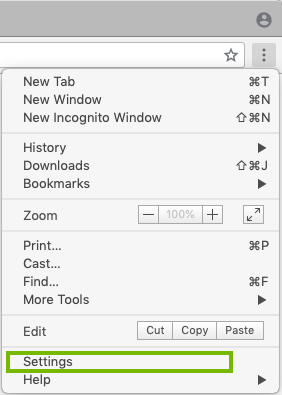
Select Settings.
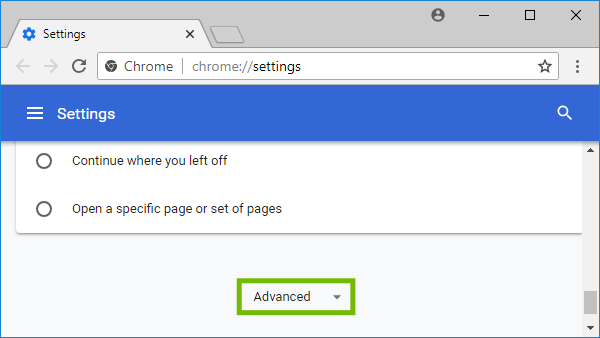
Scroll to the bottom of the page, then select Advanced.
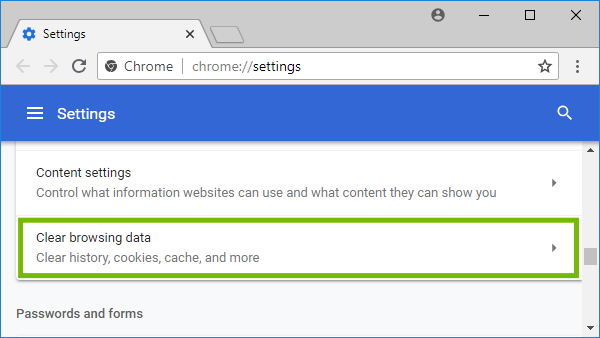
Under Privacy and security, select Clear browsing data.
For Time range, select All time. Make sure all three check boxes are checked, then select Clear data.
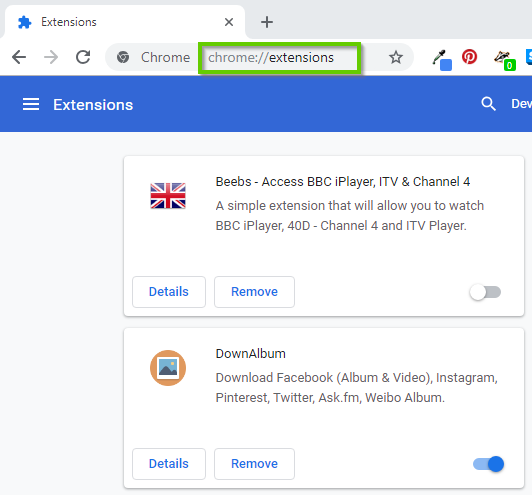
5. How to Remove Extensions
Some browser extensions / addons can cause your browser to behave abnormally. Removing any unwanted, unnecessary, or unused browser extensions/addons can get your web browser running properly again.
Click on the three dots in the upper right hand corner.
Click on (1) More tools then (2) Extensions.
The following steps can be repeated to remove multiple browser extensions.
Find the extension you want to remove, and click on REMOVE.
You will get a confirmation window. Click Remove to confirm removal.
You might get a new tab pop up upon removal, close the tab by hitting the X.
Extensions are now gone, you may have to restart your browser for it to take effect. If you removed a malicious extension, it might have changed your homepage.
6. Clear Browser Hijack
Open Google Chrome.
Enter chrome://extensions into address bar and hit Enter.
Review the list of plug-ins and remove any that you do not recognize. You may need to research the add-ons before removing.
Click the three dots menu icon at the top right.
Open Settings.
Scroll down and verify Homepage is not malicious and change it if it is.
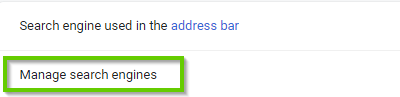
Click on Manage Search Engines.
Verify no search hijackers are present.
Click Start.
Search for "Chrome".
Right-click on the Chrome result, then click on Open File Location.
Right-click Chrome, then select Properties.
Verify that the Target only contains the path "C:\Program Files (x86)\Google\Chrome\Application\chrome.exe" with nothing after it.
Open Chrome and verify your homepage is correct.
7. Test Search Page
Open your browser and take note if it shows your normal home page or search page.
Test your ability to search the web like you normally would.
8. What Are PUPs
Potentially unwanted programs, or "PUPs", often arrive bundled with your computer or can tag along with another software program you meant to install. Most times, they are snuck into the EULA as a "Recommended Offer" that many of us are so accustomed to just click right through. Lots of these types of programs end up being junkware that your computer will not benefit from. Unfortunately, some of these programs can add unwanted browser toolbars or extensions that can clutter your browser, track your web browsing, show additional advertisements, or change your search page and other related settings. Usually, unless these types of programs are removed, they will continue causing issues with your web browsing experience.
Remove PUPs via Windows 10 Settings
Click Start (1), then click Settings (2).
Next, Select Apps.
Scroll down and locate the app you wish to remove, and click on Uninstall.
Carefully read any prompts in case there are special instructions. Proceed until the application is removed.
Some applications may require that you reboot.
Remove PUPs via the Control Panel
On your keyboard push and release the Windows Key and R at the same time.
You will see a Run window open up. Type in appwiz.cpl then click on OK.
Locate a program you wish to remove within the list, click once on it to highlight it, then click on Uninstall.
Carefully read any prompts in case there are special instructions. Proceed until the application is removed.
Some applications may require that your computer be restarted to complete the uninstallation.
Test your browser after removing any PUPs from your machine. This may require you to restart your browser or your computer beforehand depending on what was removed.
9. Uninstall Program
You may need to remove an app or program because you need the space, simply don't need it anymore, or it is malicious. The following steps show you how to easily remove an app. The first method is exclusive to Windows 10, the second method will work with all Windows versions.
Windows 10 - Using Windows Settings
Click Start (1), then click Settings (2).
Next, Select Apps.
Scroll down and locate the app you wish to remove, and click on Uninstall.
Carefully read any prompts in case there are special instructions. Proceed until the application is removed.
Some applications may require that you reboot.
All Windows Versions - Using Control Panel
On your keyboard push and release the Windows Key and R at the same time.
You will see a Run window open up. Type in appwiz.cpl then click on OK.
Locate a program you wish to remove within the list, click once on it to highlight it, then click on Uninstall.
Carefully read any prompts in case there are special instructions. Proceed until the application is removed.
Some applications may require that your computer be restarted to complete the uninstallation.
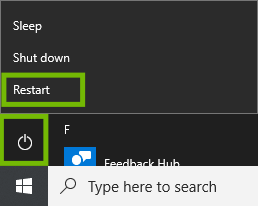
10. Restart Your PC
Before your restart or shut down your PC, make sure to save all necessary work to prevent data loss.
Using the Mouse
Select the Start menu.
By default it is in the lower left corner of your screen.
Select Power, then select Restart.
Using the Keyboard
Press the Windows and X keys at the same time. This minimizes any open windows you may have.
Press the Alt and F4 keys at the same time. This tells Windows to close the desktop.
Select Restart, then OK.
11. Test Search Page
Open your browser and take note if it shows your normal home page or search page.
On a Desktop or Laptop, look for one of these icons:
On a Smartphone or Tablet, look for one of these icons:
Make sure the page loads properly, and try following a few of the links from the page.
12. Continued Browser Hijack Issues
Unfortunately, your browser issue cannot be resolved via basic troubleshooting steps. Your machine will require hands-on service to determine the root cause of your issues.
13. What's next?
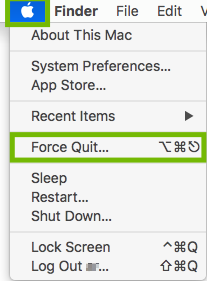
14. Force Quit Chrome
Sometimes Chrome can get stuck as it launches. Forcing it to quit and restarting it usually fixes this problem.
Select the Apple menu, then Force Quit.
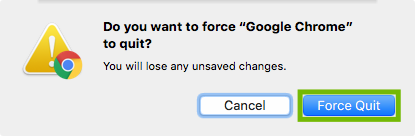
Highlight Google Chrome in the list, and select Force Quit.
You'll be prompted if you're sure, select Force Quit.
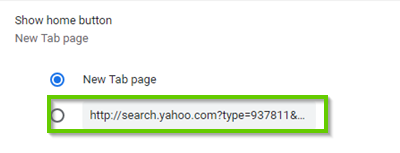
15. Check Homepage Settings
Your web browser's homepage settings dictate the websites that are loaded when it is opened up.
Click on the three dots in the upper right hand corner.
Click on Settings.
Scroll down to you get to On Startup. You will see three options. If you want to set a custom page, select Open a specific page or set of pages.
If you see one that you want to remove or change click on the 3 dots next to it. Click on Edit or Remove to change it.
16. How to Remove Extensions
Some browser extensions / addons can cause your browser to behave abnormally. Removing any unwanted, unnecessary, or unused browser extensions/addons can get your web browser running properly again.
Click on the three dots in the upper right hand corner.
Click on (1) More tools then (2) Extensions.
The following steps can be repeated to remove multiple browser extensions.
Find the extension you want to remove, and click on REMOVE.
You will get a confirmation window. Click Remove to confirm removal.
You might get a new tab pop up upon removal, close the tab by hitting the X.
Extensions are now gone, you may have to restart your browser for it to take effect. If you removed a malicious extension, it might have changed your homepage.
17. Clear Browser History
Open Google Chrome.
Select the Menu button located in the top right corner of the window.
Select Settings.
Scroll to the bottom of the page, then select Advanced.
Under Privacy and security, select Clear browsing data.
For Time range, select All time. Make sure all three check boxes are checked, then select Clear data.
18. Test Search Page
Open your browser and take note if it shows your normal home page or search page.
Test your ability to search the web like you normally would.
19. What Are PUPs
Potentially unwanted programs, or "PUPs", often arrive bundled with your computer or can tag along with another software program you meant to install. Most times, they are snuck into the EULA as a "Recommended Offer" that many of us are so accustomed to just click right through. Lots of these types of programs end up being junkware that your computer will not benefit from. Unfortunately, some of these programs can add unwanted browser toolbars or extensions that can clutter your browser, track your web browsing, show additional advertisements, or change your search page and other related settings. Usually, unless these types of programs are removed, they will continue causing issues with your web browsing experience.
Remove PUPs via Windows 10 Settings
Click Start (1), then click Settings (2).
Next, Select Apps.
Scroll down and locate the app you wish to remove, and click on Uninstall.
Carefully read any prompts in case there are special instructions. Proceed until the application is removed.
Some applications may require that you reboot.
Remove PUPs via the Control Panel
On your keyboard push and release the Windows Key and R at the same time.
You will see a Run window open up. Type in appwiz.cpl then click on OK.
Locate a program you wish to remove within the list, click once on it to highlight it, then click on Uninstall.
Carefully read any prompts in case there are special instructions. Proceed until the application is removed.
Some applications may require that your computer be restarted to complete the uninstallation.
Test your browser after removing any PUPs from your machine. This may require you to restart your browser or your computer beforehand depending on what was removed.
20. Remove App
Removing an app may also remove all data for that app. Make sure you have any information you need backed up before removing an app for your Mac.
To Remove an App Installed from the App Store
Open the Launchpad from the dock.
Click and hold on an icon until all icons start to jiggle.
Click the "x" on the top left of the icon you want to remove.
Click Delete to confirm removal.
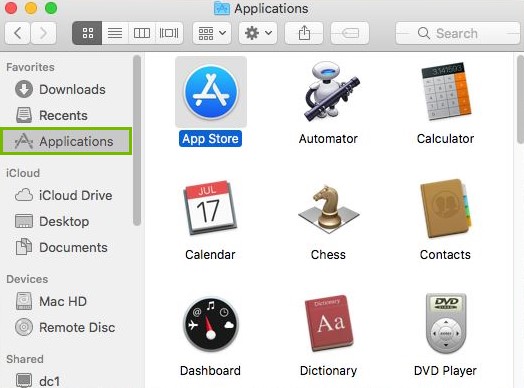
To Remove All Other Apps
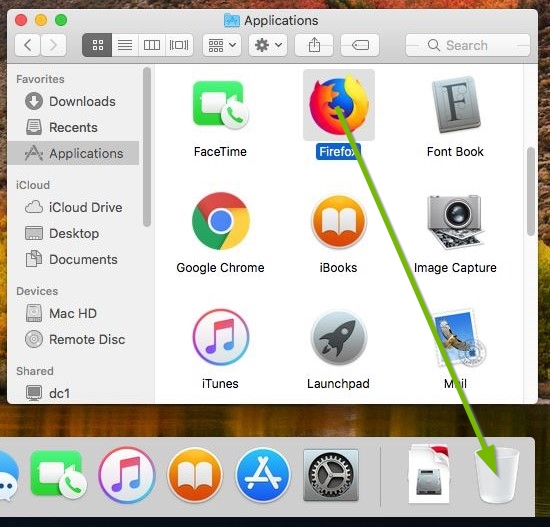
Open the Finder from the dock.
Click on Applications on the left.
Drag the app you wish to remove to the trash can.
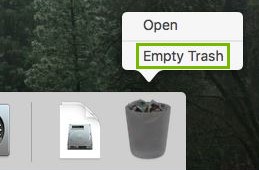
Right click on the trashcan and click Empty Trash.
21. Restart
From the menu bar across the top of the screen, select the Apple menu (1), then select Restart... (2).
Any unsaved work will be lost.
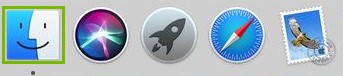
22. Test Search Page
Open your browser and take note if it shows your normal home page or search page.
On a Desktop or Laptop, look for one of these icons:
On a Smartphone or Tablet, look for one of these icons:
Make sure the page loads properly, and try following a few of the links from the page.
23. Continued Browser Hijack Issues
Unfortunately, your browser issue cannot be resolved via basic troubleshooting steps. Your machine will require hands-on service to determine the root cause of your issues.
24. What's next?
Remove Hidden Spyware In Minutes For Free
Detect and remove spyware, keyloggers, tracking cookies, and other
threats that slow down your PC or steal your data.
65+ Million Downloads
Spyware scanner with AI-powered detection engine + database
.png)