You've just purchased and installed a new PC game, but something’s off. Your frame-rate is bucking wildly. Mouse input is very erratic. The introductory sequence hangs for a second or two every time someone talks. When you move the camera, there’s some sort of horrifying stuttering.
There are a number of reasons why your machine might be struggling to run your new game. This guide will help you determine what the issue is, and ways to potentially resolve it.
Tools You'll Need:
A paperclip
iPhone charging cable
Access to a computer with iTunes installed
Any other non-consumable tools needed
Comment out tools section if no tools are necessary
-->
Supplies You'll Need:
Zip ties
Any other consumable supplies
Comment out supplies section if no supplies are necessary
-->
Before You Begin:
You must have access to a computer with iTunes installed.
You must have that thing for the other thing so you can do the thing.
Each individual prereq should have its own box like this. Not all will contain multiple links.
Comment out prerequisites section if no prereqs are necessary
-->
2. Keep Windows and My Video Drivers Up to Date
Make Sure Windows is Up to DateMicrosoft frequently sends out Updates to fix bugs, patch security issues, and add new services to the Windows Operating System. With the addition of Windows 10, updates are normally automatic but you can still access them and check if any new updates are waiting. Windows Updates may repair issues with your system that are causing freezes and slowness.
Open the Start menu and select Settings.
Select Update and Security.
Select Windows Update on the left, then select Check for updates.
Once the system has finished checking for updates, it will automatically download and install the latest applicable updates.
The system also may prompt you to restart, if it does, please do so at your earliest convenience, otherwise the update process will not complete.If you system was already recently updated, chances are that no further updates are available and your Update status will indicate: Your device is up to date.
Updating Your Graphics Driver
If you just purchased a new game or your current game is having issues running you may need to update your video drivers. Your video card uses the drivers to communicate with the rest of your system. New drivers often have bug fixes, new services, and updated settings.
 
Updating a Video Driver
Search Device Manager.
Select Device Manager.
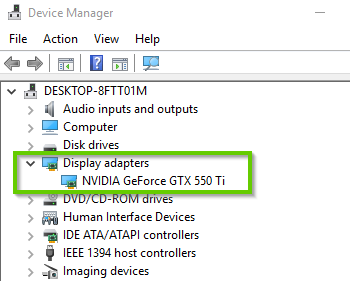
Select the small arrow next to Display adapters to expand that section, and see the devices in them.
Double click one of the devices under one of these headings to show its properties. Select Driver.
Select Update Driver.
Select Search automatically for updated driver software.
Windows will automatically locate any updated drivers available.
If any updated drivers are available, you'll be offered the chance to install them. Once installed, or if none are available, close the driver updater for this device.
Repeat these steps till you've made sure all Display adapter devices are up-to-date.
Updating an Nvidia Video Driver
Select the Start menu.
Begin typing "GeForce Experience"
Windows will search your machine for the software. Select GeForce Experience from the results.
The GeForce Experience software will open. You may be prompted to log in.
After logging in, the GeForce Experience software will display any available driver updates. If one is available, select the Express Installation button.
The driver will begin to install. Your computer may need to reboot after installation completes.
Updating an AMD Video Driver
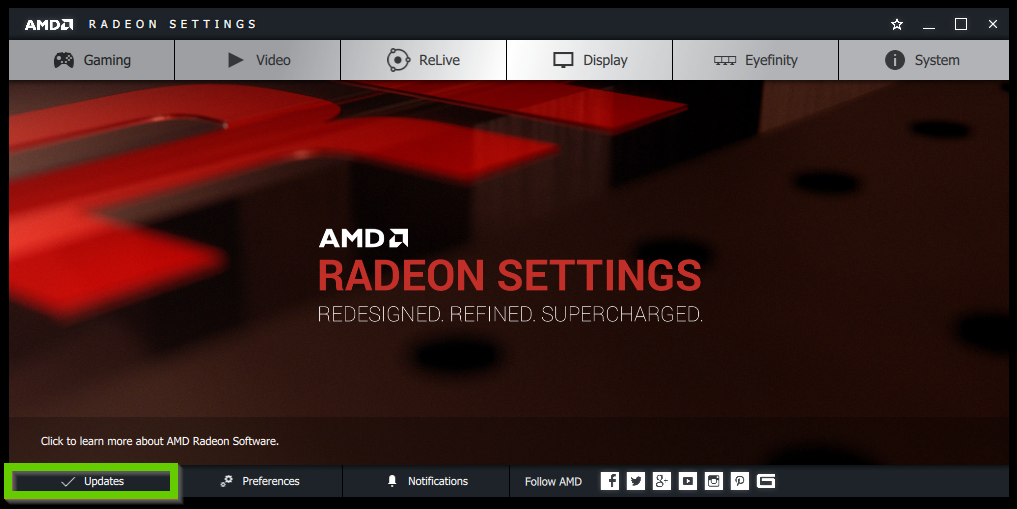
Right-click anyplace on your desktop where there is not an icon, then select AMD Radeon Settings.
From the Radeon Settings window, select Updates at the bottom left. If there is an update available, the button will say New Update instead.
If updated drivers are available, you may see New Optional or Recommended drivers on this screen. Select whichever is displayed to proceed.
Select Express Upgrade.
Select Proceed.
The installer will open and begin the installation process. Your computer may need to reboot after installation completes.
3. Reduce Game Settings for Better Performance
Reducing Your Game's SettingsReducing the graphical settings of the game you're attempting to play reduces the demand it places on your computer's hardware, and can make a game playable, albeit a bit uglier from a graphical standpoint. Each game's graphical setting options will vary, and may still not make the game playable on your machine.
Load the game you are attempting to play and navigate to the game's options or settings menu.
Look for Video or Graphics settings. Depending on the game you are playing, the labeling of this menu will vary.
Some games offer a simple menu that allows the user to set graphical options using a range. Settings may range from low all the way to ultra. Try reducing these settings below where they are currently set.
Test your game. The reduction in settings may make the game playable. Reducing graphical settings may make the game look visually less appealing, but can be the difference between a game being playable or unplayable.
Graphics Settings and What They Mean
Resolution: The number of pixels that make up your game screen. The higher the numbers, the more power your game uses. Lowering this setting will greatly increase performance.
Anti-Aliasing: A setting that smooths jagged edges, making the game look better. Reducing this will increase performance while making your game look noticeably dated. Below shows anti-aliasing off on the left, and anti-aliasing set to four on the right. The jagged edges are more noticeable on the left.
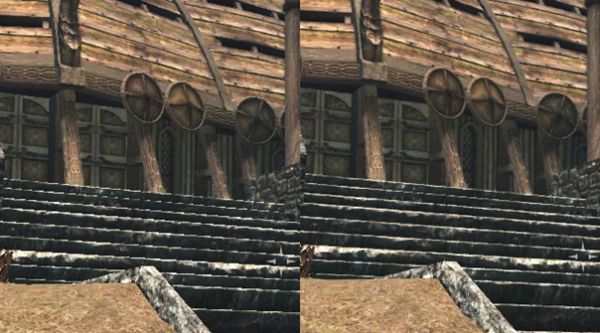
Texture Quality: Textures are the pictures put over the models in a game. The higher the quality, the better the texture. The lower the quality, the faster the game will run. The image on the left has texture quality set to low.
Shadow Quality: Like texture, shadow quality determines how crisp and accurate the shadows in a game are, but they're much easier to set lower as you don't notice them as much. Lowering shadow quality may take out the shadow entirely or just reduce it to a dark circle.
View Distance: Like it says, view distance is how far you can see in the game. It determines how far away things will be rendered. The shorter the view distance, the better the performance. The image on the left has the lower view distance.
Full Screen vs Windowed Mode: Full Screening your game may improve performance. This is because a full screened game allows the game to control the entire screen. A windowed mode game will have other simultaneous programs and settings running.
4. Close Unnecessary Background Programs
Your computer's central processing unit, or CPU, is arguably the most important component of any computing device. It handles basic instructions and allocates the more complicated tasks to other specific chips to get them to do what they do best.
Your CPU can age, get corrupted, have physical issues, or just not be up to newer tasks with newer technology.
You can check your CPU and see what processes and programs are using up its power by opening the task manager. You can then close items (hopefully after a bit of research as to what they are) to give more resources to your gaming.
Press the CTRL + ALT + DEL keys on your keyboard at the same time.
Select Task Manager.
Select More Details at the bottom.
Select the Processes tab, then select CPU to sort the process list by how much CPU they use.
Look through the top five or ten entries for programs you recognize.
There will be many you don't recognize in the list; this is normal. Windows has a lot of processes, some with odd names, to allow it to run properly.
If you see a program you know about and aren't using, select it, then select End task.
You can check this information when you have your normal programs open. Open a few programs you usually use, and return to this window. See if you're using up your CPU for an extended period. CPU usage spikes are normal, but having your usage being above 90% indicates a problem.
The CPU is a physical part of your computer, not something you can download or modify through software. If you want to upgrade your CPU you need to contact the company you purchased your computer from, or a local technical support service. Depending on your device you may not be able to upgrade your CPU at all. If this is the case you will need to purchase a new device.
5. Boost Performance in Windows with Certain Settings
Change Power Settings to High PerformanceWhether you have a laptop or a desktop you have access to power settings in Windows 10. These tend to have more effect on laptops, but changing your power settings can affect your CPU power.
More power savings means trading some performance for less energy use. Lower energy use makes your laptop battery last longer, as well as makes your computer cost less to operate.
Open the Start menu and select Settings.
Select System.
Select Power & sleep on the left, then Additional power settings on the right.
You'll be able to choose from three power plans; Balanced, Power saver, and High performance. In this case, choose High performance.
High performance
This setting will use the most energy, but will allow the computer to go as fast as it can at all time.
Disable Game Bar and Background Recording
Windows 10 includes a Game Bar that helps you record gameplay, share screenshots, and stream. It can negatively impact gameplay if you don't have the resources to share with it. Fortunately, you can easily turn it off.
Open the Start menu and select Settings.
Selecting Gaming.
Select Game Bar.
Make sure the recording slider is Off. This will prevent Windows from running background processes that record your game and keep it from impacting your gameplay.
Select Captures from the sidebar.
Make sure Background recording is set to Off. This will prevent Windows from running background processes that record your game and keep it from impacting your gameplay.
From the sidebar, select GameMode.
Make sure Game Mode is set to On. With Game Mode on, Windows Update won't bother you while you play. It also prioritizes resources to your gaming experience.
Adjust Windows Appearance for Best Performance
Your Windows 10 system uses a lot of resources to make itself pretty and streamlined. You can adjust this setting manually to focus on performance (fast) or appearance (pretty).
Select the Start menu, search for Performance. Then, select Adjust the appearance and performance of Windows from the menu.
Select Adjust for best performance at the top, then click OK at the bottom.
6. Delete Unwanted Programs to Free Up Space
You may need to remove an app because you need the space or simply don't need it anymore. The following steps show you how to easily remove an app.
Click Start then Settings.
Next, Select Apps.
Scroll down and locate the app you wish to remove, and click on Uninstall.
Carefully read any prompts in case there are special instructions. Proceed until the application is removed.
Some applications may require that you reboot.
7. System Requirements for Windows 10 Games
All games have posted system requirements. Ensuring that your machine can handle the demands of a game before purchasing is generally best.
System requirements list what type of hardware and software you need to run a game. Minimum requirements are just that, the bare minimum required to run a game. If you meet the minimum requirements the game will run, but it may run poorly.
Where Do I Find System Requirements?
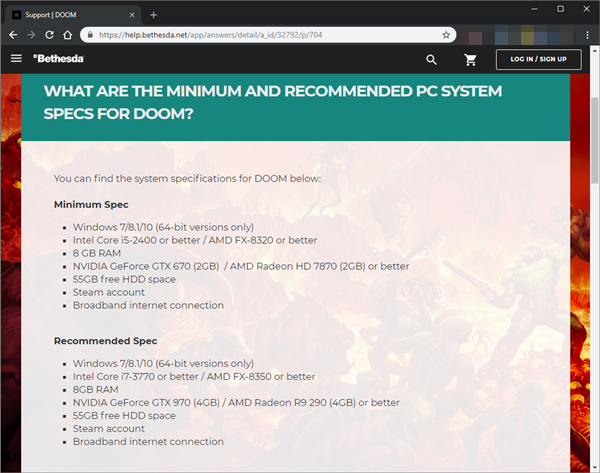
If you've purchased a physical copy of a game, the requirements are generally listed on the packaging. If you've purchased a game digitally, system requirements can be found on the marketplace they were purchased from, or directly from the game developer's website.
Here is an example of the Bethesda website displaying the system requirements for Doom:
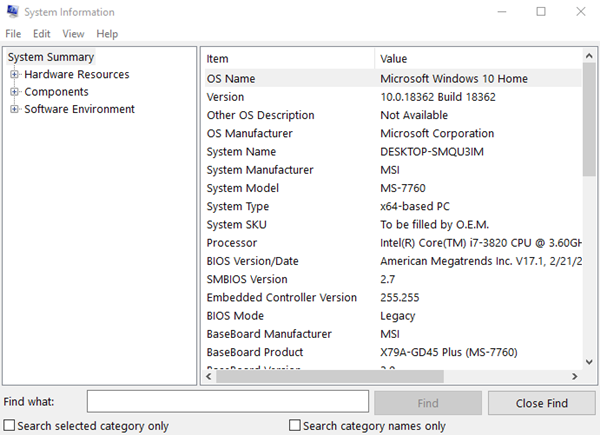
How to Find Your Computer Specs
Using your search, type SystemInformation. Select SystemInformation.
Your System Information panel will open, giving you tons of information on what OS you have, the amount of ram, and your CPU.
If Your System Does Not Meet the Requirements
When your system does not meet the requirements of a game you may be able to upgrade physical components like RAM or the video card.
.png)