How to Fix a Windows PC that Keeps Rebooting

Authored by: Support.com Tech Pro Team

1. Introduction

If your computer keeps restarting before you're able to work with it, you could be experiencing a boot loop (constant restarting of your system), a blue screen, or system failure.

These issues are as frustrating as they are difficult to resolve. They may not let you access your system to troubleshoot and take care of them.

This guide will take you through some steps that can help you determine the reason for your boot issue and fix it. The steps are listed in order, so start with the first one, see if that helps, and then continue with the next one if it doesn't.

What You'll Need:

  • No extra tools or supplies are needed.

-->

Before You Begin:

Extra instructions.

  • hyperlink

-->

Windows 10 blue screen of death

2. Boot the PC into Safe Mode if Necessary

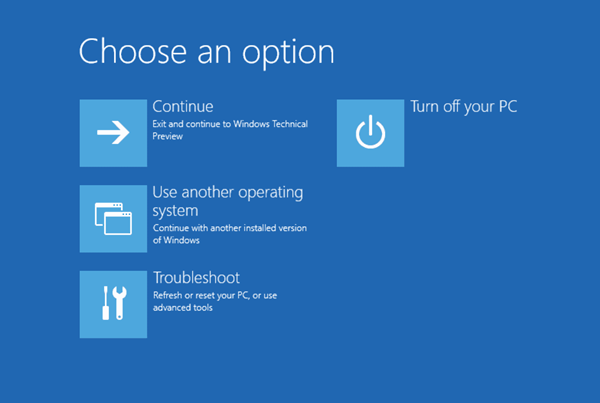
An important thing to know when troubleshooting a Windows PC is that whenever you're unable to use it the regular way, also known as using it in Normal Mode, you can choose to boot it up in Safe Mode. Situations that won't let you use the PC in Normal Mode are when:

  • It runs and responds to your instructions extremely slow,
  • It freezes on a blank screen or a distorted image,
  • It shows pop-ups with warnings or error messages,
  • It shows error messages in white text on a blue or black screen.

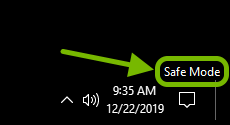
Safe Mode is a special diagnostic mode for Windows, designed to start it up in a basic state with limited features and settings to make sure nothing else can interfere with the task you're trying to perform and helps you narrow down the cause of an issue. Windows booted up this way looks different than what you are used to. The desktop background is plain black, the screen may look stretched or squished, and you will see the words Safe Mode in all four corners.

Safe Mode highlighted on bottom right corner of Windows 10 desktop.

Only boot the PC into Safe Mode if you encounter one of the situations above and only use it to troubleshoot and fix issues. There are times when you need to cycle between Safe Mode and Normal Mode multiple times to find out if changes you've made in Safe Mode fixed your issue in Normal Mode. Once all issues are fixed, only use your PC in Normal Mode.

To Boot the PC into Safe Mode

  1. Access the Advanced Troubleshooting Options menu. Depending on the issue your PC is having, there are different ways to do this:
  2. From the Start Menu
  3. Click the Start button to bring up the menu.
Windows 10 Start button
  1. Press the Shift key on your keyboard and keep holding it.
picture of a keyboard with shift highlighted
  1. With the Shift key still held down click Power, then Restart.
Start menu with Power and Restart highlighted.
  1. Release the shift key on your keyboard.
  2. From the Sign-in Screen
  3. From the Sign-in screen click the Power icon.
Log In Screen Power icon
  1. Press the Shift key on your keyboard and keep holding it.
picture of a keyboard with shift highlighted
  1. With the Shift key still held down, click on Restart.
Log In screen restart icon
  1. Release the shift key on your keyboard.
  2. From a Non-operable State
  3. Locate the power button on your PC. Hold it down until you hear the PC turn off and any lights go out.
Power button on a laptop
  1. Turn the system back on.
  2. Repeat this process (about three times) until you reach the Choose An Option menu.
Windows 10 Troubleshooting menu
  1. Choose Troubleshoot.
screenshot of boot options with troubleshoot highlighted
  1. Choose Advanced options.
screenshot showing advanced options highlighted
  1. Choose Startup Settings.
screenshot showing startup settings highlighted
  1. Choose Restart.
screenshot showing restart highlighted
  1. After your computer reboots, on the startup settings menu, push the F5 key on your keyboard for Enable Safe Mode with Networking.
picture of keyboard with F5 key highlighted

screenshot showing choice 5 enable safe mode with networking highlighted

3. Disable Automatic Restart

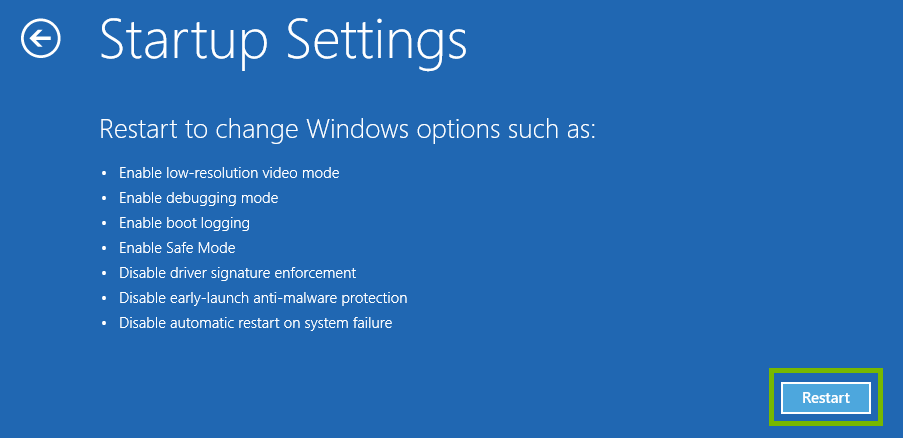
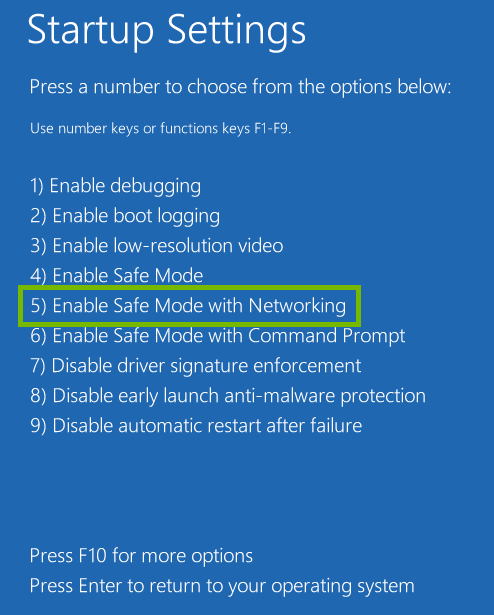
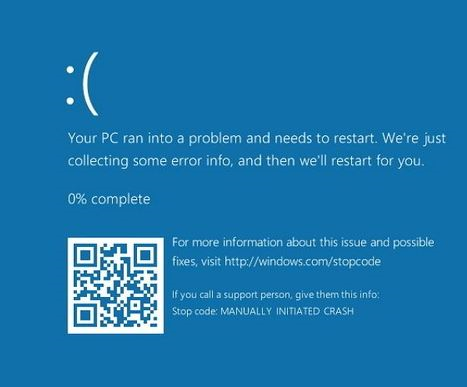
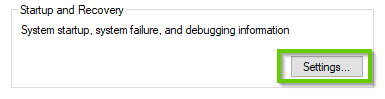
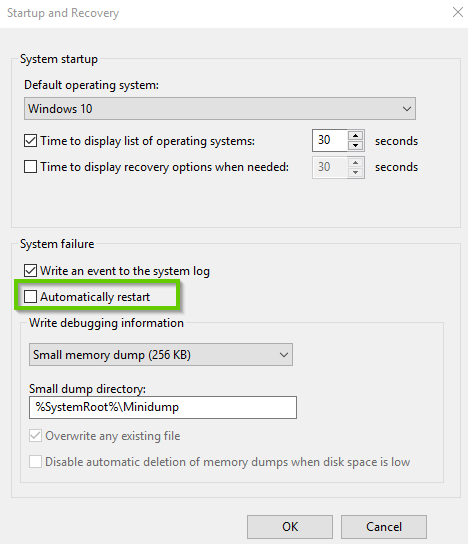
When your PC restarts abruptly on its own without an explanatory or warning message it may be because Windows encountered a failure and it triggered the default automatic restart feature. This is a protective feature but it can be disabled if you wish to find out what is causing the abrupt automatic restarts.

With this feature disabled, the next time Windows encounters a failure, the PC may either freeze, show a distorted image on the screen or show an error message in white text on a blue or black background.

If your PC won't start up normally, you will need to start it up in Safe Mode instead to be able to disable this feature.

  1. Type "Control Panel" in the search bar next to the Windows logo, then select the Control Panel app.
Windows 10 Search with control panel selected
  1. Click System and Security.
Windows 10 Control panel list
  1. Click System.
Windows 10 control panel showing the System option
  1. On the left panel, click Advanced System Settings.
Advanced System Settings
  1. Under Startup and Recovery, click Settings.
Windows 10 start up and recovery settings
  1. Make sure there is no check mark beside Automatically Restart. If there is, uncheck it and click OK.
Windows 10 start up and recovery

4. Disable Fast Startup

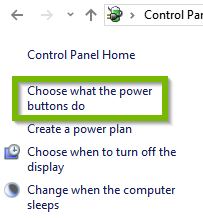
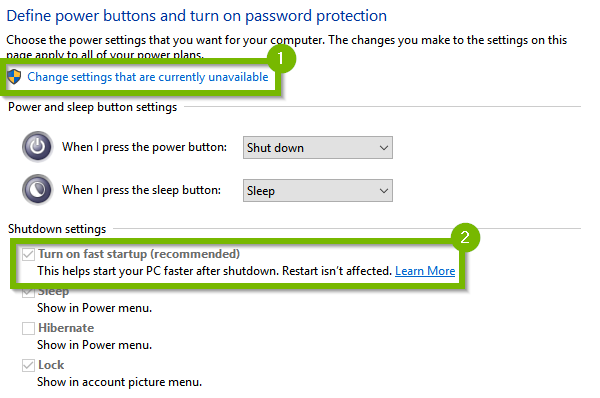
Fast Startup is a feature that allows Windows to boot up quicker by saving part of the system's state in memory an restoring it on boot-up. This feature is best to be disabled when you're troubleshooting an issue and rebooting the PC once or several times, as Windows wouldn't be starting up in a fresh state.

  1. Type "Control Panel" in the search bar next to the Windows logo, then select the Control Panel app.
Windows 10 Search with control panel selected
  1. Select Hardware and Sound.
Control Panel with Hardware and Sound selected. Screenshot.

  1. Select Power Options.
Power Options. Screenshot.
  1. Select Choose What the Power Buttons Do.
Choose what the power buttons do.
  1. If the option is there, click Change settings that are currently unavailable, then under Shutdown settings, uncheck Turn on fast startup (recommended). If the option is already unchecked, then leave it as it is. Click Save Changes at the bottom to apply the setting.
Power button properties with Turn on fast startup selected.

5. Uninstall Latest Updates

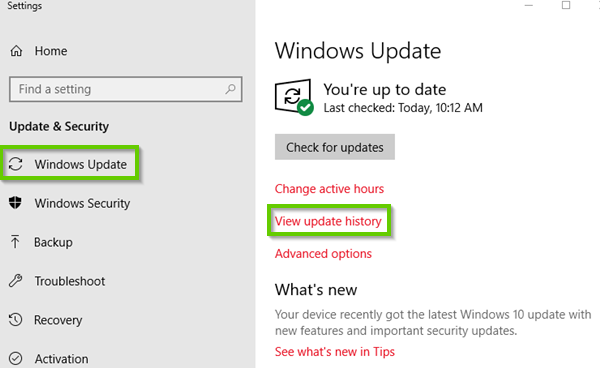
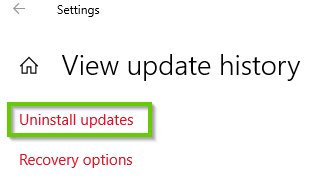
Windows Updates can sometimes install incorrectly and cause the whole operating system to malfunction. In these cases, the most recent updates that were installed before your computer started malfunctioning, need to be uninstalled to revert Windows back to a correctly functioning state:

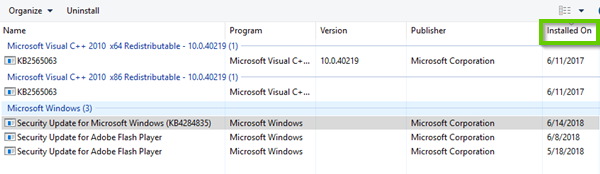
Sometimes it may be necessary to uninstall more then just one update. To narrow down which recent update is causing issues, only uninstall one update at a time then reboot the computer to observe the effects.

  1. Click the Start button then select Settings from the menu.
Start button and Settings option highlighted in Windows 10 menu.
  1. Select Update and Security from the Windows Settings.
Windows Settings with Update and Security highlighted.
  1. Select Windows Update on the left pane, then select View Update History in the right pane.
Windows Update settings with view update history highlighted
  1. Select Uninstall Updates.
Windows 10 View installed updates with uninstall updates highlighted
  1. Click Installed On to sort the list by the latest update.
Windows 10 installed updates list sorted by date
  1. Select the most recent Update, then click Uninstall and wait for it to be removed.
Windows 10 uninstall an update

6. Uninstall Recently Installed Apps

If you installed an app just before your computer started malfunctioning, it's best to uninstall it to see if it's the culprit of your issue. Sometimes apps can install incorrectly or may be incompatible with your system.

Sometimes it may be necessary to uninstall more then just one app. To narrow down which recent app is causing issues, only uninstall one app at a time then reboot the computer to observe the effects.

  1. Click the Start button then select Settings from the menu.
Start button and Settings option highlighted in Windows 10 menu.
  1. Next, Select Apps.
Windows Settings with Apps highlighted.
  1. Scroll down and locate the app you wish to remove, and click on Uninstall.
Apps screen with the uninstall option for an app highlighted.
  1. Carefully read any prompts in case there are special instructions. Proceed until the application is removed.
  2. Some applications may require that you reboot.

7. Unplug Unnecessary Peripherals

Some peripherals, such as printers, webcams, headsets, additional monitors, etc., may cause a computer to malfunction either from the start or over time, either temporarily or permanently. To determine whether one or more peripherals are affecting a computer's operation, you need to unplug them and observe the computer's behavior. If any peripherals were plugged in just before the computer started malfunctioning, unplug those first. Follow up with any additional peripherals until you reach the most essential ones such as a mouse and keyboard, however those could be the culprit as well.

8. Revert Windows to an Earlier System Restore Point

Windows has a great utility called System Restore that allows you to revert your system to an earlier state called a restore point. Restore points are created automatically when you install a new app, driver, update, or when you create one manually. Restoring your PC to an earlier point in time will not affect your personal files, it will only revert system changes and remove anything installed after the restore point was created.

Do not turn off or power down your computer during a System Restore to avoid data loss or corruption. If you are using a laptop, make sure it is plugged into power so the battery does not run out during this process.

  1. Access the System Restore utility. Depending on the issue your PC is having, there are different ways to do this:
  2. From the Start Menu
  3. Type "rstrui" in the search field next to the Windows logo then select the result from the list.
Start menu search for rstrui with Start menu, search field, and search result highlighted.
  1. From the Sign-in Screen
  2. From the Sign-in screen click the Power icon.
Log In Screen Power icon
  1. Press the Shift key on your keyboard and keep holding it.
picture of a keyboard with shift highlighted
  1. With the Shift key still held down, click on Restart.
Log In screen restart icon
  1. Release the shift key on your keyboard and wait for the PC to restart.
  2. On the choose an option screen, select Troubleshoot.
Windows 10 advanced boot options with Troubleshoot selected
  1. Select Advanced Options.
Windows 10 troubleshoot options
  1. Select System Restore.
Windows 10 advanced options showing system restore selected
  1. From a Non-operable State
  2. Locate the power button on your PC. Hold it down until you hear the PC turn off and any lights go out.
Power button on a laptop
  1. Turn the system back on.
  2. Repeat this process (about three times) until you reach the Choose An Option menu.If your PC has restarted abruptly several times, it will bring up this screen automatically.
  3. Select Troubleshoot.
Windows 10 advanced boot options with Troubleshoot selected
  1. Select Advanced Options.
Windows 10 troubleshoot options
  1. Select System Restore.
Windows 10 advanced options showing system restore selected
  1. Select Next in the System Restore utility.
System Restore welcome screen with Next highlighted.
  1. Select a date before the issue started, you may see more than 1 restore point. Select Next afterwards.
System restore with restore date and Next highlighted.
  1. Confirm your restore point by selecting Finish.
Confirm restore to restore point with Finish highlighted.
  1. A message warning you that once started, the system restore can't be stopped or undone. Select Yes to proceed.
Confirm system restore with Yes highlighted.
  1. Your system will take a few moments to ready the system restore.
Readying system restore.
  1. Your screen will turn blue, and the system restore will begin.It can take a long time, over an hour in some cases, for System Restore to complete.
System Restore in progress
  1. Your computer will reboot on its own when complete.
  2. After returning to your Desktop, a message letting you know the System Restore was successful is displayed. Select Close.
System Restore complete with Close highlighted.

9. Reset Windows to its Original State

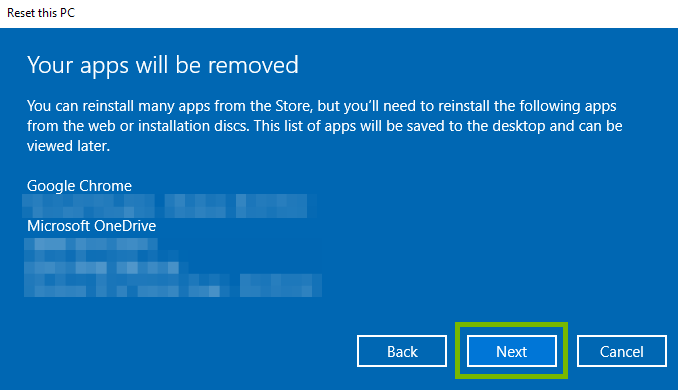
When you've exhausted all options in trying to fix a major issue with Windows, you may be left with resetting Windows to its original state your PC had right out of the box.

Depending on the reset method you choose, the process may delete all personal data and apps you have saved on the PC. If you need to back up all your personal data make sure you do so before proceeding.

Back Up All Personal Data

  1. Click the Start button then select Settings from the menu.
Start button and Settings option highlighted in Windows 10 menu.
  1. Click Update & Security.
Settings with update and security highlighted.
  1. Choose Recovery on the left.
Update and security settings with recover highlighted.
  1. On the top right, click Get started under Reset this PC.
Recovery settings with reset this PC highlighted.
  1. In the new window that opens, choose if you want to keep your files, or remove everything.
Reset this PC options.

  1. Keep my files should not delete any personal files you have stored on your computer, but will remove all applications you've installed, as well as all settings you've changed.
  2. You will be given a short list of programs Windows can find that will be removed, reminding you that you'll need to re-install them after the reset if you want to use those programs. Click Next when you are ready to begin.
Dialog showing apps to be removed with next button highlighted.
  1. Remove everything will delete your personal files, applications you've installed, and all settings will be set to their default values.
  2. You'll be presented with options to just remove files, or clean the drive.
Drive cleaning options.

  1. If you're keeping the computer and are not worried about someone attempting to retrieve data from the drive, select Just remove my files.
  2. If you are selling or giving away the computer, choosing Remove files and clean the drive will make it much harder to retrieve anything. This process will take a very long time to complete.
  3. Once you make your choice, you will be given a final list of what will be done. Click Reset when you are ready.There is no going back, and no chance to retrieve anything removed during the reset process. Please make absolutely sure your backups are up to date before pressing Reset.
Details of what will be done during reset.
  1. Once you click Reset, the process will start.
Reset in progress.
  1. Your computer will reboot, and give you the progress of the reset at the bottom.
Reset in progress during reboot.

Windows will guide you through setting it up with your username, password and other basic settings, just like when you first purchased your computer.

If the Issue Persists