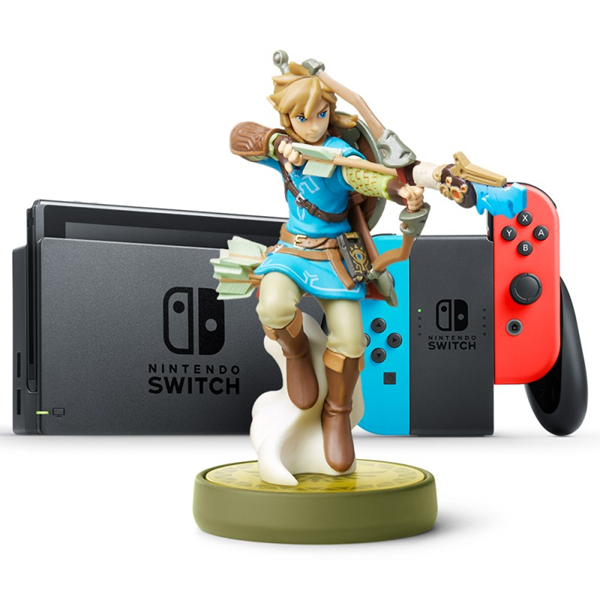
How to Fix Amiibo Not Working on a Nintendo Switch
Authored by: Support.com Tech Pro Team
1. Introduction
You finally found the Amiibo you've been searching for only to find out your Switch can't read it.
This guide will help you resolve this disappointment and get you back to playing.
2. Manual Update
Select System Settings.
Select System.
Select System Update.
Allow the update to proceed. The system will reboot when ready.
3. Amiibo Check
We need to know if your amiibo ever worked.
4. Restart
Hold the PowerButton for roughly 3 seconds.
Select PowerOptions.
Choose either TurnOff or Restart.
If the console was turned off, press the Power Button again to power it back on.
5. Avoid Joy-Con NFC Reader Interference
Ensure Nothing is Obstructing the NFC Touchpoint
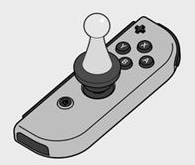
Make sure nothing is covering the directional control stick on the right Joy-Con.
If you have a cover or a skin on the right Joy-Con, remove it. You can put it back on later.
Connect Directly to Your Switch
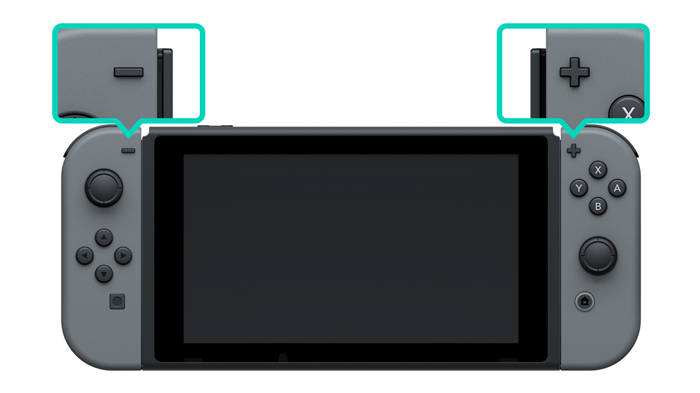
With the console undocked, attach the Joy-Con to the console.
With the Switch LCD facing you, align the - symbol on the left Joy-Con with the top left corner of console, and align the + symbol on the Joy-Con with the top right corner of the console.
Using the rail on the side of the console, slide the Joy-Con from top to bottom, until you hear a click.
Touch the amiibo to the NFC touchpoint on the directional controller.
6. Reset Amiibo Data
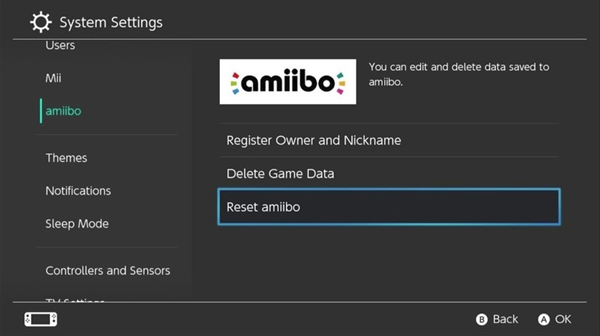
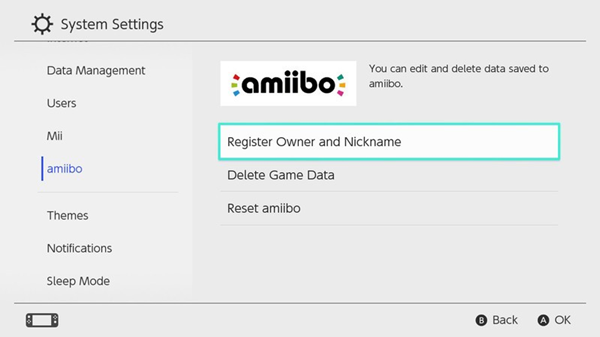
From the HOME Menu select System Settings.
Select amiibo.
To delete all data on the amiibo, select Reset amiibo.
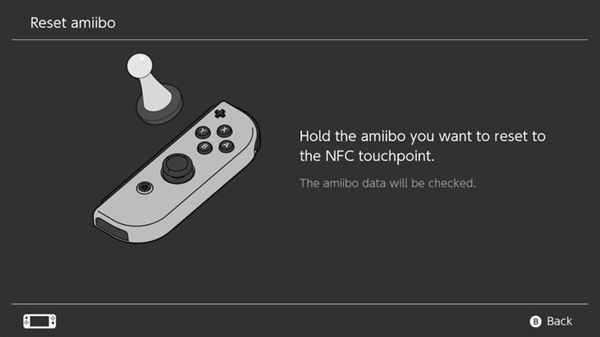
Hold an amiibo figure to the NFC touchpoint on the Right Joy-Con controller.
If the Nintendo Switch Pro Controller is being used, the NFC touchpoint is located over the Nintendo Switch logo at the top-center of the controller.
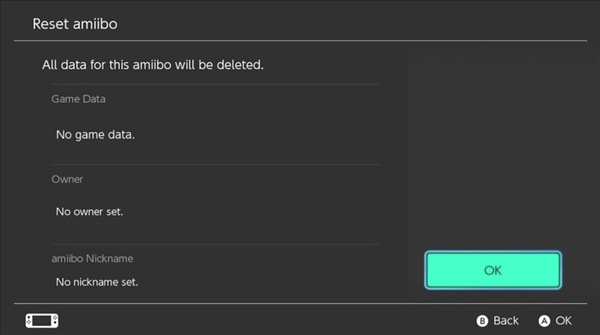
Review the data to be deleted then select OK.
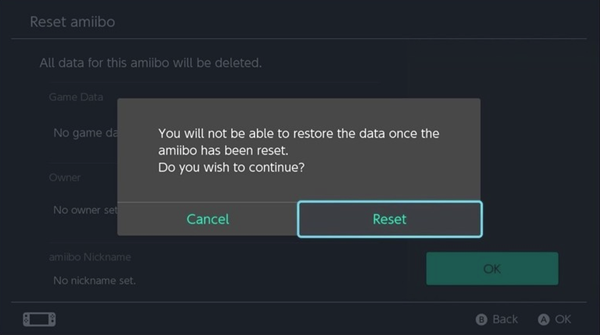
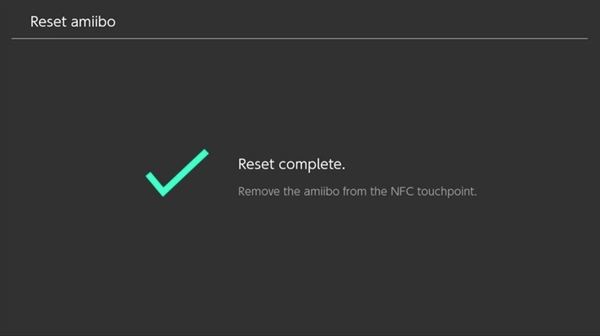
Select Reset, then hold the amiibo steady on the NFC touchpoint until the data has been deleted.
7. Try a Different Amiibo
If possible, test a different amiibo.
If the other amiibo works, the previous one is damaged or defective and should be replaced. The retailer you purchased the amiibo from may be able to replace it. This will depend on the retailer's return policies. Nintendo cannot repair or replace amiibo directly.
8. What's next?
9. Amiibo Licensing
Ensure you are using an authentic amiibo figure or amiibo card.
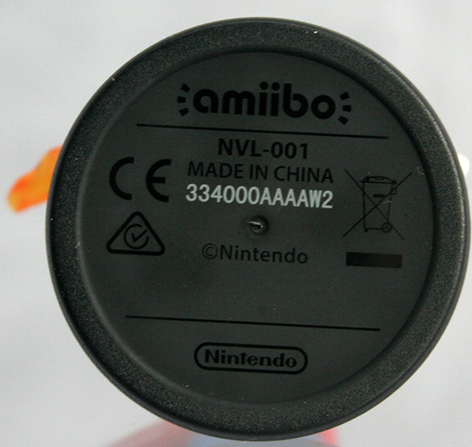
The model number on the bottom of the amiibo should read NVL-001 or NVL-201.
If either of these model numbers are not printed on the amiibo, then it is not a licensed accessory. Using an authentic amiibo should resolve the issue.
10. Avoid Joy-Con NFC Reader Interference
Ensure Nothing is Obstructing the NFC Touchpoint
Make sure nothing is covering the directional control stick on the right Joy-Con.
If you have a cover or a skin on the right Joy-Con, remove it. You can put it back on later.
Connect Directly to Your Switch
With the console undocked, attach the Joy-Con to the console.
With the Switch LCD facing you, align the - symbol on the left Joy-Con with the top left corner of console, and align the + symbol on the Joy-Con with the top right corner of the console.
Using the rail on the side of the console, slide the Joy-Con from top to bottom, until you hear a click.
Touch the amiibo to the NFC touchpoint on the directional controller.
11. Register Amiibo
From the HOME Menu select System Settings.
Select amiibo.
Select Register Owner and Nickname.
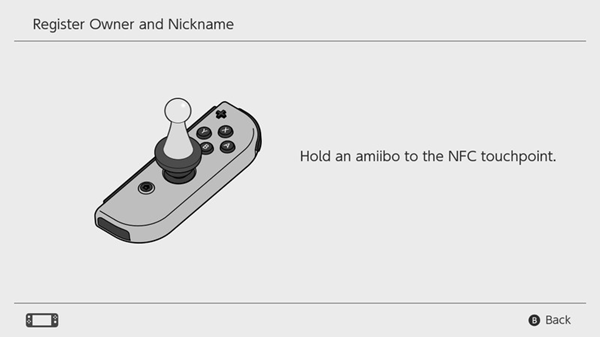
Hold an amiibo figure to the NFC touchpoint on the Right Joy-Con controller. Do not move the amiibo while it is being read or written to.
Or the NFC touchpoint located over the Nintendo Switch logo at the top-center of the Pro Controller. Do not move the amiibo while it is being read or written to.
Select an owner for the amiibo from the existing users on the console, or create a new user by selecting Create Mii.
If the amiibo already has a registered owner and nickname, this will be displayed on the screen.
Enter a nickname for your amiibo, then select OK.
The nickname can be up to 10 characters long and can include up to five numbers.
Select OK, then hold the amiibo figure steady on the NFC touchpoint until the registration is complete.
12. Restart
Hold the PowerButton for roughly 3 seconds.
Select PowerOptions.
Choose either TurnOff or Restart.
If the console was turned off, press the Power Button again to power it back on.
13. Reset Amiibo Data
From the HOME Menu select System Settings.
Select amiibo.
To delete all data on the amiibo, select Reset amiibo.
Hold an amiibo figure to the NFC touchpoint on the Right Joy-Con controller.
If the Nintendo Switch Pro Controller is being used, the NFC touchpoint is located over the Nintendo Switch logo at the top-center of the controller.
Review the data to be deleted then select OK.
Select Reset, then hold the amiibo steady on the NFC touchpoint until the data has been deleted.
14. Try a Different Amiibo
If possible, test a different amiibo.
If the other amiibo works, the previous one is damaged or defective and should be replaced. The retailer you purchased the amiibo from may be able to replace it. This will depend on the retailer's return policies. Nintendo cannot repair or replace amiibo directly.
15. What's next?
16. Get a Real Amiibo
You have been sold a bootleg amiibo. It will not work with Nintendo systems. You will need to purchase an authentic amiibo.
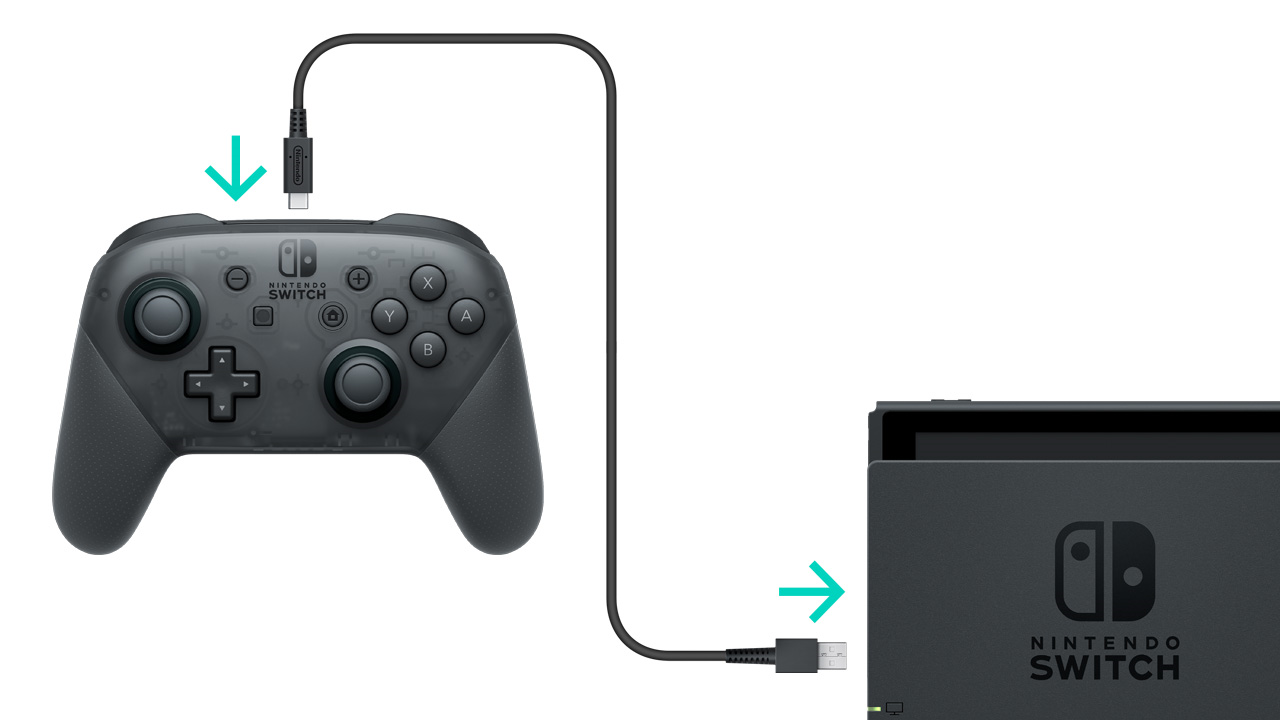
17. Pair Pro Controller
Connect With a USB Cable
Place the Nintendo Switch console in the dock.
Connect the Pro Controller to the dock with the included USB cable.
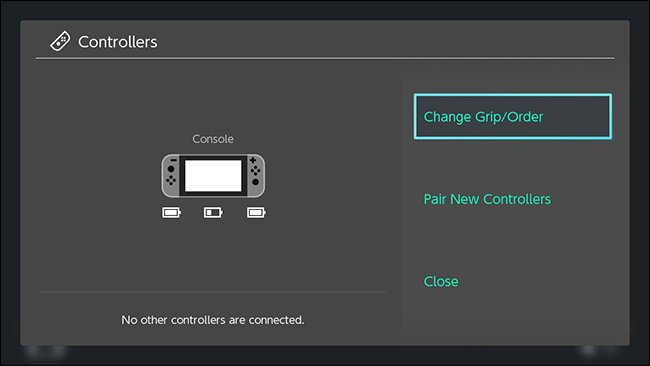
Connect Wirelessly
From the HOME Menu, select Controllers.
Select Change Grip and Order.
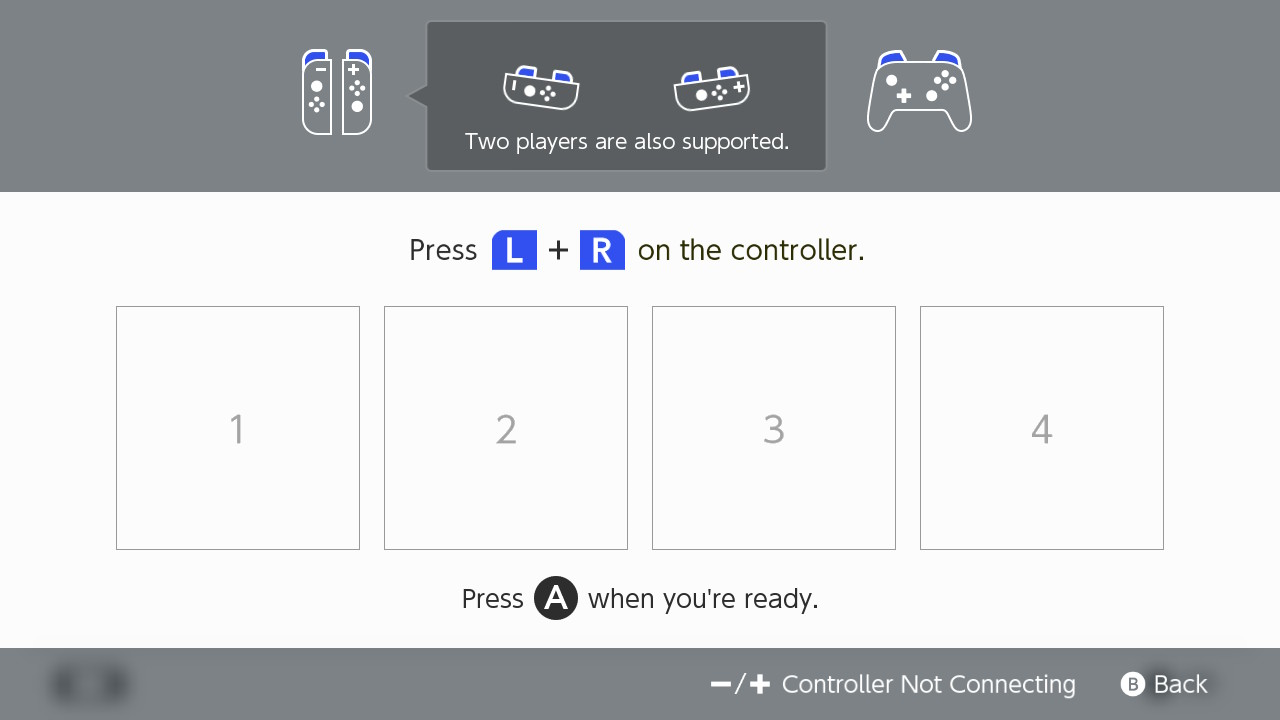
While the following screen is displayed.
Press and hold down the Sync Button for at least one second on the Pro Controller you wish to pair.
If Using An Amiibo:
If the Pro Controller is connected to the Nintendo Switch console using the USB charging cable, ensure that Pro Controller Wired Communication is set to OFF, otherwise the NFC touchpoint on the controller will be disabled.
18. Amiibo Check
We need to know if your amiibo ever worked.
19. Restart
Hold the PowerButton for roughly 3 seconds.
Select PowerOptions.
Choose either TurnOff or Restart.
If the console was turned off, press the Power Button again to power it back on.
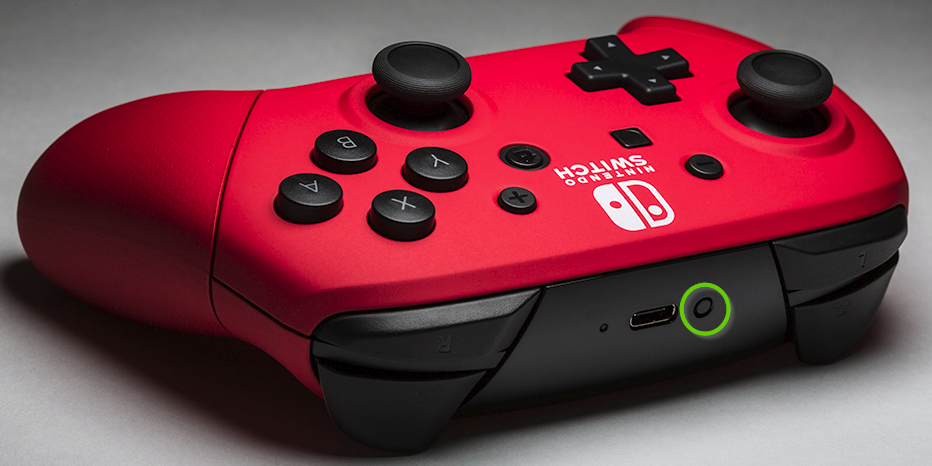
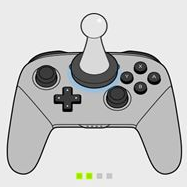
20. Avoid Pro Controller NFC Reader Interference
Ensure Nothing is Obstructing the NFC Touchpoint
Make sure nothing is covering the NFC touchpoint on the Pro Controller.
If you have a cover or a skin on the Pro Controller, remove it. You can put it back on later.
Touch the amiibo to the NFC touchpoint on the directional controller.
21. Reset Amiibo Data
From the HOME Menu select System Settings.
Select amiibo.
To delete all data on the amiibo, select Reset amiibo.
Hold an amiibo figure to the NFC touchpoint on the Right Joy-Con controller.
If the Nintendo Switch Pro Controller is being used, the NFC touchpoint is located over the Nintendo Switch logo at the top-center of the controller.
Review the data to be deleted then select OK.
Select Reset, then hold the amiibo steady on the NFC touchpoint until the data has been deleted.
22. Try a Different Amiibo
If possible, test a different amiibo.
If the other amiibo works, the previous one is damaged or defective and should be replaced. The retailer you purchased the amiibo from may be able to replace it. This will depend on the retailer's return policies. Nintendo cannot repair or replace amiibo directly.
23. What's next?
24. Amiibo Licensing
Ensure you are using an authentic amiibo figure or amiibo card.
The model number on the bottom of the amiibo should read NVL-001 or NVL-201.
If either of these model numbers are not printed on the amiibo, then it is not a licensed accessory. Using an authentic amiibo should resolve the issue.
25. Avoid Pro Controller NFC Reader Interference
Ensure Nothing is Obstructing the NFC Touchpoint
Make sure nothing is covering the NFC touchpoint on the Pro Controller.
If you have a cover or a skin on the Pro Controller, remove it. You can put it back on later.
Touch the amiibo to the NFC touchpoint on the directional controller.
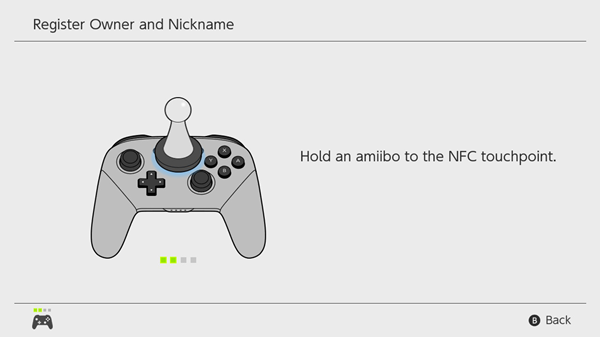
26. Register Amiibo
From the HOME Menu select System Settings.
Select amiibo.
Select Register Owner and Nickname.
Hold an amiibo figure to the NFC touchpoint on the Right Joy-Con controller. Do not move the amiibo while it is being read or written to.
Or the NFC touchpoint located over the Nintendo Switch logo at the top-center of the Pro Controller. Do not move the amiibo while it is being read or written to.
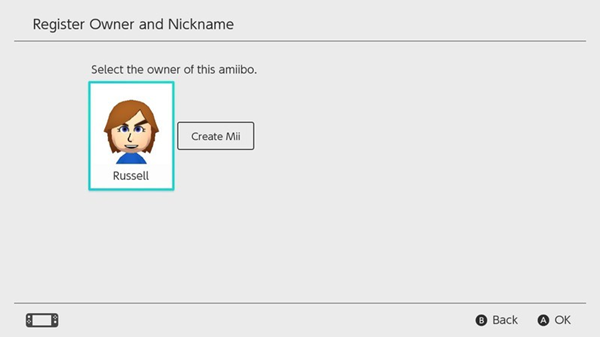
Select an owner for the amiibo from the existing users on the console, or create a new user by selecting Create Mii.
If the amiibo already has a registered owner and nickname, this will be displayed on the screen.
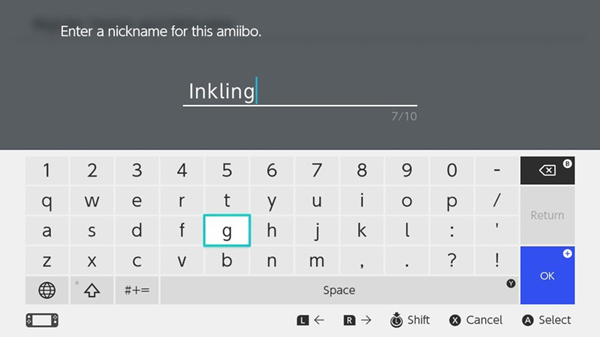
Enter a nickname for your amiibo, then select OK.
The nickname can be up to 10 characters long and can include up to five numbers.
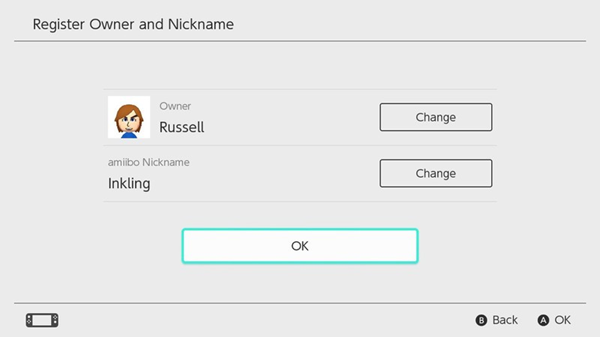
Select OK, then hold the amiibo figure steady on the NFC touchpoint until the registration is complete.
27. Restart
Hold the PowerButton for roughly 3 seconds.
Select PowerOptions.
Choose either TurnOff or Restart.
If the console was turned off, press the Power Button again to power it back on.
28. Try a Different Amiibo
If possible, test a different amiibo.
If the other amiibo works, the previous one is damaged or defective and should be replaced. The retailer you purchased the amiibo from may be able to replace it. This will depend on the retailer's return policies. Nintendo cannot repair or replace amiibo directly.
29. What's next?
30. Get a Real Amiibo
You have been sold a bootleg amiibo. It will not work with Nintendo systems. You will need to purchase an authentic amiibo.
.png)