Smart TV's are capable of running apps just like a smartphone or a computer would. There could be times when an app may encounter errors or stop working. The following steps will guide you through troubleshooting those issues.
2. Power Cycle Devices
Most of the time, restarting will fix common problems.
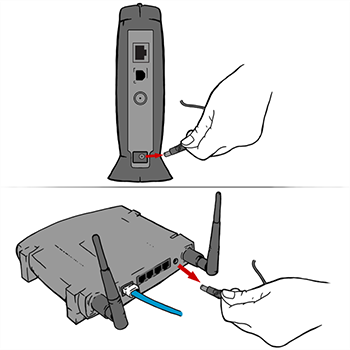
Unplug your modem, router, and TV. Do not disconnect any Ethernet cables, just unplug the power cords from the wall.
Plug in your modem and router first, and wait for it to establish a connection.
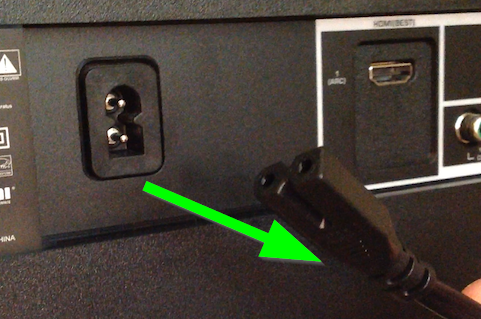
Plug in the TV and turn it on.
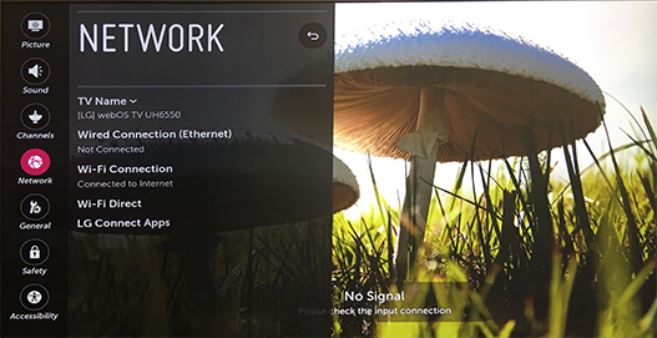
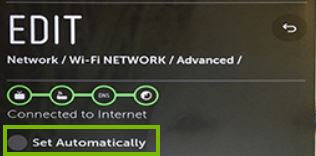
3. Check Network Status
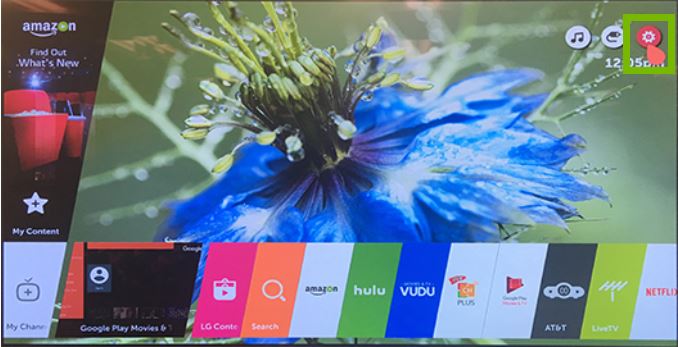
Press the Home/Smart button on your remote to bring up your launcher.
Select Settings icon in the upper right corner of the screen.
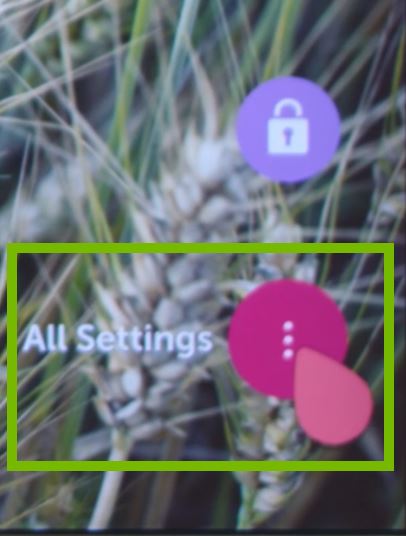
Select the All Settings option at the bottom right corner of the screen.
Select the Network menu from the left.
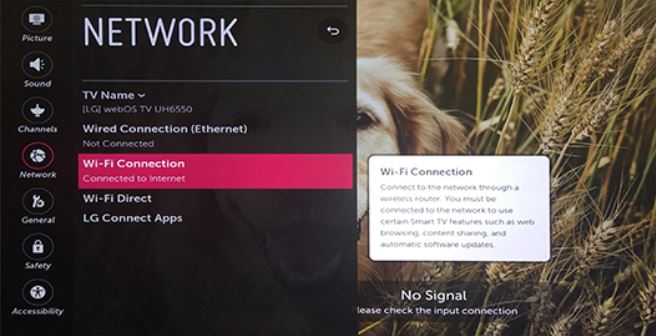
Choose Wi-Fi Connection.
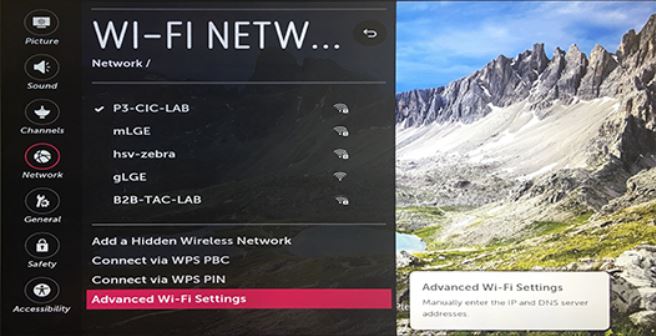
Choose Advanced Wi-Fi Settings.
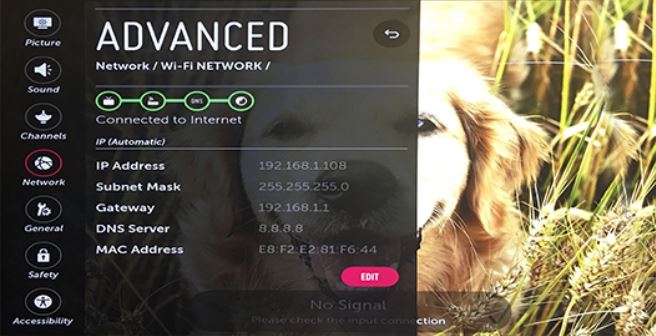
Look at the icons at the top with green circles.
4. What's next?
5. What's next?
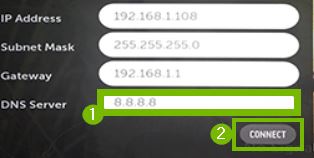
6. Manually Setting DNS
Press the Home/Smart button on your remote to bring up your launcher.
Select Settings icon in the upper right corner of the screen.
Select the All Settings option at the bottom right corner of the screen.
Select the Network menu from the left.
Choose Wi-Fi Connection.
Choose Advanced Wi-Fi Settings.
Click the Edit button.
Uncheck the box Set Automatically.
Click the box for DNS Server and enter 8.8.8.8, then click Connect.
7. What's next?
8. Introduction
Firmware updates for Smart TVs are used to enhance current features, fix bugs, and in some cases add additional applications to the device. You can perform the update via the Web (recommended). However, there are times where we may need to update via USB in order to resolve a problem.
What you'll need:
If you are updating via the web, your TV should be connected to the internet
If you are updating via USB drive, you'll need a computer with an internet connection and a USB drive with enough free storage space.
9. Update via USB Drive
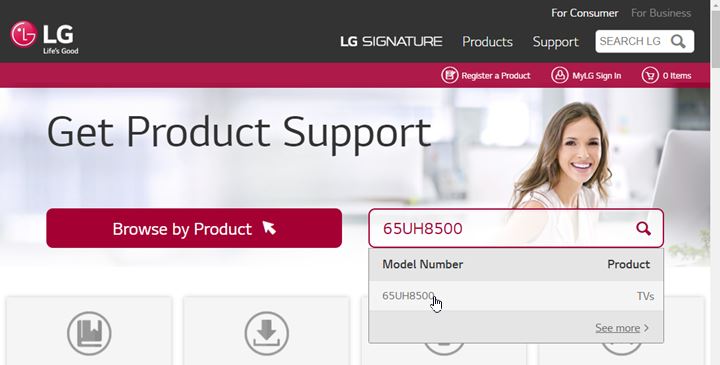
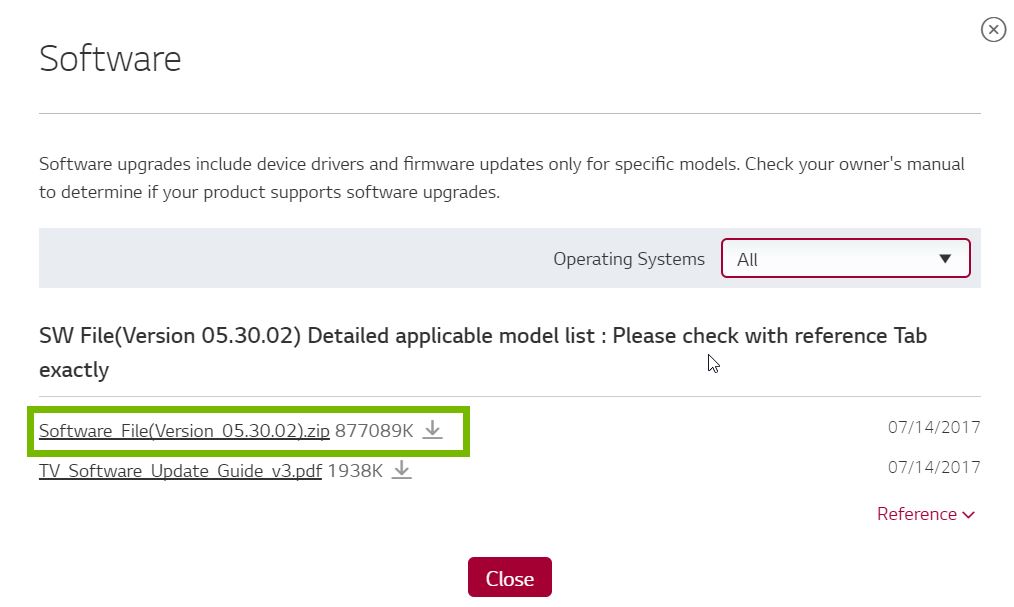
Open a web browser on your computer.
Navigate to to http://www.lg.com/us/support
Type your model number into the search box. Then click your model from the dropdown list.
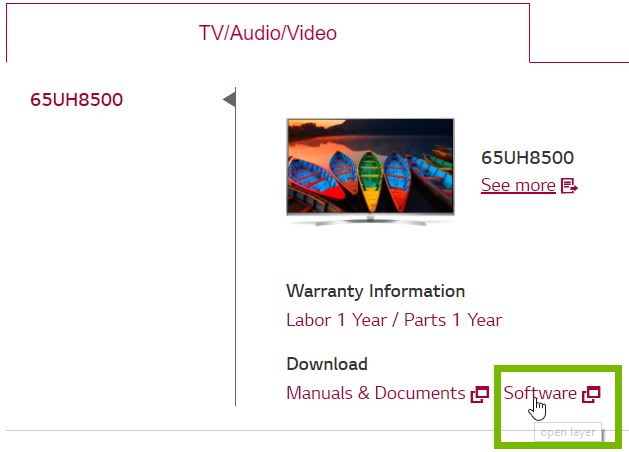
On the next page, click on Software.
Download the latest firmware file.
The firmware will be downloaded to your computer.
Take note of the file download location:
Windows OS - files typically download to your Downloads folder.
Mac OSX - files typically download to the Downloads folder in the Dock.
10. Extract Zip File
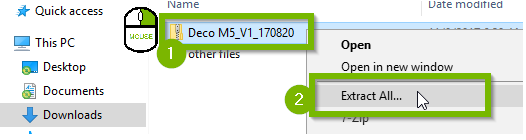
In Windows, files typically download to your "Downloads" folder.
Open Windows Explorer by holding down the Windows Key and then pressing E (Win + E)
In the left pane of the window that opens, click Downloads.
Locate the file you downloaded.
Right-click the file and select Extract All....
The extract window will appear.
Take note of the extract location (folder). If you wish to extract to another location such as a USB drive or a different folder on the computer, click Browse and pick a new location.
Click Extract when you are done.
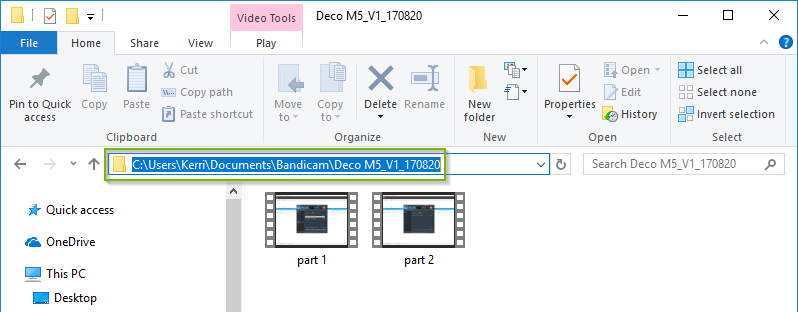
Once the files are extracted, a new Explorer window will appear with the uncompressed files. The location will be shown in the address bar while the extracted files files will appear below.
Take note of the file location. This is where your file(s) will be extracted to.
11. Move Firmware to USB Drive (PC)
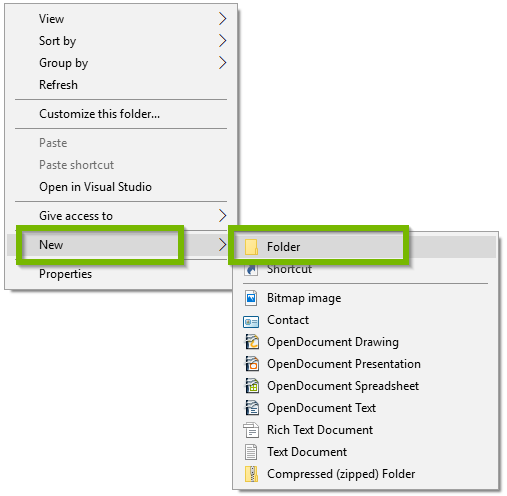
Insert a USB drive into an available USB slot on your computer.
Open the USB drive.
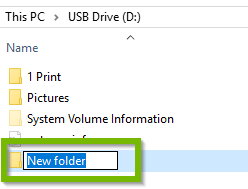
Right-click in the blank space, highlight New, then click Folder.
A "New Folder" will be created. The folder must be located in the root drive of the USB.
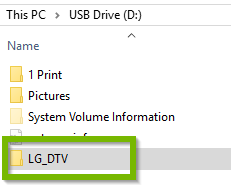
Name the new folder "LG_DTV".
The folder must be named exactly as shown above and be in the root directory.
Place the unzipped file into the LG_DTV folder. The file type should be EPK.
12. Install Update via USB Drive
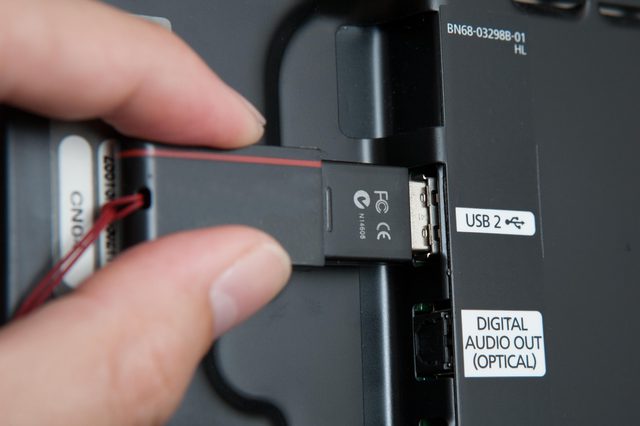
Turn on the TV.
Insert the USB drive that you prepared.
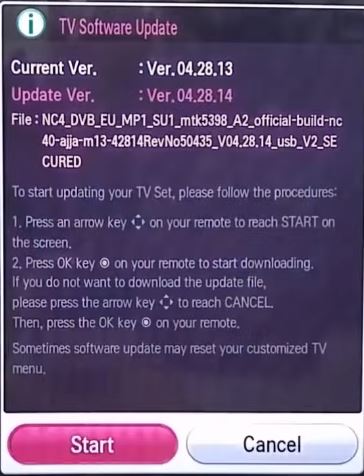
Follow the on-screen instructions.
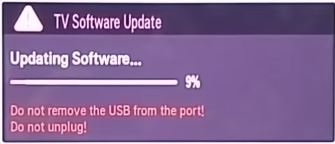
Once the update begins, a progress bar will appear.
Once the update is done, your TV will restart automatically.
You can now remove the USB drive from your TV.
If you are having trouble, make sure that you downloaded the correct firmware file for your TV and make sure the folder on your USB drive is setup properly.
13. Determine Platform
We must determine which platform is loaded on your LG Smart TV before beginning. Newer TVs released after 2014 will have webOS. Older models released between 2011 and 2015 will have NetCast. See the images below to help tell the difference.
Using webOS
Using Netcast
14. Uninstall App Using webOS
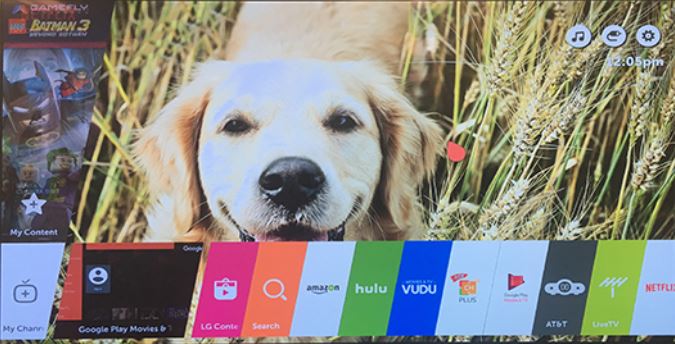
Press the Home/Smart button on your remote to bring up your launcher.
Click the More Apps Button.
Go to the app you're having trouble with, then click the upward arrow above it.
Click the skull/x symbol.
Click Remove, then click OK to confirm the removal.
15. Install App Using webOS
Press the Home/Smart button on your remote to bring up your launcher.
Click the More Apps Button.
Open the LG Content Store App.
Choose Premium.
Find your app in the LG Content Store, then choose Install.
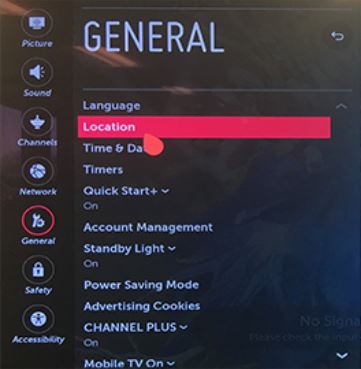
16. Change Location Settings
Press the Home/Smart button on your remote to bring up your launcher.
Select Settings icon in the upper right corner of the screen.
Select the All Settings option at the bottom right corner of the screen.
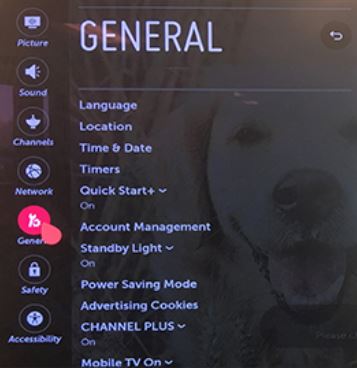
Select the General
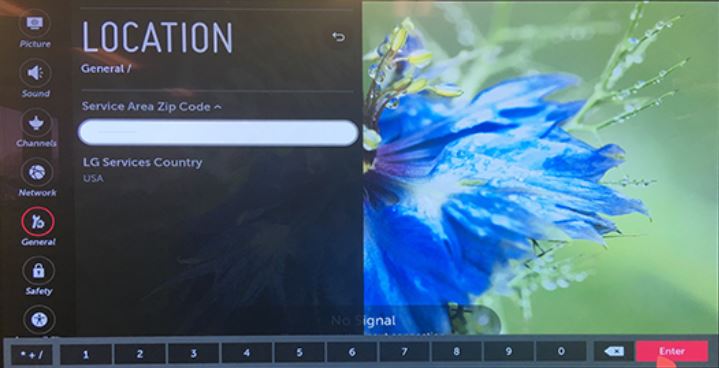
Select Location, then choose Service Area Zip Code.
Enter your zip code, then click Enter.
17. Introduction
A factory reset will reset the Smart TV back to default settings. This is typically done when there is a problem that can only be fixed with a reset or if you want to sell or give it away. This process will remove all customized TV settings, including tuned channels, recordings, custom input names, installed applications, stored Wi-Fi passwords, etc.
18. Factory Reset Using webOS
Press the Home/Smart button on your remote to bring up your launcher.
Select Settings icon in the upper right corner of the screen.
Select the All Settings option at the bottom right corner of the screen.
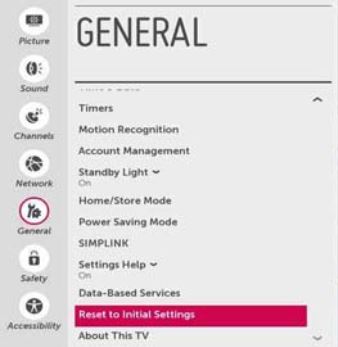
Select the General, then choose Reset to Initial Settings.
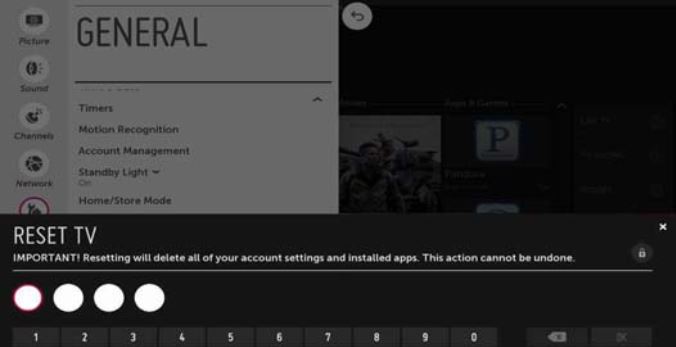
Enter your password if you have one. The TV will begin to restart. If you have not set a password, the factory set password is usually 0,0,0,0 or 1,2,3,4.
The TV will attempt to proceed through the initial setup process as if it was being setup for the first time.
19. What's next?
20. What's next?
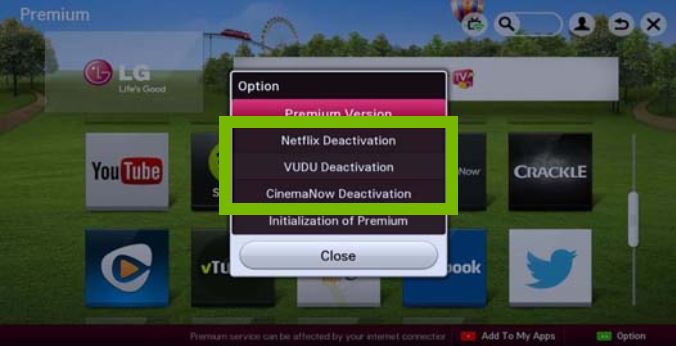
21. Uninstall App Using Netcast
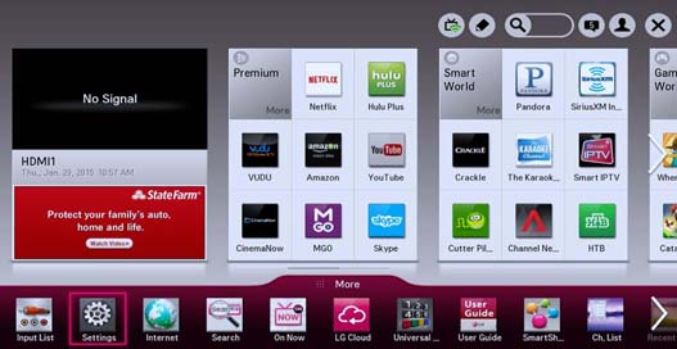
Press the Home/Smart button on your remote, then select Premium Apps.
There are four colored buttons on your remote, press the Green button to access option.
Choose Deactivation to be signed out of the app. All saved login information will be erased.
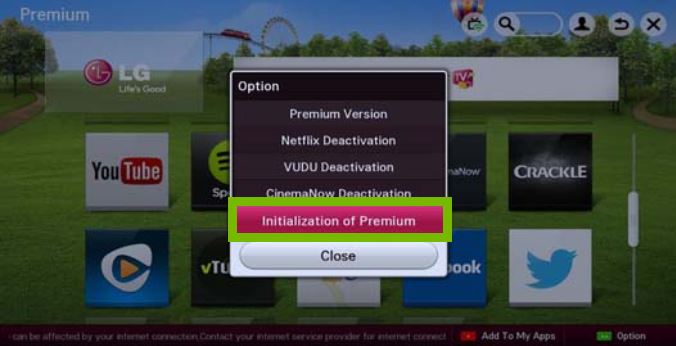
Choose Initialization of Premium.
Choose Yes to continue.
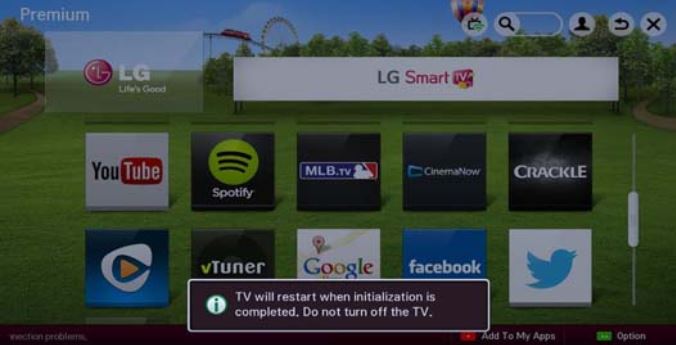
Wait for the TV to restart.
22. Install App Using Netcast
Press the Home/Smart button on your remote, then select Premium Apps.
Open the app that you want, then Sign-in if the app requires it.
If there's an available update on your Premium Apps, your TV will download and install it automatically.
23. Change Location Settings
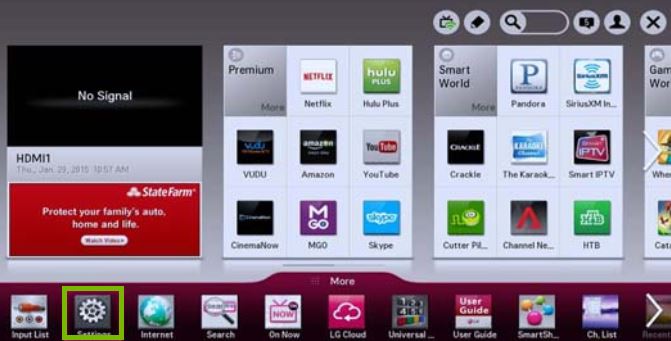
Press the Home/Smart button on your remote to bring up your launcher.
Select Settings icon in the upper right corner of the screen.
Select the All Settings option at the bottom right corner of the screen.
Select the General
Select Location, then choose Service Area Zip Code.
Enter your zip code, then click Enter.
24. Introduction
A factory reset will reset the Smart TV back to default settings. This is typically done when there is a problem that can only be fixed with a reset or if you want to sell or give it away. This process will remove all customized TV settings, including tuned channels, recordings, custom input names, installed applications, stored Wi-Fi passwords, etc.
25. Factory Reset Using Netcast
Press the Home/Smart button on your remote.
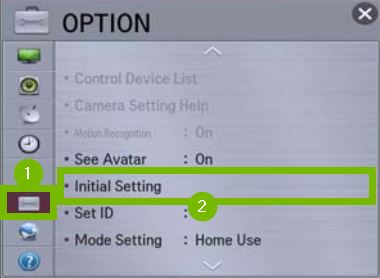
Select Settings from the bottom-left.
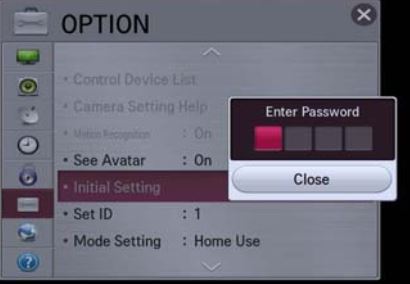
Select Option, then choose Initial Setting.
Enter your password if you have one. If you have not set a password, the factory set password is usually 0,0,0,0 or 1,2,3,4.
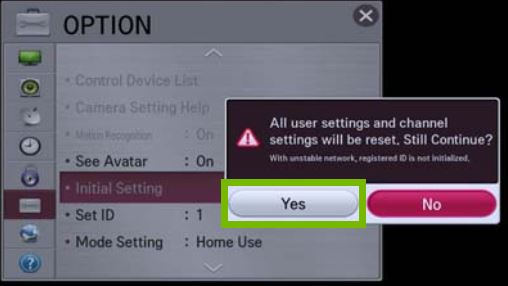
Select Yes to accept the terms of the disclaimer, then the TV will revert to factory settings.
26. What's next?
27. What's next?
28. Extract Zip File
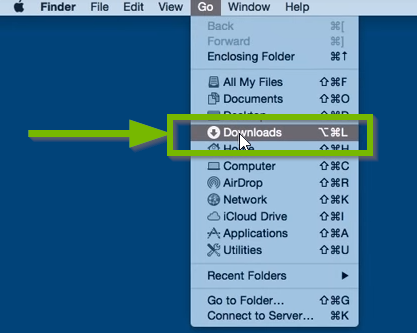
In macOS, files typically download to the Downloads folder in the Dock.
Click on Go then Downloads.
Double click on the archive that you just downloaded to extract its contents.
The extracted files should appear in the same folder as the original archive.
Sometimes you may not see the Zip file. Safari may have extracted the file for you if you downloaded the file with it. Just look for the unzipped file or folder.
Take note of the file location for later use of the extracted content.
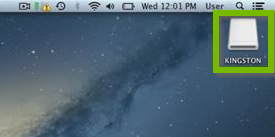
29. Move Firmware to USB Drive (Mac)
Insert a USB drive into an available USB slot on your computer.
Open the USB drive.
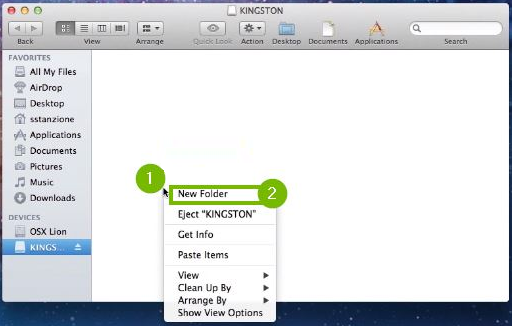
Control+Click into the folder and pick New Folder. Name the new folder "LG_DTV" on the root of the USB drive.
The folder must be named exactly as shown above and be in the root directory.
Place the unzipped file into the LG_DTV folder. The file type should be EPK.
30. Update via Web
There are 2 ways to check for Firmware Updates:
Using webOS
Using Netcast
31. Update Using webOS
Press the Home/Smart button on your remote to bring up your launcher.
Select Settings icon in the upper right corner of the screen.
Select the All Settings option at the bottom right corner of the screen.
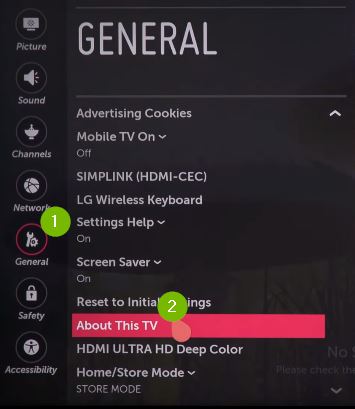
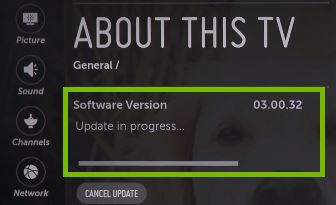
Select the General menu from the left, then scroll down and select About this TV.
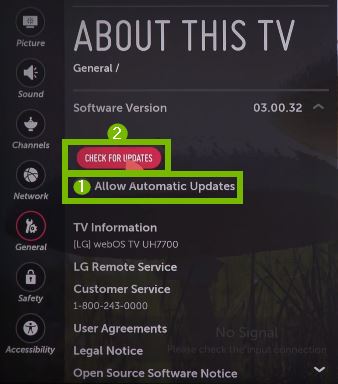
Check Allow automatic updates, then click the Check for updates button.
If an update is available, follow the steps on screen to download and install it.
This process may take some time. Don't power off your TV during an update.
Once the update is complete, you may return to using your TV.
32. Update Using Netcast
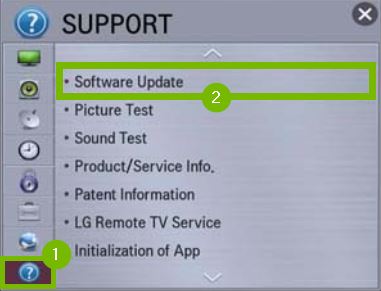
Press the Home/Smart button on your remote.
Select Settings from the bottom-left.
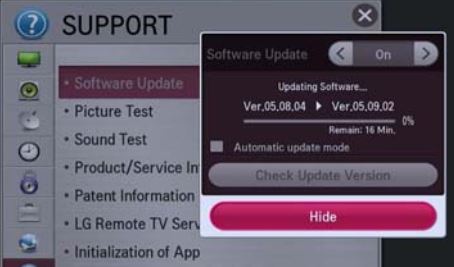
From the Settings menu, select the Others tab in the bottom-left, then choose Software update.
Turn on Software Update and then click the Check Update Version button.
If an update is available, follow the steps on screen to download and install it.
This process may take some time. Don't power off your TV during an update.
Once the update is complete, you may return to using your TV.
Remove Hidden Spyware In Minutes For Free
Detect and remove spyware, keyloggers, tracking cookies, and other
threats that slow down your PC or steal your data.
65+ Million Downloads
Spyware scanner with AI-powered detection engine + database
.png)