How to Fix Blue Screen of Death (BSOD) on Windows 10
Authored by: Support.com Tech Pro Team
1. Introduction
Blue Screens can be anything from major hardware or software errors to a simple one time hiccup that never happens again.
Blue screens are often random, so usually the best approach is to try a number of things and then await the results. This guide will walk you through diagnosing and correcting this problem.
2. Desktop Question
Does the Blue Screen error allow you to get to the desktop?
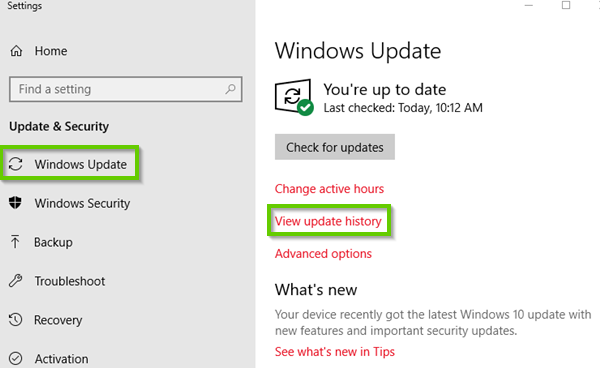
3. Uninstall an Update
Select the Start menu.
Select the Settings button.
Select Update and Security.
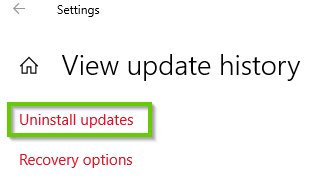
Select Windows Update, then select View Update History.
Select Uninstall Updates.
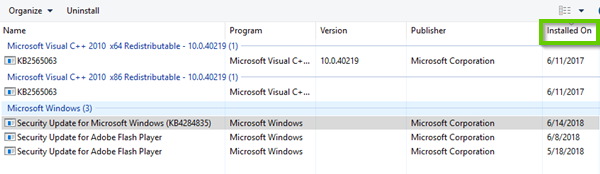
Click Installed On to sort the list by the latest update.
Select the most recent Update and select Uninstall.
4. Toggle Fast Start Up
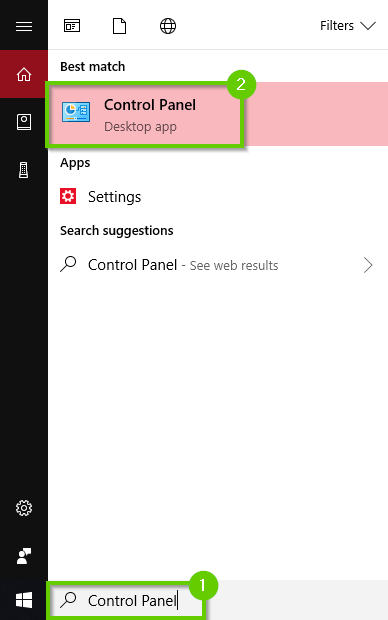
In the search bar, type "Control Panel" and select it.
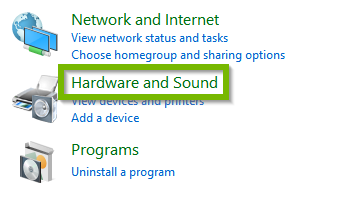
Select Hardware and Sound.
Select Power Options.
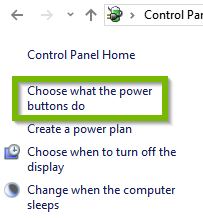
Select Choose What the Power Buttons Do.
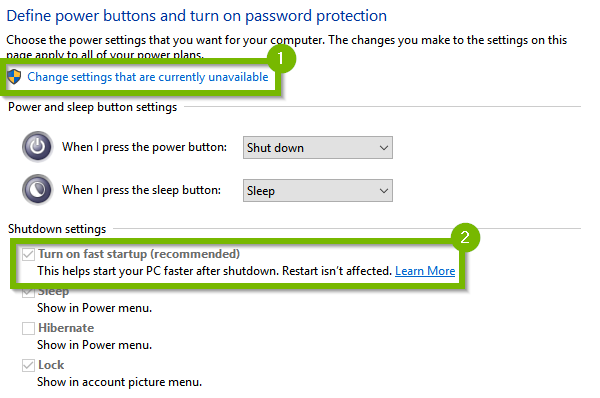
If prompted, click "Change settings that are currently unavailable", then under Shutdown settings, find Turn on fast startup (recommended). If this setting is turned off, select the check box. If it’s turned on, clear the check box.
5. Uninstall Recently Installed Apps to Resolve BSOD
If you installed a piece of software recently you should remove it to see if it is causing your blue screen issue. The following steps show you how to easily remove an app.
Click Start then Settings.
Next, Select Apps.
Scroll down and locate the app you wish to remove, and click on Uninstall.
Carefully read any prompts in case there are special instructions. Proceed until the application is removed.
Turning the system off while System Restore is running can cause corruption. If your device is battery-operated, connect it to a power outlet first. System Restore may take time and should not be interrupted.
Restoring your PC to an earlier point will remove updates and drivers installed after the restore point was made. It won't affect your personal files.
If you can't get to the desktop and your PC has restarted several times, it will begin automatic repair.
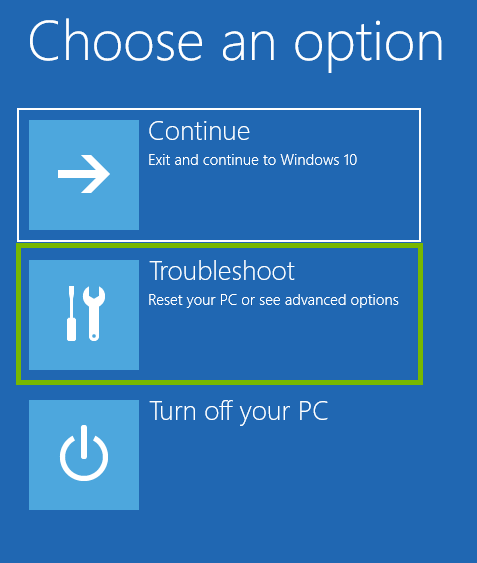
On the choose an option screen, select Troubleshoot.
Select Advanced Options.
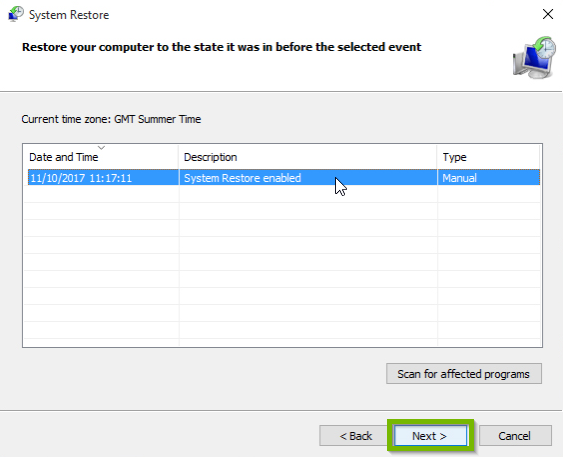
Select System Restore. This option reverts your PC to an earlier point, called a system restore point. Restore points are created when you install a new app, driver, update, or when you create a system restore point manually.
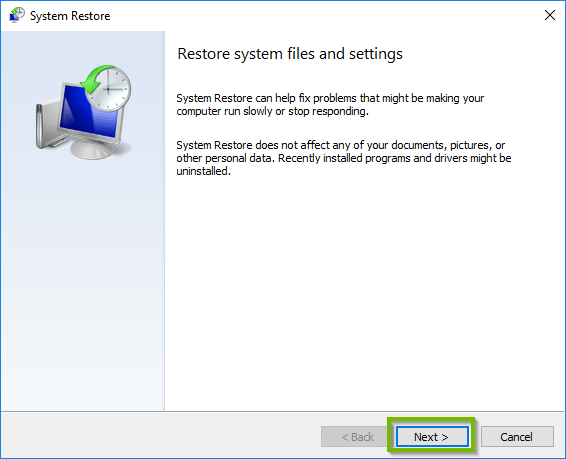
System Restore will open. Click Next.
Select a date before the issue started, you may see more than 1 restore point. Click Next afterwards.
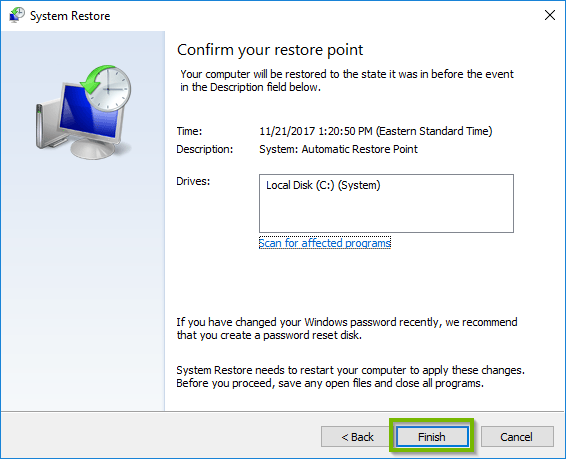
Confirm your restore point by clicking Finish. Click Back if you wish to change the restore point.
The process will take some time to finish. The system will also reboot shortly.
9. Uninstall an Update
Select the Start menu.
Select the Settings button.
Select Update and Security.
Select Windows Update, then select View Update History.
Select Uninstall Updates.
Click Installed On to sort the list by the latest update.
Select the most recent Update and select Uninstall.
10. Reboot Into Safe Mode Through Log In Screen
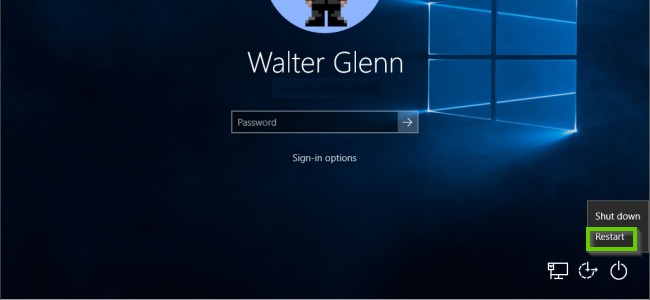
From the Log In screen select the Power icon.
Hold down the Shift key on your keyboard, and keep it held down.
With the Shift key still held down, click on Restart.
Release the shift key on your keyboard.
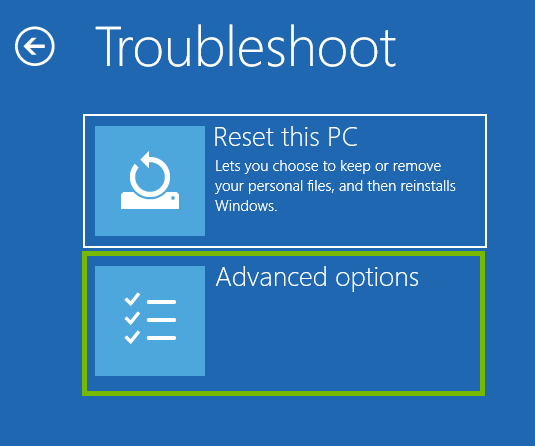
Choose Troubleshoot.
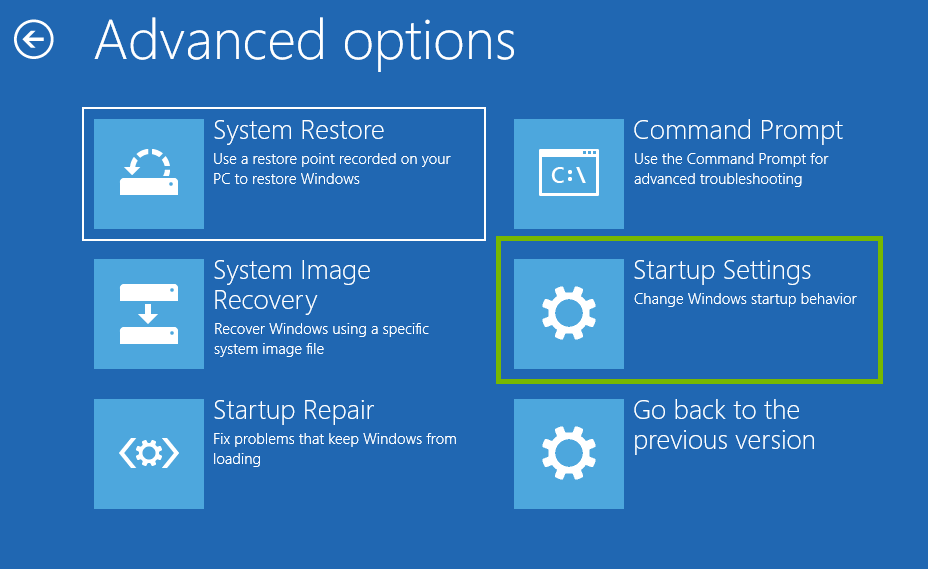
Choose Advanced options.
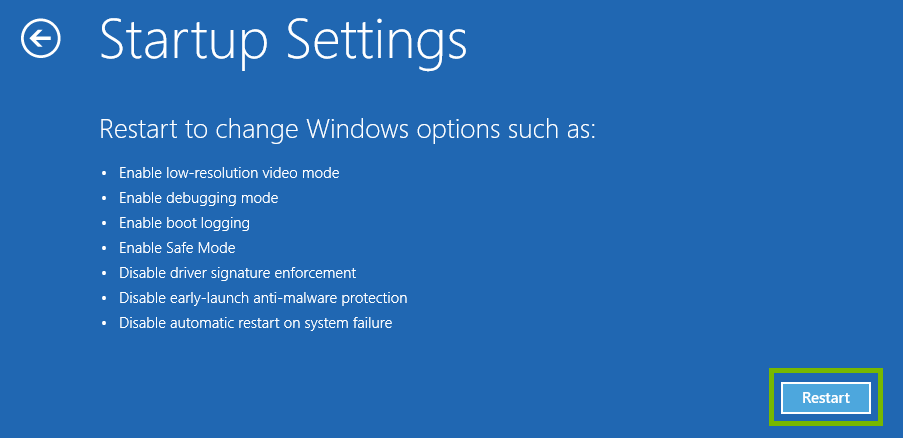
Choose Startup Settings.
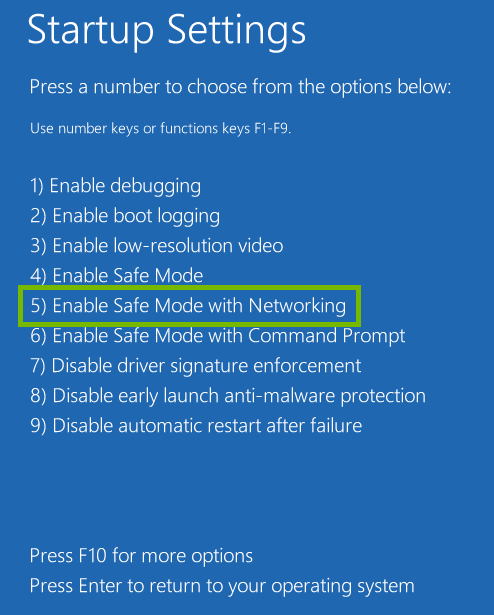
Choose Restart.
After your computer reboots, on the startup settings menu, push the F5 key on your keyboard for Enable Safe Mode with Networking.
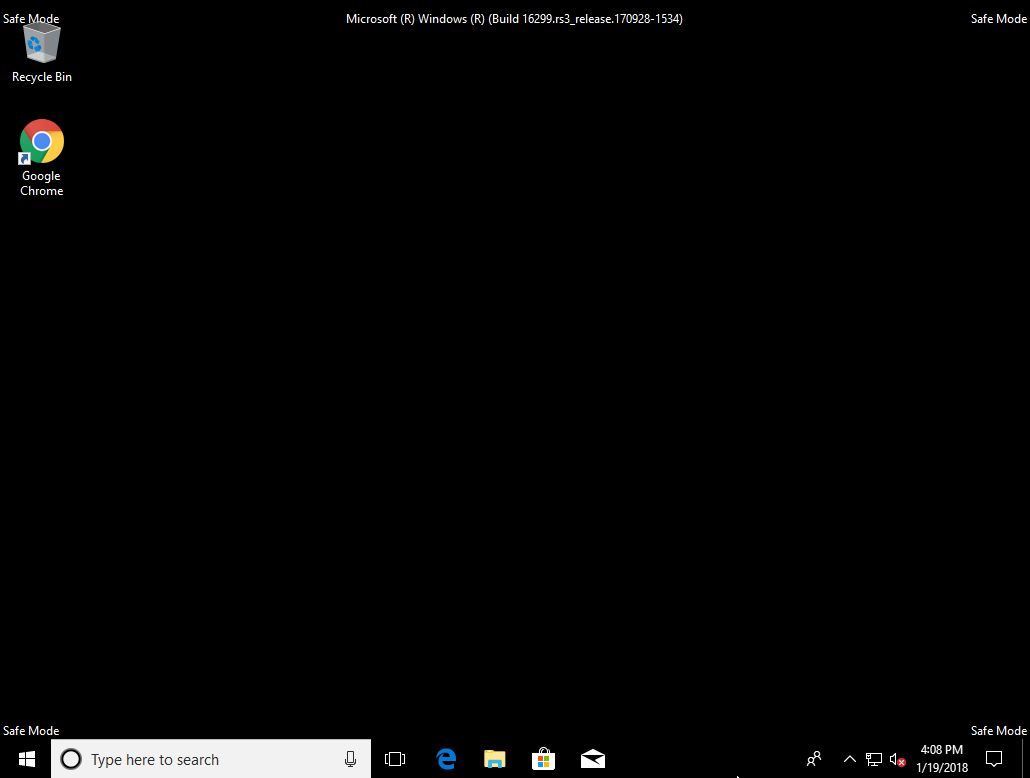
Safe mode is a special diagnostic mode for Windows, designed to startup with very few items, to make sure nothing else can interfere with the task you're trying to perform.
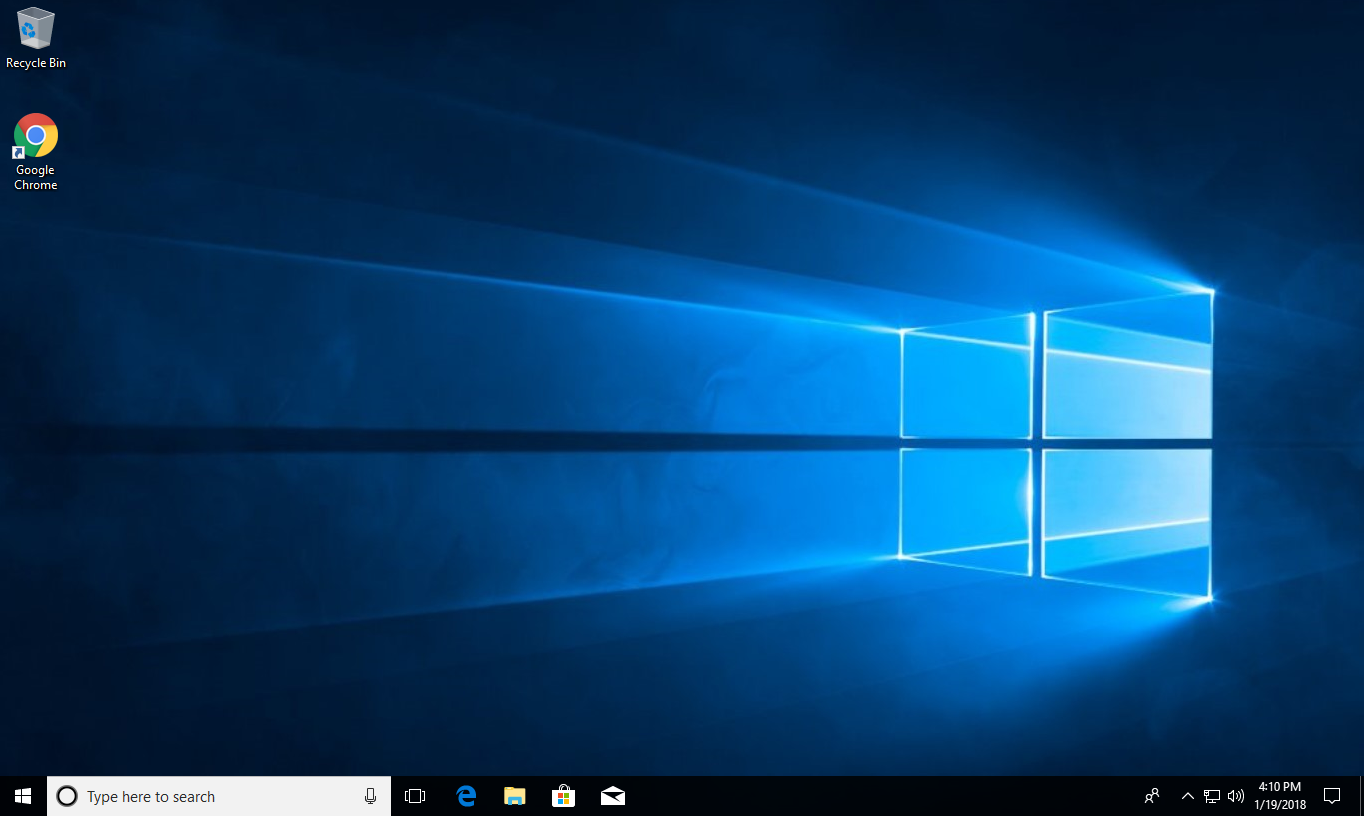
Windows may look different than you are used to, for example, the desktop background may be missing, the screen may look stretched or squished, and you should see the words Safe Mode in every corner. This is to let you know you are in safe mode.
Normal Mode ExampleSafe Mode Example
11. Uninstall an Update
Select the Start menu.
Select the Settings button.
Select Update and Security.
Select Windows Update, then select View Update History.
Select Uninstall Updates.
Click Installed On to sort the list by the latest update.
Select the most recent Update and select Uninstall.
12. Toggle Fast Start Up
In the search bar, type "Control Panel" and select it.
Select Hardware and Sound.
Select Power Options.
Select Choose What the Power Buttons Do.
If prompted, click "Change settings that are currently unavailable", then under Shutdown settings, find Turn on fast startup (recommended). If this setting is turned off, select the check box. If it’s turned on, clear the check box.
13. Uninstall Recently Installed Apps to Resolve BSOD
If you installed a piece of software recently you should remove it to see if it is causing your blue screen issue. The following steps show you how to easily remove an app.
Click Start then Settings.
Next, Select Apps.
Scroll down and locate the app you wish to remove, and click on Uninstall.
Carefully read any prompts in case there are special instructions. Proceed until the application is removed.
Does the Blue Screen error allow you to get to the desktop?
18. Toggle Fast Start Up
In the search bar, type "Control Panel" and select it.
Select Hardware and Sound.
Select Power Options.
Select Choose What the Power Buttons Do.
If prompted, click "Change settings that are currently unavailable", then under Shutdown settings, find Turn on fast startup (recommended). If this setting is turned off, select the check box. If it’s turned on, clear the check box.
19. Uninstall Recently Installed Apps to Resolve BSOD
If you installed a piece of software recently you should remove it to see if it is causing your blue screen issue. The following steps show you how to easily remove an app.
Click Start then Settings.
Next, Select Apps.
Scroll down and locate the app you wish to remove, and click on Uninstall.
Carefully read any prompts in case there are special instructions. Proceed until the application is removed.
Windows 10 is configured to automatically check for updates regularly for your computer. If you are using a laptop or tablet, make sure you plug it in to charge while updates run.
Open the Start menu, and select Settings.
Select Update & Security.
Select Windows Update on the left, then Check for updates on the right.
Once the system has finished checking for updates, it will automatically download and install the latest applicable updates.Some Windows Updates can't be made with the system running. Instead, Windows will ask to reboot to complete these updates. If prompted simply select Reboot to complete the update process.
22. Uninstall an App
You may need to remove an app because you need the space or simply don't need it anymore. The following steps show you how to easily remove an app.
Click Start then Settings.
Next, Select Apps.
Scroll down and locate the app you wish to remove, and click on Uninstall.
Carefully read any prompts in case there are special instructions. Proceed until the application is removed.
Some applications may require that you reboot.
23. What's next?
24. Reboot Into Safe Mode Through Log In Screen
From the Log In screen select the Power icon.
Hold down the Shift key on your keyboard, and keep it held down.
With the Shift key still held down, click on Restart.
Release the shift key on your keyboard.
Choose Troubleshoot.
Choose Advanced options.
Choose Startup Settings.
Choose Restart.
After your computer reboots, on the startup settings menu, push the F5 key on your keyboard for Enable Safe Mode with Networking.
Safe mode is a special diagnostic mode for Windows, designed to startup with very few items, to make sure nothing else can interfere with the task you're trying to perform.
Windows may look different than you are used to, for example, the desktop background may be missing, the screen may look stretched or squished, and you should see the words Safe Mode in every corner. This is to let you know you are in safe mode.
Normal Mode ExampleSafe Mode Example
25. System Restore Through Automatic Repair
Turning the system off while System Restore is running can cause corruption. If your device is battery-operated, connect it to a power outlet first. System Restore may take time and should not be interrupted.
Restoring your PC to an earlier point will remove updates and drivers installed after the restore point was made. It won't affect your personal files.
If you can't get to the desktop and your PC has restarted several times, it will begin automatic repair.
On the choose an option screen, select Troubleshoot.
Select Advanced Options.
Select System Restore. This option reverts your PC to an earlier point, called a system restore point. Restore points are created when you install a new app, driver, update, or when you create a system restore point manually.
System Restore will open. Click Next.
Select a date before the issue started, you may see more than 1 restore point. Click Next afterwards.
Confirm your restore point by clicking Finish. Click Back if you wish to change the restore point.
The process will take some time to finish. The system will also reboot shortly.
.png)