How to Fix Control Issues FluxSmart WiFi Smart Light
Authored by: Support.com Tech Pro Team
1. Introduction
Due to the nature of the connectivity of your FluxSmart WiFi lights, you may experience a situation where your lights no longer respond properly to the commands you're issuing within the Flux WiFi Pro app. This guide will help you resolve issues with controlling your lights.
Turn off the main power, or unplug the lamp that your smart bulb is plugged into.
Wait 10 seconds.
Turn the power back on, or plug the lamp back in.
Wait one minute for the smart bulb to reconnect to the network.
3. OS Choice
To continue, we need to know what Operating System your smartphone or tablet has.
There are 2 main Operating Systems for smartphones currently available, Android and iOS.
Android SmartphoneiOS SmartphoneAndroid smartphones are produced by multiple companies, such as Samsung, LG, Motorola, HTC, and OnePlus.Apple is the only company that makes iOS smartphones.
4. Reset Your Bulb
The following steps will need to be completed 4 times. After the 4th time, the light will strobe for 20 seconds and then turn bright white.
Power on the bulb and wait for it to turn on.
Wait 3 seconds.
Power off the bulb.
Repeat the above two steps 4 times.
After strobing for 20 seconds, the bulb will turn bright white to indicate the reset is complete.
The bulb will now show as LEDNetxxx in your phone's WiFi settings.
Open the app and go through the setup process to pair the bulb to your home wireless network.
5. Add Bulb (Android)
This process will need to be repeated for each FluxSmart Wi-Fi light you wish to set up.
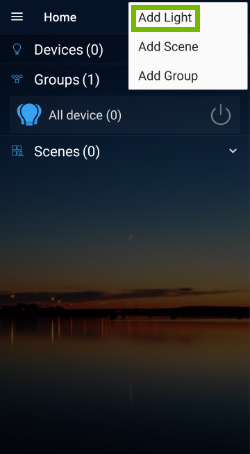
Tap the Plus+ Symbol in the top right corner of the screen.
Tap Add Light.
A list of unpaired FluxSmart lights will be displayed. Select the light you would like to add.
You will then be prompted to select your Wi-Fi network from a list of nearby networks. Select your network and enter your Wi-Fi password if necessary.
Enter a description for the light you've chosen to add, then tap Confirm.
If you have multiple SmartFlux lights installed in your home, descriptions will make it easier to identify and manage your lights later on.
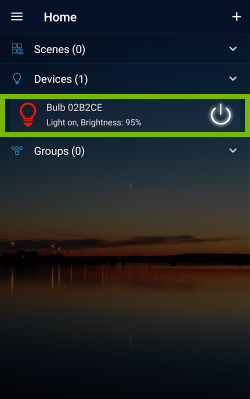
The light should now be successfully added. Tap any light from the list in order to manage it.
Additional lights can be added by repeating these steps.
6. What's next?
7. Reset Your Bulb
The following steps will need to be completed 4 times. After the 4th time, the light will strobe for 20 seconds and then turn bright white.
Power on the bulb and wait for it to turn on.
Wait 3 seconds.
Power off the bulb.
Repeat the above two steps 4 times.
After strobing for 20 seconds, the bulb will turn bright white to indicate the reset is complete.
The bulb will now show as LEDNetxxx in your phone's WiFi settings.
Open the app and go through the setup process to pair the bulb to your home wireless network.
8. Add Bulb (iOS)
This process will need to be repeated for each FluxSmart Wi-Fi light you wish to set up.
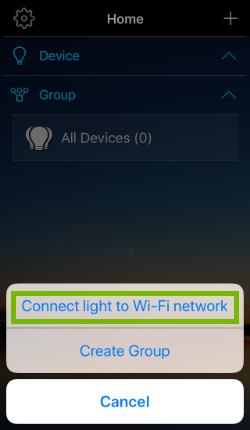
Tap the Plus+ Symbol in the top right corner of the screen.
Then tap Connect light to Wi-Fi network.
Open Settings.
Select Wi-Fi.
Select the Wi-Fi set up network from the list of available networks. It will be named either LEDnetxxx or FLUXnetxxx.
This set up network is unsecured; this is normal. You will be using it to set up the device only. After, you will be using the device over your secured wireless connection.
Return to the Flux WiFi Pro app.
Now that your device is connected to your bulb's set up network, you will be prompted to select your home's Wi-Fi network name from a list of available networks. Enter your Wi-Fi network password if necessary.
Your light will begin connecting to your home's Wi-Fi network. Wait for the bulb to connect and restart. If the pairing was successful, you will be prompted to enter a description for the light that was just added.
Enter a description for the light, then tap Confirm.
If you have multiple SmartFlux lights installed in your home, descriptions will make it easier to identify and manage your lights later on.
The light should now be successfully added. Tap any light from the list in order to manage it.
Additional lights can be added by repeating these steps.
.png)