How to Fix Google Chrome if it Crashes or Won't Open
Authored by: Support.com Tech Pro Team
1. Introduction
We use our computers increasingly online, utilizing the web browser for more and more of our daily tasks. When the browser isn't working right, it can become incredibly frustrating. This guide will take you through the steps to get Chrome back working properly on your computer.
2. OS Choice
To continue, we need to know what Operating System your computer is using.
There are 2 main Operating Systems for personal computers currently available, Microsoft Windows and Apple macOS.
Microsoft WindowsApple macOSMicrosoft Windows runs on computers produced by multiple companies, such as Lenovo, Asus, Dell, Toshiba, Hewlett Packard, Acer, and Sony.Apple is the only company that makes macOS computers.
3. Force Quit Chrome
Sometimes Chrome can get stuck as it launches. Forcing it to quit and restarting it usually fixes this problem.
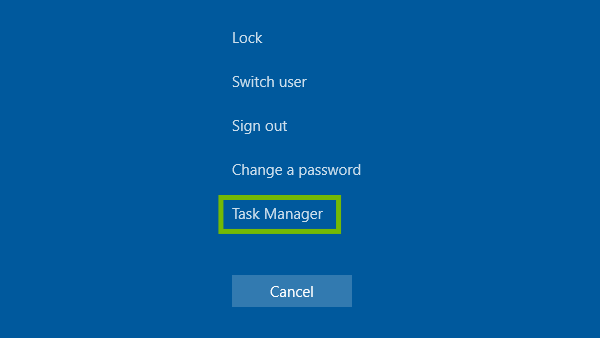
On your keyboard, press the Control, Alt, and Delete keys at the same time.
Select Task Manager.
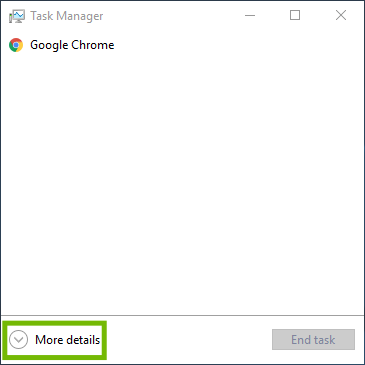
Select More details.
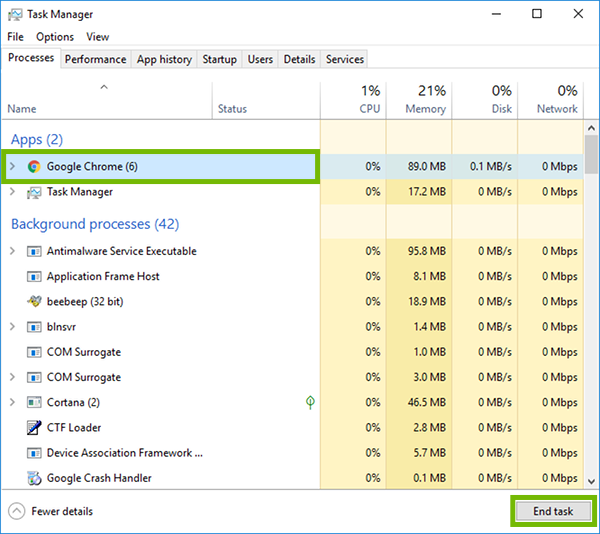
Select any entries named Google Chrome or chrome.exe, then select End task.
4. Test Site
Open your browser, and visit the website you had problems with at the start.
Make sure the page loads properly, and try following a few of the links from the page.
5. Restart Your PC
Before your restart or shut down your PC, make sure to save all necessary work to prevent data loss.
Using the Mouse
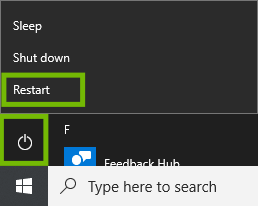
Select the Start menu.
By default it is in the lower left corner of your screen.
Select Power, then select Restart.
Using the Keyboard
Press the Windows and X keys at the same time. This minimizes any open windows you may have.
Press the Alt and F4 keys at the same time. This tells Windows to close the desktop.
Select Restart, then OK.
6. Test Site
Open your browser, and visit the website you had problems with at the start.
Make sure the page loads properly, and try following a few of the links from the page.
7. Clear Browser History
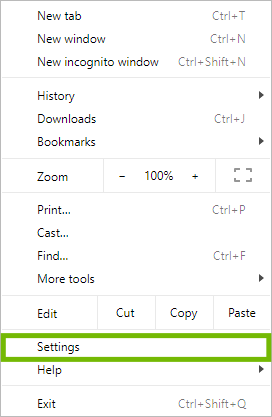
Open Google Chrome.
Select the Menu button located in the top right corner of the window.
Select Settings.
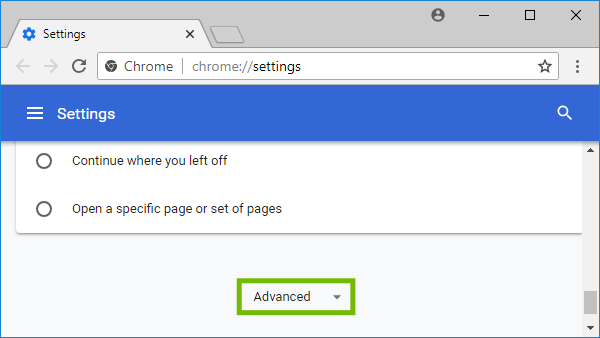
Scroll to the bottom of the page, then select Advanced.
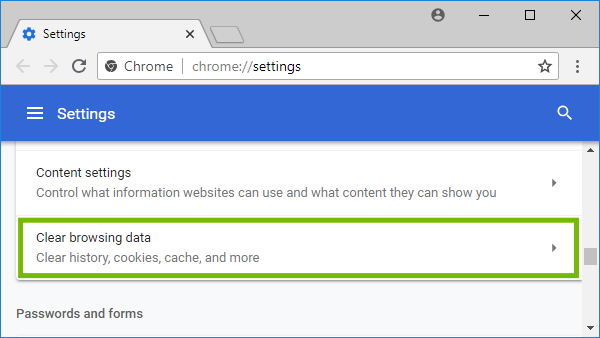
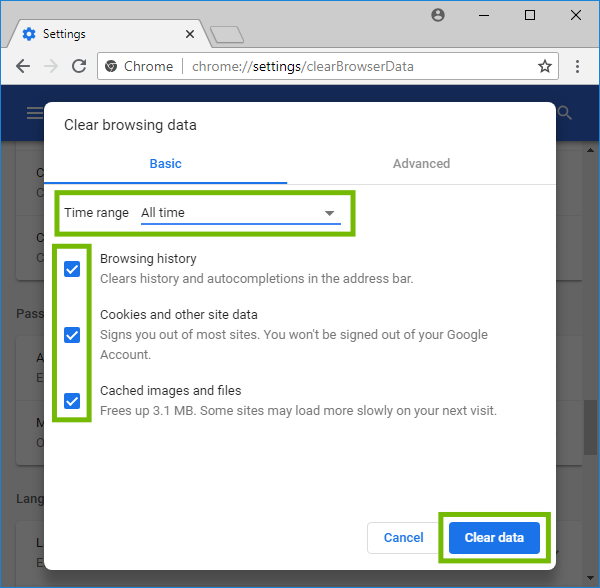
Under Privacy and security, select Clear browsing data.
For Time range, select All time. Make sure all three check boxes are checked, then select Clear data.
8. Quit and Restart
By default, Chrome will run in the background to provide faster access. If it runs out of memory, though, this can end up causing a problem. Quitting and restarting Chrome can often resolve these problems.
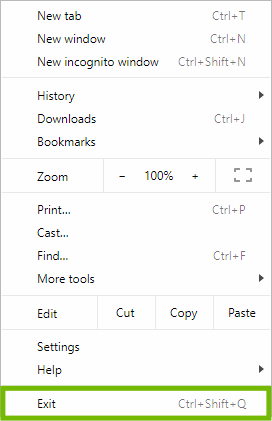
Select the menu in the top-right corner.
Select Exit at the bottom.
9. Test Site
Open your browser, and visit the website you had problems with at the start.
Make sure the page loads properly, and try following a few of the links from the page.
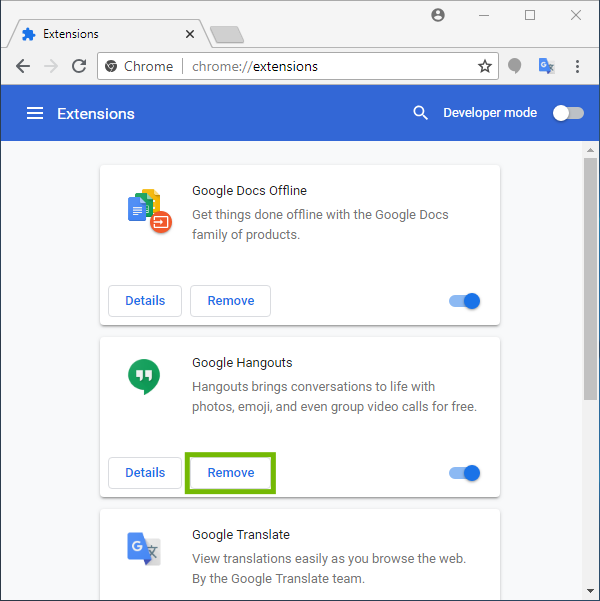
10. Disable Extensions
Extensions provide extra features to Chrome. Sometimes, these Extensions are not coded well, break after a Chrome update, or because they change the way Chrome works in a malicious way to show you advertisements.
Disabling or removing unneeded or unwanted Extensions can help resolve these problems.
It is recommended to delete all unwanted Extensions, then disable all other Extensions, then test the browser, then enable your wanted extensions one by one, testing each time to find the extension that's causing problems.
Open Google Chrome.
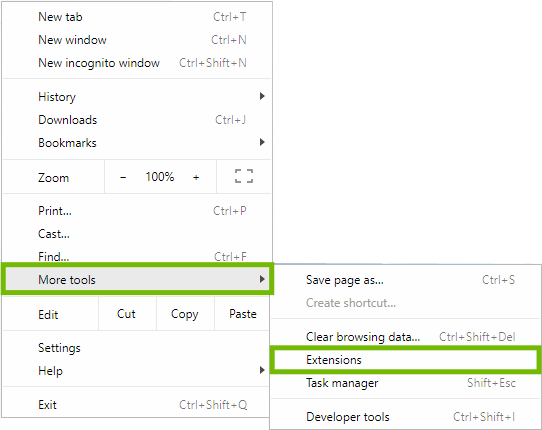
Select the Menu in the top right corner. Then, point to More tools, and select Extensions.
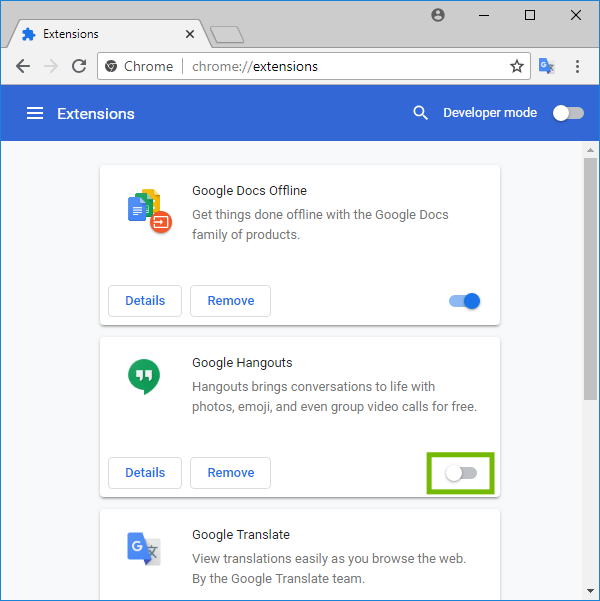
Disable an Extension
Select the toggle in the bottom right of the extension.
Repeat this for each extension you want to disable.
Delete an Extension
Select Remove for the extension.
Select Remove to confirm.
Repeat this for each extension you want to delete.
11. Test Site
Open your browser, and visit the website you had problems with at the start.
Make sure the page loads properly, and try following a few of the links from the page.
12. Enable Extensions One By One
One of the Extensions setup in Chrome is causing problems.
You will can use Chrome with all extensions disabled, it will function perfectly fine.
If you wish, return to Extensions and enable each extension one by one, testing after each, to determine which one is causing you problems, then remove just that extension.
Open Google Chrome.
Select the Menu button located in the top right corner of the window.
Point to More tools, then select Extensions.
Use the switch in the bottom right to turn on a single extension, then test using Chrome again.
Repeat these steps till Chrome no longer works to find the Extension giving you problems, then remove that extension.
For the problem extension, select Remove.
You will be prompted if you're sure you wish to remove it, select Remove.
13. Uninstall Check
Our next step is to uninstall Google Chrome.
In most cases, your bookmarks and saved passwords will be saved through uninstalling and reinstalling, but they can be lost during this process if you haven't signed into a Google account with Chrome in the past.
Any history, frequently used pages, cookies, and Extensions will be lost.
Any bookmarks, passwords, and extension settings will be lost if you have not signed into your Google account with Chrome, and won't be available again till after you sign back into your Google account with Chrome after reinstalling.
14. Uninstall
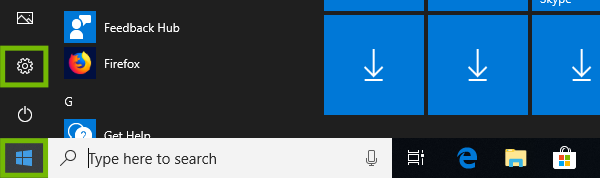
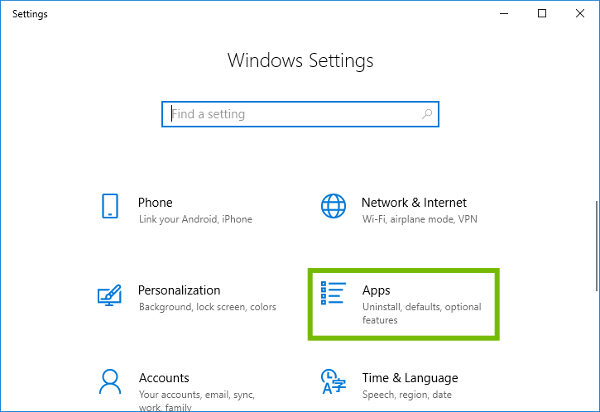
Select the Start menu, then select Settings.
Select Apps.
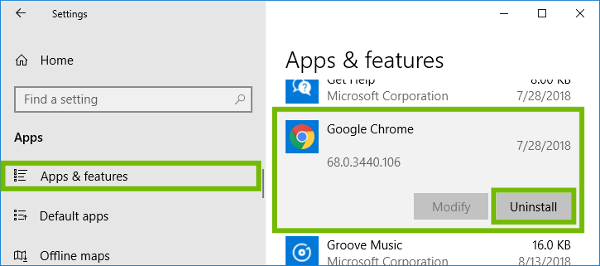
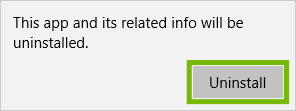
In Apps & features, select Google Chrome, then select Uninstall.
Select Uninstall for the conformation message.
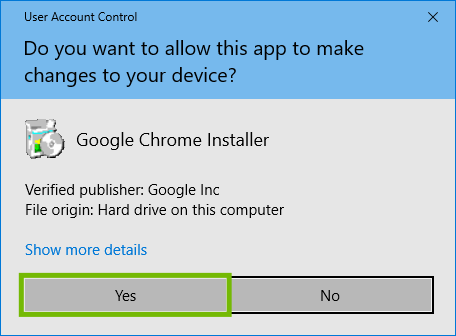
The installer will ask permission to run, select Yes.
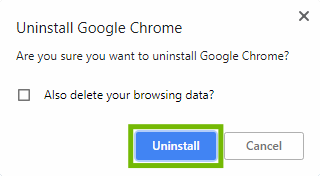
The installer will confirm you want to uninstall, select Uninstall.
15. Restart Your PC
Before your restart or shut down your PC, make sure to save all necessary work to prevent data loss.
Using the Mouse
Select the Start menu.
By default it is in the lower left corner of your screen.
Select Power, then select Restart.
Using the Keyboard
Press the Windows and X keys at the same time. This minimizes any open windows you may have.
Press the Alt and F4 keys at the same time. This tells Windows to close the desktop.
Select Restart, then OK.
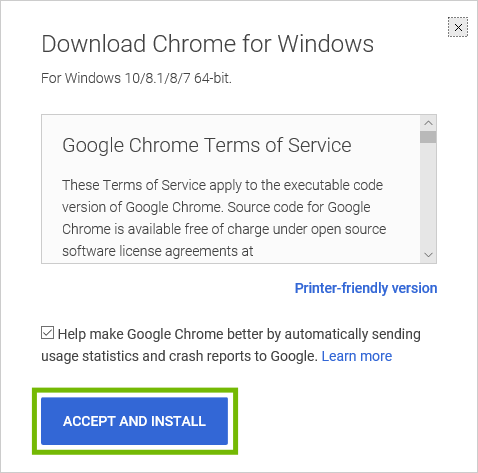
16. Install
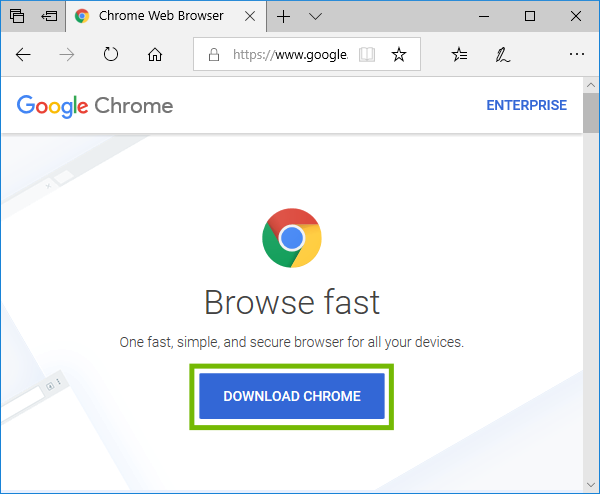
We will use the built-in Edge browser on your computer to download and install Google Chrome.
Carefully read the Terms of Service, then select Accept and Install.
Select Run to start the installer immediately after download.
The installer will ask permission to run, select Yes.
Google Chrome will begin installing automatically. Once completed, Google Chrome will open.
17. Test Site
Open your browser, and visit the website you had problems with at the start.
Make sure the page loads properly, and try following a few of the links from the page.
18. What's next?
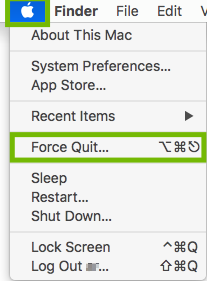
19. Force Quit Chrome
Sometimes Chrome can get stuck as it launches. Forcing it to quit and restarting it usually fixes this problem.
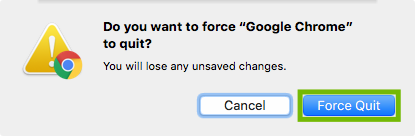
Select the Apple menu, then Force Quit.
Highlight Google Chrome in the list, and select Force Quit.
You'll be prompted if you're sure, select Force Quit.
20. Test Site
Open your browser, and visit the website you had problems with at the start.
Make sure the page loads properly, and try following a few of the links from the page.
21. Restart
From the menu bar across the top of the screen, select the Apple menu (1), then select Restart... (2).
Any unsaved work will be lost.
22. Test Site
Open your browser, and visit the website you had problems with at the start.
Make sure the page loads properly, and try following a few of the links from the page.
23. Clear Browser History
Open Google Chrome.
Select the Menu button located in the top right corner of the window.
Select Settings.
Scroll to the bottom of the page, then select Advanced.
Under Privacy and security, select Clear browsing data.
For Time range, select All time. Make sure all three check boxes are checked, then select Clear data.
24. Quit and Restart
By default, Chrome will run in the background to provide faster access. If it runs out of memory, though, this can end up causing a problem. Quitting and restarting Chrome can often resolve these problems.
Select Chrome on your Dock.
Select the Chrome menu, then Quit Google Chrome.
25. Test Site
Open your browser, and visit the website you had problems with at the start.
Make sure the page loads properly, and try following a few of the links from the page.
26. Disable Extensions
Extensions provide extra features to Chrome. Sometimes, these Extensions are not coded well, break after a Chrome update, or because they change the way Chrome works in a malicious way to show you advertisements.
Disabling or removing unneeded or unwanted Extensions can help resolve these problems.
It is recommended to delete all unwanted Extensions, then disable all other Extensions, then test the browser, then enable your wanted extensions one by one, testing each time to find the extension that's causing problems.
Open Google Chrome.
Select the Menu in the top right corner. Then, point to More tools, and select Extensions.
Disable an Extension
Select the toggle in the bottom right of the extension.
Repeat this for each extension you want to disable.
Delete an Extension
Select Remove for the extension.
Select Remove to confirm.
Repeat this for each extension you want to delete.
27. Test Site
Open your browser, and visit the website you had problems with at the start.
Make sure the page loads properly, and try following a few of the links from the page.
28. Enable Extensions One By One
One of the Extensions setup in Chrome is causing problems.
You will can use Chrome with all extensions disabled, it will function perfectly fine.
If you wish, return to Extensions and enable each extension one by one, testing after each, to determine which one is causing you problems, then remove just that extension.
Open Google Chrome.
Select the Menu button located in the top right corner of the window.
Point to More tools, then select Extensions.
Use the switch in the bottom right to turn on a single extension, then test using Chrome again.
Repeat these steps till Chrome no longer works to find the Extension giving you problems, then remove that extension.
For the problem extension, select Remove.
You will be prompted if you're sure you wish to remove it, select Remove.
29. Uninstall Check
Our next step is to uninstall Google Chrome.
In most cases, your bookmarks and saved passwords will be saved through uninstalling and reinstalling, but they can be lost during this process if you haven't signed into a Google account with Chrome in the past.
Any history, frequently used pages, cookies, and Extensions will be lost.
Any bookmarks, passwords, and extension settings will be lost if you have not signed into your Google account with Chrome, and won't be available again till after you sign back into your Google account with Chrome after reinstalling.
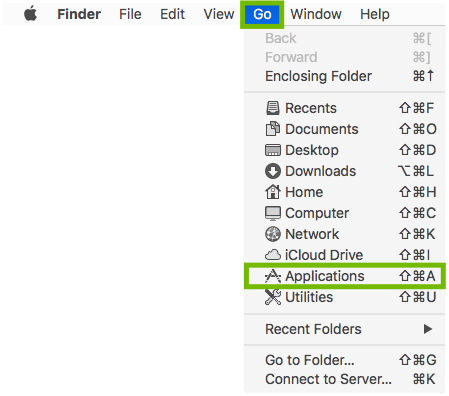
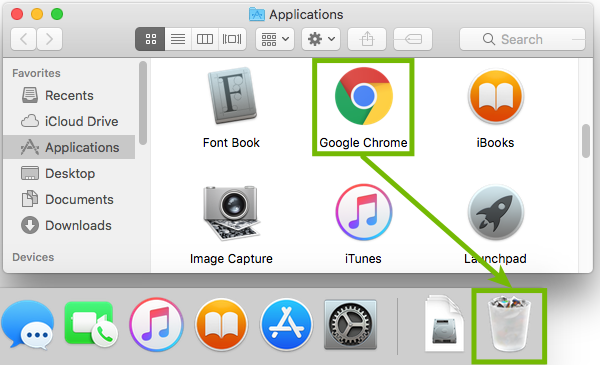
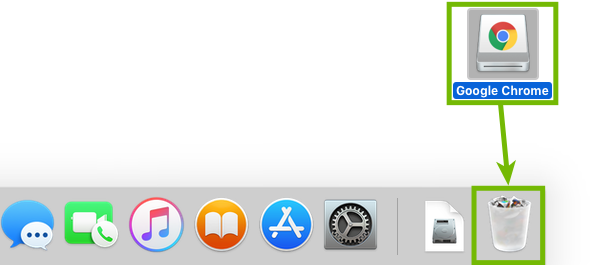
30. Uninstall
Select Finder in your Dock.
Select Go > Applications.
Drag Google Chrome to the Trash icon on your Dock.
31. Restart
From the menu bar across the top of the screen, select the Apple menu (1), then select Restart... (2).
Any unsaved work will be lost.
32. Install
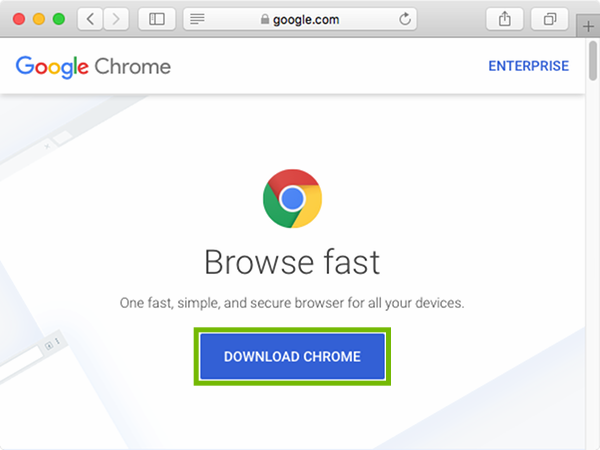
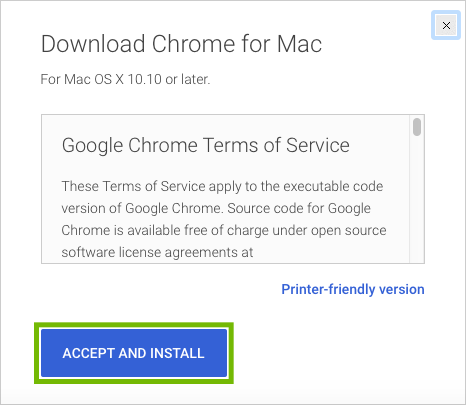
We will use the built-in Safari browser on your Mac to download and install Google Chrome.
Carefully read the Terms of Service, then select Accept and Install.
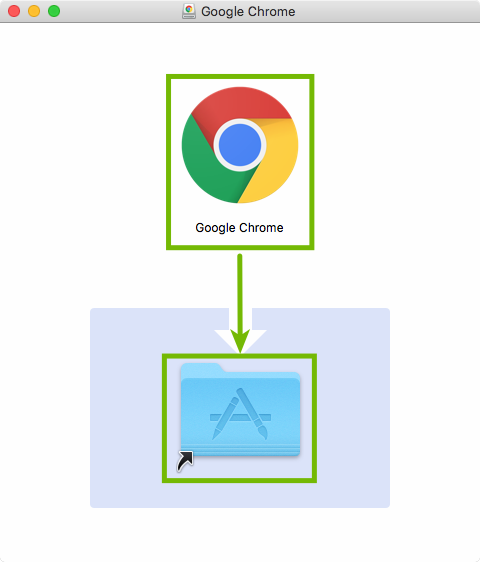
Select Downloads, then select googlechrome.dmg from the list.
Drag Google Chrome to the Applications shortcut.
Once Chrome has finished copying, drag the mounted installer disk image for Chrome from your Desktop to the Trash to unmount it. You do not need the installer now that Chrome is installed.
33. Test Site
Open your browser, and visit the website you had problems with at the start.
Make sure the page loads properly, and try following a few of the links from the page.
.png)