How to Fix Heart Rate Monitor on a Fitbit Charge 2
Authored by: Support.com Tech Pro Team
1. Introduction
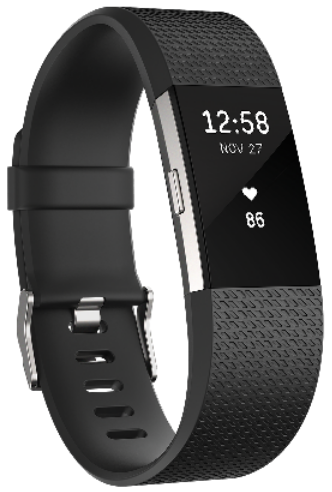
Your Fitbit device captures and records activity throughout the course of the day. The Fitbit Charge 2 will normally display your active heart rate when worn. This guide will take you through the process of troubleshooting your device's heart rate monitor, should it fail to display your heart rate properly.
2. Restart Device
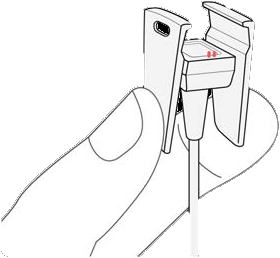
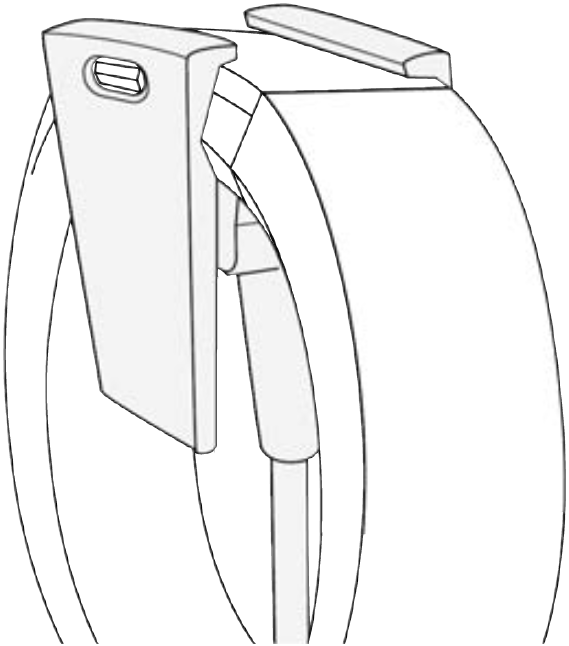
Plug the charging cable into the USB port on your computer or any USB wall charger.
Clip the other end of the charging cable to the port on the back of the tracker. The pins on the charging cable must lock securely with the port.
Make sure the button on your tracker is aligned with the button opening on the charging cable.
You will know the connection is secure when the tracker vibrates and you see a battery icon on the display. Your Charge 2 will begin charging.
Press and hold the button on your tracker for four seconds. When you see the Fitbit logo and the tracker vibrates, this means the tracker has restarted.
Unplug your tracker from the charging cable.
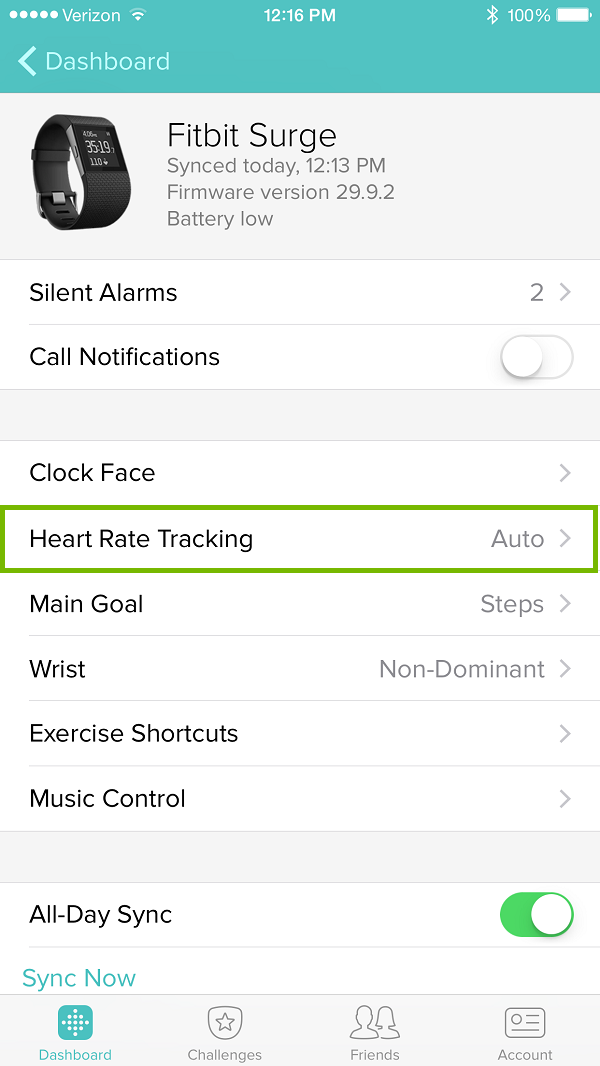
3. Set Heart Rate to Auto via App
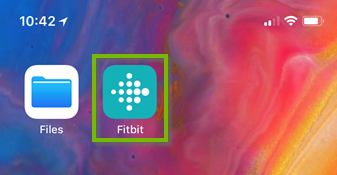
Open the Fitbit app on your mobile device.
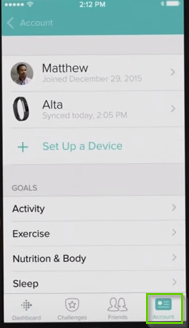
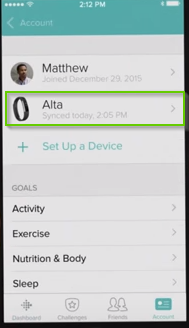
Click on the Account icon. Then Choose your Device.
Tap on Heart Rate Tracking and make sure it is set to Auto.
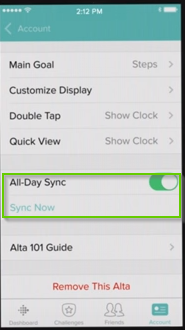
4. Manual Sync
Open your Fitbit App.
Tap Account.
Tap the device you want to sync.
Make sure All Day Sync is on. You can tap Sync Now to sync immediately.
5. Introduction
Since enabling the heart rate monitor didn't work, we're going to make some changes to the heart rate monitor settings, and then synchronize your Fitbit device again.
6. Heart Rate Monitor Fixes via App
Other common fixes for Heart RateMonitor issueswith your Fitbit:
Tighten the band just enough so it isn't slipping around on your wrist. Your tracker needs a solid contact with your arm to reliably track your heart rate. Heart rate tracking may not work with certain accessory bands, especially if they’re loose fitting. Fitbit recommends wearing their classic or sport bands during exercise.
Move the band to a slightly different position on your arm. Just a little higher or a little lower.
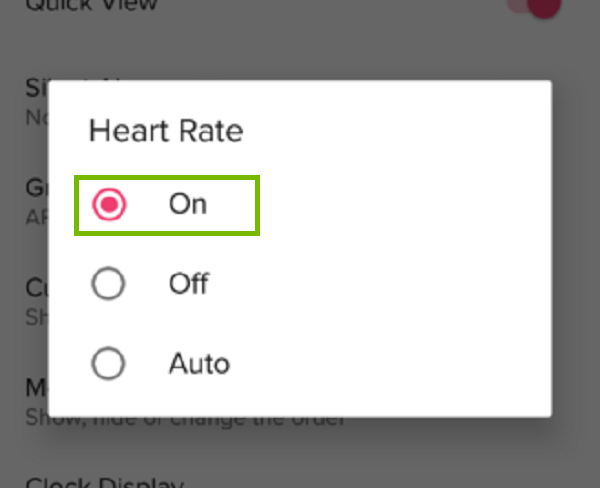
Set Heart Rate setting to ON
If the setting is Auto but your heart rate still isn't appearing, try changing the setting to On. At this setting, the green lights on the back of your tracker flash even when you aren't wearing it. This does not indicate a problem with your tracker.
Lets open the app on your mobile device.
Click on the Account icon. Then Choose your Device.
Tap on Heart Rate and make sure it is set to On.
7. Restart Device
Plug the charging cable into the USB port on your computer or any USB wall charger.
Clip the other end of the charging cable to the port on the back of the tracker. The pins on the charging cable must lock securely with the port.
Make sure the button on your tracker is aligned with the button opening on the charging cable.
You will know the connection is secure when the tracker vibrates and you see a battery icon on the display. Your Charge 2 will begin charging.
Press and hold the button on your tracker for four seconds. When you see the Fitbit logo and the tracker vibrates, this means the tracker has restarted.
Unplug your tracker from the charging cable.
8. What's next?
9. Set Heart Rate to Auto via Web
If your Fitbit device isn't displaying your heart rate, follow the steps below. After each step, check your device to see if your heart rate is being displayed again.
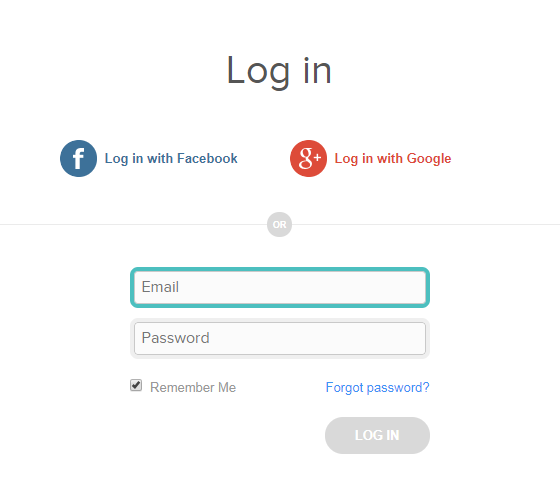
Log into your fitbit.com dashboard.
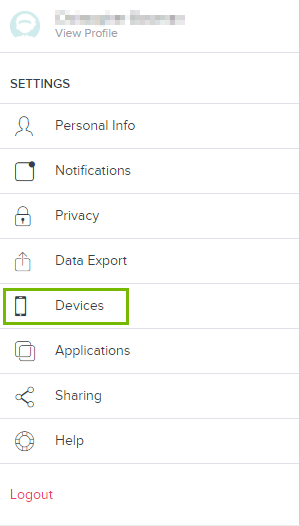
Click the gear icon in the top right corner, then select Settings.
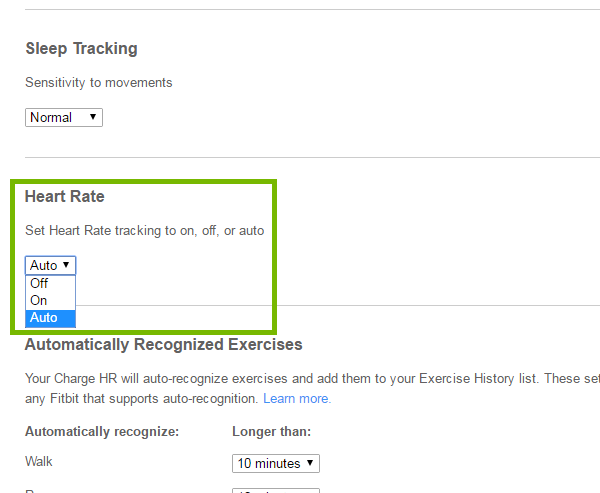
Under Devices > Heart Rate, make sure it's set to Auto.
Click Heart Rate, make sure it's set to Auto.
10. Manual Sync via Mac
After your Fitbit device is setup initially, it will automatically begin synchronizing with your device of choice when it is within 20 feet of it. However, synchronizing your Fitbit manually is also an option by following these steps.
Make sure your Fitbit's USB dongle or cradle is connected to your computer.
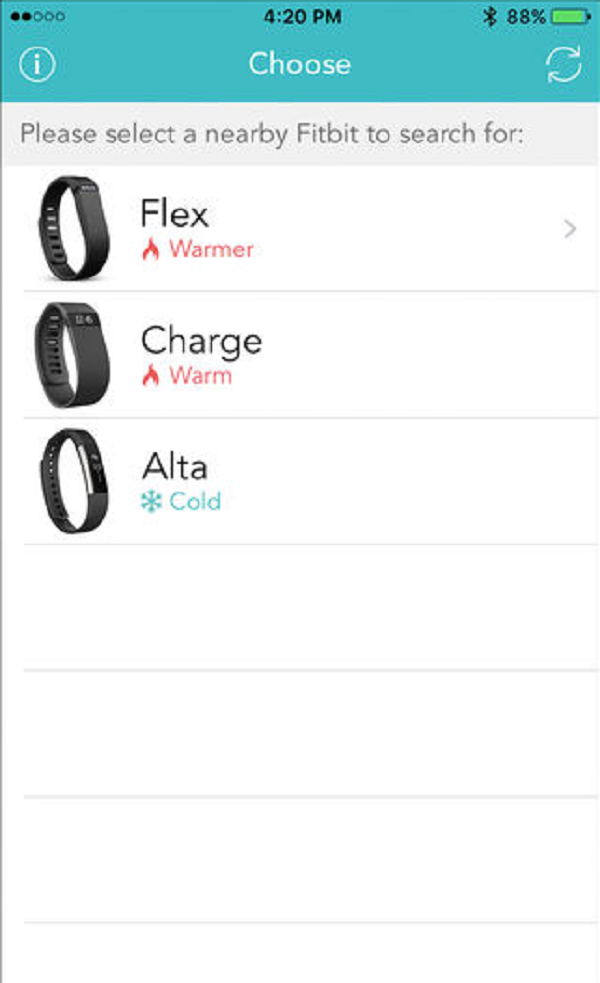
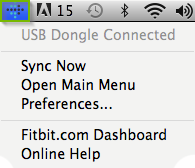
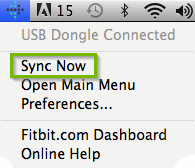
Locate and select the Fitbit icon along the upper toolbar of your Mac.
Select Sync Now.
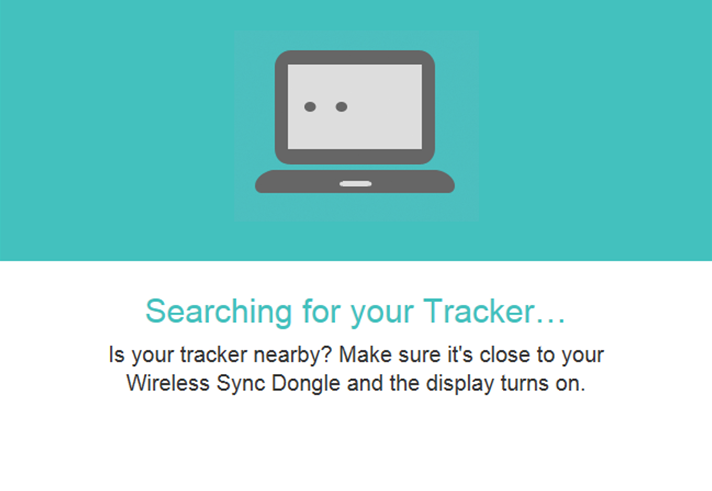
The Fitbit app will open and begin looking for your Fitbit device to synchronize to.
If prompted, log into your Fitbit account.
You will be presented with a completion screen if the synchronization was successful.
11. Introduction
Since enabling the heart rate monitor didn't work, we're going to make some changes to the heart rate monitor settings, and then synchronize your Fitbit device again.
12. Heart Rate Monitor Fixes via Computer
Other common fixes for Heart RateMonitor issueswith your Fitbit:
Tighten the band just enough so it isn't slipping around on your wrist. Your tracker needs a solid contact with your arm to reliably track your heart rate. Heart rate tracking may not work with certain accessory bands, especially if they’re loose fitting. Fitbit recommends wearing their classic or sport bands during exercise.
Move the band to a slightly different position on your arm. Just a little higher or a little lower.
Set Heart Rate setting to ON
If the setting is Auto but your heart rate still isn't appearing, try changing the setting to On. At this setting, the green lights on the back of your tracker flash even when you aren't wearing it. This does not indicate a problem with your tracker.
Log into your fitbit.com dashboard.
Click the gear icon in the top right corner. The hit Settings.
Click Devices.
Click Heart Rate, make sure it's set to On.
13. Restart Device
Plug the charging cable into the USB port on your computer or any USB wall charger.
Clip the other end of the charging cable to the port on the back of the tracker. The pins on the charging cable must lock securely with the port.
Make sure the button on your tracker is aligned with the button opening on the charging cable.
You will know the connection is secure when the tracker vibrates and you see a battery icon on the display. Your Charge 2 will begin charging.
Press and hold the button on your tracker for four seconds. When you see the Fitbit logo and the tracker vibrates, this means the tracker has restarted.
Unplug your tracker from the charging cable.
14. What's next?
15. Manual Sync via Windows
After your Fitbit device is setup initially, it will automatically begin synchronizing with your device of choice when it is within 20 feet of it. However, synchronizing your Fitbit manually is also an option by following these steps.
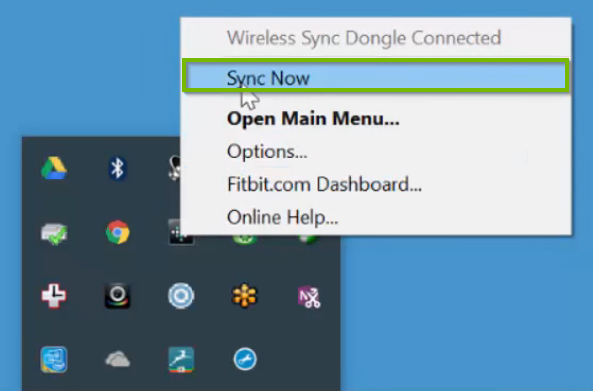
Make sure your Fitbit's USB dongle or cradle is connected to your computer.
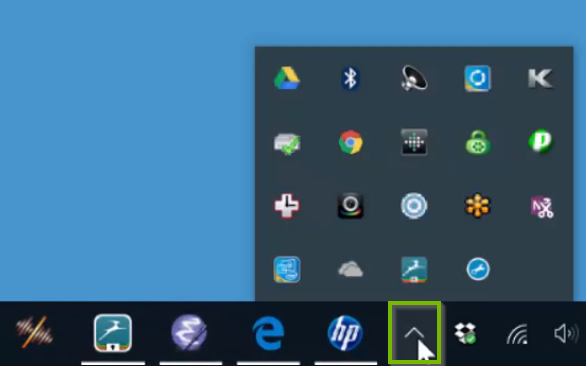
In the lower right hand corner of your screen, click the Show Hidden Icons arrow of your Taskbar.
Locate the Fitbit app icon within the system tray.
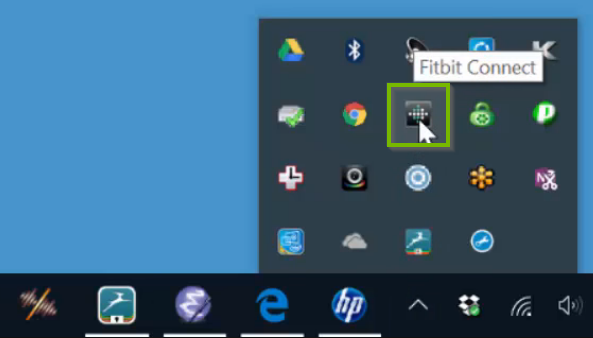
Hover your mouse pointer over the Fitbit icon and Right Click it. It's context menu will appear.
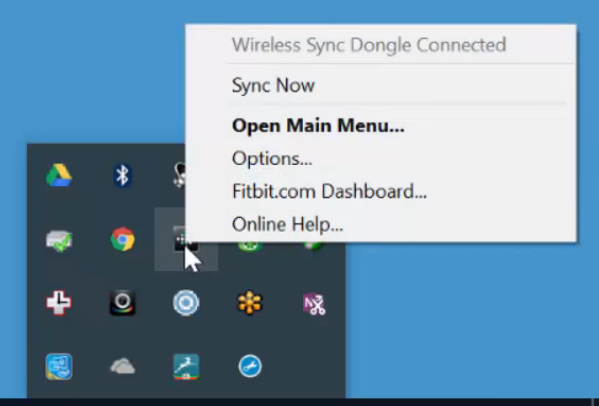
Select Sync Now to begin a manual synchronization of your Fitbit device.
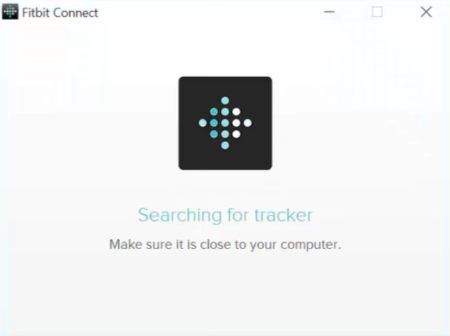
The Fitbit app will open and begin looking for your Fitbit device to synchronize to.
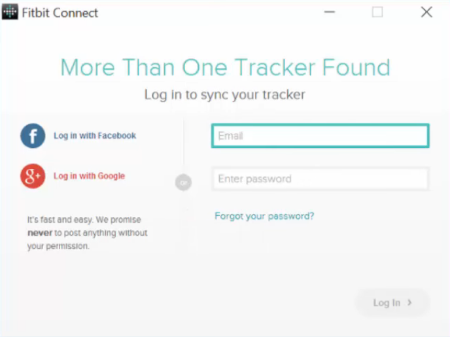
If prompted, log into your Fitbit account.
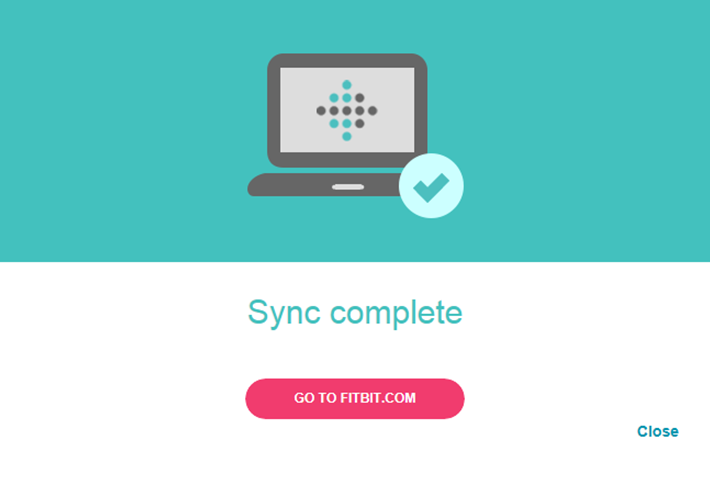
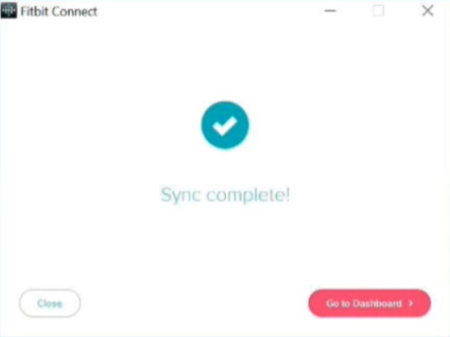
You will be presented with a completion screen if the synchronization was successful.
16. Introduction
Since enabling the heart rate monitor didn't work, we're going to make some changes to the heart rate monitor settings, and then synchronize your Fitbit device again.
17. Heart Rate Monitor Fixes via Computer
Other common fixes for Heart RateMonitor issueswith your Fitbit:
Tighten the band just enough so it isn't slipping around on your wrist. Your tracker needs a solid contact with your arm to reliably track your heart rate. Heart rate tracking may not work with certain accessory bands, especially if they’re loose fitting. Fitbit recommends wearing their classic or sport bands during exercise.
Move the band to a slightly different position on your arm. Just a little higher or a little lower.
Set Heart Rate setting to ON
If the setting is Auto but your heart rate still isn't appearing, try changing the setting to On. At this setting, the green lights on the back of your tracker flash even when you aren't wearing it. This does not indicate a problem with your tracker.
Log into your fitbit.com dashboard.
Click the gear icon in the top right corner. The hit Settings.
Click Devices.
Click Heart Rate, make sure it's set to On.
18. Restart Device
Plug the charging cable into the USB port on your computer or any USB wall charger.
Clip the other end of the charging cable to the port on the back of the tracker. The pins on the charging cable must lock securely with the port.
Make sure the button on your tracker is aligned with the button opening on the charging cable.
You will know the connection is secure when the tracker vibrates and you see a battery icon on the display. Your Charge 2 will begin charging.
Press and hold the button on your tracker for four seconds. When you see the Fitbit logo and the tracker vibrates, this means the tracker has restarted.
.png)