You may be getting a distorted picture on your Apple Mac screen similar to the one above. This can happen due to a bad connection between your Mac and its display, due to corrupted software or drivers, or even due to faulty hardware. This guide will take you through some troubleshooting steps you can take on your own to attempt to resolve this type of issue.
Tools You'll Need:
A paperclip
iPhone charging cable
Access to a computer with iTunes installed
Any other non-consumable tools needed
Comment out tools section if no tools are necessary
-->
Supplies You'll Need:
Zip ties
Any other consumable supplies
Comment out supplies section if no supplies are necessary
-->
Before You Begin:
You must have access to a computer with iTunes installed.
You must have that thing for the other thing so you can do the thing.
Each individual prereq should have its own box like this. Not all will contain multiple links.
Comment out prerequisites section if no prereqs are necessary
-->
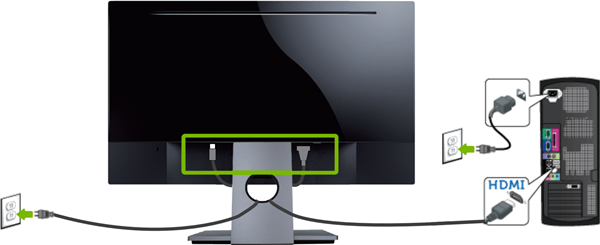
2. Make Sure Your Monitor is Connected to My Mac
Examine all cables and connectors for visible damage. If they are damaged, they may need to be replaced.
Make sure one end of the power cable is firmly connected to the back panel of the monitor and the other end into a power socket.
Make sure one end of the video cable is firmly connected to the back panel of the monitor and the other end into video source device, such as a computer, gaming console, media player, etc.
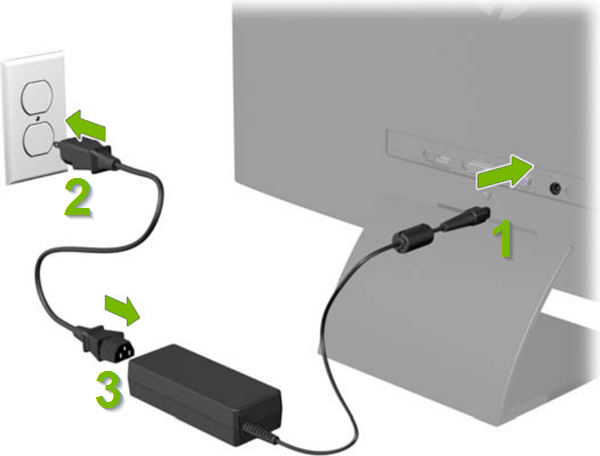
If the monitor has an external power supply, make sure all connectors are firmly plugged in:
One connector (1) plugs into the monitor
The other connector (2) plugs into a power socket
And sometimes, a third (3) connector plugs into the supply itself
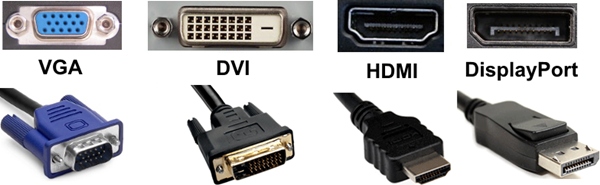
Monitors can be connected to video source devices through a variety of connection types. The most common ones are shown below:
Make sure the monitor is powered on and set to the video input source matching the connection type. This varies greatly by brand and model. If you're unsure how to do this please refer to the monitors documentation.
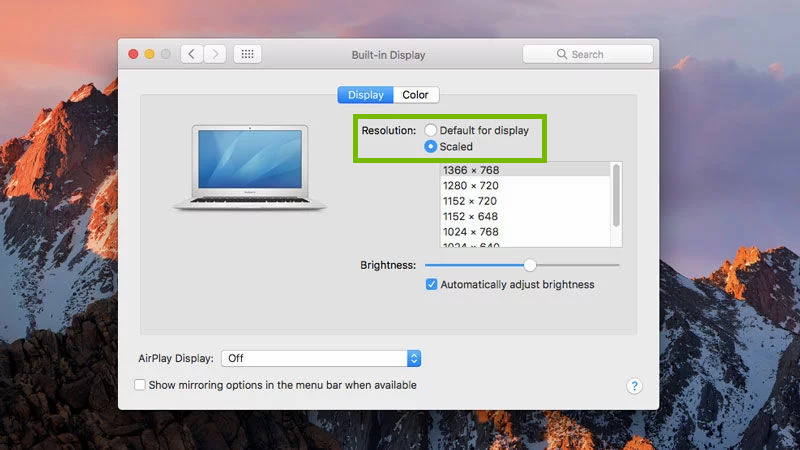
3. Check Display Menu Resolution on a Mac
Make sure your monitor is being seen by your Mac and chosen to display. You can do this by selecting it for the default display.
Choose Apple menu > System Preferences.
Choose Displays.
Place a dot next to Default for display, or choose a different resolution under Scaled.
4. Reset NVRAM on a Mac
NVRAM (nonvolatile random-access memory) is a cache of settings specific to your Mac. Resetting NVRAM is safe, however you will need to reset some of your minor customizations, such as volume, time zone, or screen resolution.
If an improper setting has been chose and it is causing the issue, you can solve it by resetting the NVRAM.
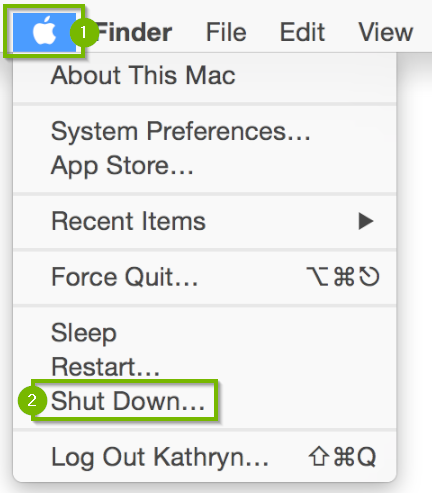
From the menu bar across the top of the screen, select the Apple menu (1), then select Shut Down... (2).
Wait for your computer to shut down, and turn off.
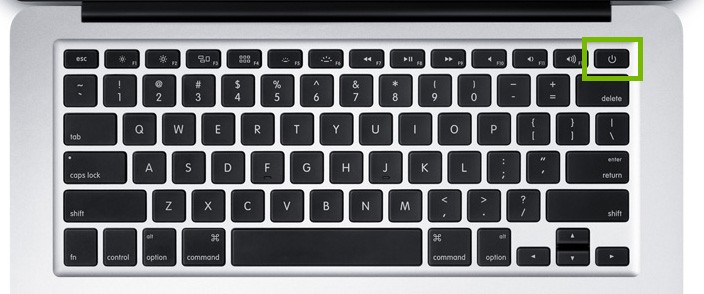
Turn your Mac back on by pushing the Power button.
Immediately push and hold the option, command ⌘, P, and R keys on your keyboard.
If your Mac plays a startup sound, release the keys after the second time it plays.
If there is no startup sound, release the keys after the second time the Apple logo disappears.
5. If It Still Doesn't Work
Remove Hidden Spyware In Minutes For Free
Detect and remove spyware, keyloggers, tracking cookies, and other
threats that slow down your PC or steal your data.
65+ Million Downloads
Spyware scanner with AI-powered detection engine + database
.png)