How to Fix Search Not Working on Google Chrome

Authored by: Support.com Tech Pro Team

1. Introduction

Searching the web is something we do every day. Whether you are searching from Chrome's address bar, or have your homepage set to take you to your favorite search engine's website instead, you've likely gotten accustomed to the way you search on a daily basis. If that search experience has suddenly changed seemingly without warning, that's a clear sign that something is messing with Google Chrome's settings without your knowledge or consent.

This guide will help you make sure Google Chrome is configured properly so that your search experience returns to normal once again.

Tools You'll Need:

  • A paperclip
  • iPhone charging cable
  • Access to a computer with iTunes installed
  • Any other non-consumable tools needed
  • Comment out tools section if no tools are necessary

-->

Supplies You'll Need:

  • Zip ties
  • Any other consumable supplies
  • Comment out supplies section if no supplies are necessary

-->

Before You Begin:

  • You must have access to a computer with iTunes installed.
  • You must have that thing for the other thing so you can do the thing.

You must have this thing before you whatever.

-->

Close-up image of a browser's address bar.

What are you running Google Chrome on?

This guide covers troubleshooting Chrome on Windows & Mac computers. Select your operating system to proceed.

Windows

Windows runs on computers produced by multiple companies, such as Lenovo, Asus, Dell, Toshiba, Hewlett Packard, Acer, and Sony.

Windows 10

macOS

Apple is the only company that makes macOS computers.

macOS Mojave

2. Clear History and Saved Data

The first order of business is making sure that your browser is not holding onto some outdated or bad data in the form of an old cookie, cached version of the website it may be trying to load, etc. Clearing this data allows your browser to load the websites you're asking it to load freshly as if it had never been there before.

  1. Open Google Chrome.
Google Chrome.
  1. Click the Customize and control Google Chrome button (three vertical dots) towards the upper right hand corner.
Menu button highlighted and pointed out in Google Chrome.
  1. Click More tools, then select Clear browsing data.
Chrome menu with More Tools and Clear Browsing Data highlighted.
  1. Select Advanced at the top. For Time range, select All time. Place a checkmark next to each item you'd like to clear, then select Clear data.
Chrome settings showing how to delete history

  1. Browsing history
  2. Recommended
    This clears the memory of the pages you've browsed to.
  3. Download history
  4. Recommended
    This clears the memory of files you've downloaded.
  5. Cookies and other site data
  6. Recommended
    Pages store small data to remember you between visits to their pages. These are called cookies. This option clears cookies.
  7. Cached images and files
  8. Recommended
    Pages are downloaded and saved to your computer, so they are faster to display. This option clears cached copies, which can resolve many problems you may have.
  9. Passwords and other sign-in data
  10. Not Recommended
    The browser saves usernames and passwords for sites you sign into. There's no need to clear this, normally.
  11. Autofill form data
  12. Not Recommended
    Your browser stores other form data, such as your address, common search terms, and other things you type often on sites. There's no need to clear this, normally.
  13. Site Settings
  14. Recommended
    Checking this will clear specialty site settings you may have save.
  15. Hosted app data
  16. Recommended
    Some sites, especially Google apps, store extra app data that will automatically re-download when needed. Clearing this will cause a very small wait and solves problems with those apps.

3. Remove Problematic Extensions

Google Chrome makes use of 'extensions' that can be added from the Chrome web store. Extensions are small software programs that customize your browsing experience. They allow users to tailor Chrome's functionality and behavior to meet certain individual needs or preferences. For example, things like ad blockers, visual themes that change Chrome's appearance, or even spell-checking extensions that can help make sure what you're typing on-screen is free of errors. Unfortunately, because of an extension's ability to alter Chrome's behavior, they can also change your homepage settings, search engine settings, etc. You may have inadvertently added an extension that has made some unexpected changes. Removing any extensions you don't want, don't need, or don't recognize is usually the best practice, and can return any altered settings back to normal.

  1. Open Chrome.
Chrome icon
  1. Click the Customize and control Google Chrome button (three vertical dots) towards the upper right hand corner.
Menu button highlighted and pointed out in Google Chrome.
  1. Click on (1) More tools then (2) Extensions.
Chrome menu with more tools and extensions highlighted. Screenshot
  1. The following steps can be repeated to remove multiple browser extensions:
  2. Find the extension you want to remove, and click on REMOVE.
Extension menu with remove highlighted. Screenshot
  1. You will get a confirmation window. Click Remove to confirm removal.
Confirmation window with Remove highlighted. Screenshot
  1. You might get a new tab pop up upon removal, close the tab by hitting the X.
  2. If you removed any extensions, close Chrome and re-open it. Sometimes a browser restart is necessary for changes to be fully applied.
  3. Test Chrome to see if your search experience has returned to normal.

4. Remove Potentially Unwanted Programs

Potentially unwanted programs, or "PUPs", often arrive bundled with your computer or can tag along with another software program you meant to install. Most times, they are snuck into the EULA as a "Recommended Offer" that many of us are so accustomed to just click right through. Lots of these types of programs end up being junkware that your computer will not benefit from. Unfortunately, some of these programs can add unwanted browser toolbars or extensions that can clutter your browser, track your web browsing, show additional advertisements, or change your search page and other related settings. Usually, unless these types of programs are removed, they will continue causing issues with your web browsing experience.

Example of a PUP installing a search bar

Remove PUPs via Windows 10 Settings

  1. Click Start (1), then click Settings (2).
Windows start menu with the start button and settings highlighted.
  1. Next, Select Apps.
Windows Settings with Apps highlighted.
  1. Scroll down and locate the app you wish to remove, and click on Uninstall.
Apps screen with the uninstall option for an app highlighted.
  1. Carefully read any prompts in case there are special instructions. Proceed until the application is removed.
  2. Some applications may require that you reboot.

Remove PUPs via the Control Panel

  1. On your keyboard push and release the Windows Key and R at the same time.
PC Desktop Keyboard with Windows key and R highlighted.
  1. You will see a Run window open up. Type in appwiz.cpl then click on OK.
Run windows with appwiz.cpl typed and OK highlighted. Screenshot
  1. Locate a program you wish to remove within the list, click once on it to highlight it, then click on Uninstall.
Uninstall window with program and uninstall highlighted. Screenshot
  1. Carefully read any prompts in case there are special instructions. Proceed until the application is removed.
  2. Some applications may require that your computer be restarted to complete the uninstallation.

Test your browser after removing any PUPs from your machine. This may require you to restart your browser or your computer beforehand depending on what was removed.

5. Verify all Settings

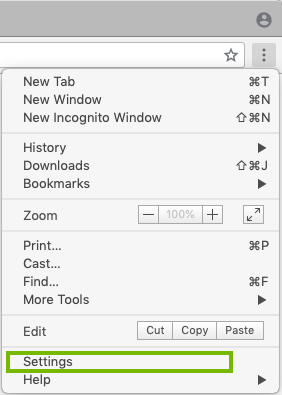
If your search experience hasn't returned to normal, the next step is to verify that all of Chrome's settings are where they should be in order to provide you with the search experience you're familiar with. If any settings were previously 'hijacked' by a malicious extension and were not reverted back to what they were originally set to, your search experience may still not be right.

Check start up, home page & search settings

  1. Open Google Chrome.
Google Chrome.
  1. Click the Customize and control Google Chrome button (three vertical dots) towards the upper right hand corner, then click Settings.
Chrome Settings
  1. Scroll down and verify Homepage is not malicious and change it if it is.
Homepage area of Chrome settings
  1. Scroll down and click on Manage Search Engines.
Manage your search engines with this button
  1. Verify no search hijackers are present.
Chrome with normal search engines

Check the Chrome shortcut

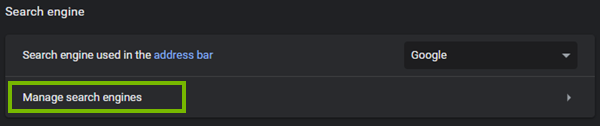
Malicious programs may have added additional code to the shortcut you click on that launches Google Chrome. This type of change would cause Chrome to load a page you don't want loaded every time it is opened using this shortcut, despite the settings you are using within Chrome itself.

  1. Click Start.
Windows 10 Start Menu.
  1. Search for "Chrome".
  2. Right-click on the Chrome result, then click on Open File Location.
Windows 10 chrome search results showing chrome right clicked
  1. Right-click Chrome, then select Properties.
Windows 10 right click menu showing properties
  1. Verify that the Target only contains the path "C:\Program Files (x86)\Google\Chrome\Application\chrome.exe" with nothing after it.
Chrome properties window showing the target shortcut
  1. Open Chrome and test things out. With all of these settings having been set to match your preferences, your search experience should return to normal.

Still having issues?

Unfortunately, it looks like your search page issue cannot be resolved via basic troubleshooting steps. We recommend your machine be serviced by a professional to determine the root cause of your search issues.

6. Clear History and Saved Data

The first order of business is making sure that your browser is not holding onto some outdated or bad data in the form of an old cookie, cached version of the website it may be trying to load, etc. Clearing this data allows your browser to load the websites you're asking it to load freshly as if it had never been there before.

  1. Open Google Chrome.
Google Chrome.
  1. Click the Customize and control Google Chrome button (three vertical dots) towards the upper right hand corner.
Menu button highlighted and pointed out in Google Chrome.
  1. Click More tools, then select Clear browsing data.
Chrome menu with More Tools and Clear Browsing Data highlighted.
  1. Select Advanced at the top. For Time range, select All time. Place a checkmark next to each item you'd like to clear, then select Clear data.
Chrome settings showing how to delete history

  1. Browsing history
  2. Recommended
    This clears the memory of the pages you've browsed to.
  3. Download history
  4. Recommended
    This clears the memory of files you've downloaded.
  5. Cookies and other site data
  6. Recommended
    Pages store small data to remember you between visits to their pages. These are called cookies. This option clears cookies.
  7. Cached images and files
  8. Recommended
    Pages are downloaded and saved to your computer, so they are faster to display. This option clears cached copies, which can resolve many problems you may have.
  9. Passwords and other sign-in data
  10. Not Recommended
    The browser saves usernames and passwords for sites you sign into. There's no need to clear this, normally.
  11. Autofill form data
  12. Not Recommended
    Your browser stores other form data, such as your address, common search terms, and other things you type often on sites. There's no need to clear this, normally.
  13. Site Settings
  14. Recommended
    Checking this will clear specialty site settings you may have save.
  15. Hosted app data
  16. Recommended
    Some sites, especially Google apps, store extra app data that will automatically re-download when needed. Clearing this will cause a very small wait and solves problems with those apps.

7. Remove Problematic Extensions

Google Chrome makes use of 'extensions' that can be added from the Chrome web store. Extensions are small software programs that customize your browsing experience. They allow users to tailor Chrome's functionality and behavior to meet certain individual needs or preferences. For example, things like ad blockers, visual themes that change Chrome's appearance, or even spell-checking extensions that can help make sure what you're typing on-screen is free of errors. Unfortunately, because of an extension's ability to alter Chrome's behavior, they can also change your homepage settings, search engine settings, etc. You may have inadvertently added an extension that has made some unexpected changes. Removing any extensions you don't want, don't need, or don't recognize is usually the best practice, and can return any altered settings back to normal.

  1. Open Google Chrome.
Google Chrome.
  1. Click the Customize and control Google Chrome button (three vertical dots) towards the upper right hand corner.
Menu button highlighted and pointed out in Google Chrome.
  1. Click on (1) More tools then (2) Extensions.
Chrome menu with more tools and extensions highlighted. Screenshot
  1. The following steps can be repeated to remove multiple browser extensions.
  2. Find the extension you want to remove, and click on REMOVE.
Extension menu with remove highlighted. Screenshot
  1. You will get a confirmation window. Click Remove to confirm removal.
Confirmation window with Remove highlighted. Screenshot
  1. You might get a new tab pop up upon removal, close the tab by hitting the X.
  2. Extensions are now gone, you may have to restart your browser for it to take effect. If you removed a malicious extension, it might have changed your homepage.

8. Remove Potentially Unwanted Programs

Potentially unwanted programs, or "PUPs", often arrive bundled with your computer or can tag along with another software program you meant to install. Most times, they are snuck into the EULA as a "Recommended Offer" that many of us are so accustomed to just click right through. Lots of these types of programs end up being junkware that your computer will not benefit from. Unfortunately, some of these programs can add unwanted browser toolbars or extensions that can clutter your browser, track your web browsing, show additional advertisements, or change your search page and other related settings. Usually, unless these types of programs are removed, they will continue causing issues with your web browsing experience.

Example of a PUP installing a search bar

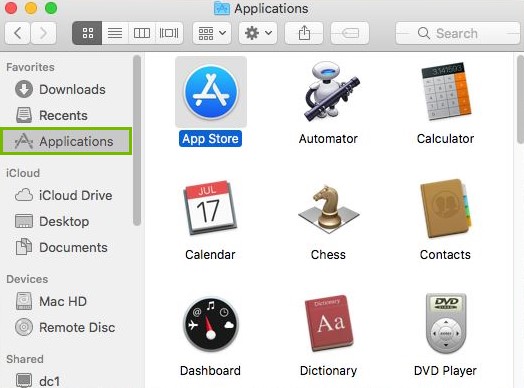
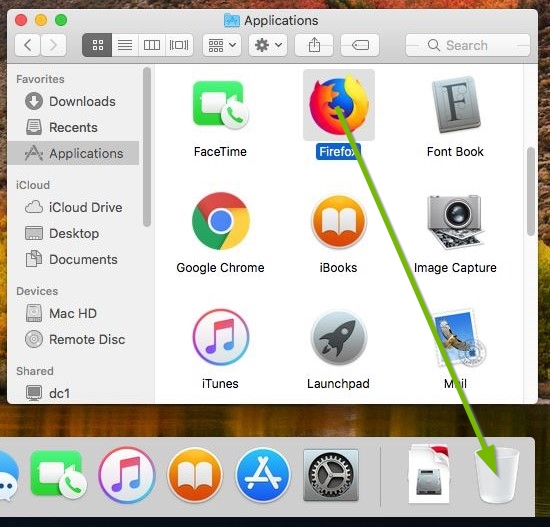
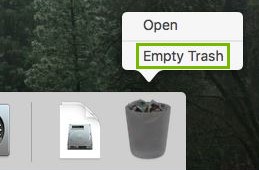
Removing an app may also remove all data for that app. Make sure you have any information you need backed up before removing an app for your Mac.

Remove apps installed from the App Store

  1. Open the Launchpad from the dock.
Launchpad highlighted
  1. Click and hold on an icon until all icons start to jiggle.
Shaking icon
  1. Click the "x" on the top left of the icon you want to remove.
X highlighted
  1. Click Delete to confirm removal.
Delete button highlighted

Remove apps via Finder

  1. Open the Finder from the dock.
Finder highlighted on the dock
  1. Click on Applications on the left.
Application highlighted
  1. Drag the app you wish to remove to the Trash Bin.
Drag app to the trashcan
  1. Right click on the trashcan and click Empty Trash.
Empty Trash highlighted

Test your browser after removing any PUPs from your machine. This may require you to restart your browser or your computer beforehand depending on what was removed.

9. Check Homepage Settings

Your web browser's homepage settings dictate the websites that are loaded when it is opened up. Malicious or scam programs can change these settings and cause issues. They can force an unwanted search page to load, blocking the legitimate one you want to use.

  1. Open Chrome.
Chrome icon
  1. Click the Customize and control Google Chrome button (three vertical dots) towards the upper right hand corner.
Menu button highlighted and pointed out in Google Chrome.
  1. Click on Settings.
Chrome menu with Settings highlighted. Screenshot
  1. Scroll down to you get to On Startup. You will see three options. If you want to set a custom page, select Open a specific page or set of pages.
  2. If you see one that you want to remove or change click on the 3 dots next to it. Click on Edit or Remove to change it.
Chrome On startup menu with 3 dots highlighted. Screenshot

Edit or remove options. Screenshot
  1. Open Chrome and test things out. With all of these settings having been set to match your preferences, your search experience should return to normal.

Still having issues?

Unfortunately, it looks like your search page issue cannot be resolved via basic troubleshooting steps. We recommend your machine be serviced by a professional to determine the root cause of your search issues.