How to Fix Search Not Working on Internet Explorer
Authored by: Support.com Tech Pro Team
1. Introduction
Searching the web is something we do every day. Whether you are searching from Internet Explorer's address bar, or have its homepage set to take you to your favorite search engine's website instead, you've likely gotten accustomed to the way you search on a daily basis. If that search experience has suddenly changed seemingly without warning, that's a clear sign that something is messing with IE's settings without your knowledge or consent.
This guide will help you make sure Internet Explorer is configured properly so that your search experience returns to normal once again.
Tools You'll Need:
A paperclip
iPhone charging cable
Access to a computer with iTunes installed
Any other non-consumable tools needed
Comment out tools section if no tools are necessary
-->
Supplies You'll Need:
Zip ties
Any other consumable supplies
Comment out supplies section if no supplies are necessary
-->
Before You Begin:
You must have access to a computer with iTunes installed.
You must have that thing for the other thing so you can do the thing.
Each individual prereq should have its own box like this. Not all will contain multiple links.
Comment out prerequisites section if no prereqs are necessary
-->
2. Clear History and Saved Data
The first order of business is making sure that your browser is not holding onto some outdated or bad data in the form of an old cookie, cached version of the website it may be trying to load, etc. Clearing this data allows your browser to load the websites you're asking it to load freshly as if it had never been there before.
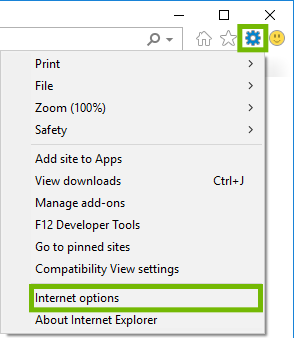
Open Internet Explorer.
Select the Gear icon in the top right corner, then select Internet options.
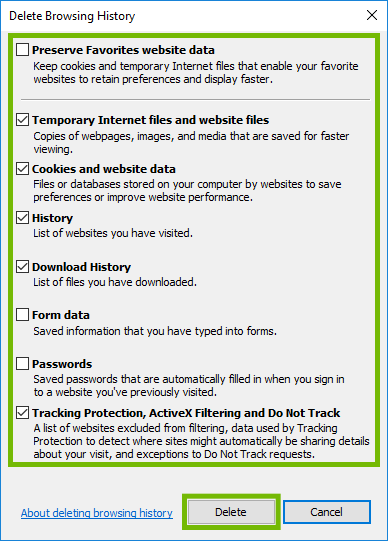
Under Browsing history, select Delete.
Go through the list of options here, to ensure the proper items are cleared. Once you have chosen your options, select Delete.
SettingCheckboxPreserve Favorites website dataUncheckedInternet Explorer segments out pages you have marked as favorites. We need to be sure to clear all data, not just some of it.Temporary Internet files and website filesCheckedThis clears your cache, making your browser get a new copy of the webpage, images, etc. It's important to clear this to get a fresh copy the next time you visit, as the copy your browser has may simply be corrupt.Cookies and website dataCheckedCookies are how websites 'know' you when you visit them multiple times. This file can become corrupt, and simply downloading a new one can fix many problems.
You will have to log back into any pages you use, such as mail or social media.
HistoryCheckedWhile you browse Your browser will keep track of every page you visit, to try to make it easier to return. This can become corrupt due to modern active web pages.Download HistoryPersonal ChoiceThese are a list of files you've downloaded recently. It is entirely safe to delete, or keep this list, as it won't affect pages. Checking this option does not delete the files you've downloaded, just the list the browser keeps.Form DataUncheckedInformation from entering forms online, such as your name, address, or other filled in information. This does not affect how a page loads, and can slow you down on your most commonly used pages.PasswordsUncheckedYour browser will save your passwords while you browse, making it easier to log into your most common websites later. This does not affect how a page loads, and can slow you down on your most commonly used pages.Tracking Protection, ActiveX filtering and Do Not TrackPersonal ChoiceA number of pages will track your use of those pages, and if you've opted out of such tracking. This setting tends not to be well respected from page to page, and some pages simply do not give you the option. While it can affect how a page is displayed, it will only do so in the advertising or other 'personalized content' on that page; not the page itself. It is okay to check or uncheck this option.
When complete, a message will open at the bottom of your browser letting you know the history has been deleted.
It can take quite a while to delete the cache and history, please be patient.
3. Remove Potentially Unwanted Programs
Potentially unwanted programs, or "PUPs", often arrive bundled with your computer or can tag along with another software program you meant to install. Most times, they are snuck into the EULA as a "Recommended Offer" that many of us are so accustomed to just click right through. Lots of these types of programs end up being junkware that your computer will not benefit from. Unfortunately, some of these programs can add unwanted browser toolbars or extensions that can clutter your browser, track your web browsing, show additional advertisements, or change your search page and other related settings. Usually, unless these types of programs are removed, they will continue causing issues with your web browsing experience.
Remove PUPs via Windows 10 Settings
Click Start (1), then click Settings (2).
Next, Select Apps.
Scroll down and locate the app you wish to remove, and click on Uninstall.
Carefully read any prompts in case there are special instructions. Proceed until the application is removed.
Some applications may require that you reboot.
Remove PUPs via the Control Panel
On your keyboard push and release the Windows Key and R at the same time.
You will see a Run window open up. Type in appwiz.cpl then click on OK.
Locate a program you wish to remove within the list, click once on it to highlight it, then click on Uninstall.
Carefully read any prompts in case there are special instructions. Proceed until the application is removed.
Some applications may require that your computer be restarted to complete the uninstallation.
Test your browser after removing any PUPs from your machine. This may require you to restart your browser or your computer beforehand depending on what was removed.
4. Verify All Internet Explorer Settings
If your search experience hasn't returned to normal, the next step is to verify that all of IE's settings are where they should be in order to provide you with the search experience you're familiar with. If any settings were previously 'hijacked' by a malicious extension and were not reverted back to what they were originally set to, your search experience may still not be right.
Click Start.
Search inetcpl.cpl and select it.
Internet Properties will open.
On the General tab, review that the homepage is correct and remove those you don't recognize.
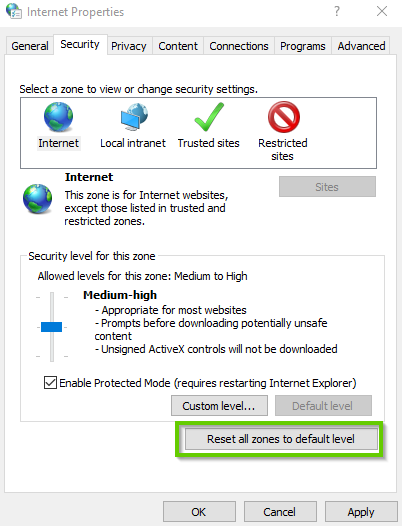
Click the Security tab.
Click Reset all zones to default level if it is available.
Click Trusted sites
Click the Sites button.
Highlight and Remove any websites you do not recognize.
Click Close when done.
Click Restricted sites then click the Sites button.
Highlight and Remove any helpful websites listed. Leave harmful websites in the list.
Click Close when done.
Click the Programs tab, then click Manage Add-ons.
Set to show All add-ons and check all entries for each. You may need to research add-ons you do not recognize before you remove them.
Do the same for Search Providers, and Accelerators.
Click Close when done
Return to the StartMenu.
Search for Internet Explorer.
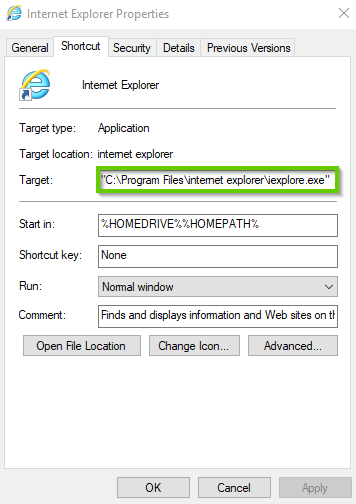
Right-click Internet Explorer and select Open File Location.
Right-click the Internet Explorer icon and select Properties.
Click the Shortcut tab.
Verify that is only contains C:\Program Files\Internet Explorer\iexplore.exe with nothing after it.
5. Try Your Search Page Again
Open Internet Explorer.
Test things out to see if your search experience has returned to normal.
If your search experience is still abnormal, we recommend that your machine be professionally diagnosed to determine the root cause of the issue.
.png)