.png)
Authored by: Support.com Tech Pro Team

Did you find yourself unable to connect your PC/Laptop to the internet? Or does your system internet connection show a “ No Internet Access†or “Limited Internet Access†error message? There are several causes that can trigger this type of issue, according to some users, they start receiving “No Internet Connection†or unidentified network no internet access error after installing the latest Windows 10 updates.
Some other report After upgrade to latest Windows 10 version, when they try to connect their computer or laptop to the internet or access the internet in any way then they will face different scenarios such as No network access, wifi no internet, wireless network connection not connected, No wireless network connection, unidentified network no internet access, no internet access etc.
Well, there are many factors that can cause the No Internet Access issue but some of them are corrupted, outdated or incompatible network adapter drivers, incorrect network configuration, hardware issues, network account issues, corrupt profile, etc. If you are suffering from any of the above-discussed scenarios. Here are some applicable solutions to fix the issue, make your PC/Laptop to the normal state and enjoy the Internet.
Windows have an inbuilt troubleshooter to check and fix network and internet connection problems. We recommend running the troubleshooter and letting windows fix the problem itself.
Flush DNS cache and Reset TCP/IP configuration to defaults setting is very helpful to fix most of the network and internet problems. To do this open Command Prompt with Admin privilege.
1. Here on the command prompt type the following command and hit enter after each command:
2. Restart your computer. Normally it should work by now. After flushing DNS you will see that No Internet Connection issue gets fixes and you can now enjoy your internet connection.
When you encounter a no Internet access issue, you can try configuring some network functions to fix it. To do so you need to use Command Prompt.
If the above solutions failed to fix, try to configure the DNS address manually (Google open DNS ). To do this Press Windows key + R, type ncpa.cpl hit the enter key. This will open the network configuration window, right-click on the currently active network adapter select properties. Click on Open Internet Protocol Version 4 (TCP/IP) properties. Make sure everything is set to DHCP (If you are using DHCP in your network). Otherwise, check your static configuration.
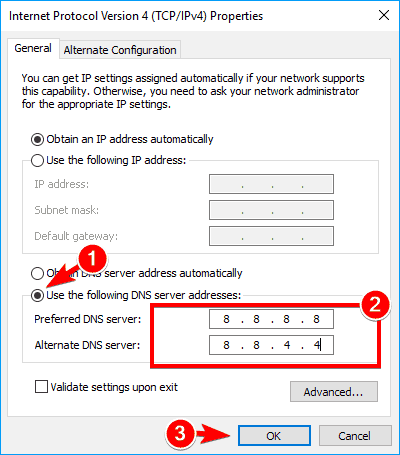
You should especially check the DNS configuration. Change the DNS IPs to 8.8.4.4 and 8.8.8.8 (Google DNS) and check if you get rid of the limited connectivity error.
If you are using a WiFi connection:

Support.com is committed to your privacy
We do not share or sell your data to third parties. We do use cookies and other third-party technologies to improve our site and services. The California Consumer Privacy Act (CCPA) gives you the ability to opt out of the use of cookies, third-party technologies and/or the future sale of your data. Do not sell my personal information.

Support.com is committed to your privacy
Read our Privacy Policy for a clear explanation of how we collect, use, disclose and store your information
