It won’t happen often, but there may be a time when something goes wrong and your PC will display a black or blank screen. You may or may not have your mouse cursor on screen.
This guide will walk you through correcting this problem.
Note: If you have a laptop go ahead and connect it to power. A drained battery may be the reason you're seeing a black screen.
2. Wake From Sleep
Tap any key on your keyboard or move your mouse to see if your system wakes up.
3. Understanding Power & Sleep Settings
When you're going to be away from your computer for a time or just have to step away for a cup of tea, Windows 10 has a variety of settings that will help you save power and your place.
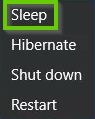
What is Sleep Mode
Sleep mode is best used when you're only stepping away for a short time. It will force your computer to enter a low power mode and power down your monitor. When you return, simply tap a key and it will resume where you left off with all the same windows open.
What is Hibernate Mode
Hibernate is like sleep mode, but goes a little farther. This mode will save your spot in a file on your system. Designed for laptops, it forces your computer into an even lower power mode.
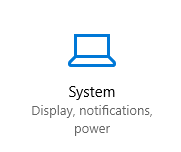
4. Configure Power & Sleep
Open the Start Menu.
Choose the Settings icon.
Choose the System icon.
On the left side of the screen, choose Power & sleep.
Change Screen and Sleep settings as needed.
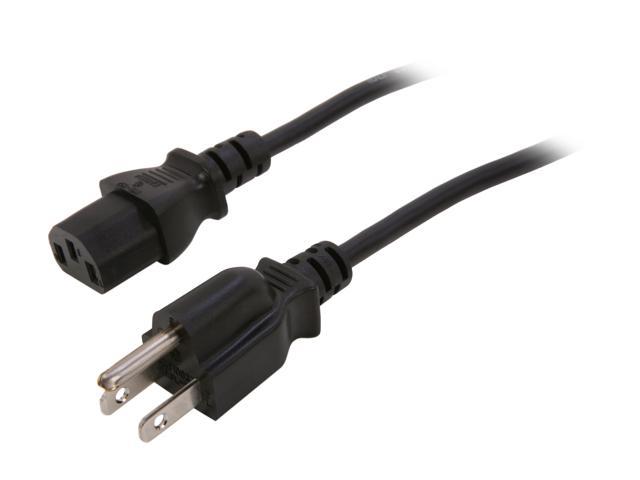
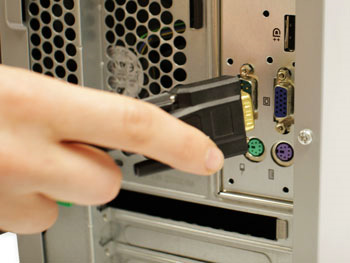
5. Check Physical Connections
Complete the following steps if you're using a monitor, or skip if you aren't.
Ensure that the power cord is securely plugged in from the wall to the monitor & PC.
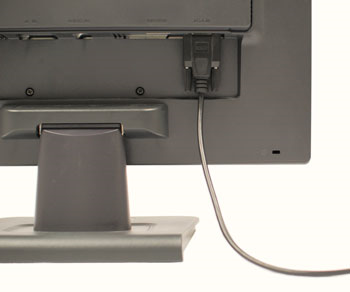
Check the video cable to make sure it is securely plugged into the PC and the monitor. If your computer supports more than 1 video port, try plugging the cable in a different port.
Ensure that both your computer and monitor are powered on. This will usually be indicated by a light on the monitor and computer.
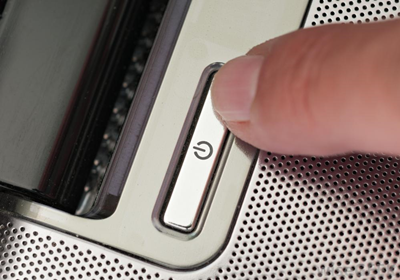
6. Hard Reboot
Locate the power button on your computer. Hold it down until you hear the hard drive turn off and any lights go out.
Turn the system back on.
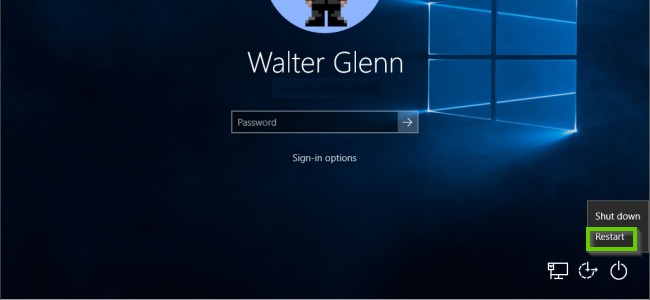
7. Reboot Into Safe Mode Through Log In Screen
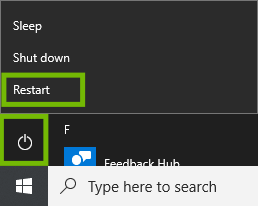
From the Log In screen select the Power icon.
Hold down the Shift key on your keyboard, and keep it held down.
With the Shift key still held down, click on Restart.
Release the shift key on your keyboard.
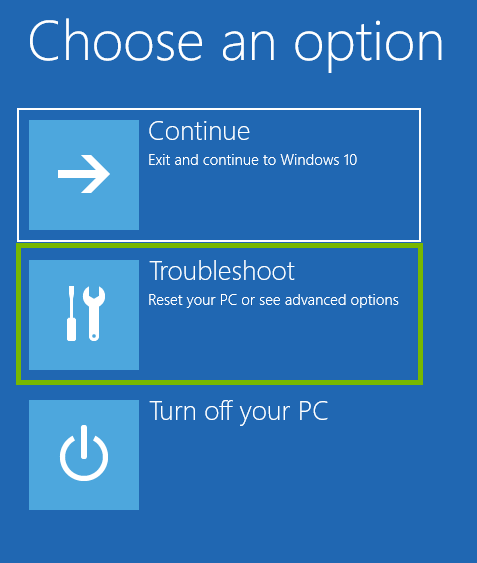
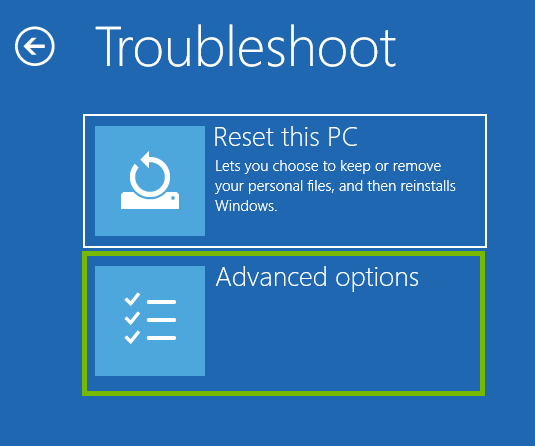
Choose Troubleshoot.
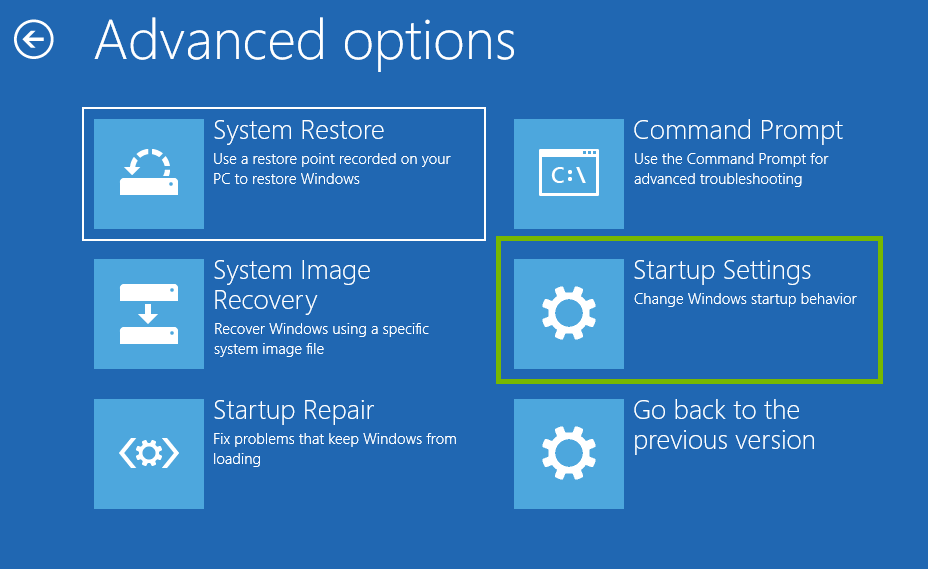
Choose Advanced options.
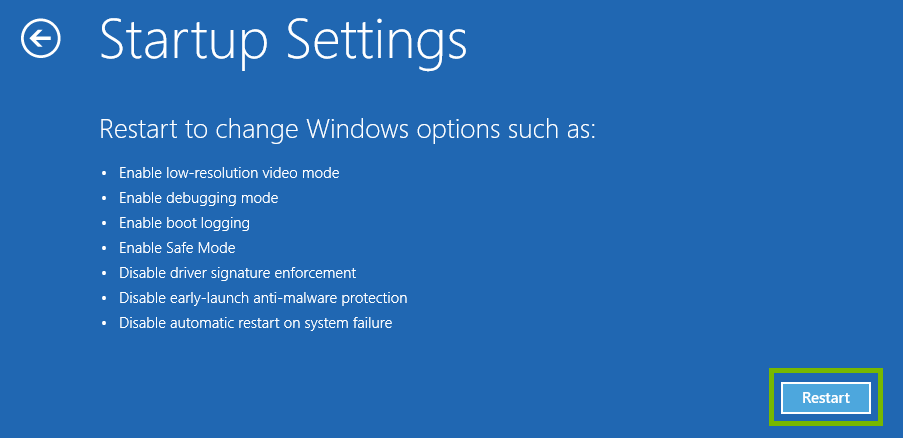
Choose Startup Settings.
Choose Restart.
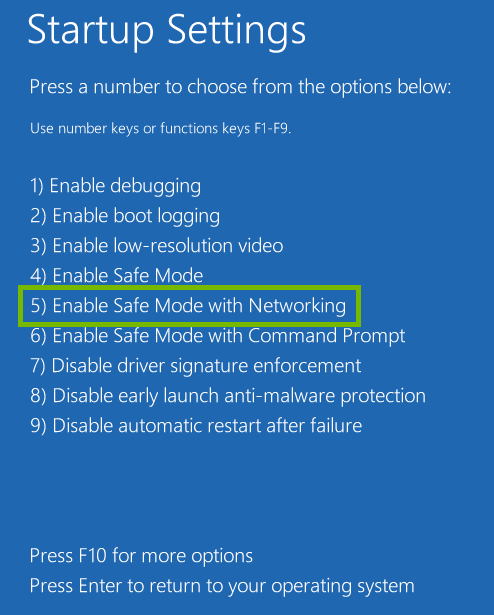
After your computer reboots, on the startup settings menu, push the F5 key on your keyboard for Enable Safe Mode with Networking.
Safe mode is a special diagnostic mode for Windows, designed to startup with very few items, to make sure nothing else can interfere with the task you're trying to perform.
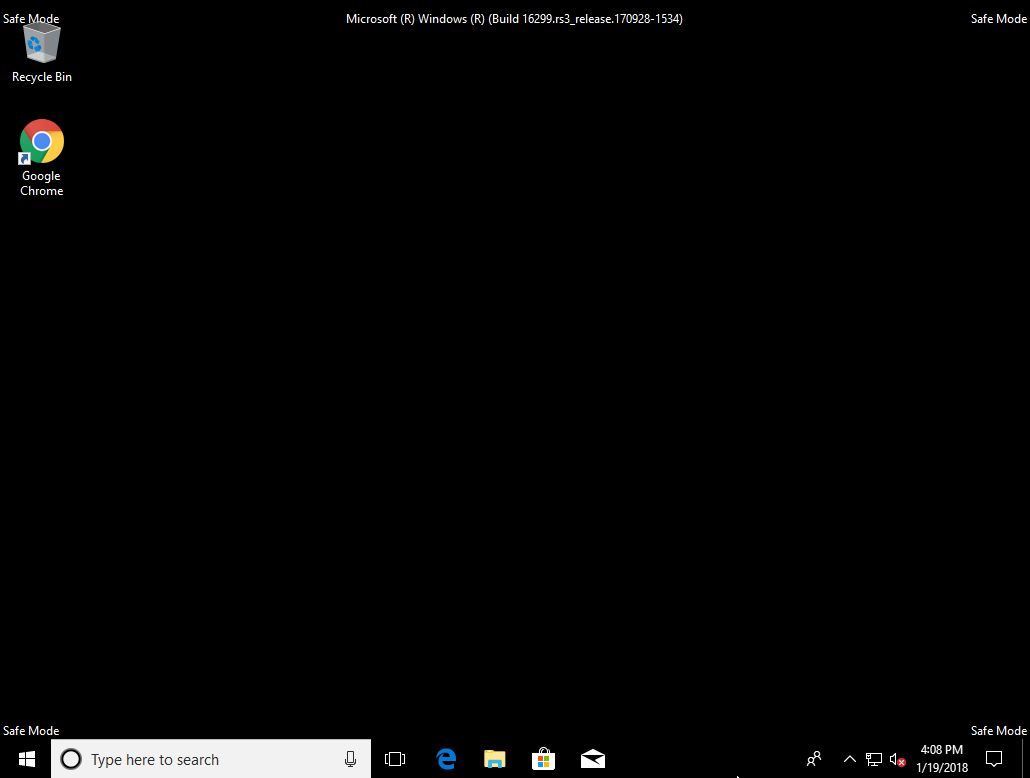
Windows may look different than you are used to, for example, the desktop background may be missing, the screen may look stretched or squished, and you should see the words Safe Mode in every corner. This is to let you know you are in safe mode.
Normal Mode ExampleSafe Mode Example
8. Reinstall Video Driver
The next steps will help you reinstall your video driver.
9. Uninstall Video Driver
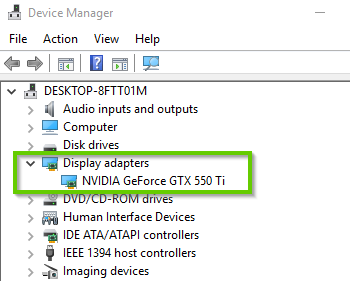
Search Device Manager.
Select Device Manager.
Select the small arrow next to Display adapters to expand this section, and see the devices in them.
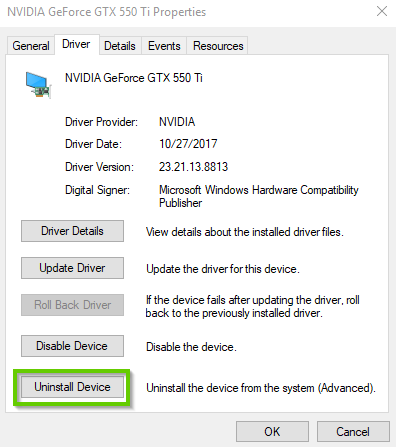
Double click one of the devices under one of these headings to show its properties. Select Driver.
Select Uninstall Driver.
10. Restart Your PC
Before your restart or shut down your PC, make sure to save all necessary work to prevent data loss.
Using the Mouse
Select the Start menu.
By default it is in the lower left corner of your screen.
Select Power, then select Restart.
Using the Keyboard
Press the Windows and X keys at the same time. This minimizes any open windows you may have.
Press the Alt and F4 keys at the same time. This tells Windows to close the desktop.
Select Restart, then OK.
11. Install Drivers
The drivers may come with the peripheral on a disc or you can download them from the manufacturers website.
Method 1:
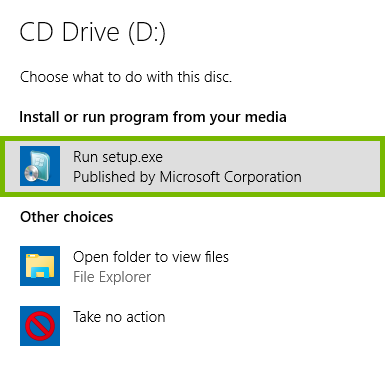
Insert the disc that came with your device into the computer.
You may get a pop-up on the screen asking you what you want to do with the contents of the disc. Choose the option that allows you to install or run the software from the disc.
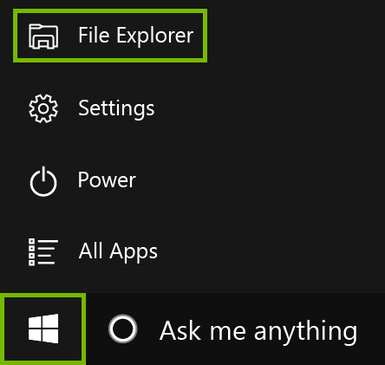
If you don't get this pop-up, click on the Windows button on the bottom left corner of the screen, then click on File Explorer or its icon.
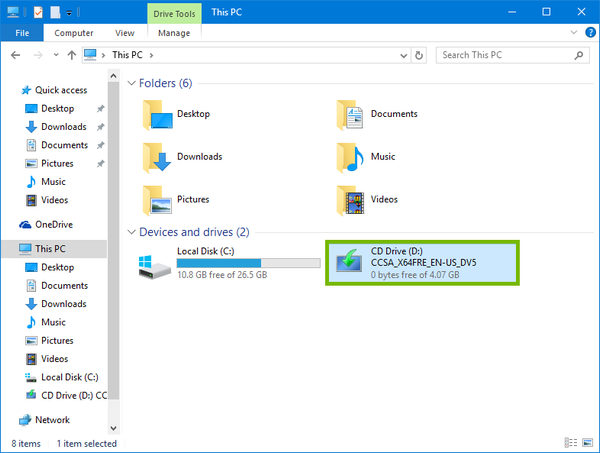
In the File Explorer, look for the disc drive and double click it to open its contents.
Look for the Setup or Install file and launch it, then follow the instructions to install the drivers onto the computer.
Method 2:
Open a web browser on your computer.
Navigate to the manufacturers website.
Look for the Support heading on the website and click on it.
The place where the drivers can be downloaded from varies by how the manufacturers website is designed. Sometimes you can find them under the Downloads section, other times under Software or under Drivers, or even a combination of these words.
You can either find the needed drivers by typing in the peripherals name and model in the search field like in the image above or you can find them by clicking through the categories of devices like in the image below.
Once you've located the driver for your device, click to download it and save it onto your computer.
Launch the downloaded driver and follow the instructions to install it on the computer.
12. System Restore
Turning the system off while System Restore is running can cause corruption. If your device is battery-operated, connect it to a power outlet first as System Restore may take time and should not be interrupted.
System restore will remove any programs installed and settings made after the selected date.
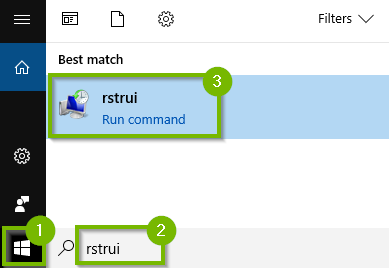
Open the Start Menu, type "rstrui" in the search box and then click rstrui.
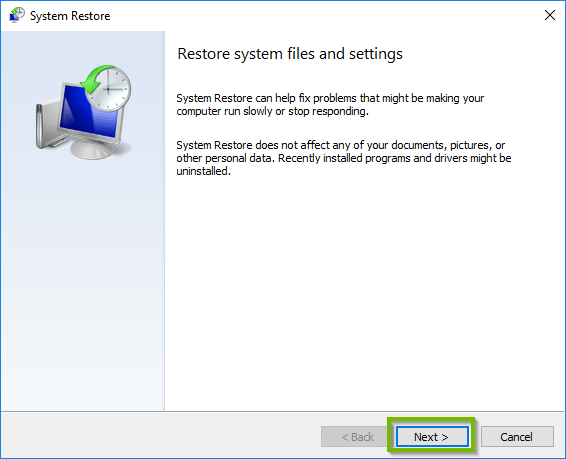
System Restore will open. Click Next.
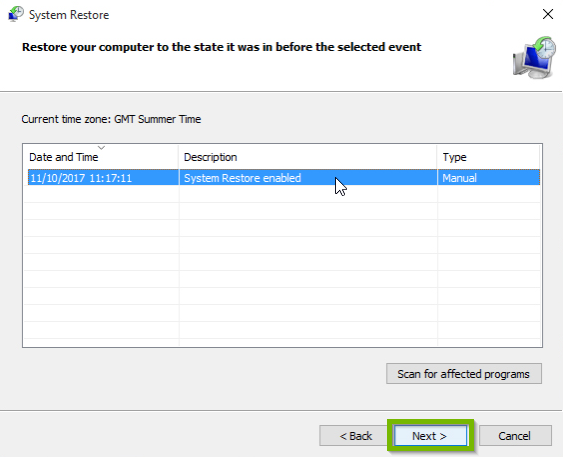
Select a date before the issue started, you may see more than 1 restore point. Click Next afterwards.
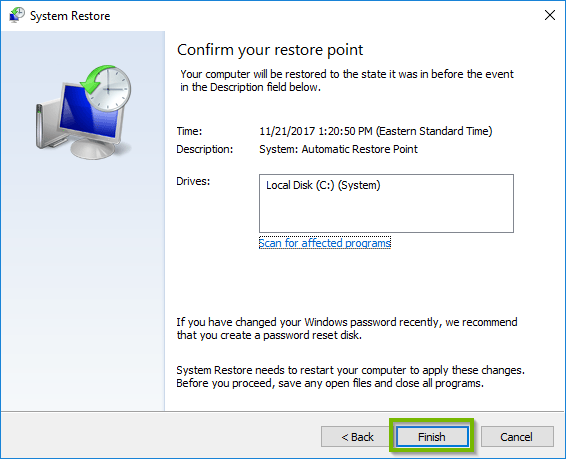
Confirm your restore point by clicking Finish. Click Back if you wish to change the restore point.
The process will take some time to finish. The system will also reboot shortly.
13. Backup Question
The next steps will reset Windows.
In order to continue we need to know if you want to backup your data.
14. Backup
Windows 10 comes with its own backup software.
To begin you'll need an external drive.
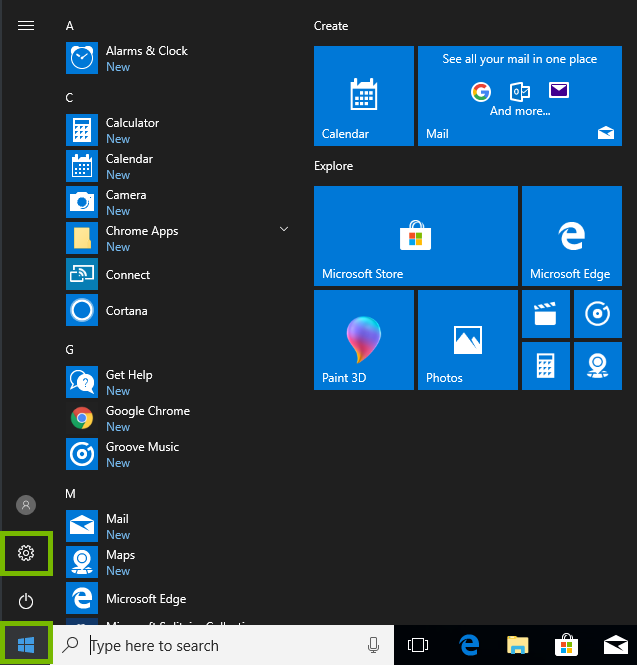
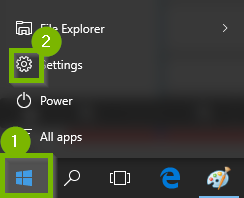
Select the Start button, then select Settings.
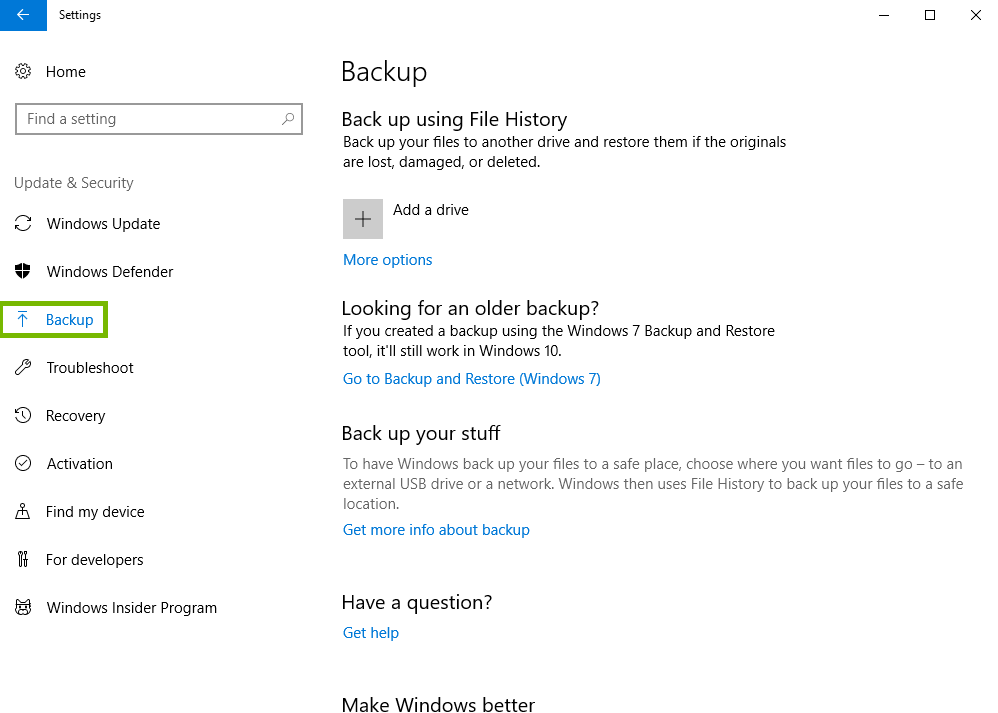
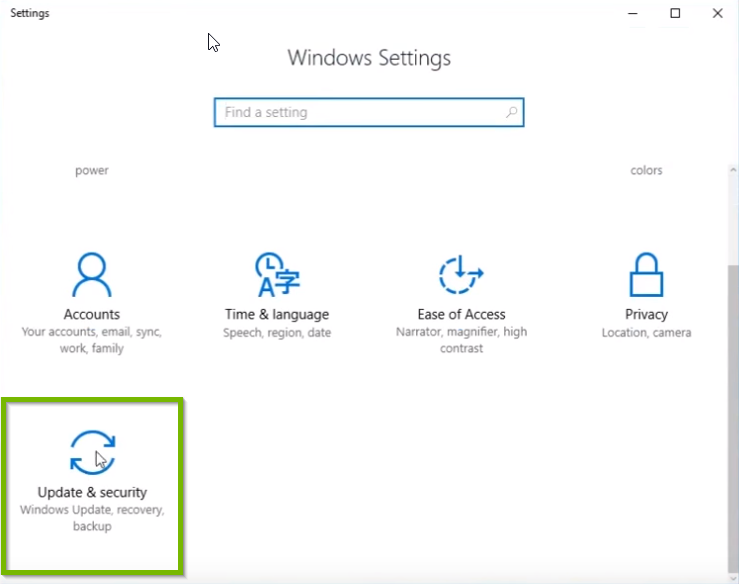
Select Update & Security.
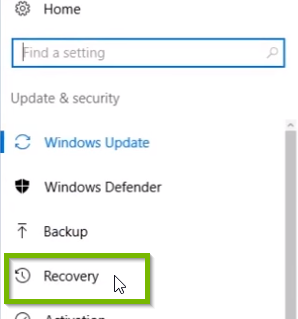
Select Backup.
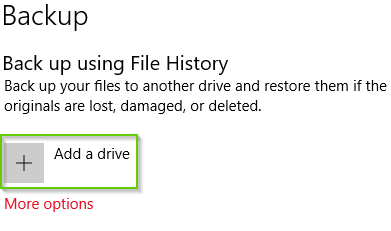
Make sure your external drive is connected and select Add a Drive.
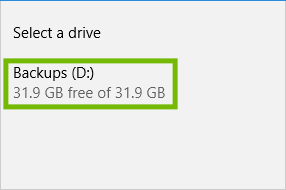
Select your drive from the drop down list.
Backups will start automatically, you do not have to make any other changes.
Windows 10 will now make a backup every hour of C:\Users\<your username>.
If you want to change these settings click More Options beneath Add a drive.
15. Reset Windows
Performing a Windows 10 Reset keeps your personal files, settings, and apps that came installed on your machine in-tact.
For portable devices: Before proceeding with a Reset, make sure the device is connected to a power outlet to avoid power loss during the reset process.
Open the Start Menu, and select the Settings icon.
Scroll down and select Update & Security.
Select Recovery.
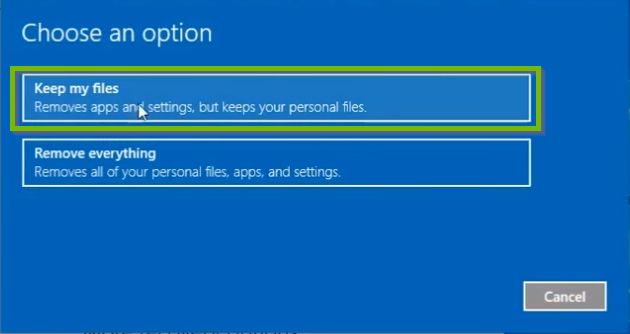
Click Get started under Reset this PC.
Select Keep my files.
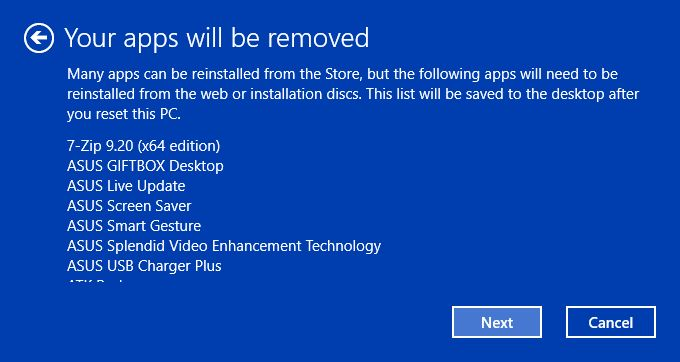
Take note of any apps that will need to be reinstalled. Click 'Next'.
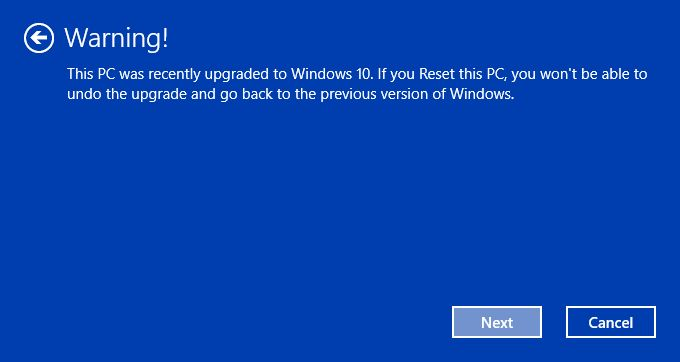
If prompted with a Warning, click 'Next'.
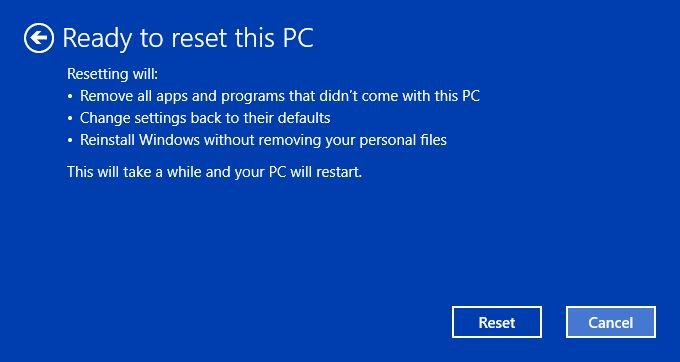
At this point, the system is ready to be reset. This process may take quite a while, and the system will automatically restart when needed. Click Reset when ready.
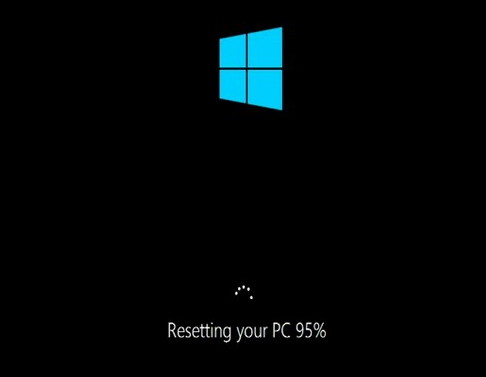
Windows 10 will start the reset process and may reboot several times while running. Follow any on-screen instructions that may require your attention.
Once the process is complete, you may use your system again.
16. What's next?
17. What's next?
18. Reboot Into Safe Mode Through Log In Screen
From the Log In screen select the Power icon.
Hold down the Shift key on your keyboard, and keep it held down.
With the Shift key still held down, click on Restart.
Release the shift key on your keyboard.
Choose Troubleshoot.
Choose Advanced options.
Choose Startup Settings.
Choose Restart.
After your computer reboots, on the startup settings menu, push the F5 key on your keyboard for Enable Safe Mode with Networking.
Safe mode is a special diagnostic mode for Windows, designed to startup with very few items, to make sure nothing else can interfere with the task you're trying to perform.
Windows may look different than you are used to, for example, the desktop background may be missing, the screen may look stretched or squished, and you should see the words Safe Mode in every corner. This is to let you know you are in safe mode.
Normal Mode ExampleSafe Mode Example
19. System Restore
Turning the system off while System Restore is running can cause corruption. If your device is battery-operated, connect it to a power outlet first as System Restore may take time and should not be interrupted.
System restore will remove any programs installed and settings made after the selected date.
Open the Start Menu, type "rstrui" in the search box and then click rstrui.
System Restore will open. Click Next.
Select a date before the issue started, you may see more than 1 restore point. Click Next afterwards.
Confirm your restore point by clicking Finish. Click Back if you wish to change the restore point.
The process will take some time to finish. The system will also reboot shortly.
20. Backup Question
The next steps will reset Windows.
In order to continue we need to know if you want to backup your data.
21. Backup
Windows 10 comes with its own backup software.
To begin you'll need an external drive.
Select the Start button, then select Settings.
Select Update & Security.
Select Backup.
Make sure your external drive is connected and select Add a Drive.
Select your drive from the drop down list.
Backups will start automatically, you do not have to make any other changes.
Windows 10 will now make a backup every hour of C:\Users\<your username>.
If you want to change these settings click More Options beneath Add a drive.
22. Reset Windows
Performing a Windows 10 Reset keeps your personal files, settings, and apps that came installed on your machine in-tact.
For portable devices: Before proceeding with a Reset, make sure the device is connected to a power outlet to avoid power loss during the reset process.
Open the Start Menu, and select the Settings icon.
Scroll down and select Update & Security.
Select Recovery.
Click Get started under Reset this PC.
Select Keep my files.
Take note of any apps that will need to be reinstalled. Click 'Next'.
If prompted with a Warning, click 'Next'.
At this point, the system is ready to be reset. This process may take quite a while, and the system will automatically restart when needed. Click Reset when ready.
Windows 10 will start the reset process and may reboot several times while running. Follow any on-screen instructions that may require your attention.
Once the process is complete, you may use your system again.
23. What's next?
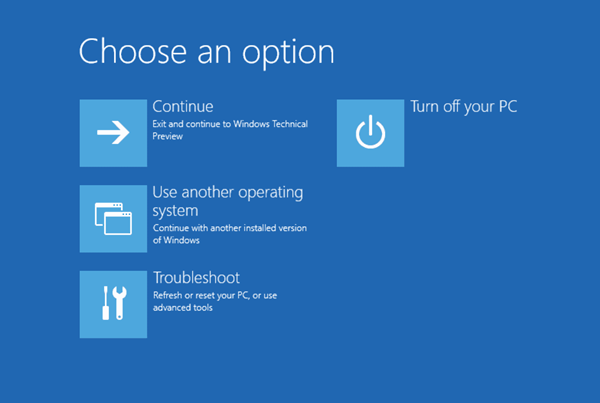
24. Try to Get to Troubleshooting Menu
Locate the power button on your computer. Hold it down until you hear the hard drive turn off and any lights go out.
Turn the system back on.
Repeat this process until you reach the Choose An Option menu.
25. Enter Safe Mode from Troubleshooting Menu
Choose Troubleshoot.
Choose Advanced options.
Choose Startup Settings.
Choose Restart.
After your computer reboots, on the startup settings menu, push the F5 key on your keyboard for Enable Safe Mode with Networking.
Safe mode is a special diagnostic mode for Windows, designed to startup with very few items, to make sure nothing else can interfere with the task you're trying to perform.
Windows may look different than you are used to, for example, the desktop background may be missing, the screen may look stretched or squished, and you should see the words Safe Mode in every corner. This is to let you know you are in safe mode.
Normal Mode ExampleSafe Mode Example
26. System Restore
Turning the system off while System Restore is running can cause corruption. If your device is battery-operated, connect it to a power outlet first as System Restore may take time and should not be interrupted.
System restore will remove any programs installed and settings made after the selected date.
Open the Start Menu, type "rstrui" in the search box and then click rstrui.
System Restore will open. Click Next.
Select a date before the issue started, you may see more than 1 restore point. Click Next afterwards.
Confirm your restore point by clicking Finish. Click Back if you wish to change the restore point.
The process will take some time to finish. The system will also reboot shortly.
Remove Hidden Spyware In Minutes For Free
Detect and remove spyware, keyloggers, tracking cookies, and other
threats that slow down your PC or steal your data.
65+ Million Downloads
Spyware scanner with AI-powered detection engine + database
.png)