Sometimes the accounting data in your current file cannot be cleaned up in a reasonable timeframe. In these cases, importing your data is a great option to start with a clean accounting file. To import data:
Go to the Gear icon > Tools > Import data and select the type of data you would like to import.
Download a Sample File to use as a template for correct file mapping. File types for import must be of .xlsx or .csv file type.
3. Customers Import
Select Customers.
Browse for the File to be imported.
Once the import file is chosen, Next
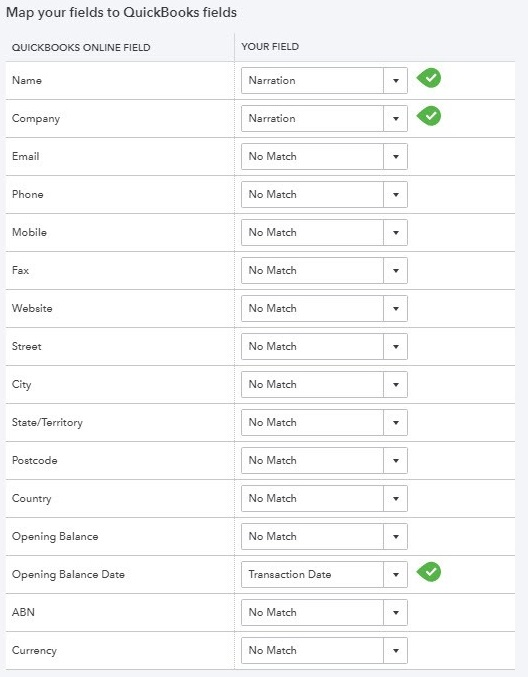
Review the fields (columns from import file) to ensure they are matched correctly with QuickBooks Online fields for Customers. If necessary, change the mapping of any field, and select Next.
Review the list and make any corrections if required, directly on the preview screen. Click on Import to finalize the file import.
4. Suppliers Import
Select Suppliers.
Browse for the File to be imported.
Once the import file is chosen, Next
Review the fields (columns from import file) to ensure they are matched correctly with QuickBooks Online fields for Suppliers. If necessary, change the mapping of any field, and select Next.
Review the list and make any corrections if required, directly on the preview screen. Click on Import to finalize the file import.
5. Chart of Accounts import
Select Chart of Accounts.
Browse for the File to be imported.
Once the import file is chosen, Next
Review the fields (columns from import file) to ensure they are matched correctly with QuickBooks Online fields for Chart of Accounts. If necessary, change the mapping of any field, and select Next.
Review the list and make any corrections if required, directly on the preview screen. Click on Import to finalize the file import.
To complete the import process, the Chart of Accounts list must be imported prior to the Products and Services list.
6. Products and Services
Select Products and Services.
Browse for the File to be imported.
Once the import file is chosen, Next
Review the fields (columns from import file) to ensure they are matched correctly with QuickBooks Online fields for Products and Services. If necessary, change the mapping of any field, and select Next.
Review the list and make any corrections if required, directly on the preview screen. Click on Import to finalize the file import.
.png)