Windows 8 was released in 2008 and introduced the Metro interface.
This guide will walk you though the install and setup process of Windows 8. This will cover how to do a clean install or a parallel install.
Clean Install - You will lose all data on the drive or partition you install Windows on.
Parallel Install - This is typically done for recovery purposes and in some cases for dual booting. This will install a copy of windows on your existing drive and rename your existing system folders of your previous install so you do not lose any data.
2. Media
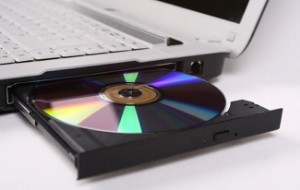
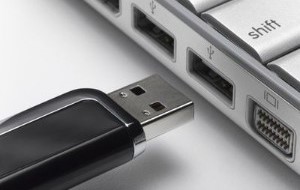
Insert your Windows 8 disc into their DVD-ROM drive. If the Installation Media is on a USB drive, then plug it in.
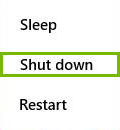
Shut down the system completely.
Select the Start Menu.
Select the Power Button.
Select Shut Down to shut down your computer.
Any unsaved work will be lost. Please save any documents you are working on before shutting down your computer.
Remove any unnecessary devices that may interfere with the installation and configuration of the OS. This includes but is not limited to any USB mass storage devices, including flash drives (that are not related to their installation media), external hard drives, and external USB hubs. Printers should be disconnected as well. If the system is a laptop and it is in a docking station, remove it from the dock.
Turn on the computer. A prompt stating "Press any key to boot from CD / DVD / USB" should appear. Press any key.
The Windows 8 Installation Splash Screen should appear.
3. Install OS
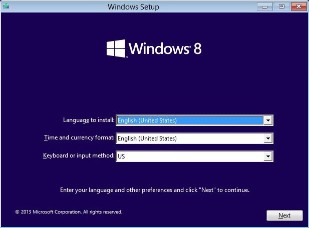
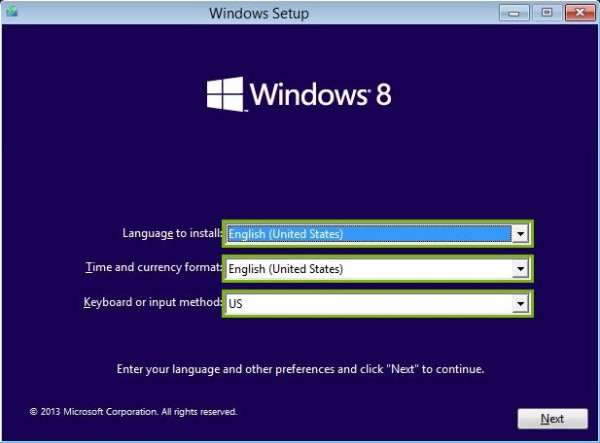
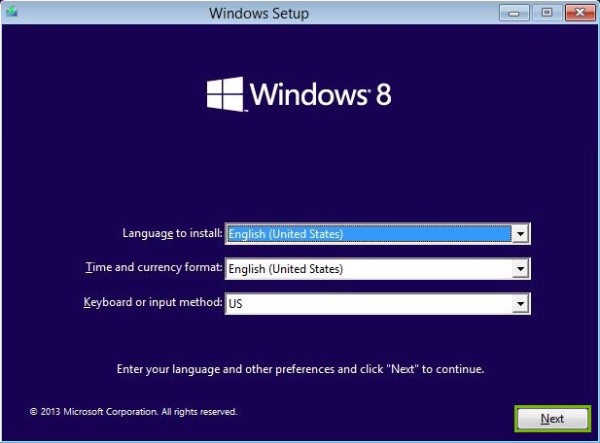
Select your language, region, and keyboard type.
Click Next.
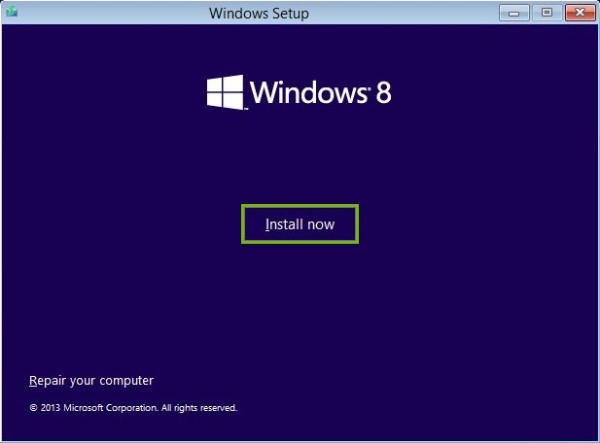
Click Install Now.
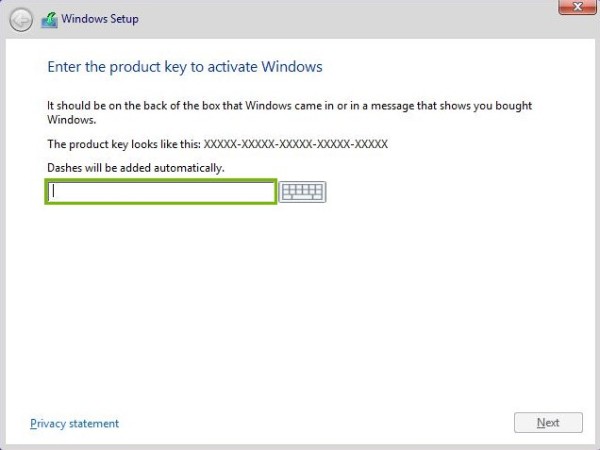
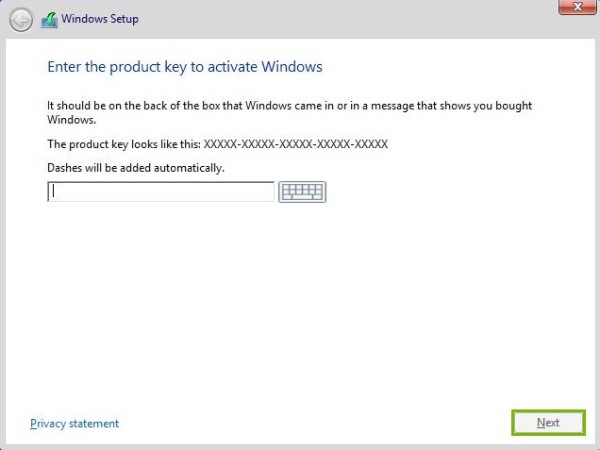
Enter your product key.
Click Next.
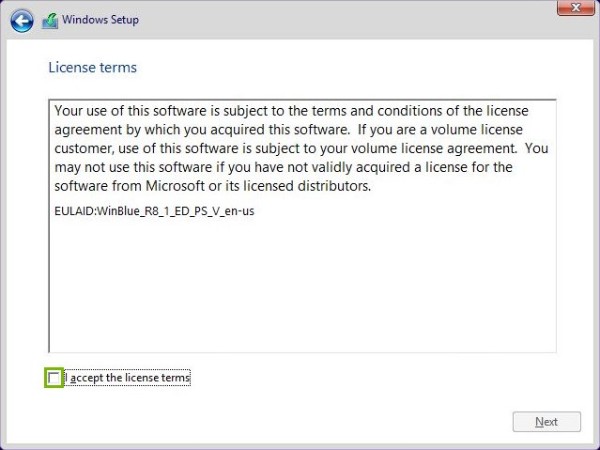
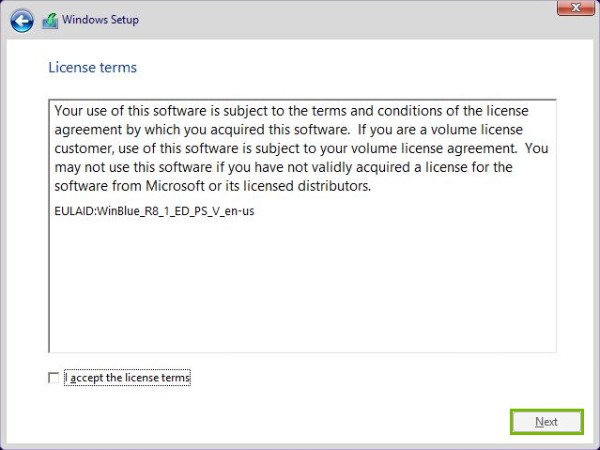
Click the I accept the license terms box.
Click Next.
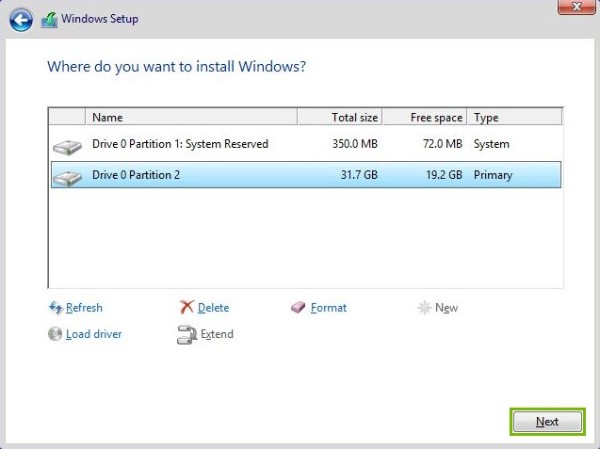
Select the type of install you wish to perform.
You may only choose the upgrade options if you ran the windows setup from within a compatible running version of Windows.
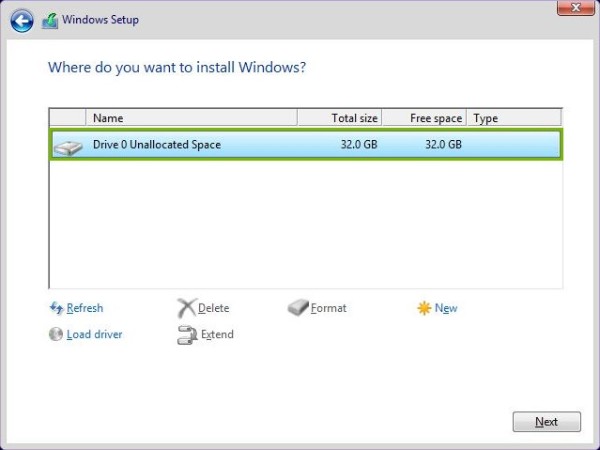
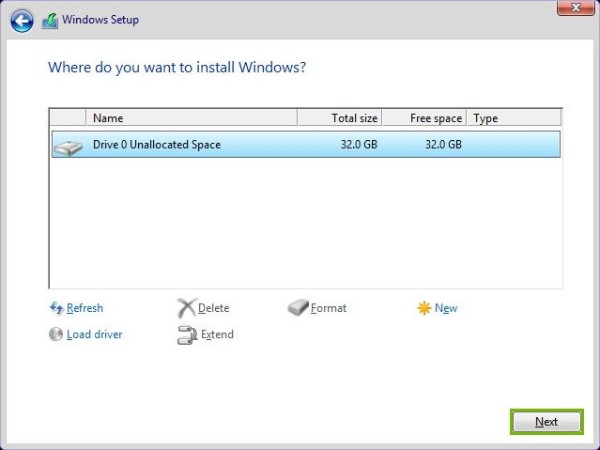
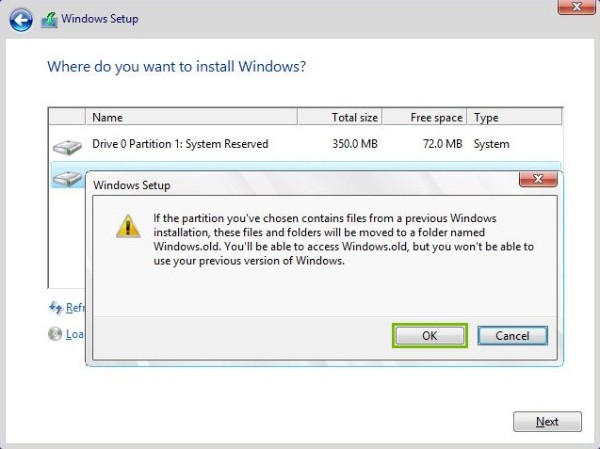
Select the drive you want to install windows on.
Click Next.
The install process will now begin. This will take around 30 minutes to complete.
4. Start
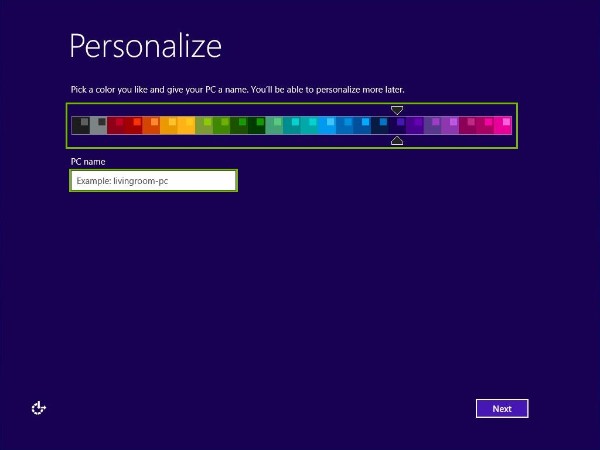
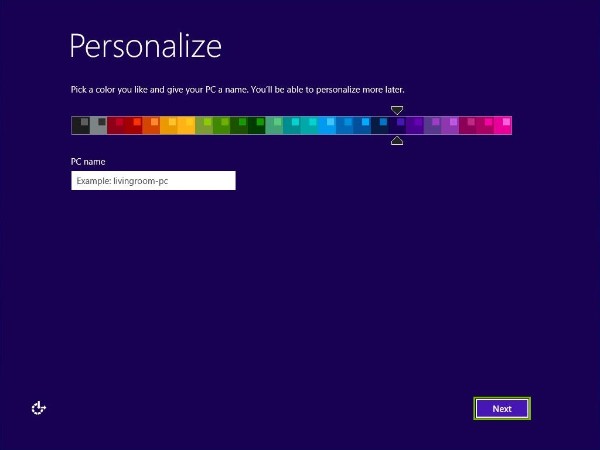
Choose a color you would like to have for your profile and then type a description to identify your computer.
Click on Next.
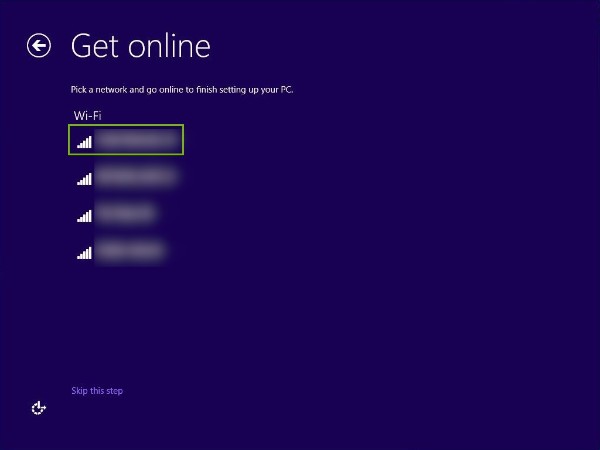
5. Wi-Fi
Select the Wi-Fi network you wish to connect to.
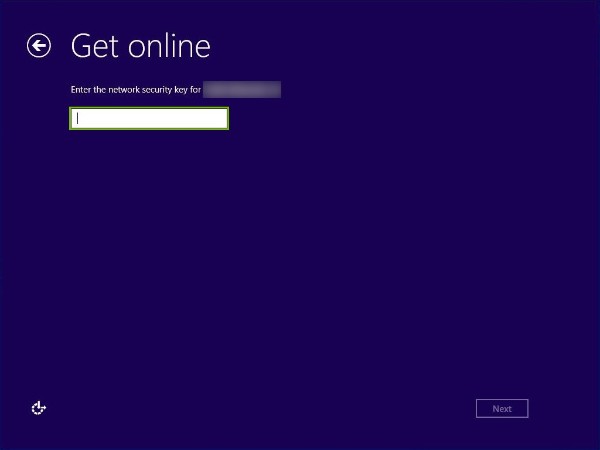
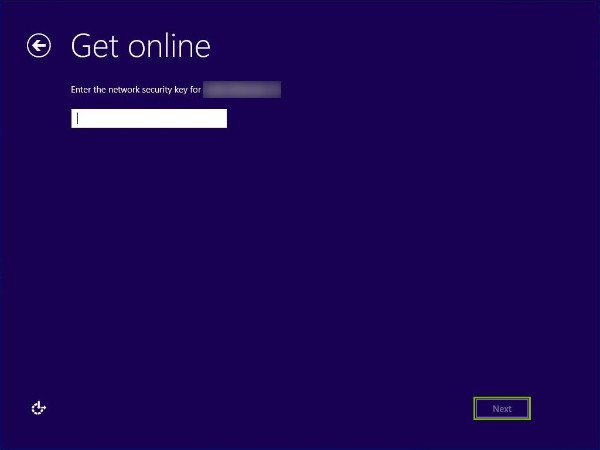
Enter your security key.
Click Next.
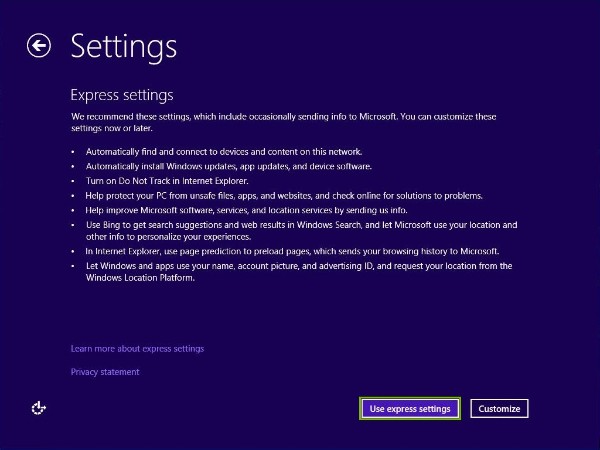
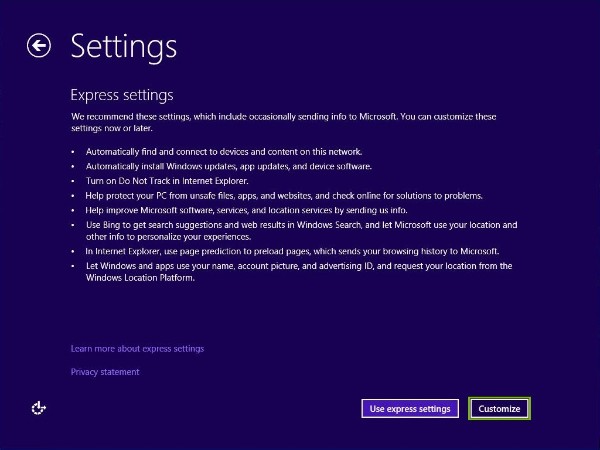
6. Express or Custom Setup
Express Settings - The following list are enabled by default.
Automatically find and connect to devices and content on the local network.
Automatically install windows updates, app updates, and device software.
Turn on Do Not Track in Internet Explorer
Help protect your PC from unsafe files, apps, and web sites.
Help Improve Microsoft services by sending data to Microsoft.
Use Bing and search suggestions and web results in Windows Search.
Let Microsoft use your location and other info to personalize your experience.
Page Prediction is used to preload pages. This sends your browsing history to Microsoft.
Let windows and apps use your name, account picture, and advertising ID, and request your location from the Windows Location Platform.
Custom Settings - Allows you to pick your preferences
7. Express Setup
Click on Use express settings.
8. Microsoft Account or Local Account
Microsoft Account - Allows you to synchronize you settings between multiple computers signed into the same account. If you forget your password, you must reset it online using another device. A PIN can be setup for easy login access.
Local Account - All information is kept on that computer regarding your computer login. If you forget your password you can only reset it using a password reset tool, or by using 3rd party utilities. Local accounts do not require a password.
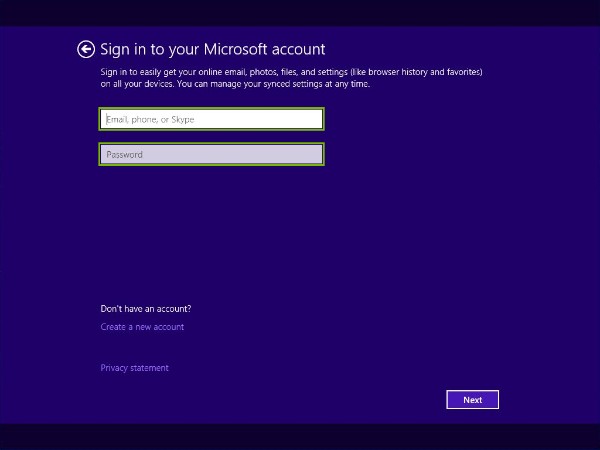
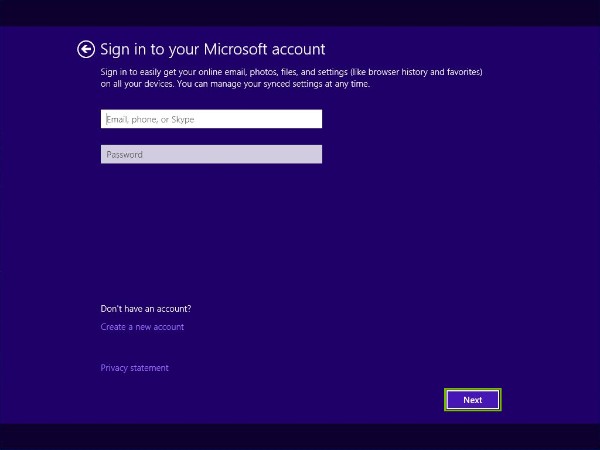
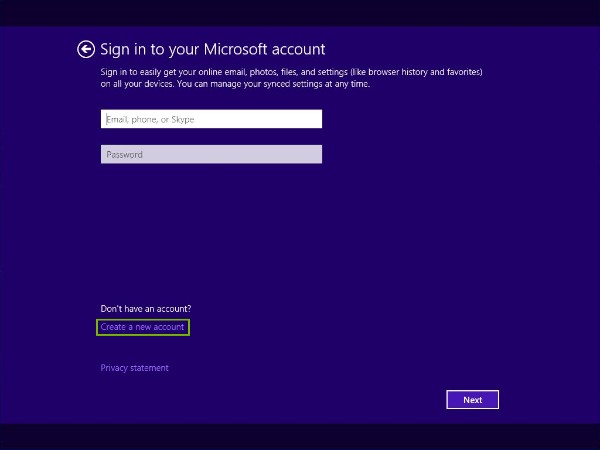
9. Existing Microsoft Account
Enter your Microsoft account credentials.
Click Next.
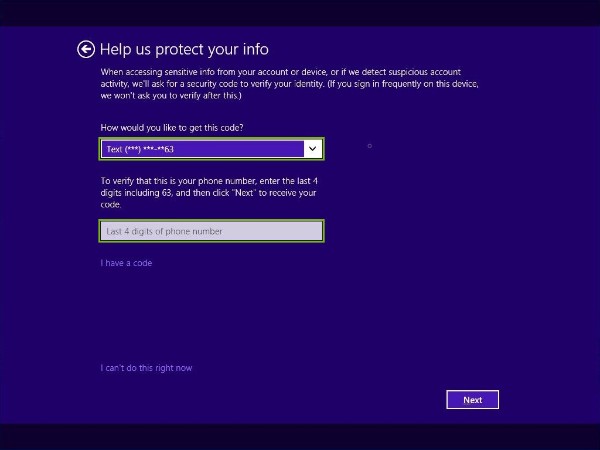
You will be prompted to verify your work. Choose an option.
Click Next.
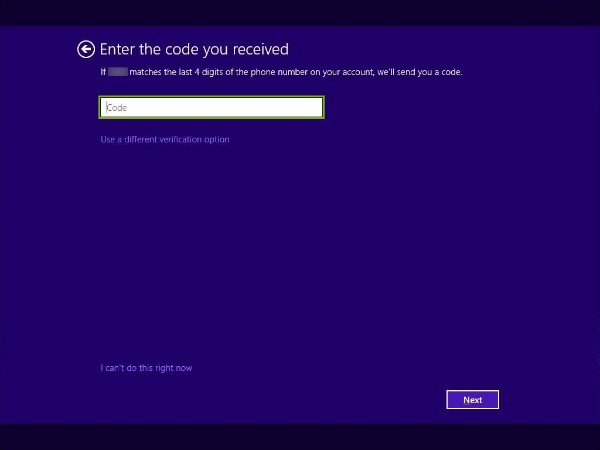
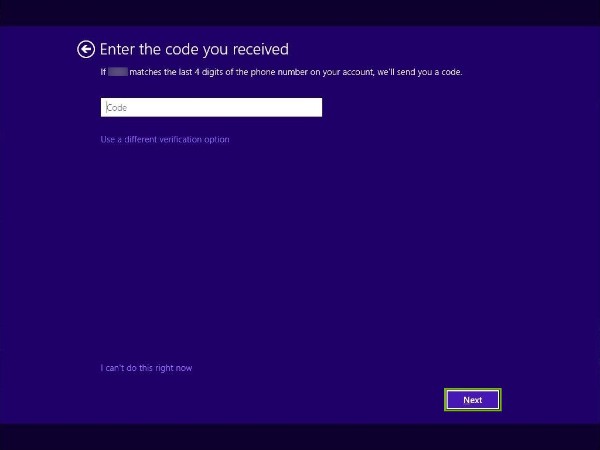
Depending on your verification method you will be asked to provide a code.
Click Next.
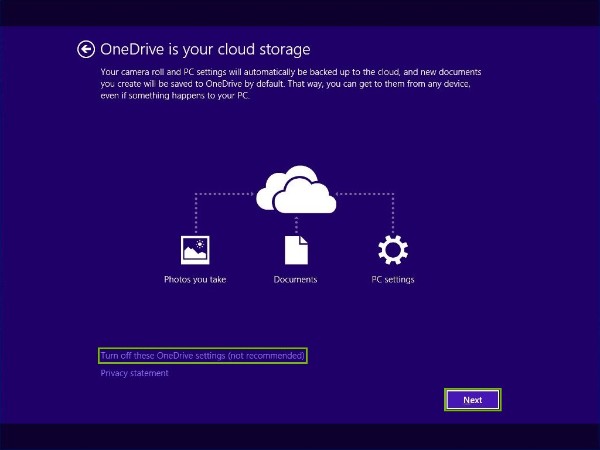
Choose whether or not you wish to use One Drive.
10. Create Microsoft Account
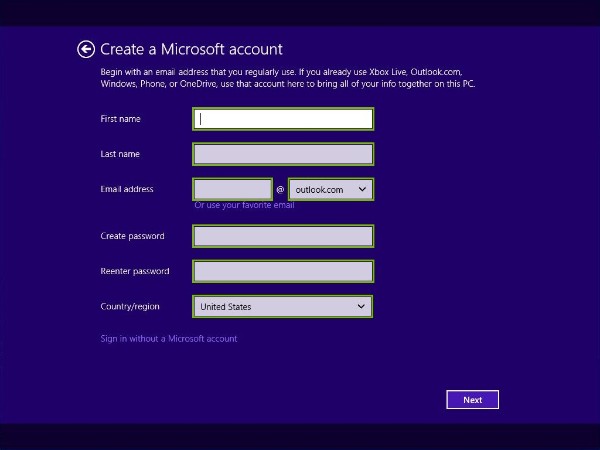
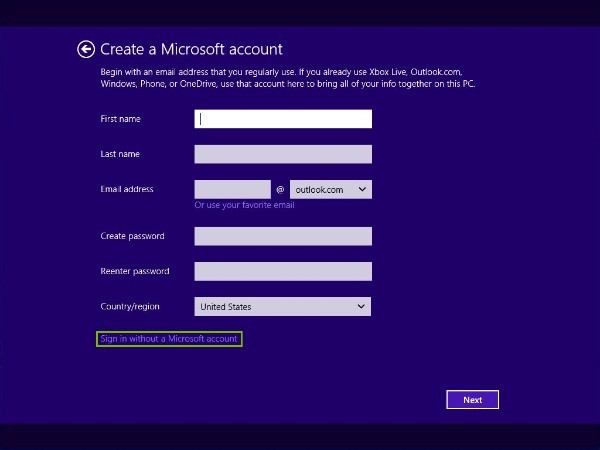
Click on Create a new account.
Enter your name, email address, password, and region.
Click Next.
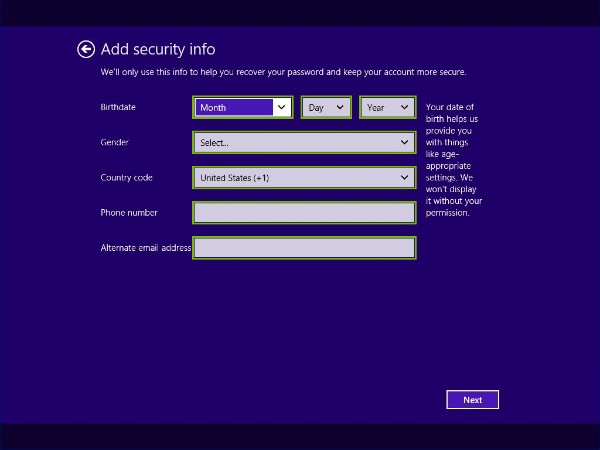
Enter your birth date, gender, country code, phone number, and an alternative e-mail address.
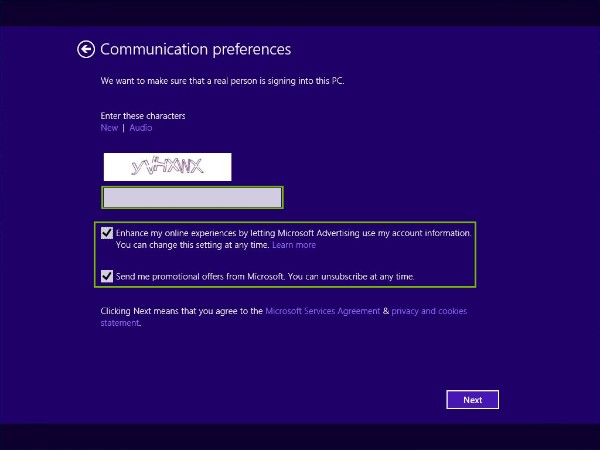
Enter the captcha code and choose your communication preferences.
Choose an verification method.
Click Next.
Enter the code that was provided to you.
Click Next.
Choose whether or not you wish to use One Drive.
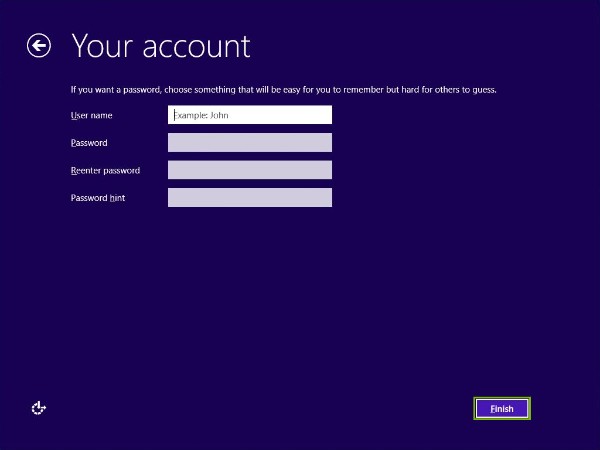
11. Local Account
Click on Create a new account.
Click Sign in without a Microsoft Account.
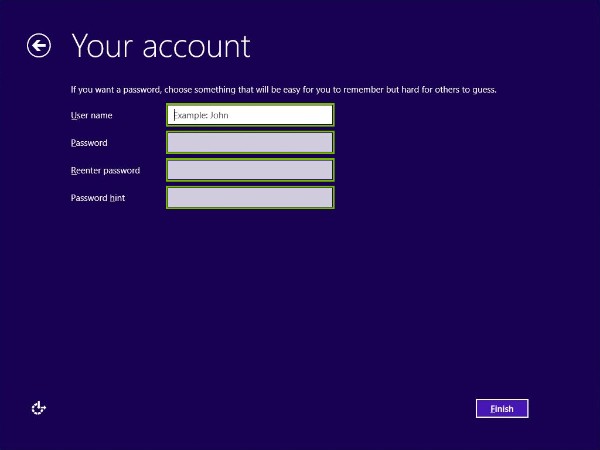
Enter your username, password, and password hint.
Click on Finish.
12. Custom Setup
Click Customize.
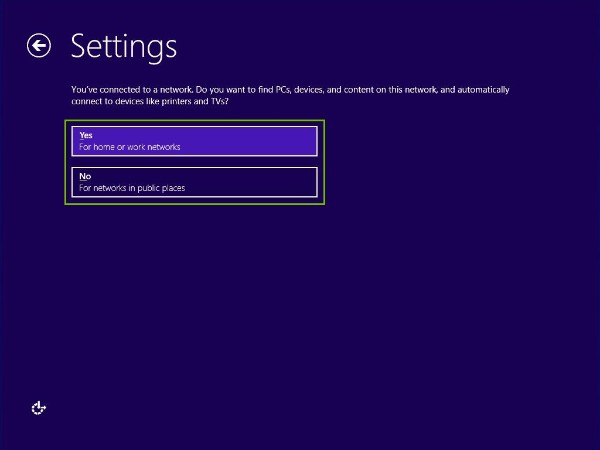
Choose whether or not you want your computer to locate other devices on the network.
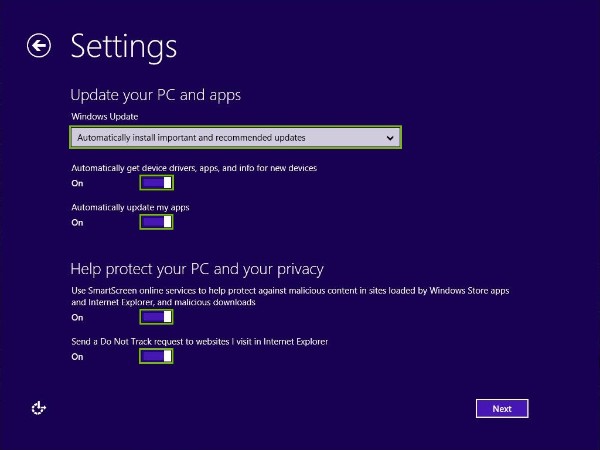
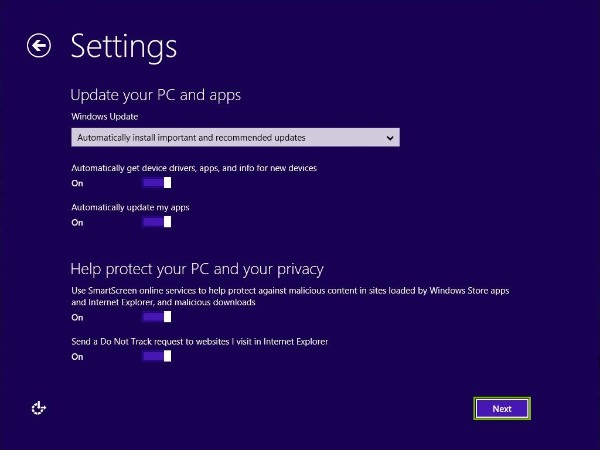
Choose your Windows Update and PC Privacy and Protection preferences.
Click Next.
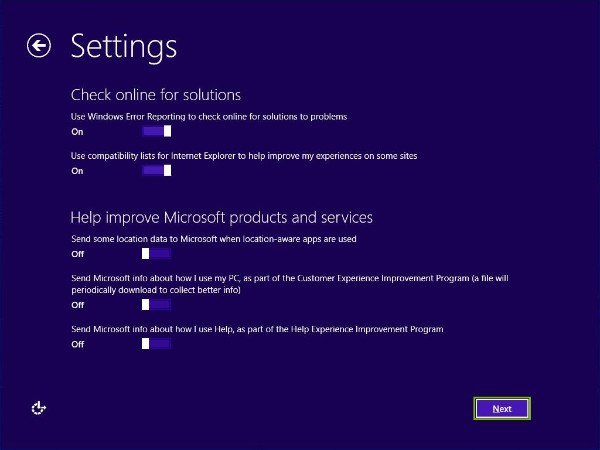
Choose your Microsoft reporting preferences.
Click Next.
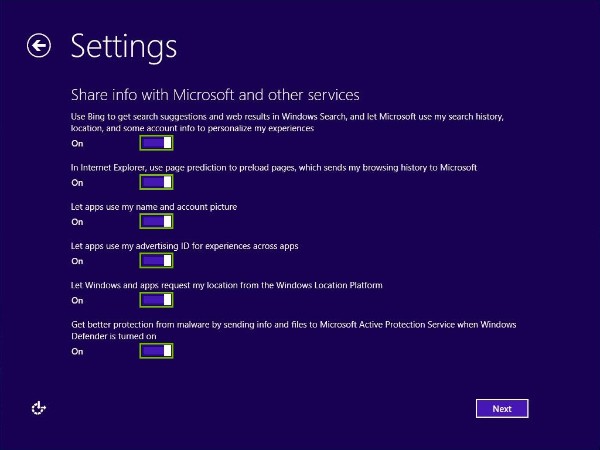
Choose what information you wish to share with Microsoft.
Click Next.
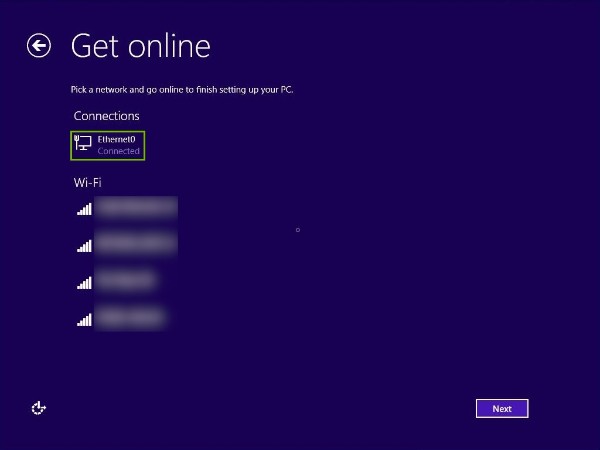
13. Ethernet
Plug in your Ethernet cable to your computer. Once connected it should show you are connected.
Click Next.
14. Express or Custom Setup
Express Settings - The following list are enabled by default.
Automatically find and connect to devices and content on the local network.
Automatically install windows updates, app updates, and device software.
Turn on Do Not Track in Internet Explorer
Help protect your PC from unsafe files, apps, and web sites.
Help Improve Microsoft services by sending data to Microsoft.
Use Bing and search suggestions and web results in Windows Search.
Let Microsoft use your location and other info to personalize your experience.
Page Prediction is used to preload pages. This sends your browsing history to Microsoft.
Let windows and apps use your name, account picture, and advertising ID, and request your location from the Windows Location Platform.
Custom Settings - Allows you to pick your preferences
15. Express Setup
Click on Use express settings.
16. Microsoft Account or Local Account
Microsoft Account - Allows you to synchronize you settings between multiple computers signed into the same account. If you forget your password, you must reset it online using another device. A PIN can be setup for easy login access.
Local Account - All information is kept on that computer regarding your computer login. If you forget your password you can only reset it using a password reset tool, or by using 3rd party utilities. Local accounts do not require a password.
17. Existing Microsoft Account
Enter your Microsoft account credentials.
Click Next.
You will be prompted to verify your work. Choose an option.
Click Next.
Depending on your verification method you will be asked to provide a code.
Click Next.
Choose whether or not you wish to use One Drive.
18. Create Microsoft Account
Click on Create a new account.
Enter your name, email address, password, and region.
Click Next.
Enter your birth date, gender, country code, phone number, and an alternative e-mail address.
Enter the captcha code and choose your communication preferences.
Choose an verification method.
Click Next.
Enter the code that was provided to you.
Click Next.
Choose whether or not you wish to use One Drive.
19. Local Account
Click on Create a new account.
Click Sign in without a Microsoft Account.
Enter your username, password, and password hint.
Click on Finish.
20. Custom Setup
Click Customize.
Choose whether or not you want your computer to locate other devices on the network.
Choose your Windows Update and PC Privacy and Protection preferences.
Click Next.
Choose your Microsoft reporting preferences.
Click Next.
Choose what information you wish to share with Microsoft.
Click Next.
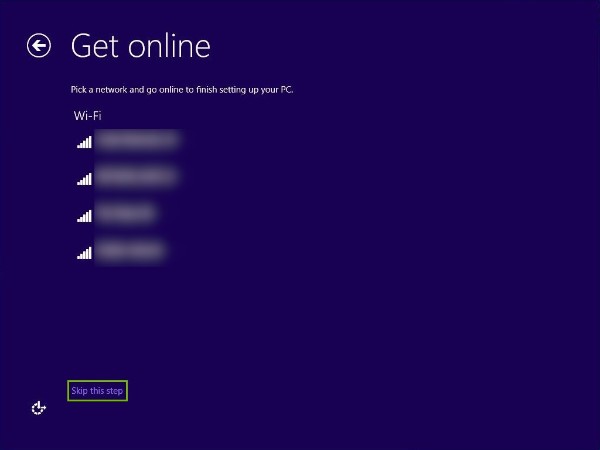
21. Set Up Network Later
Click Skip this step.
22. Express or Custom Setup
Express Settings - The following list are enabled by default.
Automatically find and connect to devices and content on the local network.
Automatically install windows updates, app updates, and device software.
Turn on Do Not Track in Internet Explorer
Help protect your PC from unsafe files, apps, and web sites.
Help Improve Microsoft services by sending data to Microsoft.
Use Bing and search suggestions and web results in Windows Search.
Let Microsoft use your location and other info to personalize your experience.
Page Prediction is used to preload pages. This sends your browsing history to Microsoft.
Let windows and apps use your name, account picture, and advertising ID, and request your location from the Windows Location Platform.
Custom Settings - Allows you to pick your preferences
23. Express Setup
Click on Use express settings.
24. Local Account
Enter your username, password, and password hint.
Click on Finish.
25. Custom Setup
Click Customize.
Choose whether or not you want your computer to locate other devices on the network.
Choose your Windows Update and PC Privacy and Protection preferences.
Click Next.
Choose your Microsoft reporting preferences.
Click Next.
Choose what information you wish to share with Microsoft.
Click Next.
26. What's next?
27. Media
Insert your Windows 8 disc into their DVD-ROM drive. If the Installation Media is on a USB drive, then plug it in.
Shut down the system completely.
Select the Start Menu.
Select the Power Button.
Select Shut Down to shut down your computer.
Any unsaved work will be lost. Please save any documents you are working on before shutting down your computer.
Remove any unnecessary devices that may interfere with the installation and configuration of the OS. This includes but is not limited to any USB mass storage devices, including flash drives (that are not related to their installation media), external hard drives, and external USB hubs. Printers should be disconnected as well. If the system is a laptop and it is in a docking station, remove it from the dock.
Turn on the computer. A prompt stating "Press any key to boot from CD / DVD / USB" should appear. Press any key.
The Windows 8 Installation Splash Screen should appear.
28. Install OS (Parallel)
Select your language, region, and keyboard type.
Click Next.
Click Install Now.
Enter your product key.
Click Next.
Click the I accept the license terms box.
Click Next.
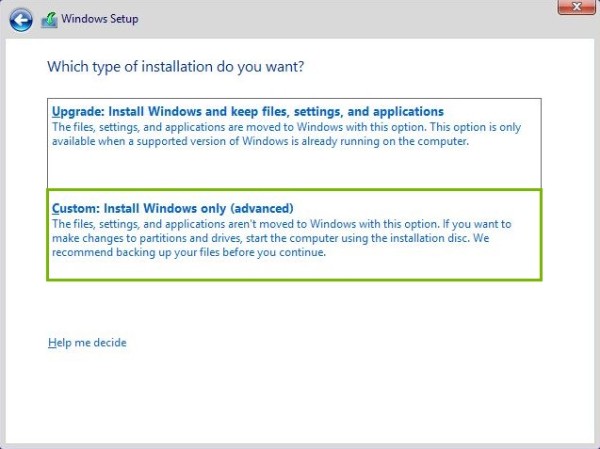
Click on Custom: Install Windows only (advanced)..
You may only choose the upgrade options if you ran the windows setup from within a compatible running version of Windows.
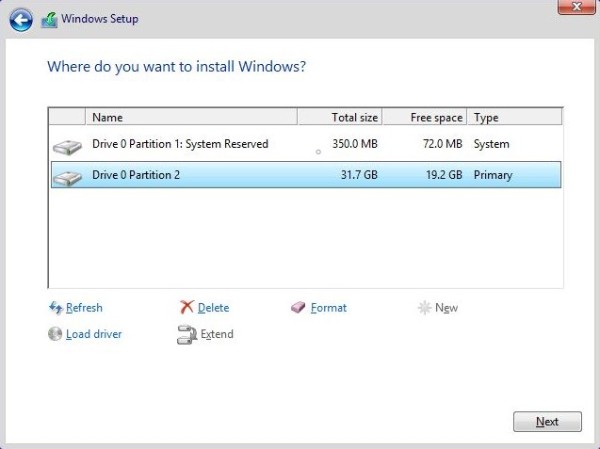
Select the drive you want to install windows on.
Click Next.
Click OK.
The install process will now begin. This will take around 30 minutes to complete.
Remove Hidden Spyware In Minutes For Free
Detect and remove spyware, keyloggers, tracking cookies, and other
threats that slow down your PC or steal your data.
65+ Million Downloads
Spyware scanner with AI-powered detection engine + database
.png)