Setting up and connecting to an unsecured WiFi connection in your home may seem convenient, but that convenience comes at the cost of security. An unsecured WiFi connection is one that does not utilize security encryption whatsoever. This means no passwords. Having an encrypted WiFi network secures your data from interception, as no outside devices can access or monitor any of the devices you have connected to your password-protected home network. Identifying an unsecured network is easy, as they do not require a password to connect to. All secured networks will ask for a valid password before a successful connection can be made.
While there are dozens of different brands and models of wireless routers on the market today, securing your wireless network is generally done by accessing settings that are common to all routers. This guide will help you figure out how to get connected to your router and what must be done to secure your home network.
Tools You'll Need:
A paperclip
iPhone charging cable
Access to a computer with iTunes installed
Any other non-consumable tools needed
Comment out tools section if no tools are necessary
-->
Supplies You'll Need:
Zip ties
Any other consumable supplies
Comment out supplies section if no supplies are necessary
-->
Before You Begin:
You must have access to a computer with iTunes installed.
You must have that thing for the other thing so you can do the thing.
Each individual prereq should have its own box like this. Not all will contain multiple links.
Comment out prerequisites section if no prereqs are necessary
-->
Know the risks of using an unsecured WiFi network
Copyright Infringement Claims (If someone uses your connection to download or access copyright protected material).
Criminal Investigations (If someone uses your connection for illegal activities).
Account Information or Password Capture.
Packet Sniffing.
Data Security Breaches.
Malware Attacks.
Loss of internet speed.
Loss of bandwidth on metered connections.
Always exercise caution
Exercise caution with who you share your wireless password with.
If at any time you suspect that your password has been compromised, change it immediately.
Ensure you're connected to the right network
Before adjusting any router settings, it's important to remember that this process will help you access the router your computer is currently connected to. This means you must be currently connected to the WiFi network whose settings you wish to alter. If you are not at home, or are connected to a different network, you will be attempting to change the settings of a router that is not yours. Please make sure you're connected to the correct network before proceeding with this guide.
2. Find the Router's IP Address
To access the router's web interface you will need to obtain its IP address on the private network.
In order to provide you with the most specific steps, please choose the type of device you are currently using.
Windows
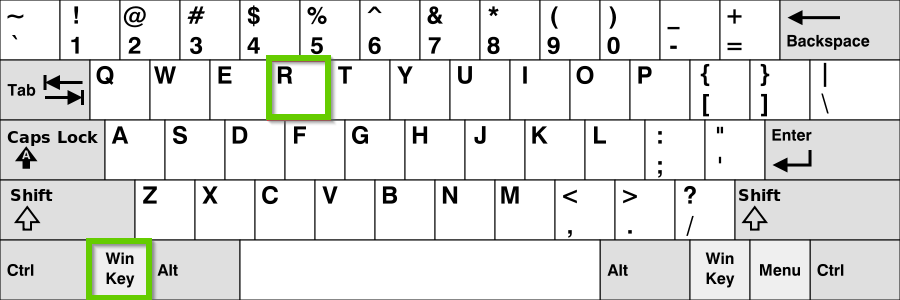
On your keyboard, simultaneously press the Windows key and R to bring up the Run Window.
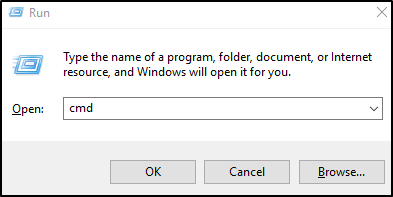
In the Run window type: cmd and click OK or hit Enter on your keyboard.
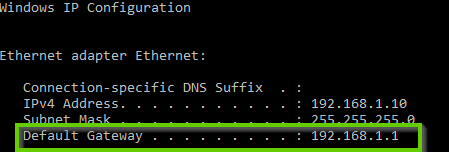
In the Command Prompt window type: ipconfig
Hit Enter on your keyboard.
In the ipconfig results, look for the value next to Default Gateway.
Take note of the Default Gateway.
It should be a string of numbers separated by 3 periods, E.g. 192.168.1.1
 
Mac
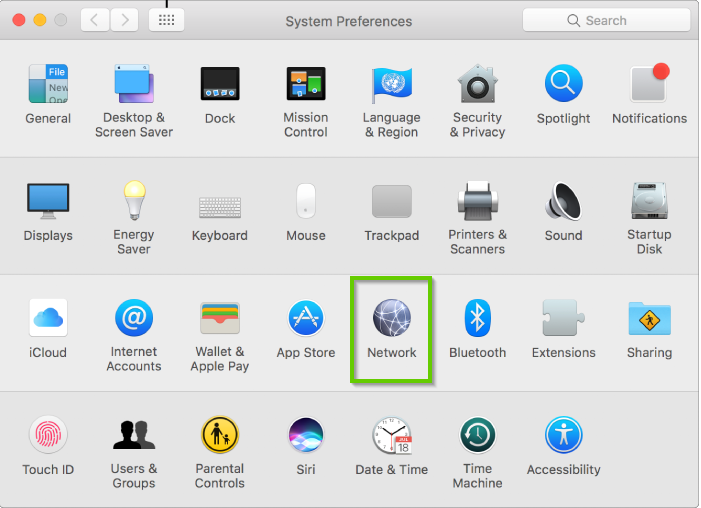
Click the Apple logo in the upper left corner of your desktop.
Click System Preferences.
Click Network.
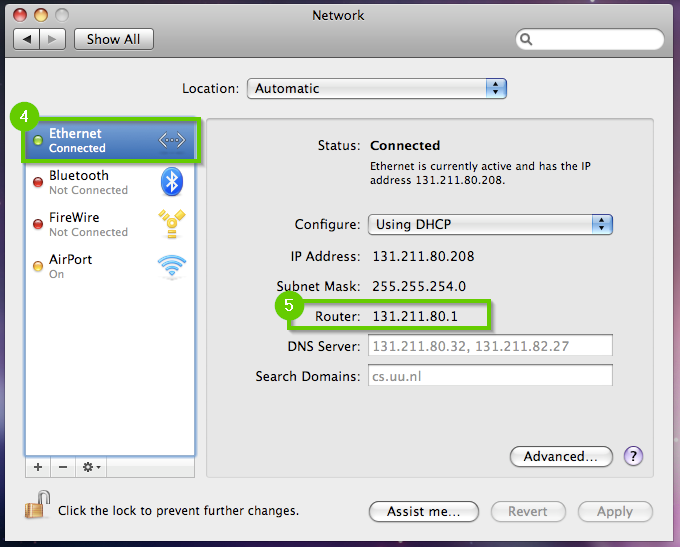
In the left pane, select the network with the green status indicating Connected.
Take note of the value next to Router.
It should be a string of numbers separated by 3 periods, E.g. 192.168.1.1
Android
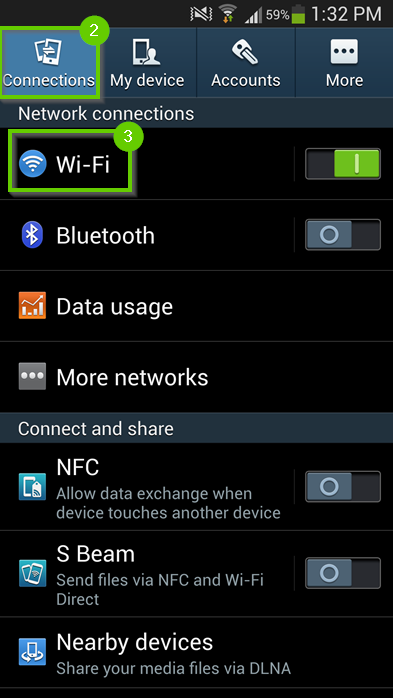
Tap Settings.
Tap Connections.
Tap Wi-Fi.
Tap your network - It should indicate Connected.
Take note of the value under or next to Manage Router.
It should be a string of numbers separated by 3 periods, E.g. 192.168.1.1
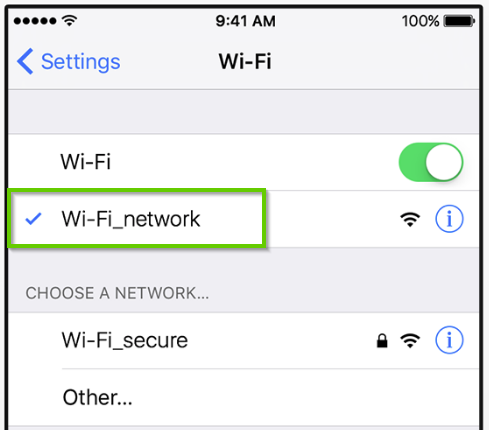
iOS
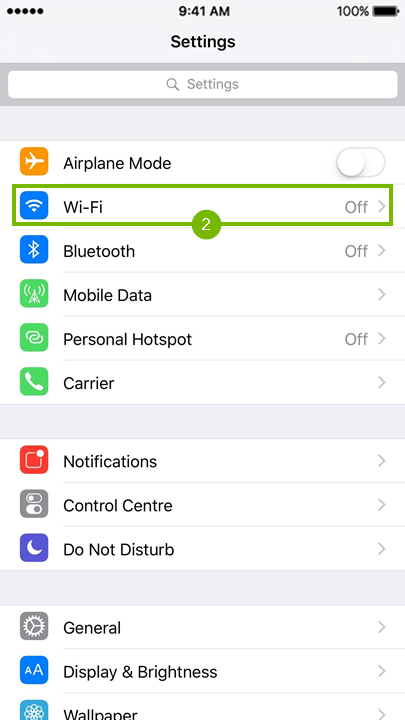
Tap Settings.
Tap Wi-Fi.
Find your network - It should indicate Connected by a check mark.
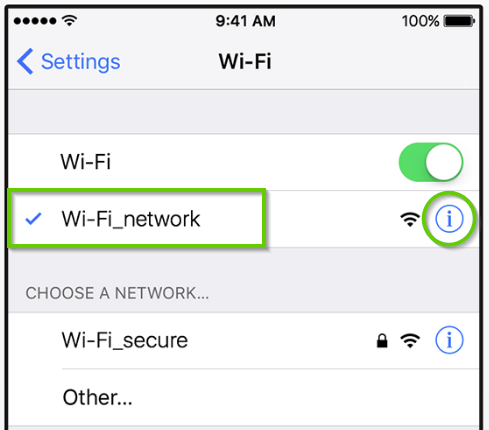
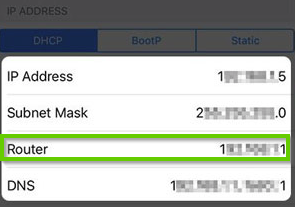
Tap the Info icon to the right of your network's name.
Take note of the value next to Router.
The IP address will be a string of numbers separated by 3 periods, E.g. 192.168.1.1
 
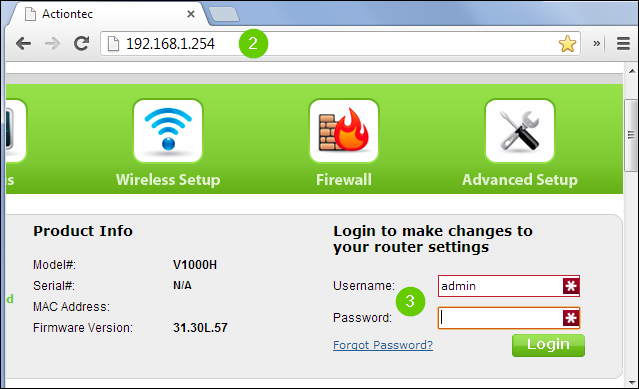
3. Log Into the Router's Web Interface
Now that you know your router's IP address, you can attempt to access its web interface where all of its settings can be found.
Open a web browser of your choice.
Type the Default Gateway IP address you noted in the previous step into the address bar and press Enter on your keyboard.
Login using your router's username and password.
If you do not know the username and password for your router's web interface, chances are it is still set to the default. In most cases the default credentials are listed on a sticker on the back or bottom of the router. If they are not, consult your router's user manual, search on the support site or contact the manufacturer.
4. Access the Router's Security Settings
Your router's interface will vary depending on what brand and model of wireless router you have in your home. The following is an example of what to look for when accessing your router's settings.
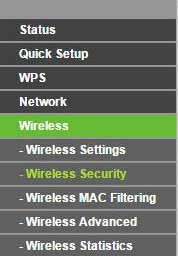
Locate and click on the option/menu that says Wireless or WiFi.
Within the main wireless menu you should see some basic information regarding your network such as the network name (SSID), network type and channel selection. You may also see a Security section, if you do, skip to step 4.
If you do not see a security section in the main wireless menu there should be a submenu that you can click on from the heading on the top or the left side navigation pane.
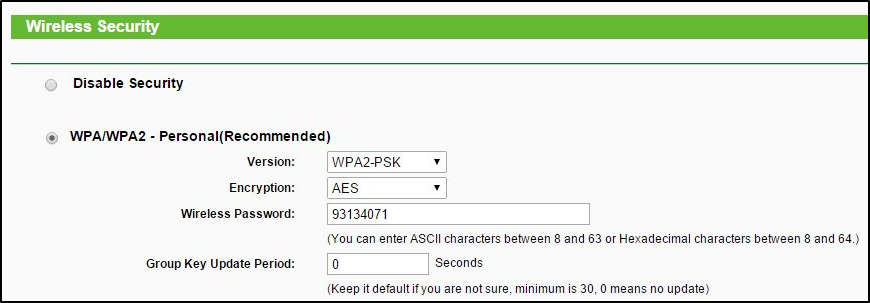
Once in the security section you will see options for the security type. The best security type and the current standard is WPA2-AES. If this option is available, select it.
Once a security type (preferably WPA2-AES) is enabled, you will need to enter a network password. The password should be something that you can remember but not something someone can guess. Do not use your birthday, phone number, address, name or any other readily available information. It is a best practice to use a combination of letters, numbers, upper case letters and special characters.
Once you have specified your security type and password click Save or Apply.
Any time you change your wireless security settings you will need to reconnect your wireless devices since the profiles they have stored for the network no longer apply.
If your router is dual band, meaning it has a 2.4 and a 5 GHz network you may need to repeat the steps listed above for each network because each network may be controlled individually. You must use different network names for each band.
If your router has a guest network you will need to repeat the steps listed above for the guest network because it is controlled separately.
.png)