How to Maintain a Windows PC

Authored by: Support.com Tech Pro Team

1. Introduction

In This Guide

You'll Learn How To:

  • Maintain your Windows 10 system using various practices.
  • Use the Automatic Maintenance Tool.
  • Defragment your hard drive (if necessary).
  • Ensure Automatic Updates are on.
  • Clean up your hard drive.
  • Check file integrity.
  • Make sure Windows Defender is on, should you need it.

Before We Begin:

  • You need a Windows 10 computer.
  • Have access to the internet.
Windows 10 Logo

2. Automatic Maintenance

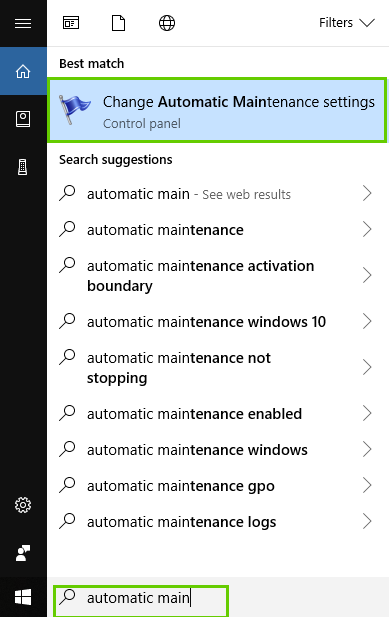
Many of the settings and tasks we are about to go over can be set to run automatically when your system is idle. Windows 10's Automatic Maintenance service checks your system for errors, defragments your hard drive, and performs various other optimization services.

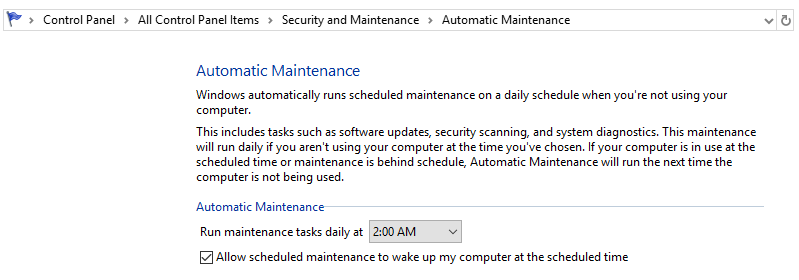
Make Sure Automatic Maintenance Is On

  1. Search for Automatic Maintenance.
  2. Select Change Automatic Maintenance settings.
Automatic maintenance search results
  1. Choose a time for Automatic Maintenance to run.
Windows 10 control panel window for Automatic maintenance showing scheduled maintenance checked

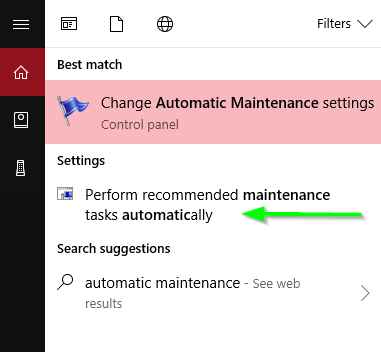
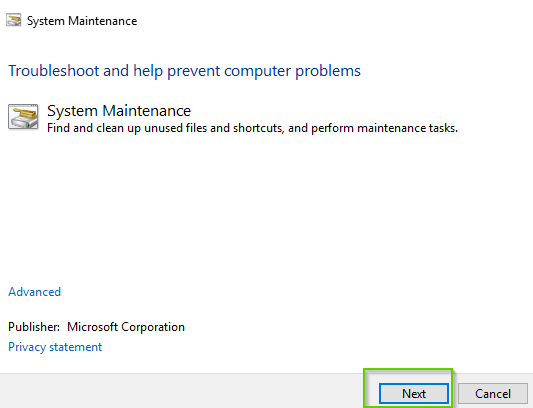
Run Automatic Maintenance

  1. Search for Automatic Maintenance.
  2. Click Perform Recommended Maintenance Tasks Automatically.
Windows 10 start menu with performance recommended maintenance tasks automatically selected
  1. Click Next to begin maintenance.
Windows 10 system maintenance window with Next highlighted

3. Defragmenting

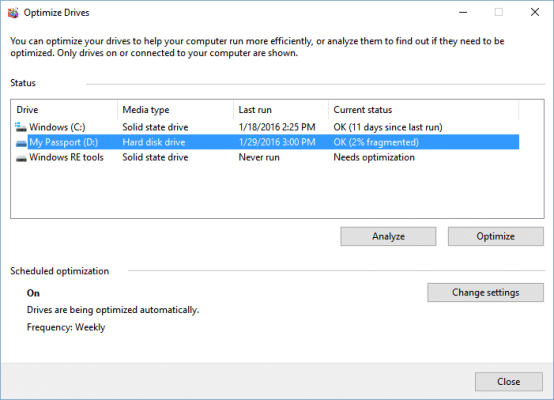
Over time, the files on your hard drive become fragmented and your computer slows down because it can take longer to find the files being requested of it. There is a built-in Windows tool that can organize those files and optimize your hard drive.

This process is not something you'll want to do too often, as it does put wear and tear on your hard drive. Defragmenting is not something that should ever be done to a Solid state hard drive.

To Defragment and Optimize Your Hard Drives:

  1. Search Defragment in the taskbar.
  2. Click Defragment and Optimize Drives.
Windows 10 start menu searching optimize with Defragment and optimize drives highlighted at the top
  1. Review the drives and select the one you want to analyze or defragment.
Windows 10 defragment window

  1. Click Optimize.

4. Check for Updates

  1. Open the Start menu and select Settings.
Windows 10 Start Menu

Windows 10 Settings
  1. Select Update and Security.
Updates and Security Settings
  1. Select Windows Update on the left, then select Check for updates.
Update and Security with Windows Update and Check for updates highlighted.
  1. Once the system has finished checking for updates, it will automatically download and install the latest applicable updates.
  2. The system also may prompt you to restart, if it does, please do so at your earliest convenience, otherwise the update process will not complete.If you system was already recently updated, chances are that no further updates are available and your Update status will indicate: Your device is up to date.

5. Disk Cleanup

Windows needs about 2 GB free space, at minimum, to function. In order to properly update and perform other functions, around 5 GB free space is recommended.

A simple way to help free up space is to remove temporary files; files that were useful during an update or other working of the computer, but now simply take up space.

This will guide you through safely clearing those temporary files.

  1. Open the Start menu and select Settings.
Windows 10 Start Menu

Windows 10 Settings
  1. Select System.
System Settings
  1. Select Storage on the left, then select Temporary files on the right.
System Settings with Storage and Temporary files highlighted.
  1. Place a checkmark next to each item, then select Remove files.
Temporary files settings with each item checked and remove files highlighted.

6. Tidy Desktop

Windows tends to slow down with more icons on the desktop, because it has to check and redraw them constantly. Also, the Desktop tends to turn into a 'default dumping ground' for many applications.

Having a clean, orderly Desktop with just the applications you use most frequently, and a few important files can lead to better performance overall for your computer.

Move Files to Appropriate Folders

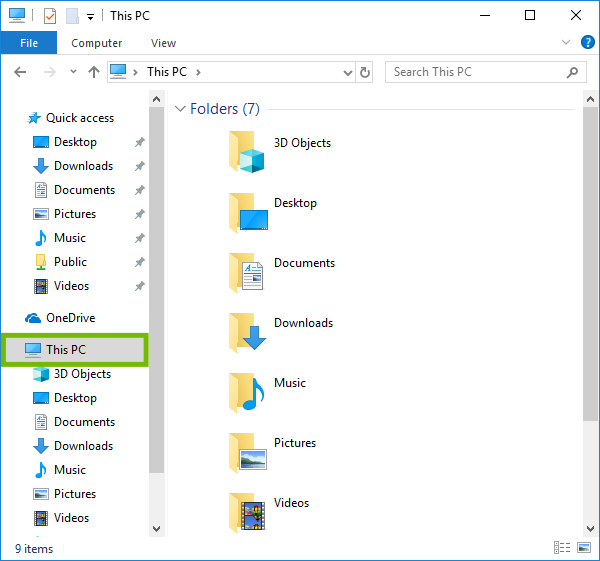
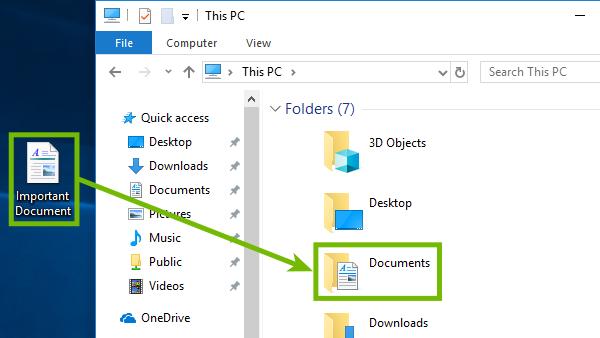
Windows has built-in folders to help you organize your documents, pictures, music and videos. You can also create folders inside folders to help better organize projects and collections.

  1. Open Windows Explorer. The icon is usually on the task bar at the bottom of your screen.
Windows Explorer.
  1. Select This PC on the left.
Explorer with This PC highlighted.
  1. You'll see a series of folders on the right for your most common types of files.
Explorer showing This PC with folders highlighted.
  1. To move a file to a folder, click on the file, and don't let go. Then, drag it over the folder you'd like it in, then release the mouse button.
Dragging a file from desktop to a folder.
  1. To view files in that folder in the future, double-click that folder.
Documents showing file.

Delete Unneeded Files

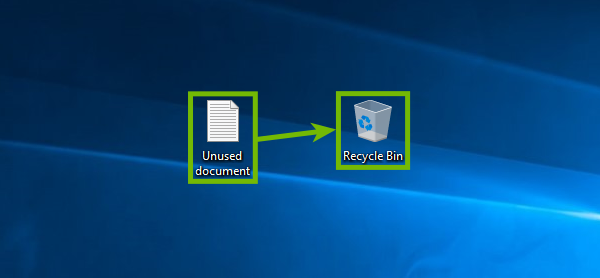
If you no longer need a file or shortcut you can delete it using one of three methods, depending on which you are most comfortable with.

Deleting With The Mouse

  1. Click on the file or folder, and don't let go. Then, drag it over the Recycle Bin on the desktop, then release the mouse button.
Dragging a file to the Recycle Bin.

Deleting With The Keyboard

  1. Highlight the file you want to delete by clicking on it one time.
Highlighted document.
  1. Press the Delete key on your keyboard.
Keyboard with Delete key highlighted.

Deleting With A Right Click

  1. Using your Right mouse button, Right Click on a file. A context menu will open.
Highlighted document.
  1. Select Delete.
Right-click file menu with Delete highlighted.

7. System File Checker (SFC)

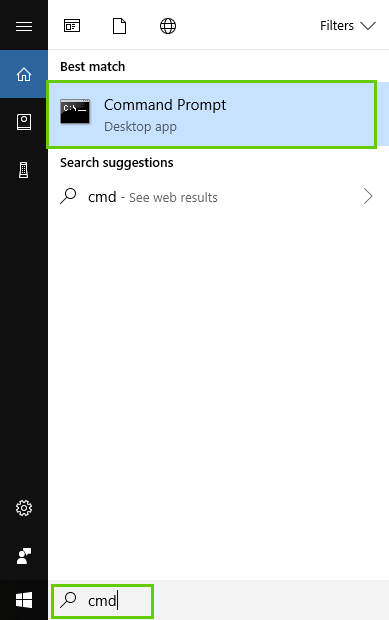
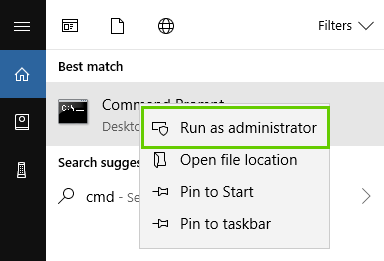
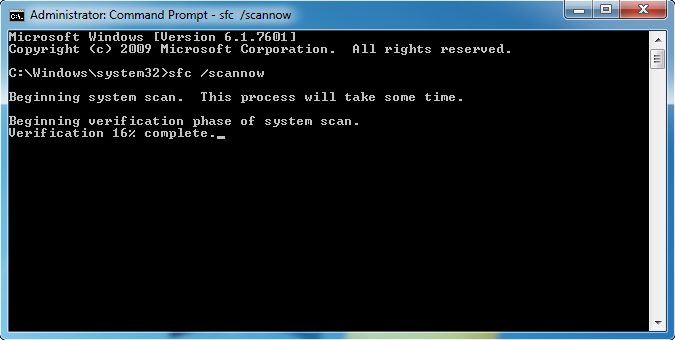
In order to make sure none of your protected operating system files have become corrupted you need to run a tool called System File Checker. This tool will scan all protected files and in the event they are corrupted, replace them with an undamaged version. This guide will walk you through opening it and running it.

  1. Click your Start Menu.
Windows 10 Start Menu
  1. Begin typing CMD. It will appear within the Windows search box.
Search results
  1. Right-click on the Command Prompt result, then select Run as Administrator.
Run as administrator prompt
  1. In the Command Prompt type:
    sfc /scannow
  2. Press Enter on your keyboard.
  3. SFC will begin to scan your system.
Command prompt window with System File Checker scan running
  1. Once finished, the process will either tell you it found no issues, it found and repaired issues, or it could not be run.

8. Enable or Disable Defender

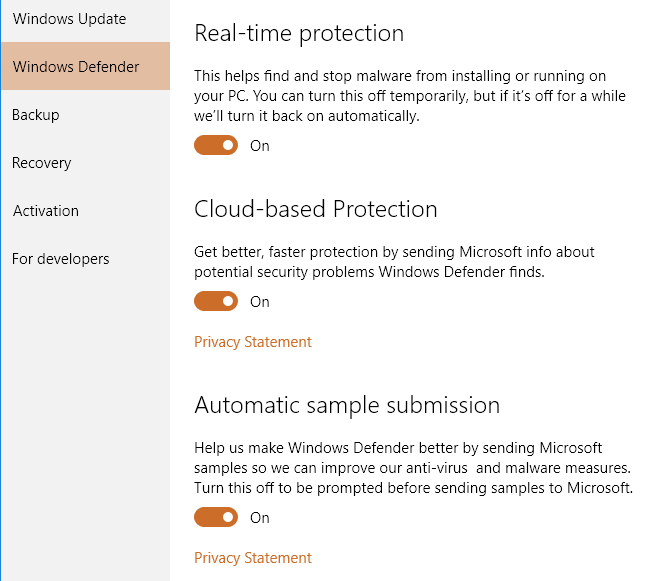
Windows Defender will be on by default but if you want to make sure (or you want to turn it off) go ahead and follow these steps.

  1. Click the Start button.
Windows 10 start button


Helpful Tip
  1. By default it is in the lower left corner of your screen.
  2. Click the Settings button on the left side of the start menu
Windows 10 settings button


  1. Click Update and Security.
Windows 10 Update and security button
  1. On the left side click Windows Defender.
Windows 10 control panel window with Windows Defender tab selected


  1. Slide the button under Real-time Protection to On.

9. Conclusion of Maintenance

General maintenance for your computer has been completed. We've gone over numerous options to maintain the health of your computer:

  • Automatic Maintenance
  • Defragment & Optimize drives
  • Performing Updates
  • Cleaning up your files
  • Organizing your desktop
  • Running the System File Checker
  • Checking the status of Windows Defender

As this is general maintenance, this process should be completed once every 6 months to ensure that your machine is running at peak performance.