If a disc is stuck in your PS4, follow these steps to eject it manually:
Power Off the PS4:
Turn off the PS4 completely by holding the power button for 7 seconds until it beeps twice.
Unplug All Cables:
Unplug the power cable, HDMI cable, and any other connected cables.
Remove the Cover:
Place the PS4 on a flat surface.
Remove the hard drive cover by sliding it off.
Locate the Manual Eject Screw:
Look for the manual eject screw inside the drive mechanism area. It is a small screw that you can turn with a Phillips-head screwdriver.
Insert the Screwdriver:
Insert the Phillips-head screwdriver into the manual eject hole.
Turn the screw counterclockwise until the disc begins to emerge from the disc slot.
Remove the Disc:
Gently pull the disc out of the disc slot once enough of it is exposed to grasp.
Reassemble the PS4:
Replace the hard drive cover and reconnect all cables.
Power on the PS4 and ensure it is functioning correctly.
Test the Disc Drive:
Insert and eject a disc normally to ensure the drive is working properly.
Contact Support if Necessary:
If the issue persists, contact Sony customer support for further assistance.
Contact Support.Com
If you are still having trouble, refer to the Step-By-Step Guide below, or Contact Support.Com for Personalized Assistance.
1. Introduction
It can be incredibly frustrating when a disk gets stuck in your PlayStation. This guide will take you through ejecting the disk manually if necessary.
2. Eject Disk
There are 2 main ways to eject the disk from your PlayStation 4.
Eject Button
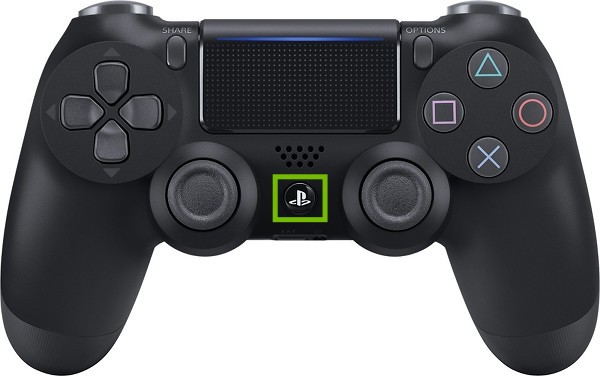
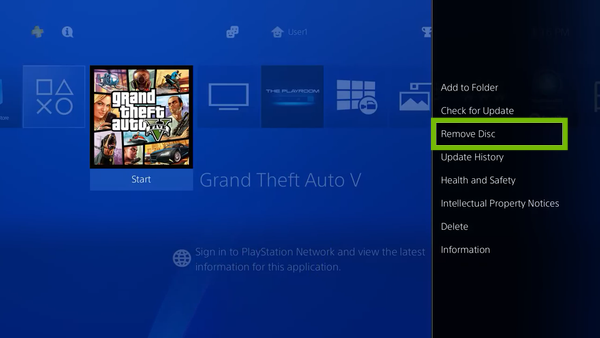
Push the PS button on your controller to return to the main menu.
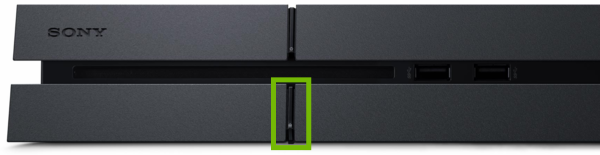
Push the Eject button on your PlayStation 4.
Menu
Push the PS button on your controller to return to the main menu.
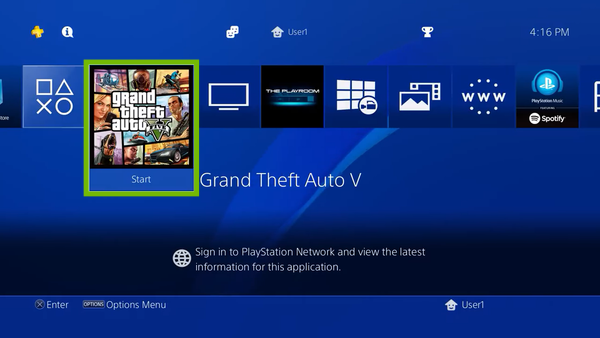
Highlight the game or movie in the list.
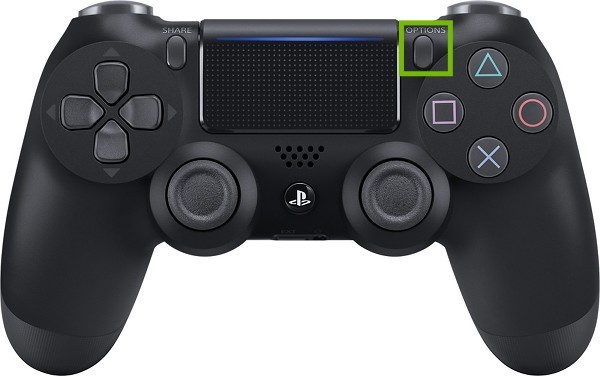
Push the Options button on your controller.
Select Remove Disc.
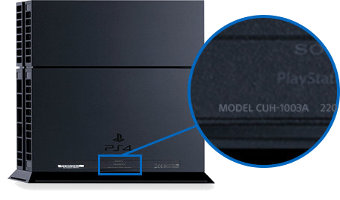
3. Model Check
There are a few different models of PlayStation 4, and each has a slightly different method for manual ejection of a disk.
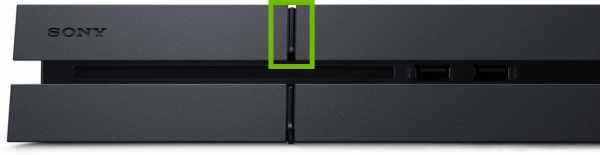
Look in the following locations for the model number, and choose the series number.
4. 1000, 1110 Series
You will need a Phillips head screwdriver.
You may need a flashlight as well to find the disc eject screw.
Turn off your PlayStation 4.
Unplug the Power cable, HDMI cable, and any other cables.
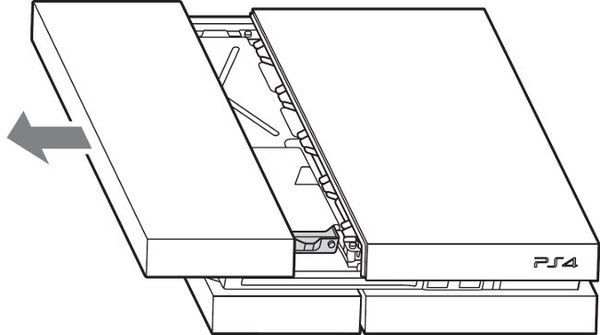
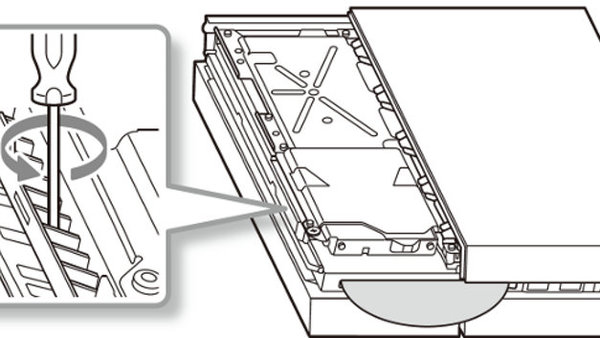
Press down on the top-left panel firmly, and pull the panel off.
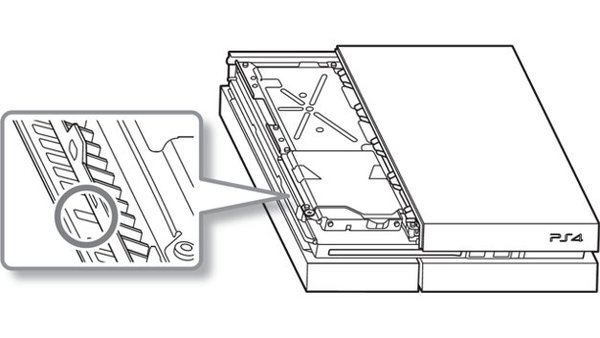
There are 2 sets of vents on the left side. one will be a single vent.
You may need a flashlight to see the screw.
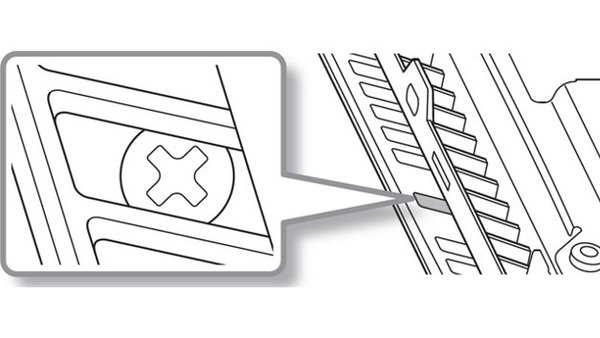
Using a screwdriver, rotate the screw counter-clockwise to eject the disk.
Replace the top cover of your PlayStation 4.
Reconnect the Power cable, HDMI cable, and other cables.
Press the Power button to turn your PlayStation 4 back on.
5. Test Other Disk
It is important to test your PlayStation 4 using a different disk.
Try playing an audio CD, a game, or a movie disk. Use a different disk than the one that had problems.
Make sure it plays properly.
6. Eject Disk
There are 2 main ways to eject the disk from your PlayStation 4.
Eject Button
Push the PS button on your controller to return to the main menu.
Push the Eject button on your PlayStation 4.
Menu
Push the PS button on your controller to return to the main menu.
Highlight the game or movie in the list.
Push the Options button on your controller.
Select Remove Disc.
7. 1000, 1110 Series
You will need a Phillips head screwdriver.
You may need a flashlight as well to find the disc eject screw.
Turn off your PlayStation 4.
Unplug the Power cable, HDMI cable, and any other cables.
Press down on the top-left panel firmly, and pull the panel off.
There are 2 sets of vents on the left side. one will be a single vent.
You may need a flashlight to see the screw.
Using a screwdriver, rotate the screw counter-clockwise to eject the disk.
Replace the top cover of your PlayStation 4.
Reconnect the Power cable, HDMI cable, and other cables.
Press the Power button to turn your PlayStation 4 back on.
8. What's next?
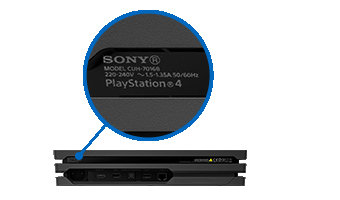
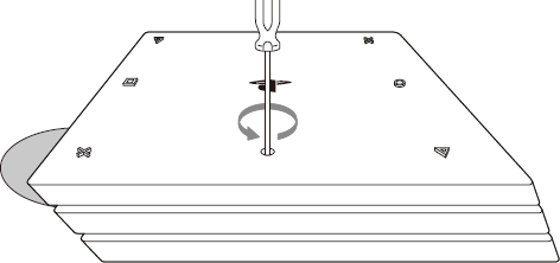
9. 1200 Series
You will need a Phillips head screwdriver.
Turn off your PlayStation 4.
Unplug the Power cable, HDMI cable, and any other cables.
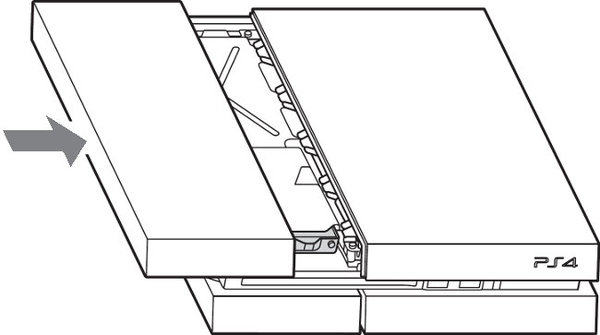
Press down on the top-left panel firmly, and pull the panel off.
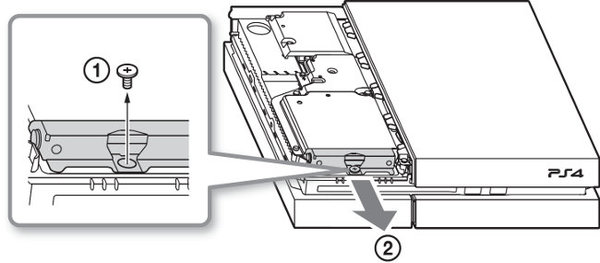
With the top panel removed, you will see a screw with the PlayStation symbols on it. Turn this screw counter-clockwise to remove it.
Pull the Hard Drive out part way, and you'll see the disc manual eject hole.
Using a screwdriver, turn the screw clockwise to release the disk.
Put the Hard Drive back in.
Replace the screw for the hard drive.
Replace the top cover of your PlayStation 4.
Reconnect the Power cable, HDMI cable, and other cables.
Press the Power button to turn your PlayStation 4 back on.
10. Test Other Disk
It is important to test your PlayStation 4 using a different disk.
Try playing an audio CD, a game, or a movie disk. Use a different disk than the one that had problems.
Make sure it plays properly.
11. Eject Disk
There are 2 main ways to eject the disk from your PlayStation 4.
Eject Button
Push the PS button on your controller to return to the main menu.
Push the Eject button on your PlayStation 4.
Menu
Push the PS button on your controller to return to the main menu.
Highlight the game or movie in the list.
Push the Options button on your controller.
Select Remove Disc.
12. 1200 Series
You will need a Phillips head screwdriver.
Turn off your PlayStation 4.
Unplug the Power cable, HDMI cable, and any other cables.
Press down on the top-left panel firmly, and pull the panel off.
With the top panel removed, you will see a screw with the PlayStation symbols on it. Turn this screw counter-clockwise to remove it.
Pull the Hard Drive out part way, and you'll see the disc manual eject hole.
Using a screwdriver, turn the screw clockwise to release the disk.
Put the Hard Drive back in.
Replace the screw for the hard drive.
Replace the top cover of your PlayStation 4.
Reconnect the Power cable, HDMI cable, and other cables.
Press the Power button to turn your PlayStation 4 back on.
13. What's next?
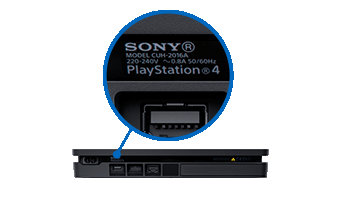
14. 7010, 2015 Series
You will need a Phillips head screwdriver.
Turn off your PlayStation 4.
Unplug the Power cable, HDMI cable, and any other cables.
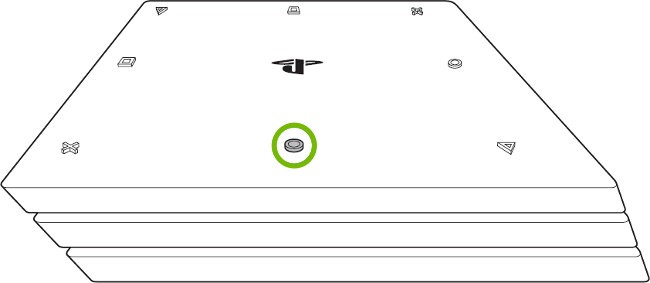
Turn your PlayStation 4 upside down, with the PS logo facing away from you.
Remove the small cap near you, above the PS logo.
Turn the screw counter-clockwise.
There may be a small piece of plastic, sealing the screw. It is safe to go through this and will not void the warranty. It may take multiple turns to eject the disk.
Remove the disk from the tray.
Replace the screw hole cover.
Return your PlayStation 4 to the proper position, and reconnect the Power, HDMI, and any other cables you removed before.
Press the Power button to turn your PlayStation 4 back on.
15. Test Other Disk
It is important to test your PlayStation 4 using a different disk.
Try playing an audio CD, a game, or a movie disk. Use a different disk than the one that had problems.
Make sure it plays properly.
16. Eject Disk
There are 2 main ways to eject the disk from your PlayStation 4.
Eject Button
Push the PS button on your controller to return to the main menu.
Push the Eject button on your PlayStation 4.
Menu
Push the PS button on your controller to return to the main menu.
Highlight the game or movie in the list.
Push the Options button on your controller.
Select Remove Disc.
17. 7010, 2015 Series
You will need a Phillips head screwdriver.
Turn off your PlayStation 4.
Unplug the Power cable, HDMI cable, and any other cables.
Turn your PlayStation 4 upside down, with the PS logo facing away from you.
Remove the small cap near you, above the PS logo.
Turn the screw counter-clockwise.
There may be a small piece of plastic, sealing the screw. It is safe to go through this and will not void the warranty. It may take multiple turns to eject the disk.
Remove the disk from the tray.
Replace the screw hole cover.
Return your PlayStation 4 to the proper position, and reconnect the Power, HDMI, and any other cables you removed before.
Press the Power button to turn your PlayStation 4 back on.
Remove Hidden Spyware In Minutes For Free
Detect and remove spyware, keyloggers, tracking cookies, and other
threats that slow down your PC or steal your data.
65+ Million Downloads
Spyware scanner with AI-powered detection engine + database
.png)