It can be frustrating when a piece of software has problems getting online, and you're requested to check your networking configuration, or to 'open ports'.
This guide hopes to help demystify network security on your router, and help you check what settings are in place, to be certain nothing is causing problems.
2. Router Technology Overview
Today's modern routers no longer rely on you, the user, to know the inner workings of networking to setup secure communications. Instead, they use a variety of different technologies to get your data to you.
Also, in most cases, most routers do not have a dedicated firewall looking at your traffic. Instead, they rely on these key technologies to facilitate communication between your computer and others on the Internet safely.
IPs and Ports
The way computers talk to each other on the Internet and home networks is through Internet Protocol (IP) addresses and Ports.
An easy way to think of this is a block of office buildings.
Each building has an address; just like each home on the Internet has a public IP address.
Each business inside the office building has a suite number; just like each computer has a private IP address.
Each office or desk in the suite has a number; just like each program has ports it uses.
For example, if you wanted to write a letter to someone in Building 101, Suite 300, Office 2, you'd probably put the following on the envelope:
Building 101 Suite 302
The Postal Service would take care of getting the mail to Building 101. From there, the office mail would take care of getting the mail up to the third floor, and into office two.
Computers work in the same way. Each bit of data, or letter, is called a packet. Each packet has an address. For the exact same example, using the computer numbers on the right instead:
34.56.78.101::192.168.0.3:443
Your Internet Service Provider (ISP), would take care of getting that packet to the home network's public IP (34.56.78.101). From there, the router in your home would take care of getting that packet to computer 192.168.0.3. Then, the computer itself would receive it, and any program listening on port 443 would hear the message.
Your router does this dozens of times for every web page you visit, for example. Once for each image, the page itself, etc. It does it thousands, if not millions, of times for the various bits of the video you watch, or audio you listen to, or game you play.
Network Address Translation
You may have noticed in the above example there were 2 addresses the router had to look at.
34.56.78.101::192.168.0.3:443
The first address (34.56.78.101) is known as your Public IP Address. This is the address your router is given by your ISP. It is different for everyone worldwide, the exact form may vary slightly from provider to provider, and your ISP may give you a different one every day or so.
The second address (192.168.0.3) is known as your Private IP Address. This is the address your router itself gives to each device on your home network. It will be a unique number for each computer, but not to the world as a whole, just to your home. Your home router keeps a list of these, and creates and hands out more as needed, depending on number of devices you have on your home network.
The way the Internet is designed, there must be direct communication between devices. So, when a server sends you a web page, it must address it directly to your computer, or it will never get there. But, since your computer isn't directly on the Internet, but rather behind a router, how does that work?
Enter Network Address Translation, or NAT. Your router acts as a concierge of sorts and acts on your computer's behalf to make the connection possible. It forwards the request for the web page or video along, then when the server on the Internet responds, it looks at that second address, the internal one, and forwards it to you. This is mostly transparent, and allows you to surf the web or check your mail without ever having to worry about it.
Without NAT, you'd only be able to get one device online in your house, and you'd have to disconnect the first device, reboot everything, then connect the second. Network Address Translation is essential for the modern connected home.
Universal Plug and Play
All the above technologies allow responses to requests you make. In other words, your computer asks for something, then your router takes care of all the ports and routing needed to receive that response and hand it to you. For security reasons, everything else is discarded. You don't need to get random requests to your network from the Internet, and you don't want them. In this way alone, your router keeps you safer.
But, what about games or other highly-active content such as smart home appliances that need to start talking to your computer or device? Your router would normally just throw away this information.
This is where Universal Plug and Play (UPnP) comes in. This replaces the need to forward ports, set up static addresses for your devices, or worry about removing these intricate settings later for security.
When you start a game or setup a smart home appliance that needs to listen to requests, it makes a UPnP request to the router automatically. It tells your router what it is, what ports it needs, and for how long.
As example, a game console may request port 3074 forward traffic from the company that made the console for the next hour. Your router would automatically setup the whole thing; traffic that comes from a certain address or range of addresses on the internet would reach your router, and be handed over to your game console to deal with, allowing you to play your game without needing to know anything about how it's all setup. Plus, when your console is turned off, that forward is turned off too, keeping you safer.
What This Means
Ports are no longer 'blocked' or 'closed'. There's just nothing 'attached' to it, so the data goes nowhere. Any ports that need to be used or need to listen to something are routed automatically, without you having to lift a finger.
3. Port Forwarding Warning
The following steps will provide general guidance on setting up port forwarding.
This is usually not necessary with modern devices, services, and programs, and carries with it a number of rather serious security concerns.
Also, these instructions will be general, and may be difficult to follow without knowing your specific router very well. Each router is slightly different in how they setup port forwarding, as well as exactly which menu, option, and area each step is located.
If you are having problems with a specific device getting online, it's recommended to review the article specific to troubleshooting that device here, or contact the device manufacturer before trying to use port forwarding to solve the problem.
Given the huge variation in routers, these instructions will not be exact, nor will you be able to follow them exactly to enable port forwarding. It is recommend you contact your router manufacturer if you need specific direction or are unable to locate the suggested areas to look.
4. Port Forwarding
Find Your Router's IP
For Machines Running Windows 10
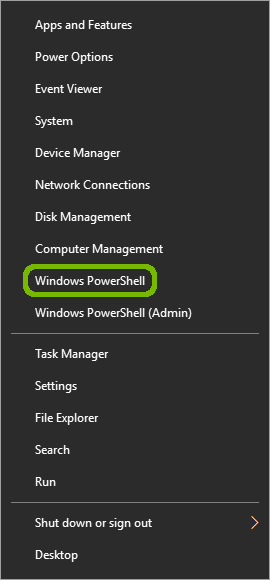
Using your right mouse button, right click on the Start menu.
From the menu, select Windows PowerShell.
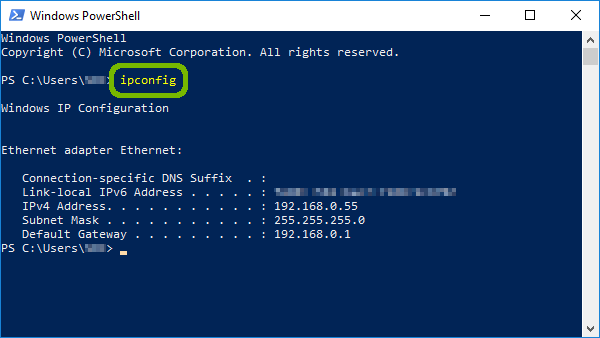
In the PowerShell window, type ipconfig, and press enter.
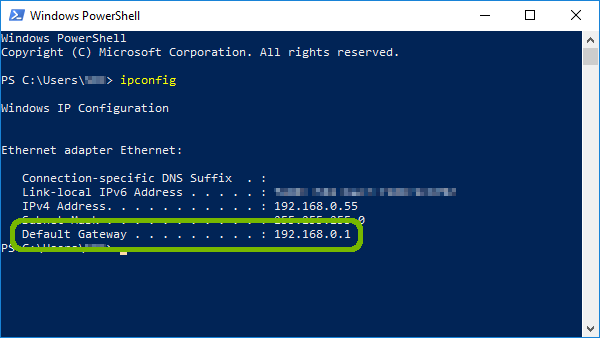
Look at the information shown. Find the line that says Default Gateway, and make note of the address. Yours may be different from this example.
Write down the address listed for Default Gateway, you will need it in just a moment.
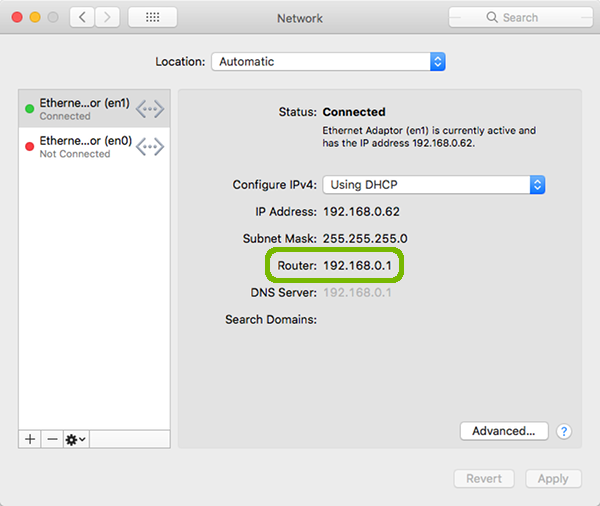
For Machines Running macOS
Select Apple menu > System Preferences.
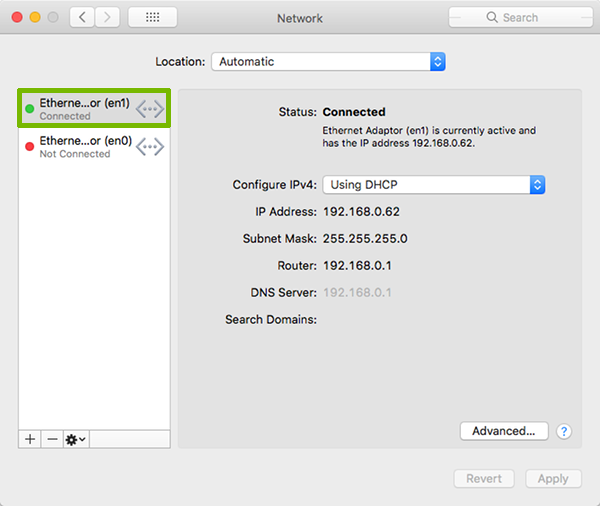
Select Network.
On the left, select your active network connection. It will have a green dot next to it.
On the right, look for Router. Make note of the number listed here. Yours may be different than this example.
Write down the address listed for Default Gateway, you will need it in just a moment.
Open Your Router's Administration Page
Open your preferred web browser. Look for one of these icons.
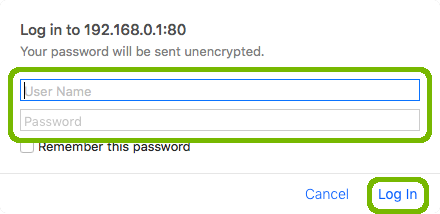
Type the address you found above, and press return or enter.
Type in your router's Administrator username and password, then Log In.
If you are not sure of your router's username and password, try some of these common defaults:
Username:
admin
administrator
user
blank (as in, do not put in anything)
Password:
admin
password
user
blank (as in, do not put in anything)
Set Static IP for Device
Setting a Static IP on your device only refers to your internal, home network. This has no effect on your Internet service.
It is critically important you setup a Static IP for your device, before you setup port forwarding. Without doing so, you could easily lose all your port forwarding setup, and expose other devices that may not be as well-secured to malicious attack on the Internet.
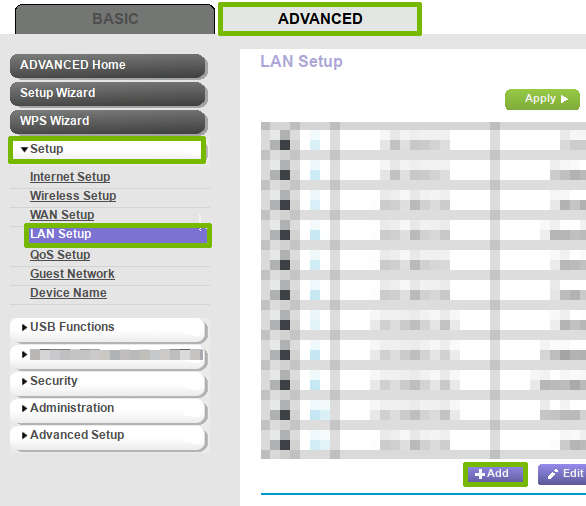
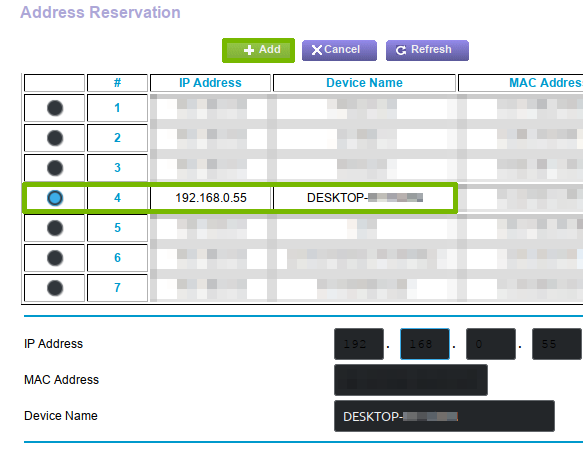
Locate and identify where in your router's interface you can setup an Address Reservation. In this example, it was under Advanced > Setup > LAN Setup, then scroll down to Address Reservation at the bottom.
Select or enter the information required to assign a static address. Make note of the IP address you set as static for your device, you will need it in a moment.
Write down the address you just assigned as static, you will need it in just a moment.
Set Up Port Forwarding
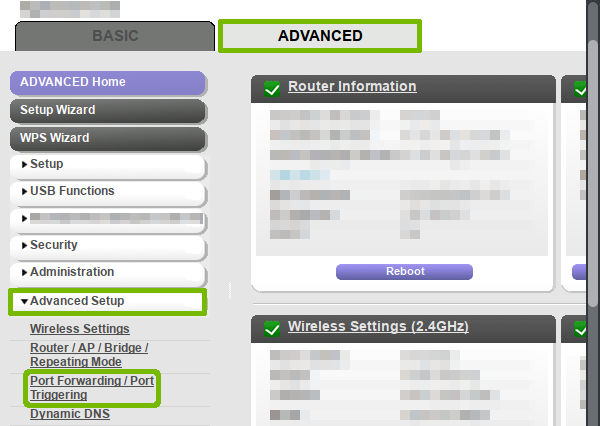
Locate the Port Forwarding section of your router's configuration. In this example, it was under Advanced > Advanced Setup > Port Forwarding / Port Triggering.
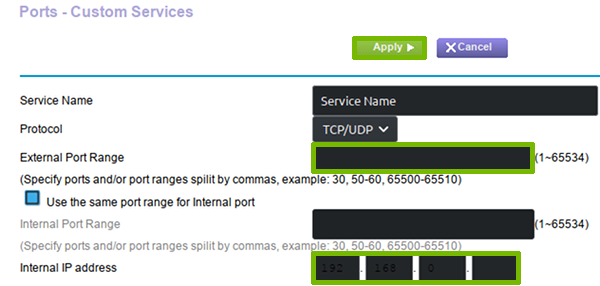
Enter the Internal IP you just statically assigned above, and the Port you want to forward, then Apply your changes.
5. Guided Path not helpful.
6. Escalate to PTE
If you are a PST, follow the Escalation Process to PTE.
7. What's next?
8. It Can't Happen Here
It Can't Happen Here
9. Guided Path not helpful.
10. Escalate to PTE
If you are a PST, follow the Escalation Process to PTE.
11. What's next?
12. It Can't Happen Here
It Can't Happen Here
13. Guided Path not helpful.
14. Escalate to PTE
If you are a PST, follow the Escalation Process to PTE.
15. What's next?
16. It Can't Happen Here
It Can't Happen Here
Remove Hidden Spyware In Minutes For Free
Detect and remove spyware, keyloggers, tracking cookies, and other
threats that slow down your PC or steal your data.
65+ Million Downloads
Spyware scanner with AI-powered detection engine + database
.png)