Setting up your JBL Charge 3 wireless speaker ensures you can enjoy your music wirelessly. Follow these steps:
Charge the Speaker:
Ensure the JBL Charge 3 is fully charged using the included USB cable and power adapter.
The battery indicator lights will show when the speaker is fully charged.
Power On the Speaker:
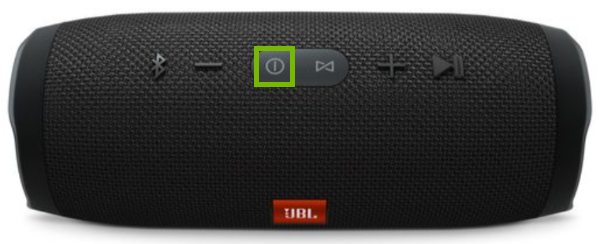
Press the power button on the JBL Charge 3 to turn it on. The power button will light up, indicating the speaker is on.
Enable Pairing Mode:
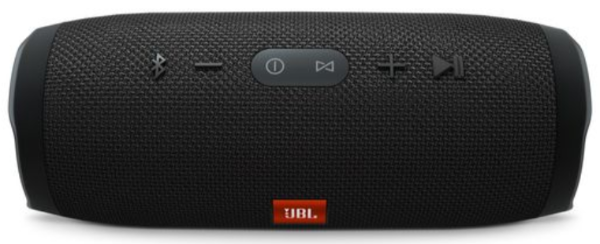
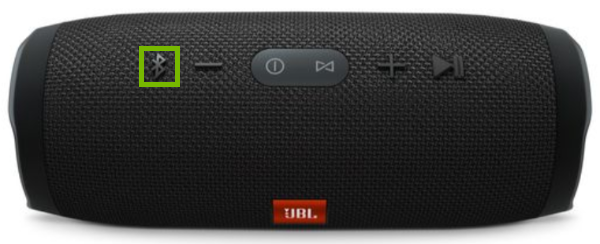
Press the Bluetooth button on the JBL Charge 3. The Bluetooth light will start flashing, indicating the speaker is in pairing mode.
Activate Bluetooth on Your Device:
On your smartphone, tablet, or computer, go to the Bluetooth settings and turn on Bluetooth.
Select JBL Charge 3:
In the list of available Bluetooth devices, select “JBL Charge 3” to initiate pairing.
Confirm Pairing:
If prompted, confirm the pairing request.
Once paired, the Bluetooth light on the JBL Charge 3 will stop flashing and remain solid.
Test the Connection:
Play music or audio from your device to ensure the JBL Charge 3 is working correctly.
Reconnect Automatically:
The JBL Charge 3 will automatically reconnect to the last paired device when turned on, as long as the device’s Bluetooth is enabled.
Use Speakerphone:
Use the built-in microphone to take calls by pressing the phone button on the speaker.
Activate Voice Assistant:
Press and hold the play/pause button to activate the voice assistant on your connected device (e.g., Siri, Google Assistant).
Contact Support.Com
If you are still having trouble, refer to the Step-By-Step Guide below, or Contact Support.Com for Personalized Assistance.
1. Introduction
This guide will teach you how to set up your Charge 3 speaker, how you can charge other devices using the battery bank, how you can play music using a 3.5mm audio cable, or how to pair it with your favorite Bluetooth device to play your music wirelessly.
Tools You'll Need:
Wall charger (included) to charge the speaker.
USB Type B cable to charge your other devices using the battery bank.
3.5mm audio cable to connect the speaker to an external source.
2. Charging Your Speaker
First, make sure your speaker is adequately charged before powering on.
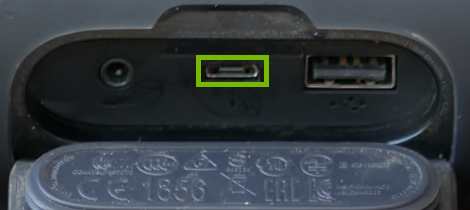
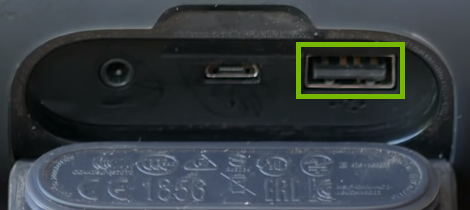
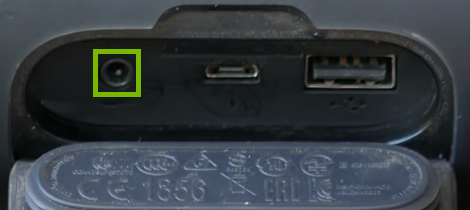
Lift the rubber flap to expose the audio, charging, and USB ports of your speaker.
Always remember to firmly replace the rubber flap on your Charge 3 when the ports beneath are not in use. This flap is part of what allows your Charge 3 to achieve its IPX7 water resistance rating.
Connect the included plug into the charging port of your speaker.
Depending on the method being used to charge your speaker, charging times will vary. Charging your speaker to full takes approximately 4.5 hours.
3. Using the Battery Bank
The Charge 3 has a 6,000 mAh battery bank that you can use to charge devices that use a USB Type B cable.
The battery life is shared between the speaker and any device you are charging. The battery will drain faster while charging other devices.
Press the Power button to turn on the speaker. The power button will light up white.
Lift the rubber flap to expose the audio, charging, and USB ports of your speaker.
Always remember to firmly replace the rubber flap on your Charge 3 when the ports beneath are not in use. This flap is part of what allows your Charge 3 to achieve its IPX7 water resistance rating.
Plug your USB cable into the USB Type B port on the speaker and the other end into the device you want to charge.
4. Using an Audio Cable
Ensure the speaker is turned on.
Plug the 3.5 mm audio cable into the speaker and the device you want to play music from.
You are now ready to play music through your speaker.
If playing music from a computer, you may need to configure sound output options to route audio to your speaker correctly.
5. Pairing Mode
Ensure your speaker is turned on.
To place the JBL Charge 3 in pairing mode press the Bluetooth button. The Power button will start flashing blue and you will hear an audible noise.
You are now ready to pair the speaker to your Bluetooth device.
.png)