Be at your computer, laptop, tablet, or smartphone.
2. Physical Set Up
Connect the three antennas, and either attach your Range Extender to the stand, or put the small non-slip pads on the bottom.
Place your Range Extender about half-way between your Router, and the Wi-Fi device.
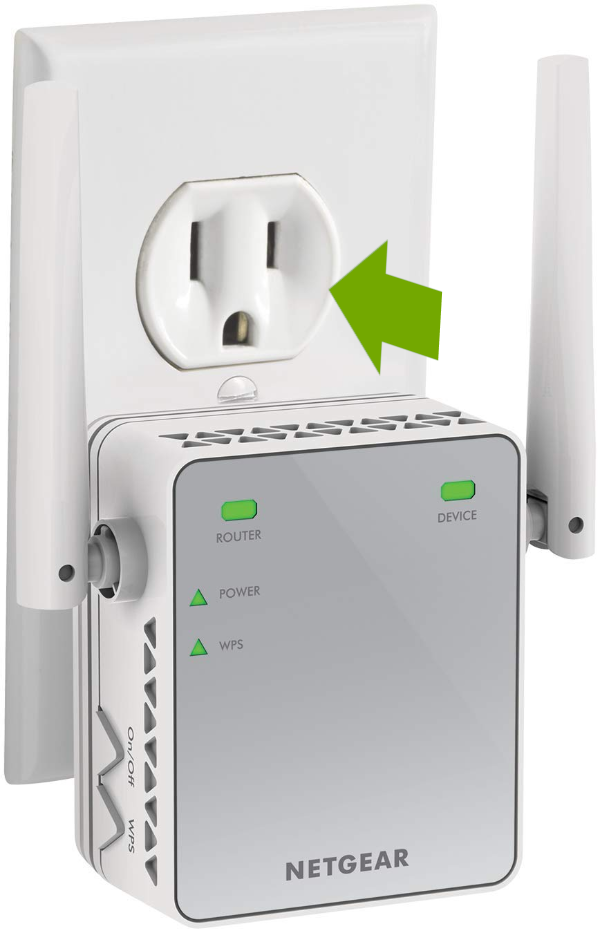
Plug the range extender into the wall.
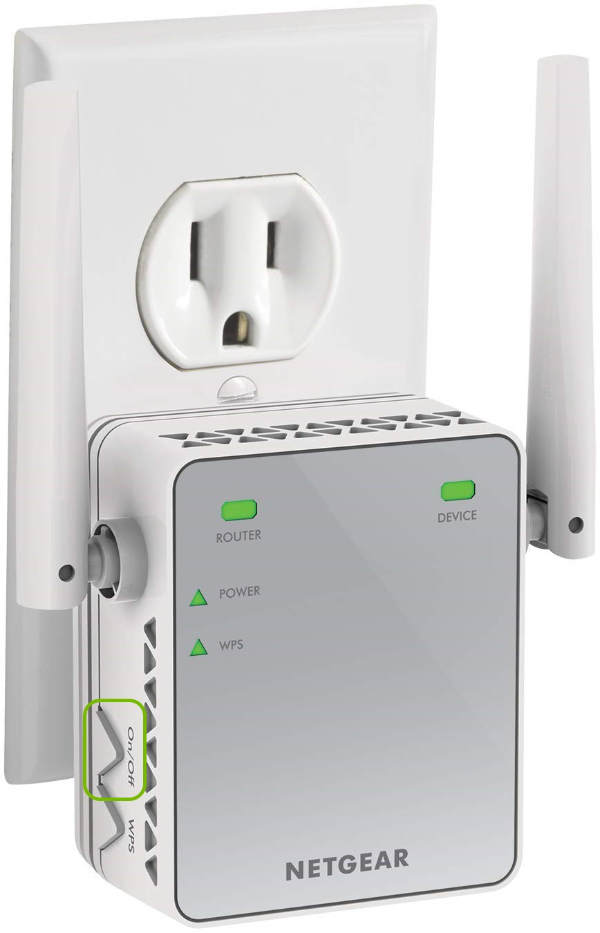
Turn on the Range Extender by pressing the power button on the side.
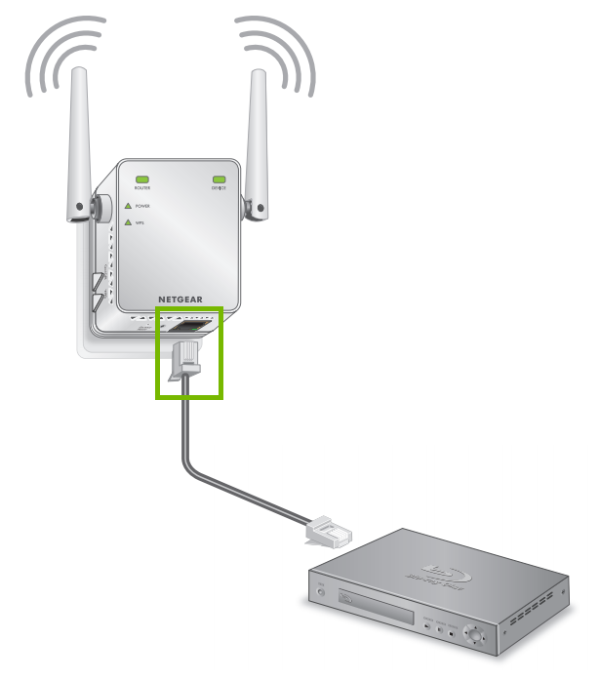
If you are using a Wired device where the Range Extender is located, plug it into the Ethernet port now, as well.
3. OS Choice
To continue, we need to know what Operating System your computer is using.
There are 2 main Operating Systems for personal computers currently available, Microsoft Windows and Apple macOS.
Microsoft WindowsApple macOSMicrosoft Windows runs on computers produced by multiple companies, such as Lenovo, Asus, Dell, Toshiba, Hewlett Packard, Acer, and Sony.Apple is the only company that makes macOS computers.
4. Wired or Wireless
A wired connection is provided by an Ethernet cable. Most commonly, these are used by desktop computers and other equipment you don't move around often.
If you don't connect a cable between your computer and your Range Extender, you are using a Wireless connection.
5. Initial Setup
Open your preferred browser.
Type in www.mywifiext.net and press Enter or Return on your keyboard.
Select New Extender Setup.
Create your account. This is used to log in and change settings on your Wi-Fi Range Extender in the future. When you're done filling this out, select Next.
This password has nothing to do with your Wi-Fi connectivity, it's only used to manage the Range Extender in the future. Choose one that is easy for you to remember, but hard for others to guess.
Your Extender can be used as an Access Point; connected with an Ethernet cable that's run a long distance to your router. We're setting up as a range extender, without an extra Ethernet cable. Select WiFi Range Extender.
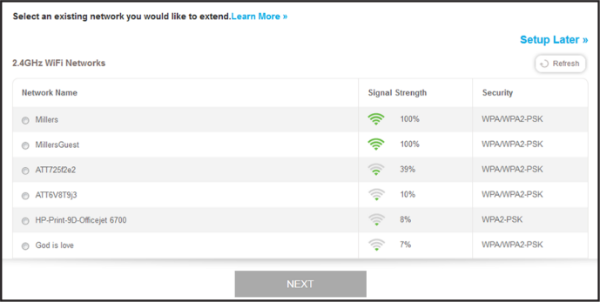
Select your Wi-Fi Network from the list.
Enter your Wi-Fi password for your router's network for both the 2.4GHz and 5GHz networks, then select Next.
These are the passwords you'd normally use to connect to your home Wi-Fi connection.
You'll be asked to name your extended networks, and give them passwords. These are the names you'll see when you connect to the range extender, and the password you'll use. Once setup as you want, select Next.
By default, the extender will add _EXT, _2GEXT, or _5GEXT to the end, and use the same password as your router's Wi-Fi. These are perfectly fine choices!
Your range extender will reboot with the new settings in place.
6. Connect to Setup Network (Windows 10)
Windows 10 may show slightly different options, but the steps should be similar across all versions of Windows 10.
Select the Network icon in the bottom right.
Select NETGEAR_EXT from the list.
Select Connect.
The network is unsecured; this is normal. You will be using it to set up the device only. After, you will be using the device over a secured wireless connection.
7. Initial Setup
Open your preferred browser.
Type in www.mywifiext.net and press Enter or Return on your keyboard.
Select New Extender Setup.
Create your account. This is used to log in and change settings on your Wi-Fi Range Extender in the future. When you're done filling this out, select Next.
This password has nothing to do with your Wi-Fi connectivity, it's only used to manage the Range Extender in the future. Choose one that is easy for you to remember, but hard for others to guess.
Your Extender can be used as an Access Point; connected with an Ethernet cable that's run a long distance to your router. We're setting up as a range extender, without an extra Ethernet cable. Select WiFi Range Extender.
Select your Wi-Fi Network from the list.
Enter your Wi-Fi password for your router's network for both the 2.4GHz and 5GHz networks, then select Next.
These are the passwords you'd normally use to connect to your home Wi-Fi connection.
You'll be asked to name your extended networks, and give them passwords. These are the names you'll see when you connect to the range extender, and the password you'll use. Once setup as you want, select Next.
By default, the extender will add _EXT, _2GEXT, or _5GEXT to the end, and use the same password as your router's Wi-Fi. These are perfectly fine choices!
Your range extender will reboot with the new settings in place.
8. Connect to Network (Windows 10)
Windows 10 may show slightly different options, but the steps should be similar across all versions of Windows 10.
Select the Network icon in the bottom right.
Select the the network name you setup during the extender setup.
Select Connect.
If you're asked for a password, it's the one you just setup on your range extender.
9. Wired or Wireless
A wired connection is provided by an Ethernet cable. Most commonly, these are used by desktop computers and other equipment you don't move around often.
If you don't connect a cable between your computer and your Range Extender, you are using a Wireless connection.
10. Initial Setup
Open your preferred browser.
Type in www.mywifiext.net and press Enter or Return on your keyboard.
Select New Extender Setup.
Create your account. This is used to log in and change settings on your Wi-Fi Range Extender in the future. When you're done filling this out, select Next.
This password has nothing to do with your Wi-Fi connectivity, it's only used to manage the Range Extender in the future. Choose one that is easy for you to remember, but hard for others to guess.
Your Extender can be used as an Access Point; connected with an Ethernet cable that's run a long distance to your router. We're setting up as a range extender, without an extra Ethernet cable. Select WiFi Range Extender.
Select your Wi-Fi Network from the list.
Enter your Wi-Fi password for your router's network for both the 2.4GHz and 5GHz networks, then select Next.
These are the passwords you'd normally use to connect to your home Wi-Fi connection.
You'll be asked to name your extended networks, and give them passwords. These are the names you'll see when you connect to the range extender, and the password you'll use. Once setup as you want, select Next.
By default, the extender will add _EXT, _2GEXT, or _5GEXT to the end, and use the same password as your router's Wi-Fi. These are perfectly fine choices!
Your range extender will reboot with the new settings in place.
11. Connect to Setup Network (macOS)
macOS may show slightly different options, but the steps should be similar across all versions and themes on macOS.
Select Wi-Fi from the menu bar, then select NETGEAR_EXT.
The network is unsecured; this is normal. You will be using it to set up the device only. After, you will be using the device over a secured wireless connection.
12. Initial Setup
Open your preferred browser.
Type in www.mywifiext.net and press Enter or Return on your keyboard.
Select New Extender Setup.
Create your account. This is used to log in and change settings on your Wi-Fi Range Extender in the future. When you're done filling this out, select Next.
This password has nothing to do with your Wi-Fi connectivity, it's only used to manage the Range Extender in the future. Choose one that is easy for you to remember, but hard for others to guess.
Your Extender can be used as an Access Point; connected with an Ethernet cable that's run a long distance to your router. We're setting up as a range extender, without an extra Ethernet cable. Select WiFi Range Extender.
Select your Wi-Fi Network from the list.
Enter your Wi-Fi password for your router's network for both the 2.4GHz and 5GHz networks, then select Next.
These are the passwords you'd normally use to connect to your home Wi-Fi connection.
You'll be asked to name your extended networks, and give them passwords. These are the names you'll see when you connect to the range extender, and the password you'll use. Once setup as you want, select Next.
By default, the extender will add _EXT, _2GEXT, or _5GEXT to the end, and use the same password as your router's Wi-Fi. These are perfectly fine choices!
Your range extender will reboot with the new settings in place.
13. Connect to Network (macOS)
macOS may show slightly different options, but the steps should be similar across all versions and themes on macOS.
Select Wi-Fi from the menu bar, then select the extended network you just setup.
If you're asked for a password, it's the one you just setup on your range extender.
14. OS Choice
To continue, we need to know what Operating System your smartphone or tablet has.
There are 2 main Operating Systems for smartphones currently available, Android and iOS.
Android SmartphoneiOS SmartphoneAndroid smartphones are produced by multiple companies, such as Samsung, LG, Motorola, HTC, and OnePlus.Apple is the only company that makes iOS smartphones.
15. Connect to Setup Network (Android)
Depending on your exact device (Smartphone or Tablet), and which generation you have, the menu theme and options might look slightly different on your screen. However, the steps should be similar across all Android devices and generations.
Open Settings.
Select Wi-Fi.
Select NETGEAR_EXT from the list.
The network is unsecured; this is normal. You will be using it to set up the device only. After, you will be using the device over a secured wireless connection.
16. Initial Setup
Open your preferred browser.
Type in www.mywifiext.net and press Enter or Return on your keyboard.
Select New Extender Setup.
Create your account. This is used to log in and change settings on your Wi-Fi Range Extender in the future. When you're done filling this out, select Next.
This password has nothing to do with your Wi-Fi connectivity, it's only used to manage the Range Extender in the future. Choose one that is easy for you to remember, but hard for others to guess.
Your Extender can be used as an Access Point; connected with an Ethernet cable that's run a long distance to your router. We're setting up as a range extender, without an extra Ethernet cable. Select WiFi Range Extender.
Select your Wi-Fi Network from the list.
Enter your Wi-Fi password for your router's network for both the 2.4GHz and 5GHz networks, then select Next.
These are the passwords you'd normally use to connect to your home Wi-Fi connection.
You'll be asked to name your extended networks, and give them passwords. These are the names you'll see when you connect to the range extender, and the password you'll use. Once setup as you want, select Next.
By default, the extender will add _EXT, _2GEXT, or _5GEXT to the end, and use the same password as your router's Wi-Fi. These are perfectly fine choices!
Your range extender will reboot with the new settings in place.
17. Connect to Network (Android)
Depending on your exact device (Smartphone or Tablet), and which generation you have, the menu theme and options might look slightly different on your screen. However, the steps should be similar across all Android devices and generations.
Open Settings.
Select Wi-Fi.
Select your extended network from the list.
If you're asked for a password, it's the one you just setup on your range extender.
18. Connect to Setup Network (iOS)
Depending on your exact device (Smartphone or Tablet), and which generation you have, the menu theme and options might look slightly different on your screen. However, the steps should be similar across all Apple iOS devices and generations.
Open Settings.
Select Wi-Fi.
Select NETGEAR_EXT from the list.
The network is unsecured; this is normal. You will be using it to set up the device only. After, you will be using the device over a secured wireless connection.
19. Initial Setup
Open your preferred browser.
Type in www.mywifiext.net and press Enter or Return on your keyboard.
Select New Extender Setup.
Create your account. This is used to log in and change settings on your Wi-Fi Range Extender in the future. When you're done filling this out, select Next.
This password has nothing to do with your Wi-Fi connectivity, it's only used to manage the Range Extender in the future. Choose one that is easy for you to remember, but hard for others to guess.
Your Extender can be used as an Access Point; connected with an Ethernet cable that's run a long distance to your router. We're setting up as a range extender, without an extra Ethernet cable. Select WiFi Range Extender.
Select your Wi-Fi Network from the list.
Enter your Wi-Fi password for your router's network for both the 2.4GHz and 5GHz networks, then select Next.
These are the passwords you'd normally use to connect to your home Wi-Fi connection.
You'll be asked to name your extended networks, and give them passwords. These are the names you'll see when you connect to the range extender, and the password you'll use. Once setup as you want, select Next.
By default, the extender will add _EXT, _2GEXT, or _5GEXT to the end, and use the same password as your router's Wi-Fi. These are perfectly fine choices!
Your range extender will reboot with the new settings in place.
20. Connect to Network (iOS)
Depending on your exact device (Smartphone or Tablet), and which generation you have, the menu theme and options might look slightly different on your screen. However, the steps should be similar across all Apple iOS devices and generations.
Open Settings.
Select Wi-Fi.
Select the extended network you just setup from the list.
If you're asked for a password, it's the one you just setup on your range extender.
.png)