.png)
Authored by: Support.com Tech Pro Team
Setting up both a wired and wireless connection to a TP-Link Router is crucial for establishing a home network. TP-Link routers are known for their user-friendly interfaces. Follow these step-by-step instructions to configure both a wired and wireless connection:
Before you begin:
Ensure you have your TP-Link Router, power adapter, and Ethernet cable ready.
Have your Internet Service Provider (ISP) account information, including your username and password (if required).
Connect Hardware:
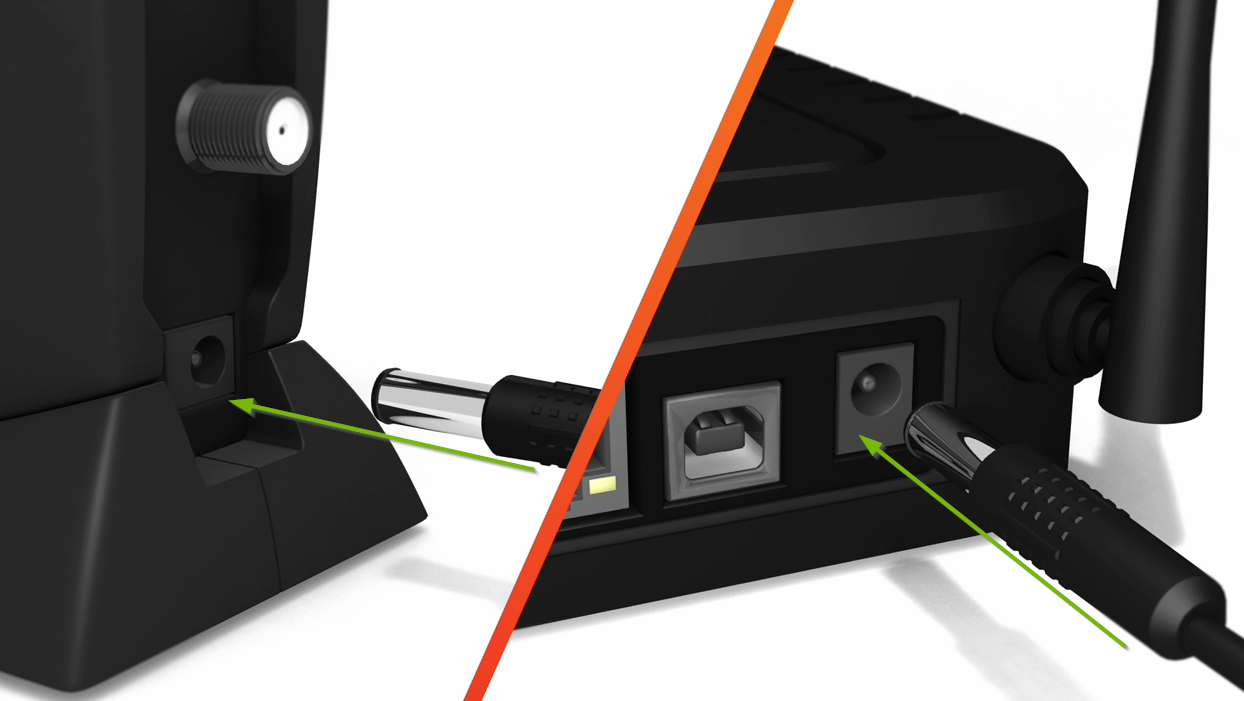
Plug the TP-Link Router into a power outlet using the provided power adapter.
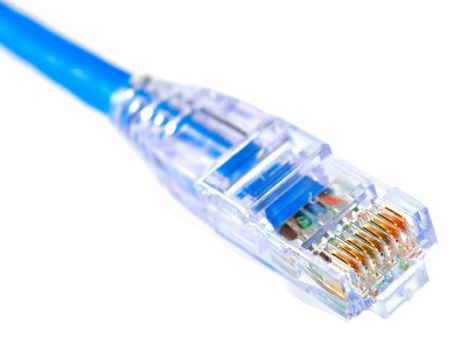
Use an Ethernet cable to connect your modem to the WAN (Internet) port on the TP-Link Router.
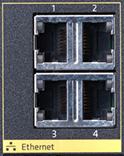
Connect your computer to any of the LAN ports on the router using another Ethernet cable.
Power On the Router: Turn on the TP-Link Router using the power button, if available. Wait for the router to boot up. This may take a few minutes.
Access the Router's Web Interface:
Open a web browser on your connected computer.
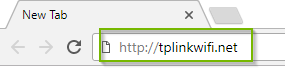
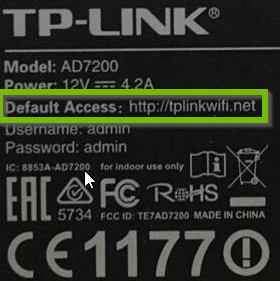
In the address bar, enter the default IP address for TP-Link routers, which is often http://192.168.0.1 or http://192.168.1.1, and press Enter.
You will be prompted to log in. Use the default username and password (usually "admin" for both), which can be found in the router's manual or on a sticker on the router itself.
Configure Internet Settings:
Once logged in, navigate to the WAN (Internet) settings.
Select the appropriate connection type based on your ISP's requirements (usually DHCP or PPPoE).
Enter the necessary information provided by your ISP, such as username and password.
Save the settings.
Test the Wired Connection: Open a web browser and try to access a website to verify that your wired connection is working correctly.
Access the Router's Web Interface (if not already logged in):
Open a web browser.
Enter the router's IP address (usually http://192.168.0.1 or http://192.168.1.1) in the address bar.
Log in using your router's admin credentials.
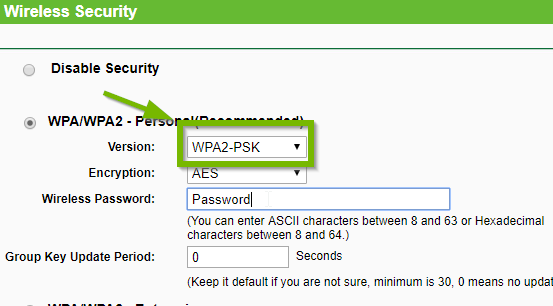
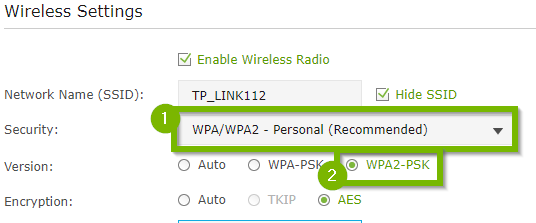
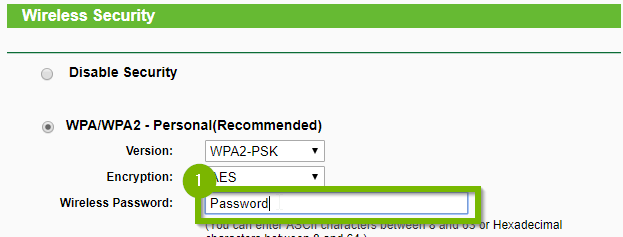
Configure Wireless Settings:
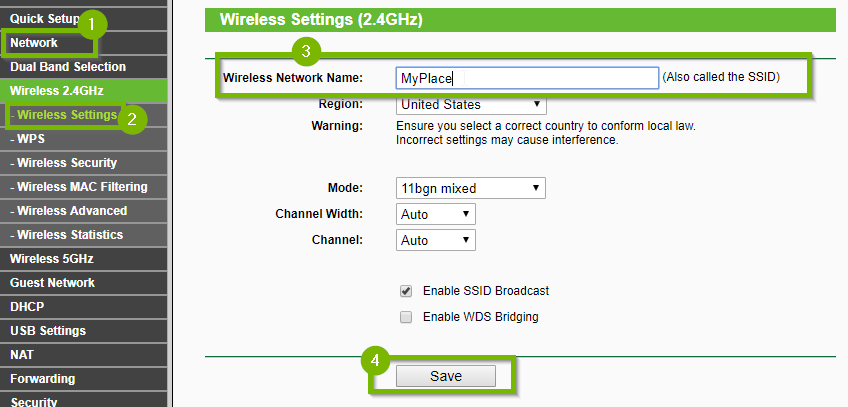
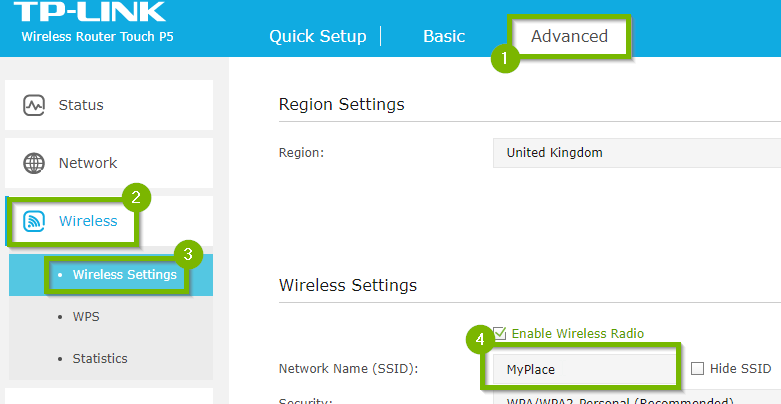
Navigate to the wireless settings section in the router's web interface.
Set your SSID (Wi-Fi network name) to something unique.
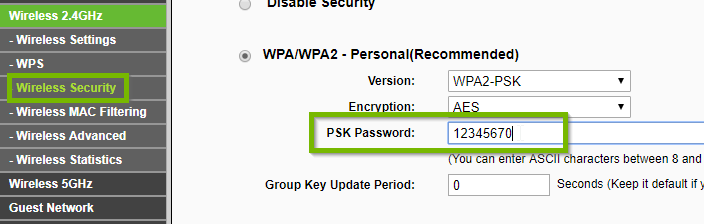
Choose a strong Wi-Fi password (WPA2 is recommended) to secure your network.
Select the appropriate Wi-Fi security mode and encryption settings.
Save and Apply Settings: After configuring the Wi-Fi settings, save and apply the changes. The router may need a moment to apply the settings.
Connect to the Wi-Fi Network:
On your wireless device (e.g., laptop, smartphone), search for available Wi-Fi networks.
Locate and select your TP-Link Router's SSID.
Enter the Wi-Fi password you set during configuration.
Test the Wireless Connection: Once connected, open a web browser on your wireless device and confirm that you can access websites.
You've now successfully set up both a wired and wireless connection to your TP-Link Router. You can connect multiple devices wirelessly to your network using the SSID and password you configured.
If you are still having trouble, refer to the Step-By-Step Guide below, or Contact Support.Com for Personalized Assistance.
A router is a box that allows multiple computers, smartphones, and so on to join the same network. From there, the router is typically connected to a modem in order to provide an Internet connection to any device that is connected to the router. This guide aims to help you through the first time setup process for your router.
In the box you may have some of the following:
Please ensure that you are using the power adapter that came with your router.
Your router must be connected to a modem in order to provide the local network with an Internet connection.


The default credentials are typically:
Wherever possible, you should pick a password that is impossible to guess and is also resistant to brute-force attacks.
Some devices or systems do not allow special characters or they may have their own requirements.
Dos:


Don'ts:


Password Resources
After logging-in the router's user interface:

Some precautions should be taken in order to keep your password secure.
Router updates are provided to add new security features, fix vulnerabilities, or other enhancements like performance upgrades. We recommend updating your router at this time in order to get the best possible security. Depending on the model, you may need an internet connection, access to a computer, and a formatted USB flash drive in order to update.
You may update now or do so another time.

Support.com is committed to your privacy
We do not share or sell your data to third parties. We do use cookies and other third-party technologies to improve our site and services. The California Consumer Privacy Act (CCPA) gives you the ability to opt out of the use of cookies, third-party technologies and/or the future sale of your data. Do not sell my personal information.

Support.com is committed to your privacy
Read our Privacy Policy for a clear explanation of how we collect, use, disclose and store your information
