This guide will walk you the basic setup of your VIZIO SB4531-D5 soundbar.
2. Initial Setup
Your VIZIO soundbar comes with a soundbar speaker, a subwoofer, and a box of accessories that includes power cords and audio cables.
Placement and Power
Center the soundbar below your TV.
Plug the power cord into the soundbar.
Place the subwoofer in a corner of the room.
Plug the power cord into the subwoofer and turn it on.
Audio
Your soundbar can connect to your television in four different ways.
Digital Optical
Optical audio works for most modern televisions, is of the highest quality, and the most recommended way to make the connection to your soundbar.
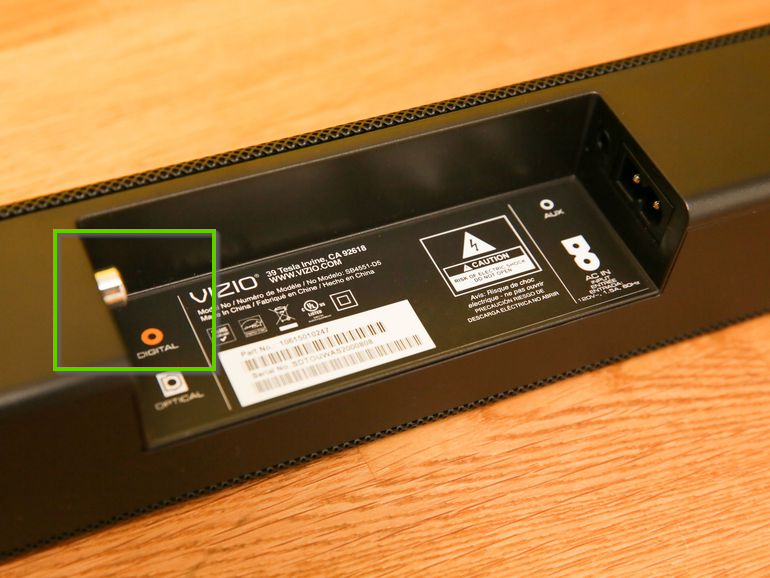
Digital Coaxial (Coax)
Some televisions have a coaxial audio port, but this has become more uncommon.
RCA to Aux/Aux to RCA
This is not a common output, but some televisions will require an RCA-to-minijack or minijack-to-RCA connection.
3. Optical Connection
Optical allows you to use a simple, single-wire connection from your television to your sound bar to enjoy all your media with your new soundbar automatically.
Plug the optical cable into your soundbar.
Plug the optical cable into your television.
Turn your television on and the soundbar will automatically begin searching for an active input.
4. LED Indicators
LED Indicators
Press the Menu button and use the Up/Down Arrow buttons on the remote to access the different functions and acoustic settings of the sound bar. Each function and setting will be displayed on the remote control’s LCD display. The LED Indicators will behave differently with each function.
Bluetooth Pairing Function
LED Behavior
Press the Enter button on the remote. The sound bar will be discoverable for 15 minutes. You can now search for the sound bar using your Bluetooth Device. The sound bar will power down if no device is found. Note: Set your Bluetooth device into pairing mode prior to the sound bar.
Bass Levels Function
LED Behavior
Press the Next/Previous button to increase/decrease the bass level. The LED indicators will move to the top with increasing levels and to the bottom with decreasing levels. Note: Decreasing the level to the minimum mutes the subwoofer.
Treble Levels Function
LED Behavior
Press the Next/Previous button to increase/decrease the treble level. The LED indicators will move to the top with increasing levels and to the bottom with decreasing levels.
Center Levels Function
LED Behavior
Press the Next/Previous button to increase/decrease the presence of dialog in the center channel. The LED indicators will move to the top when the dialog presence is increased and to the bottom when the dialog presence is decreased.
Slim Subwoofer Levels Function
LED Behavior
Press the Next/Previous button to increase/decrease the level of the subwoofer. The LED indicators will move to the top with increasing levels and to the bottom with decreasing levels. Note: Decreasing the level to the minimum turns off the sound bar.
Equalizer Mode Function
LED Behavior
Press the Next/Previous button to toggle between two preset equalizer settings, Music and Movie. Note: Movie mode is on by default.
DTS TruVolume On/Off Function
LED Behavior
Press the Next/Previous button to enable/disable TruVolume. When enabled (On), TruVolume provides a consistent and comfortable volume level for a more enjoyable listening experience. Note: Default is setting is Off.
Night Mode On/Off Function
LED Behavior
Press the Next/Previous button to enable/disable Night Mode. When enabled (On), the sound bar will lower bass frequency levels to provide a more quiet environment (ideal for apartment living and homes with sleeping children).
AV Delay Function
LED Behavior
Press the Next/Previous button to increase/decrease the amount of audio delay. The LED indicators will move to the top with increasing audio delay levels.
TV Remote Function
LED Behavior
Press the Next/Previous button to enable/disable VIZIO TV Remotes. When enabled (On), you can use a VIZIO TV remote control to turn on the sound bar (using the TV Volume Up button) and control volume.
Program Remote Function
LED BehaviorNonePress the Next/Previous and Play buttons to toggle and select and program your TV remote to control the Volume Down, Volume Up, and Mute functions on your sound bar. See the Program Remote section for more information.
5. Using the Remote
Using the Remote
Display (this button displays soundbar settings)
Power
Input
Previous
Up/Down
Mute
Menu
Enter/Play/Pause
Next
Volume +/-
6. Android or iOS
For the next steps, we need to determine what type of mobile device you have.
7. Enable Bluetooth
Swipe down on your screen (or up, if using a tablet) to access the menu.
Hold down on the Bluetooth icon to bring up Bluetooth options.
Ensure the Bluetooth switch is set to ON.
8. Install Android App
Open Play Store.
Type "Vizio Smartcast" in the search bar.
If you do not see the SmartCast app in the search results, check your search words and try again. If you can't still see it, it may not be compatible with your phone/tablet.
Touch the magnifying glass on the on-screen keyboard to search.
Select Vizio SmartCast in the search results.
On the App's install page, touch INSTALL.
Review the install prompt that pops up. Once done, touch ACCEPT.
Wait for the download to finish. Once done, touch OPEN to launch the App or go back to your apps to access the new App's icon.
9. Enable Bluetooth
Press and Hold the Bluetooth button.
The Soundbar will enter Pairing mode.
The LEDs will light from top to bottom and back again. Function
LED Behavior
10. First Time Setup
Open the SmartCast app.
Tap the Menu
Tap Setup A New Device.
Tap Get Started.
Select your Language.
Hold your Smartphone next to the power LED on your soundbar and it should connect.
11. HDMI
Plug the HDMI cable into the back of your soundbar with the HDMI Out connector.
Plug the other end into your television.
If you are changing to an HDMI connection after having completed initial setup, you can remove whatever connection cable was used to complete the initial setup at this time.
12. Enable Bluetooth
Open Settings on your phone or tablet.
Then tap Bluetooth.
Make sure Bluetooth is set to On.
13. Install iPhone/iPad App from Store
Open App Store.
At the bottom of the screen, tap on Search.
Type "Vizio Smartcast" in the search bar.
Tap Search to start the search.
Select VIZIO SmartCast in the search results.
Next, tap the GET button:
If you have previously downloaded the app in the past, you can re-download it by selecting the cloud download icon.
Tap OPEN once the app is installed.
14. Coax Connection
Coax allows you to use a simple, single-wire connection from your television to your sound bar to enjoy all your media with your new soundbar automatically.
Plug the coaxial cable into your soundbar.
Plug the other end of your coaxial cable into your television.
Turn your television on and the soundbar will automatically begin searching for an active input.
15. Aux Connection
Aux allows you to connect your soundbar using RCA outputs from your television.
Plug the mini-jack into your soundbar.
Plug the RCA cables into your television. Match the white end with the white port, and the red end with the red port.
Turn your television on and the soundbar will automatically begin searching for an active input.
16. HDMI No First Time Setup
HDMI cannot be used for first-time setup. If you do wish to use HDMI as a connection method, it can be switched to after the initial setup has been performed.
.png)