What parental control restrictions are available for your Windows 10 PC.
How to create a Family Group for the users of your Windows 10 PC.
How to implement parental control restrictions for members of your Family Group.
Before We Begin:
Be in front of your computer & logged into the primary user account.
2. About Parental Controls
Parental controls for computers running Windows 10 allow you to monitor and manage the activity of your Microsoft Family group.
No parental control system is 100% perfect. The best solution is active, engaged parenting; working with your child to ensure they develop good habits through your instruction and guidance.
How Parental Controls Work
Parental controls are set up and managed using Microsoft accounts. As the parent, your Microsoft account will be used to create and add family members to your Microsoft Family group. Each member of the household must use their Microsoft account, or have one created for them at the time things are configured. There are two types of accounts that can be added to your Family group:
Child Account
Child accounts are accounts that can be restricted via parental control settings.
Adult Account
Adult accounts have the ability to manage Child accounts. Adult accounts cannot be restricted via parental control settings.
Benefits of Parental Controls
Manage Family Login Permissions
Prevent certain Microsoft Family group members from being able to log into certain computers in the home.
Remove Family Members
When your child eventually grows out of the need for parental controls, they can be removed from the Family group altogether.
View Recent Activity
Allows you to view reports on recent activity from apps, games, web browsing, searches, and screen time available through account.microsoft.com/family.
Manage Screen Time
Screen Time limitations allow you to limit usage based on the total amount of time spent on the computer, or set windows of time during the day when the computer can and cannot be used.
Content Restrictions
Allows you to restrict specific games or apps, as well as block inappropriate web sites. Specific websites can also be blocked as well.
Manage Purchases and Spending
Set up your child's account to require adult approval for the things your child wants to buy in the Microsoft Store - except for what they get with gift cards or money in their Microsoft account.
Find Your Child
See your child's location on a map when your child uses a Windows 10 phone or runs Microsoft Launcher version 4.10 or higher on their Android device.
3. Check Account Type
In order to proceed, your computer needs to be logged into a Microsoft Account. If you use any of the following services, you may already have a Microsoft Account:
Microsoft Email
If you have an email address that ends in one of the following:
@outlook.com
@hotmail.com
@msn.com
@live.com
These domains are automatically considered to be Microsoft accounts.
XBOX Live
If you have an XBOX console and you use XBOX Live online services.
Skype
If you have ever used Skype to make calls to other Skype users or paid phone services, the email address used is considered a Microsoft account.
Microsoft Office
If you have purchased or registered a copy of Microsoft Office at all in recent years, Microsoft now requires that all Office licenses be tied to a Microsoft account. Any email address used in this capacity is considered to be tied to a Microsoft account.
Other Microsoft Account
If you have ever used services such as OneDrive or the Microsoft Store, those require a Microsoft account as well. You may have used an existing email address to create a Microsoft account to access them.
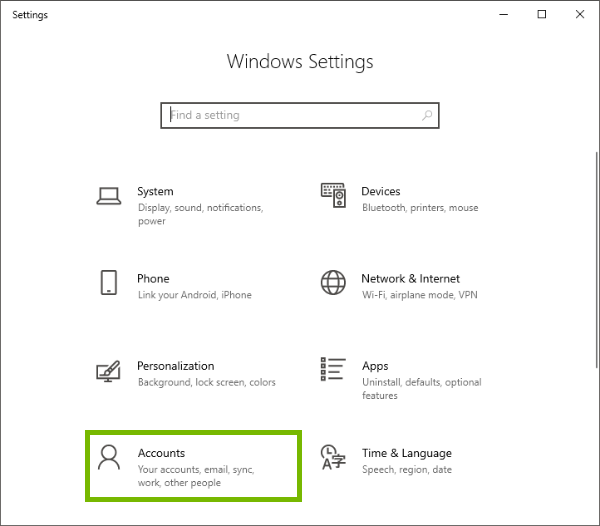
To Check If You Use a Local or Microsoft Account
Click on the start menu.
Click on Settings.
Click on Account.
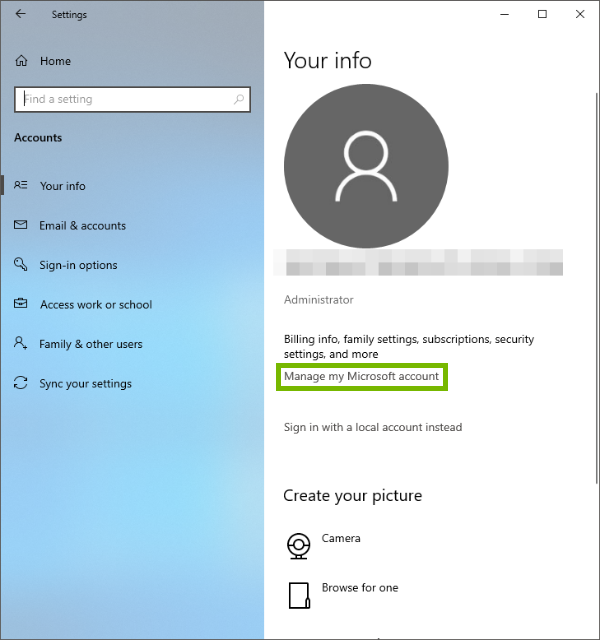
Check to see if you are using a Microsoft account, or a Local account:
Signed into a Microsoft account.
Signed into a Local account.
4. Add Family Member
To add someone to your Family group, that family member will need to have a Microsoft account. If they have ever used any of the following services, they may already have a Microsoft account. If not, a Microsoft account can be created during set up.
Microsoft Email
If you have an email address that ends in one of the following:
@outlook.com
@hotmail.com
@msn.com
@live.com
These domains are automatically considered to be Microsoft accounts.
XBOX Live
If you have an XBOX console and you use XBOX Live online services.
Skype
If you have ever used Skype to make calls to other Skype users or paid phone services, the email address used is considered a Microsoft account.
Microsoft Office
If you have purchased or registered a copy of Microsoft Office at all in recent years, Microsoft now requires that all Office licenses be tied to a Microsoft account. Any email address used in this capacity is considered to be tied to a Microsoft account.
Other Microsoft Account
If you have ever used services such as OneDrive or the Microsoft Store, those require a Microsoft account as well. You may have used an existing email address to create a Microsoft account to access them.
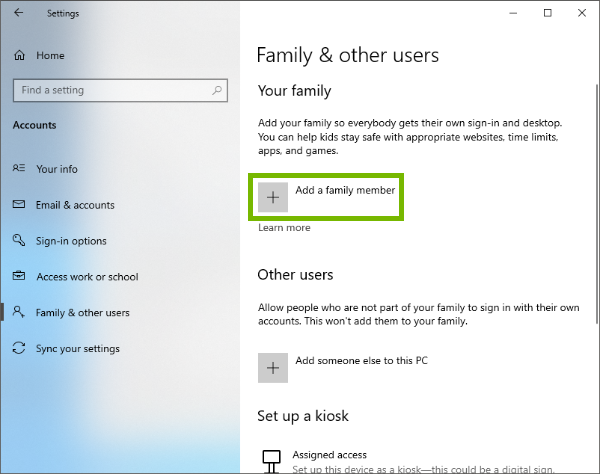
To Add a Family Member to Your Family Group
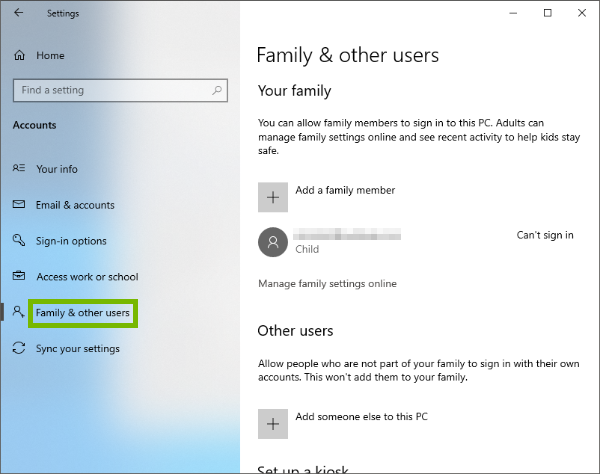
Click Family & other users.
Click Add a family member.
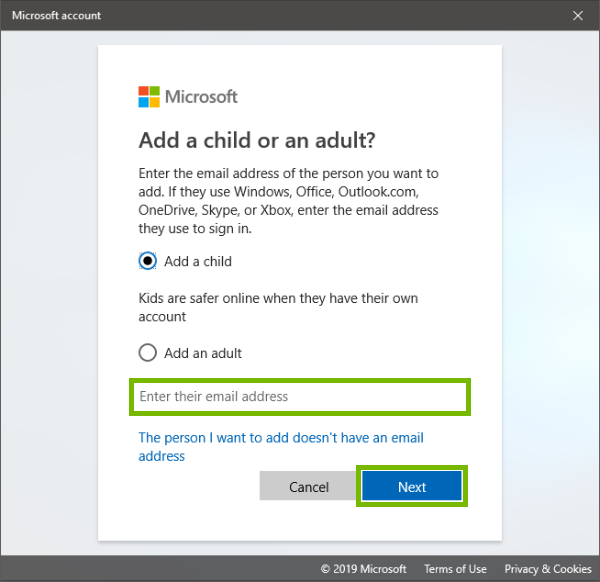
Choose whether you are adding a child or an adult.
Adult accounts cannot have child restrictions placed on the account. They can be used to validate a purchase for a child.
5. Add Family Member (Existing MS Account)
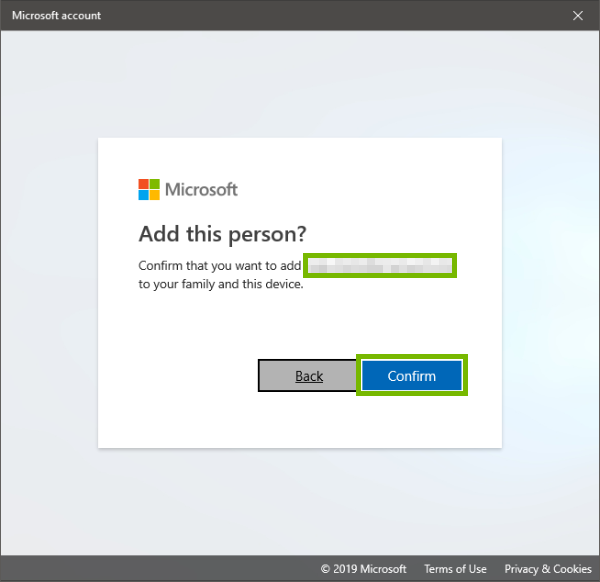
Enter your Microsoft username and press Next.
Confirm you have the right email address and click Confirm.
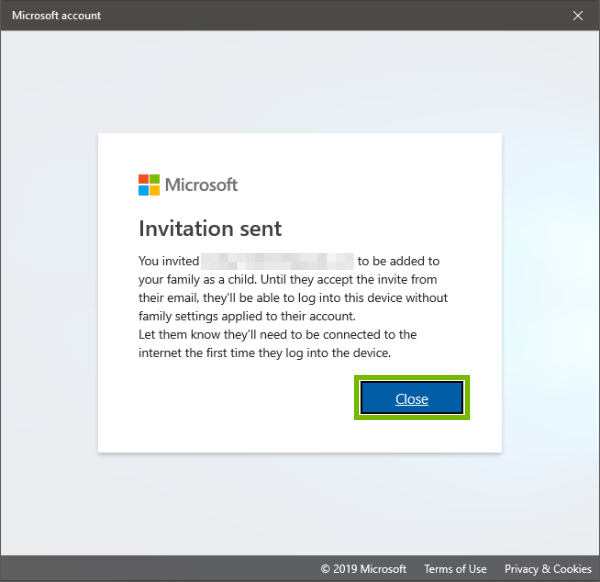
You will get a verification that an invitation was sent. Click Close.
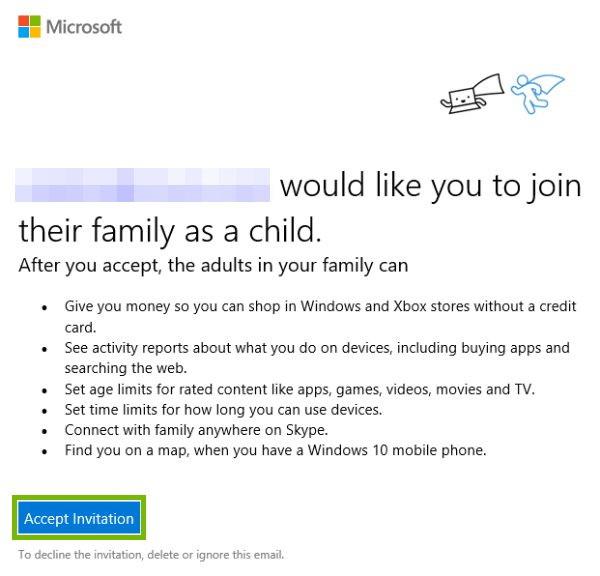
Check the email for the account you just invited for an invitation and click Accept Invitation.
6. Parental Control Options
Now that you have created your Family group, you are free to set up or manage any child account's restrictions. We can help demonstrate any of the following features:
Manage Family Login Permissions
Prevent certain Microsoft Family group members from being able to log into certain computers in the home.
Remove Family Members
When your child eventually grows out of the need for parental controls, they can be removed from the Family group altogether.
View Recent Activity
Allows you to view reports on recent activity from apps, games, web browsing, searches, and screen time available through account.microsoft.com/family.
Manage Screen Time
Screen Time allows you to dictate how much time your child can spend on the computer, and when they're allowed to spend that time.
Content Restrictions
Allows you to restrict specific games or apps, as well as block inappropriate web sites. Specific websites can also be blocked as well.
Manage Purchases and Spending
Set up your child's account to require adult approval for the things your child wants to buy in the Microsoft Store - except for what they get with gift cards or money in their Microsoft account.
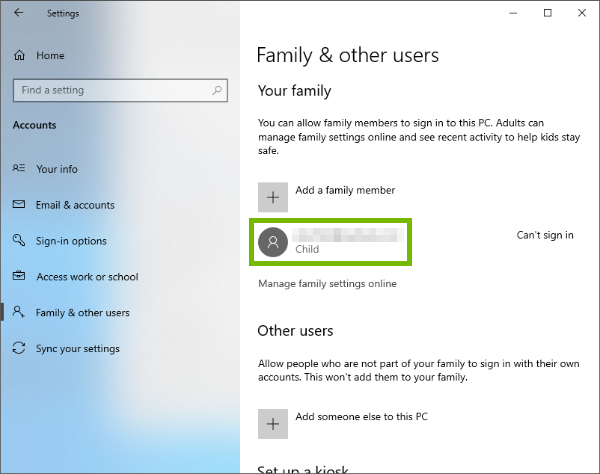
7. Allow or Block Login Access of a Child Account
You can restrict members of your Family group from being able to log into certain computers in your home. For instance, if there is a home-office computer that your children are forbidden from using, and you want to be sure that they are unable to log into that machine when you're not around, you can restrict login access in this fashion.
The following steps must be performed on the computer that you wish to allow or block login access from.
To Allow or Block Login Access
Click Family & other users.
Select the family member whose login settings you wish to change.
Click to Allow or Block the user from being able to log into this computer.
Allow Login Access
Block Login Access
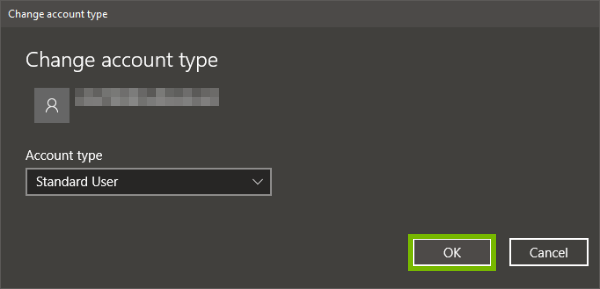
Administrator
Administrator accounts have complete control over a computer. Users with this type of account can change settings globally, install programs, get through the User Account Control (UAC) when elevation to perform a task is required.
Standard User
Standard User accounts have limited control. Users with this type of account can run applications, but they can't install new programs. Users can change system settings, but only settings that won't affect other accounts. If a task requires elevations a username and password for an administrator will be needed to pass through the UAC prompt.
Click OK.
-->
8. More Information
You have finished the current topic. You may wish to explore other available topics.
If your child has reached an age where parental control restrictions are no longer necessary, or if you no longer wish to manage a particular member of your Family group for any reason, they can be removed from the Family group altogether. Removing an account from the Family group also removes any parental restrictions the Family group was enforcing on it.
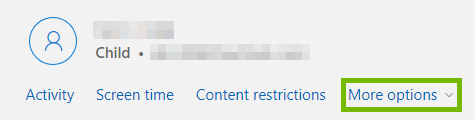
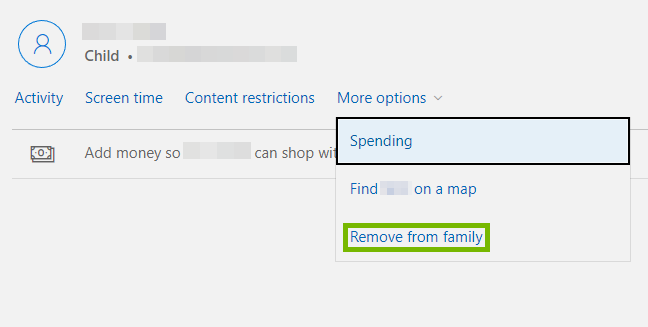
To Remove a Child Account
Click More Options beneath the Family group account you wish to remove.
Then click Remove from family.
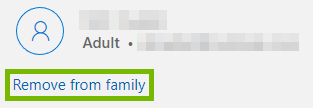
To Remove an Adult Account
Click Remove from family beneath the Family group account you wish to remove.
When you add any child into your Family group and turn Activity reporting on, you'll have access to a summary of activity for their Windows 10 and Xbox devices, including any websites they've visited, games and apps they've used, any terms they searched for using search engines like Bing, Google, or Yahoo! Search, and data around how much screen time they've had. You can also choose to have weekly email reports sent to you that will recap all of the same information.
Activity reports are broken down into the following categories:
Apps & Games
Displays the apps and games your child has been using, including any that were blocked. Age ratings will be displayed next to any applicable titles. You can choose to allow or block any apps or games listed right from this report.
Web Browsing
Displays any websites your child has visited or attempted to view. Blocked sites will be listed first, followed by sites that your child successfully visited. You can choose to allow or block any of the sites listed right from this report.
Searches
Displays any terms your child has searched for using common search engines along with timestamps.
Screen Time
Displays the total amount of time an account has been in use for each of the past seven days, followed by a breakdown of total time and the name of the device that was used for that total.
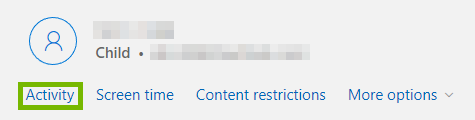
To Review Recent Activity Reports
Click Activity beneath the Family group member you wish to access reports for.
Then click Manage to expand this category.
The first set of information that will be displayed when the Manage category has been expanded are the settings for Activity reporting. You can choose to turn Activity reporting or Weekly email reports On or Off from here.
Scroll down the page to view the categories that were outlined above.
Screen time limitations allow you to decide at what times Family group members are able to access their devices, and/or how much time they can spend per day using those devices. These settings can be applied across all of the devices a particular Family group member uses, or you can implement specific settings for each device that is used.
To Set Screen Time Restrictions
Choose Devices to Limit Screen Time
You can choose to set screen time globally across all devices, or you can set per device screen time limits. You might want to keep your child off of the XBox One for but let them use the computer for school work.
Click Screen Time beneath the Family group member you wish to change Screen time settings for.
You can set screen time globally on all devices or on a per device basis.
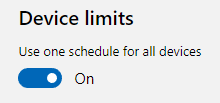
Globally
To set screen time globally, ensure the toggle for Use one schedule for all devices is set to On.
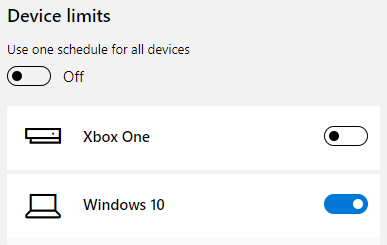
Per Device
To set per device limits, make sure Use one schedule for all devices is set to off and then you can toggle each device individually.
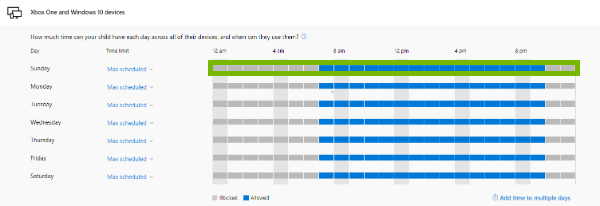
Set a Schedule
Choose what times your child can use across all of their devices.
Click Screen Time beneath the Family group member you wish to change Screen time settings for.
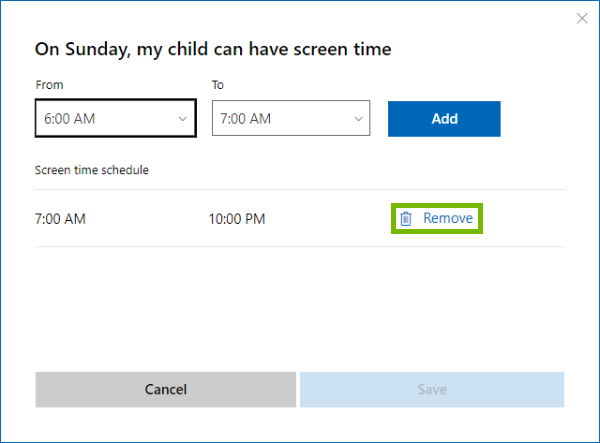
Select a day you want to modify the schedule for.
If you have per device limits enabled, select the day under the device you wish to manage.
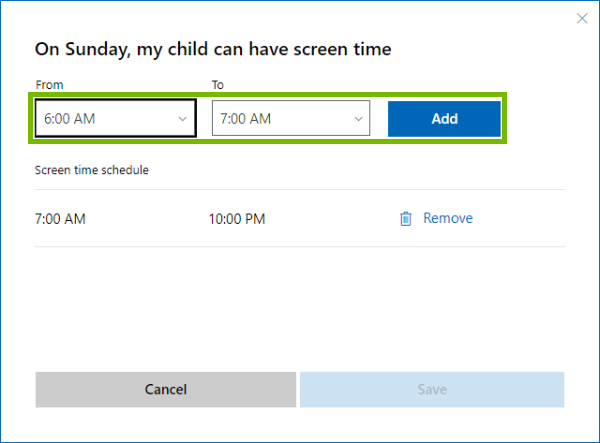
Choose to add or remove a time allotment.
Add Time Allotment
Remove Time Allotment
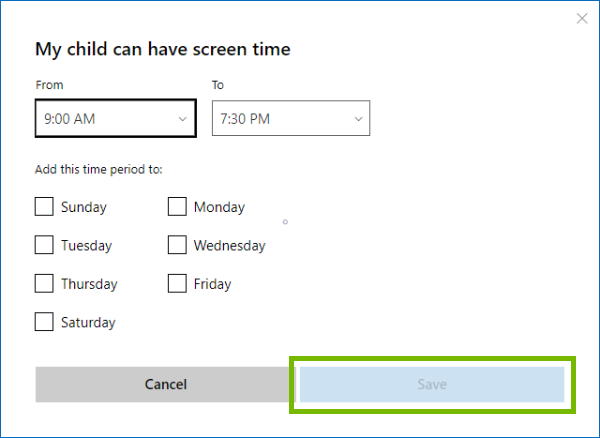
Set a Schedule for Multiple Days at Once
Click Screen Time beneath the Family group member you wish to change Screen time settings for.
Ensure Device limits are toggled on.
Click Add time to multiple days.
Choose the timeframe and the days you want to add to the schedule and click Save.
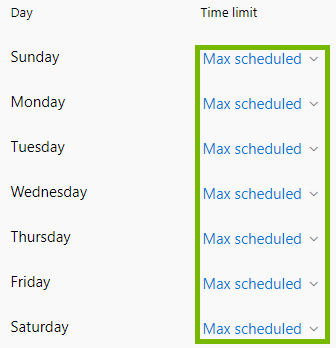
Set Daily Screen Time Limits
Choose how much time can your child have each day across all of their devices.
Ensure Device limits are toggled on.
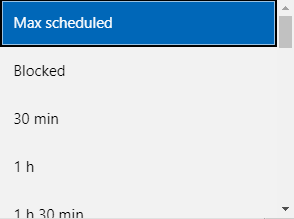
Click Max scheduled.
You can now choose how much time your child can spend on the PC during any given day of the week.
Setting Content restrictions for your Family group members gives you the ability to limit certain categories of content for each group member. You can require approval for purchases, restrict apps, games, and media based on your child's age, and block inappropriate websites.
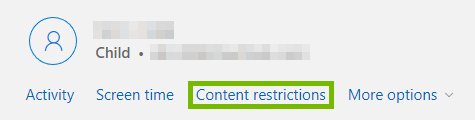
To Set Content Restrictions
Click Content Restrictions beneath the Family group member you wish to set Content restrictions for.
The following categories are available for restriction:
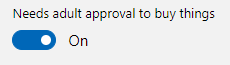
Ask a Parent
Require adult approval for the things your child wants to buy in the Microsoft Store. This does not apply when they purchase items with gift cards or money in their Microsoft account.
You can also elect to receive notifications via email for each purchase your child makes from their account. If you have chosen to require adult approval, this email message will give you the ability to approve or deny potential transactions as well.
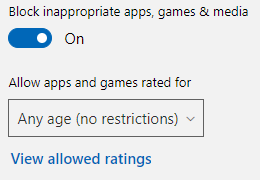
Apps, Games, & Media
Set an age limit to block inappropriate apps, games, and media. Anything that exceeds the content ratings you've decided is appropriate for your child will need your approval.
This setting applies to Windows 10 and Xbox One devices.
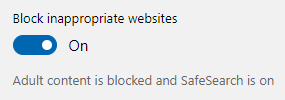
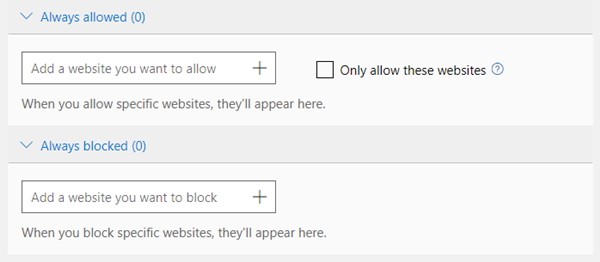
Web Browsing
Turn this on to block inappropriate websites and help protect your child from sites and search results that are too mature.
This setting only works with Microsoft Edge and Internet Explorer on Windows 10 and Xbox One devices and blocks commonly used browsers to help keep your child safer.
If enabled, you will be able to restrict access to only the websites you allow, or you may choose to only block the specific websites that you add into the Family group interface.
Managing purchases & spending for your Family group can help you control and be aware of what and when any purchases are made. Child accounts must manually have funds added to them. Additionally, you can set up notifications for any purchases that are made, and even require parental approval in order to make purchases on a particular Family group member's account.
To Add Money to a Child Account
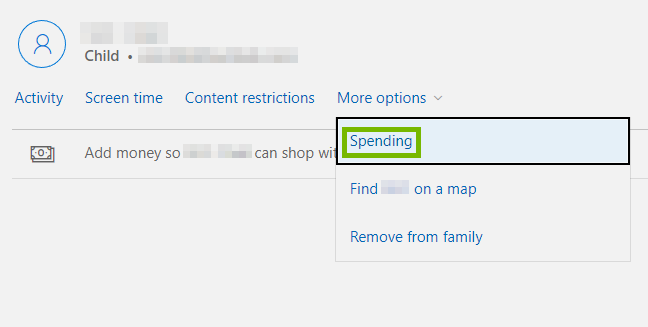
Click More Options, then click Spending.
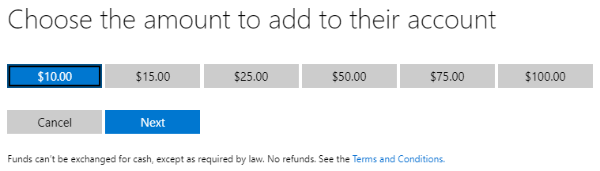
Click Add money.
Select an amount of money you would like to add, then click Next.
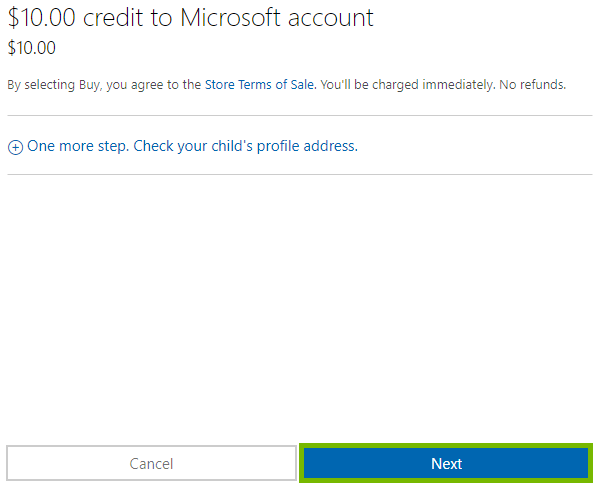
From the confirmation screen, click Next to proceed.
To Restrict Spending on a Child Account
Click Content Restrictions beneath the Family group member you wish to set Spending restrictions for.
To require adult approval for purchases, ensure the toggle is set in the On position.
To receive email notification for any purchases this account makes, ensure the toggle is set in the On position.
To Approve or Deny Purchase Requests
Click More Options, then click Spending.
All pending purchase requests will be displayed beneath the Purchase History header. Options for approving or denying requests will appear here.
If you have chosen to require adult approval for purchases and have also elected to be notified via email when purchases are made for an account, the email message you will receive will also give you the ability to approve or deny purchases right from the message itself.
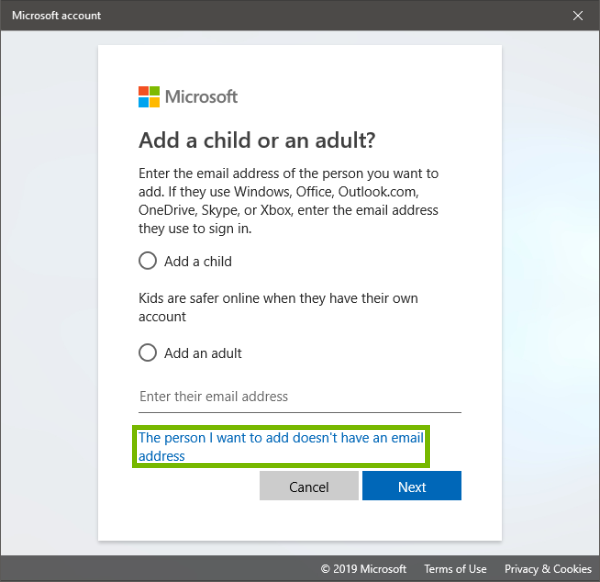
19. Create Family Member
The following are owned by Microsoft and already considered a Microsoft account.
@outlook.com
@live.com
@hotmail.com
@msn.com
Click The person I want to add doesn't have an email address.
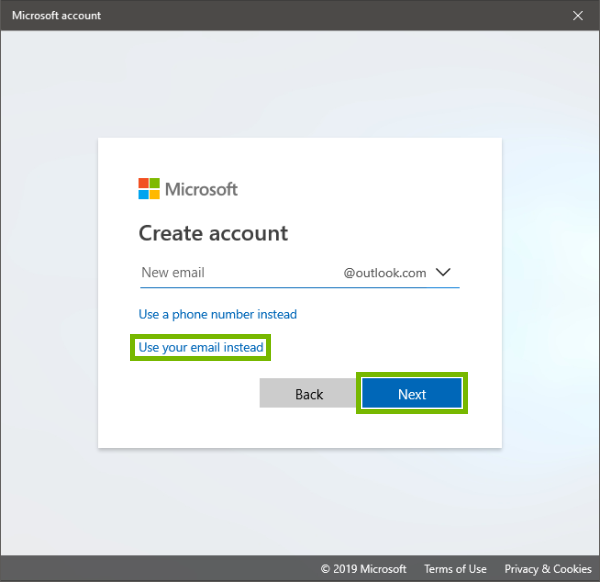
20. Create Family Member (Existing Email)
Click Use your email instead.
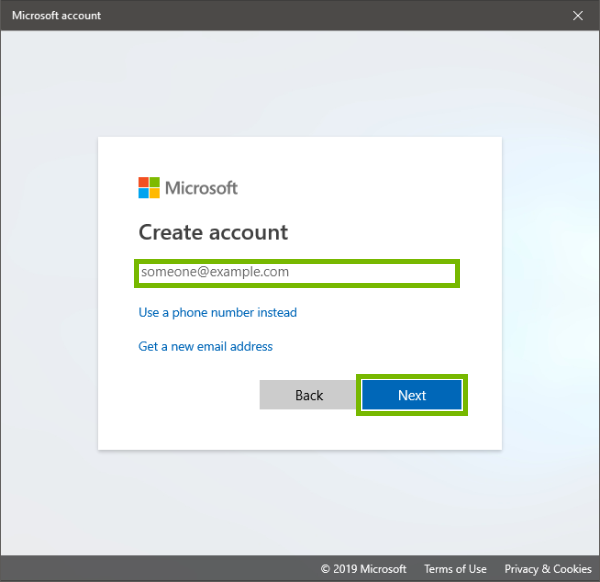
Enter your current email address you wish to use.
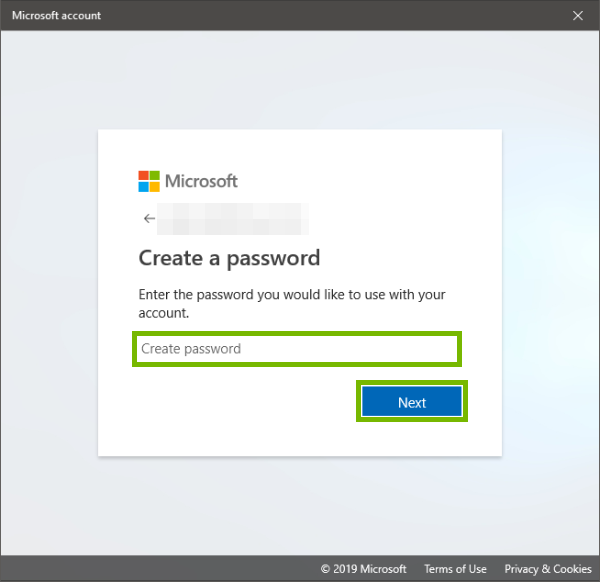
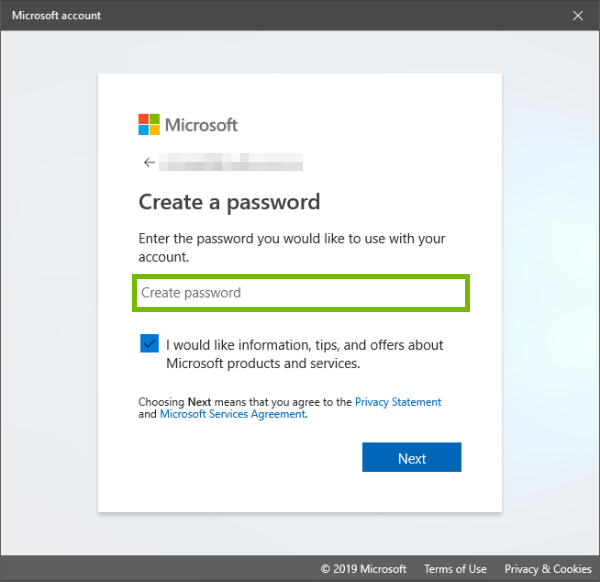
Enter a password you would like to use and hit Next.
We suggest that you use a unique strong password you don't use on other sites.
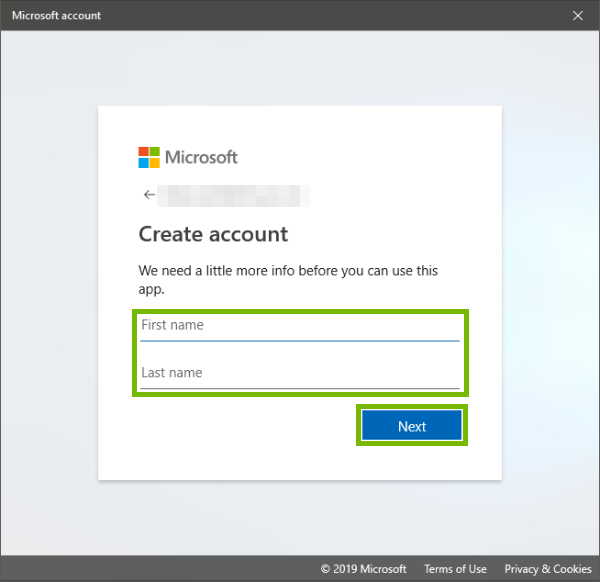
Enter your name and click Next.
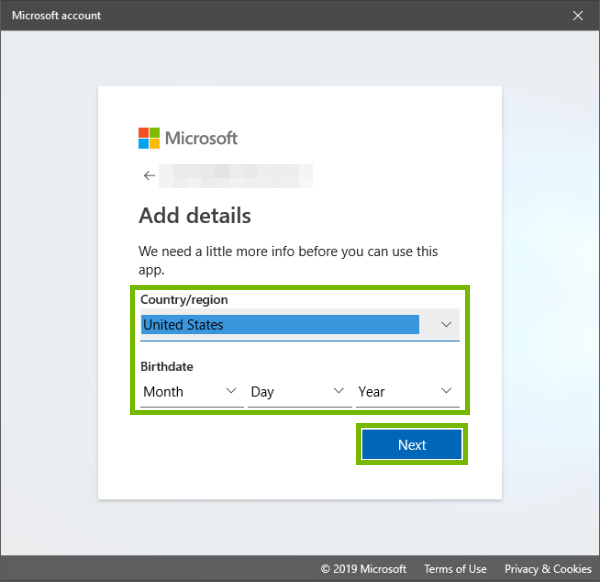
Select your region and birthdate, then click Next.
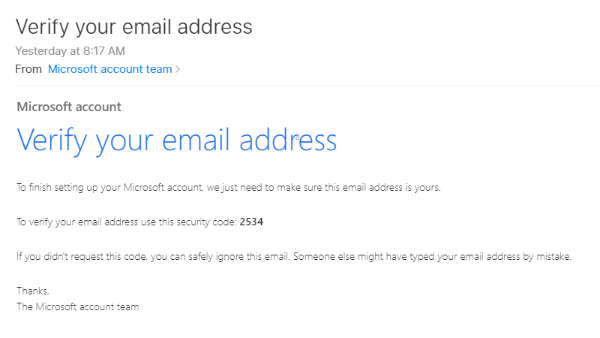
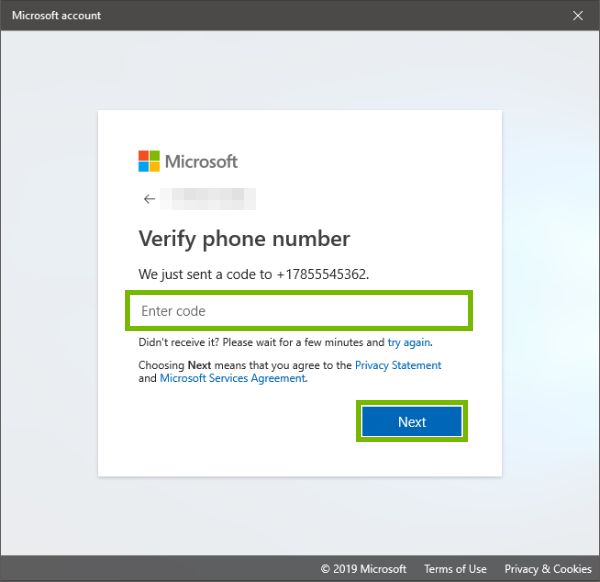
Check your email with the code and enter the code provided to you. Click Next.
Click Close.
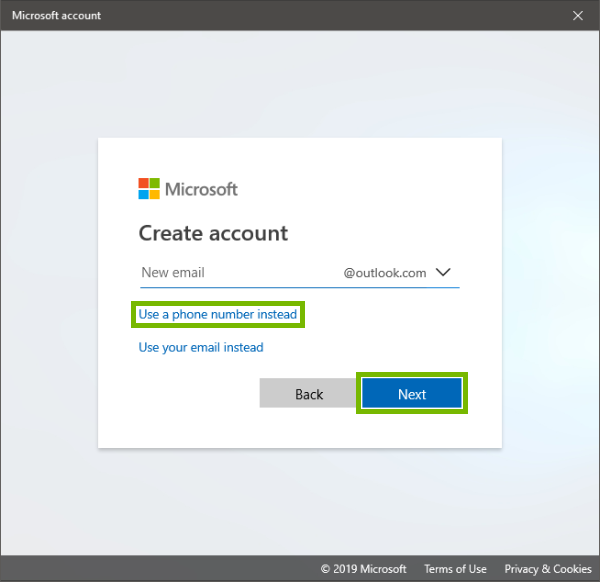
21. Create Family Member (Phone Number)
Click Use a phone number instead.
Type in your phone number and click Next.
Choose a password you would like to use.
Enter your name and click Next.
Select your region and birthdate, then click Next.
Check your phone for the code and enter the code provided to you. Click Next.
Click Close.
22. Create Family Member (New Email)
Type in an email address you would like and click Next.
Choose a password you would like to use.
Enter your first and
Enter your name and click Next.
Select your region and birthdate, then click Next.
Click Close.
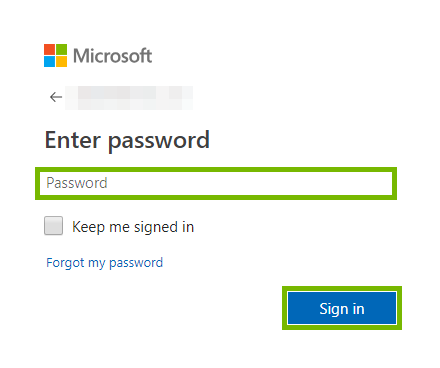
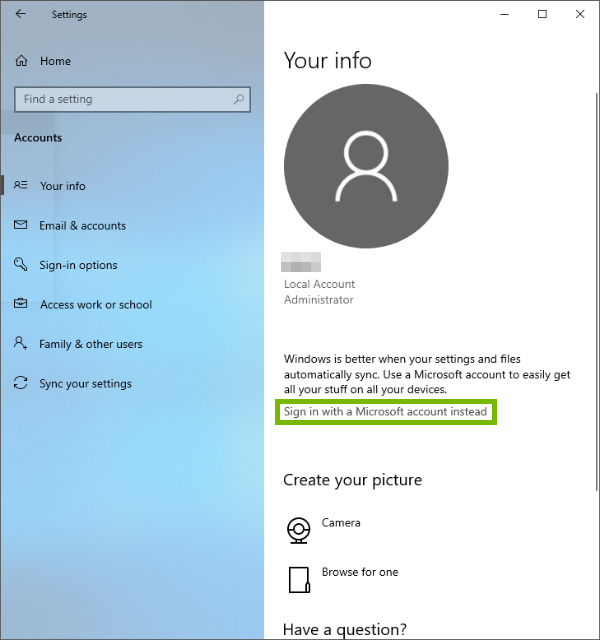
23. Sign into Microsoft Account
Click Sign in with a Microsoft account instead.
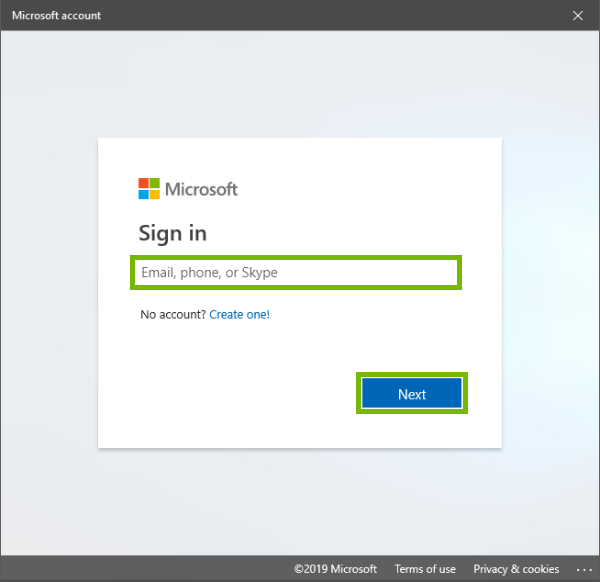
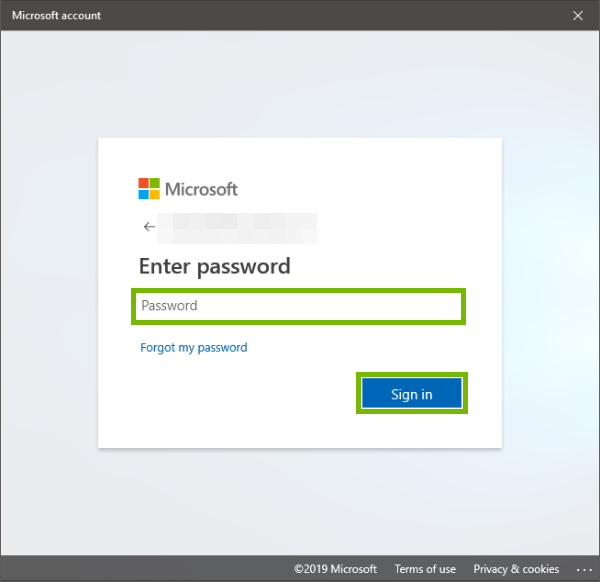
Enter your Microsoft username and press Next.
Enter your Password and click Sign in.
If you have two-factor authentication, you may be prompted to enter a code from your email or phone.
24. Create Microsoft Account
The following are owned by Microsoft and already considered a Microsoft account.
@outlook.com
@live.com
@hotmail.com
@msn.com
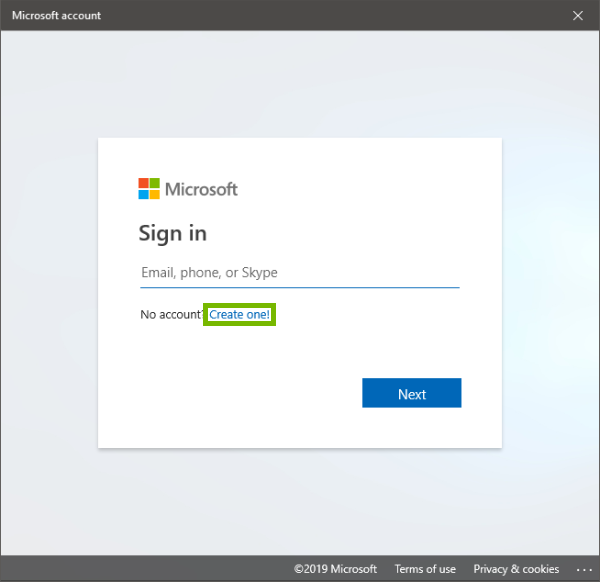
Click Sign in with a Microsoft account instead.
Click Create one.
25. Create Microsoft Account (Existing Email)
Enter your current email address you wish to use.
Enter a password you would like to use and hit Next.
We suggest that you use a unique strong password you don't use on other sites.
Enter your name and click Next.
Select your region and birthdate, then click Next.
Check your email with the code and enter the code provided to you. Click Next.
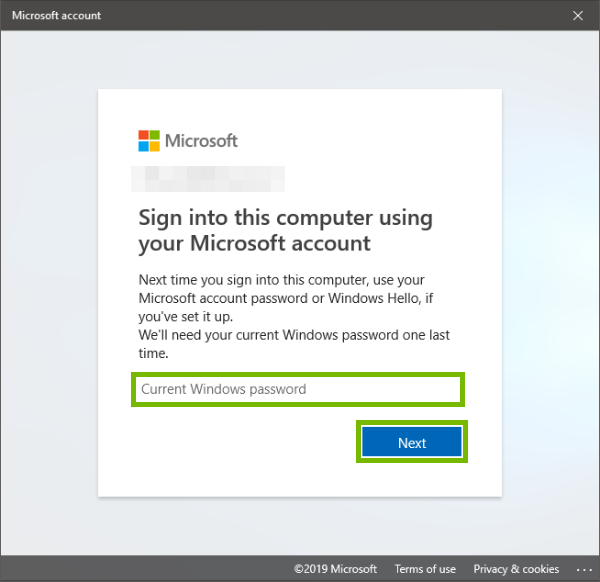
Enter your current windows password and then click Next.
Click Next.
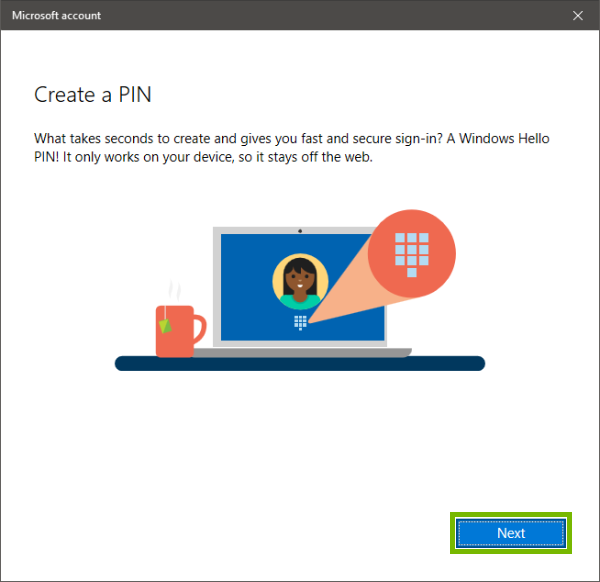
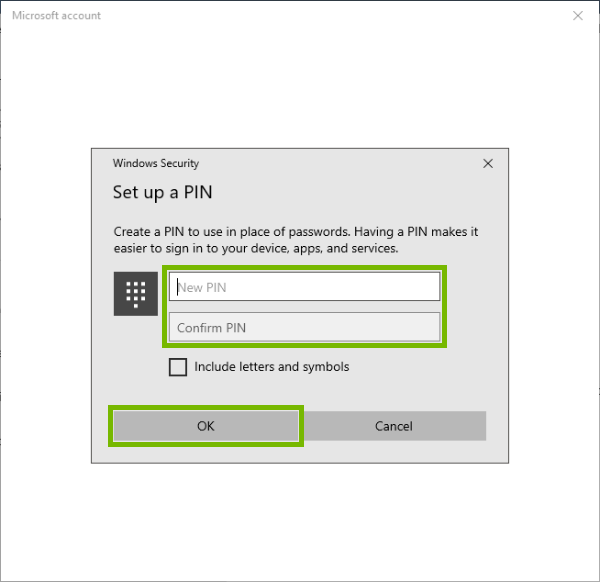
Enter a PIN you would like to use when you log into your computer and click OK.
d
26. Create Microsoft Account (Phone Number)
Enter the phone number you wish to use and click Next.
Enter a password you would like to use and hit Next.
We suggest that you use a unique strong password you don't use on other sites.
Enter your name and click Next.
Select your region and birthdate, then click Next.
Check your phone for the code and enter the code provided to you. Click Next.
Enter your current windows password and then click Next.
Click Next.
Enter a PIN you would like to use when you log into your computer and click OK.
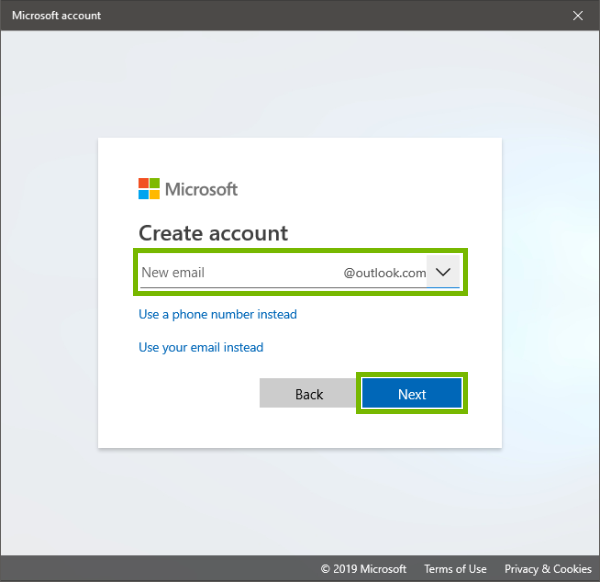
27. Create Microsoft Account (New Email)
Click Get a new email address.
Enter an email address you wish to use and click Next.
Enter a password you would like to use and hit Next.
We suggest that you use a unique strong password you don't use on other sites.
Enter your name and click Next.
Select your region and birthdate, then click Next.
Enter your current windows password and then click Next.
Click Next.
Enter a PIN you would like to use when you log into your computer and click OK.
.png)