How to Set Up Parental Controls on a Netgear Router
Authored by: Support.com Tech Pro Team
1. Introduction
In This Guide
You'll Learn How To:
Establish & configure parental controls on your Netgear router for the first time.
Download and install the Netgear Genie application for your computer or mobile device.
Before We Begin:
Have your computer or mobile device nearby & be connected to your router via an Ethernet cable or its Wi-Fi network.
Your router should already be setup & working properly.
2. How Parental Controls Work
Live Parental Control (LPC) is a content filtering solution provided by Netgear and OpenDNS to help you protect your family from accessing adult web content, gaming, social networking, or possible phishing sites. This feature is very easy to set up on your Netgear router.
Benefits of Parental Controls
You can block inappropriate and dangerous sites, restrict access by time (for example, no Facebook during homework time) and category (adult, gaming, social media, etc.), and at the same time protect every device on your home network against adware and phishing through one central control point - your Netgear Router.
Functionally, your router uses a baseline level of filtering for every device connected to your network, then individual restriction levels can be put into place using the Genie software.
Additionally, bypass accounts can be created and used to define specific levels of restriction at specific times for devices that are used by certain family members. The use of bypass accounts is limited to devices that can install and run the Netgear Genie software.
Netgear Parental Controls & OpenDNS
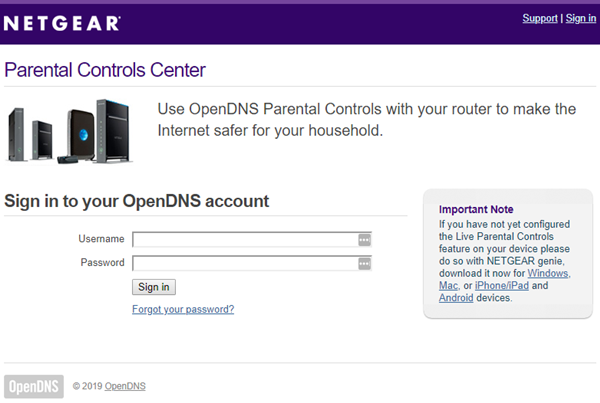
Parental controls on your Netgear Router are powered by OpenDNS.
You'll be required to create a free OpenDNS account to setup your parental controls.
OpenDNS is a company and service that adds to the Domain Name System (DNS) by including features such as phishing protection and optional content filtering in addition to DNS lookup, if its DNS servers are used.
Parental controls can be configured using the Netgear Genie app on your computer or mobile device.
3. OS Choice
To continue, we need to know what Operating System your computer or mobile device has.
For Computers
There are 2 main Operating Systems for personal computers currently available, Windows and macOS.
Windows
Windows runs on computers produced by multiple companies, such as Lenovo, Asus, Dell, Toshiba, Hewlett Packard, Acer, and Sony.
macOS
Apple is the only company that makes macOS computers.
For Mobile Devices
There are 2 main Operating Systems for smartphones currently available, Android and iOS.
Android Smartphone
Android smartphones are produced by multiple companies, such as Samsung, LG, Motorola, Sony, Nokia, Lenovo, and HTC.
iOS Smartphone
Apple is the only company that makes iOS smartphones.
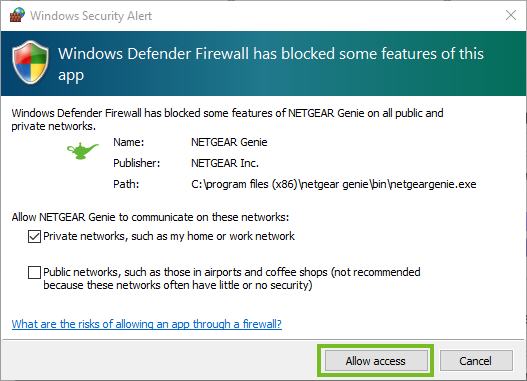
Windows will ask if you want to allow the Genie to access files and the network.
5. Create OpenDNS Account & Set Filtering (Computer)
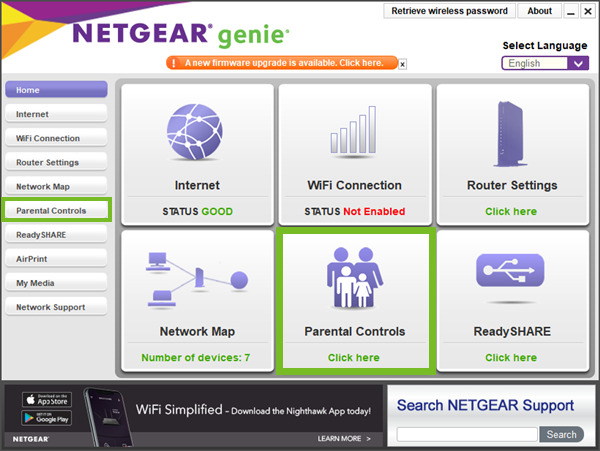
Open the Netgear Genie application.
Select ParentalControls.
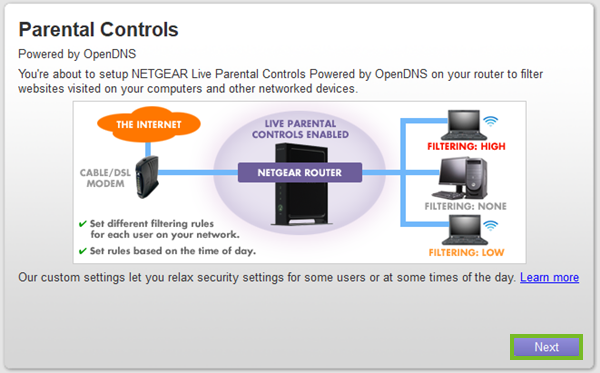
Netgear parental controls are powered by OpenDNS. Select Next to proceed.
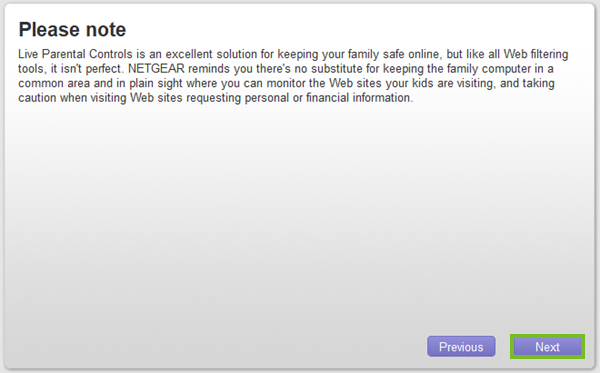
Netgear will give you a reminder and some tips on keeping your kids safe online. Select Next to proceed.
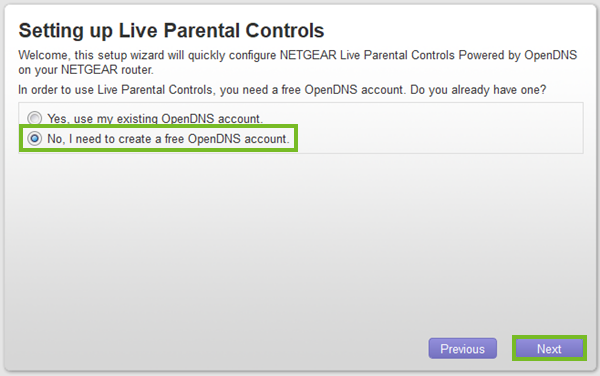
To begin creating an OpenDNS account, select No, I Need to Create, then click Next.
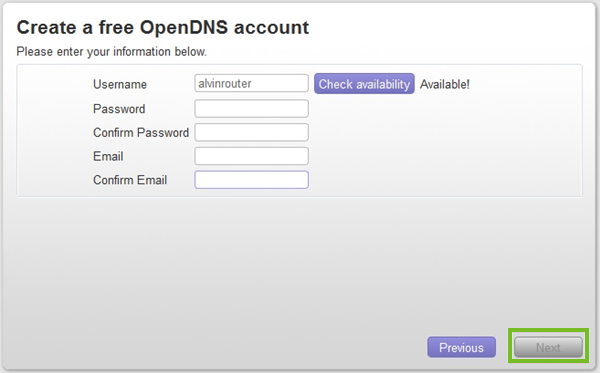
Fill out the form to create an OpenDNS account. Then click Next.
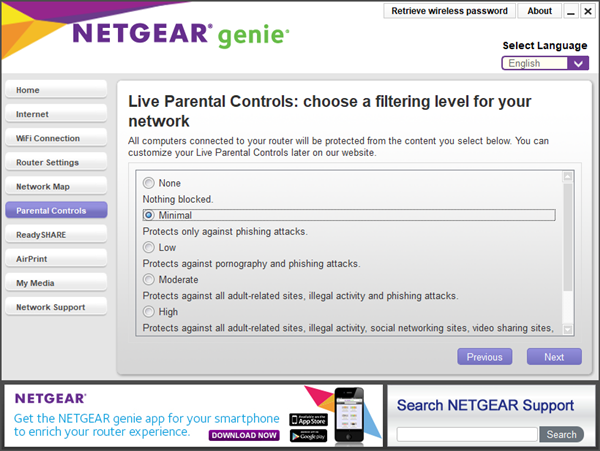
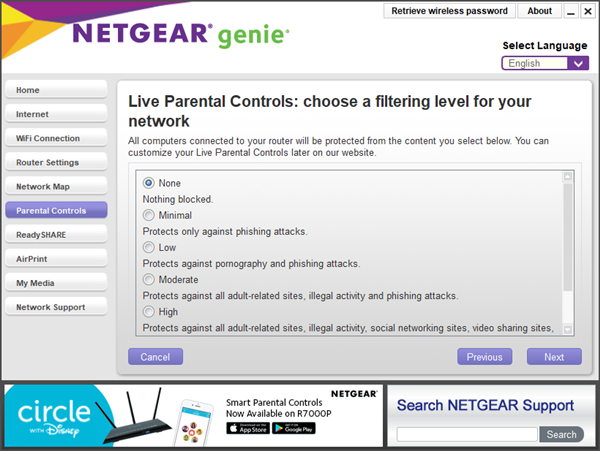
Next, the default level of filtering for your entire network must be selected. Click Next once you have chosen the default level of filtering you're comfortable with.
We recommend selecting None, Minimal, or Low. Keeping the default level of filtering low allows you to keep the majority of the devices in your home restriction-free. The Netgear Genie software can then be used to define customized levels of filtering for any devices you deem necessary.
Please be aware that the filtering level chosen here will impact all of the devices currently connected to your home network and any new device added in the future.
6. Create & Log Into a Bypass Account (Computer)
Bypass accounts can be created and added to your OpenDNS account, then used in conjunction with the Netgear Genie software to bypass the default filtering levels your Netgear router enforces. The use of bypass accounts allows you to get creative with your network's restrictive settings. For example, one bypass account might be created for an adult so that their device is not affected by restrictive settings at all, and another bypass account might be created for a child who needs to have customized restrictive levels put into place, with a time block that becomes more strict at certain times of the day.
Bypass accounts can only be used with devices that can install and run the Netgear Genie app. Creating a Bypass Account requires access to the internet and your OpenDNS account.
Open the Netgear Genie application.
Select ParentalControls.
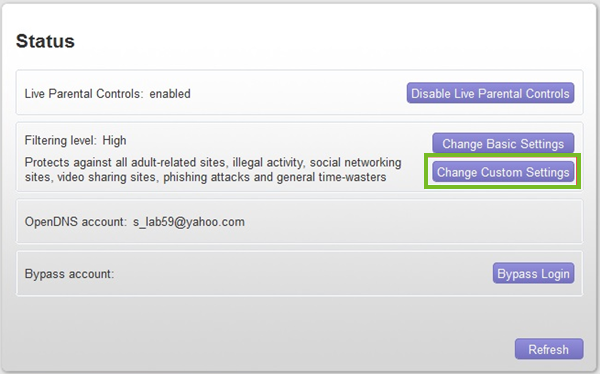
Click Change Custom Settings on the Status page.
Your computer's default web browser will open, and you will be redirected to https://netgear.opendns.com. Log into your OpenDNS account to proceed.
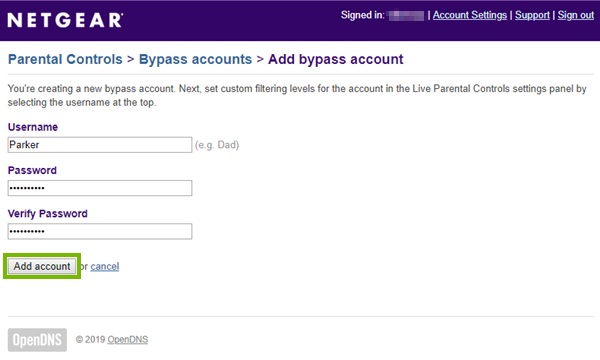
Click Add a Bypass Account to begin the creation of a bypass account.
If You Already Have a Bypass Account
If your OpenDNS account already has a bypass account present, click Manage Bypass Accounts.
Then click Add Another Bypass Account.
Create the username and password for your bypass account, then click Add Account.
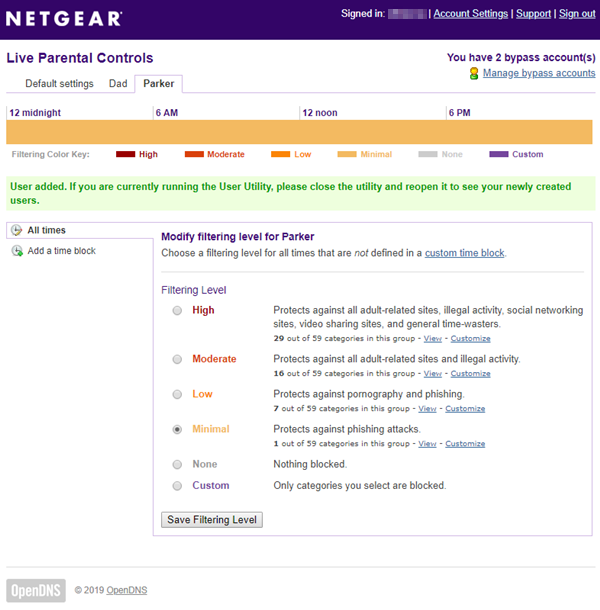
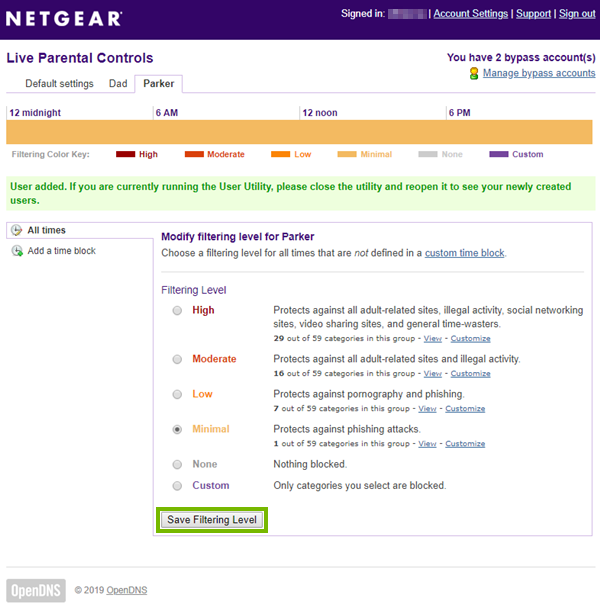
Select the filtering level you would like the bypass account to use.
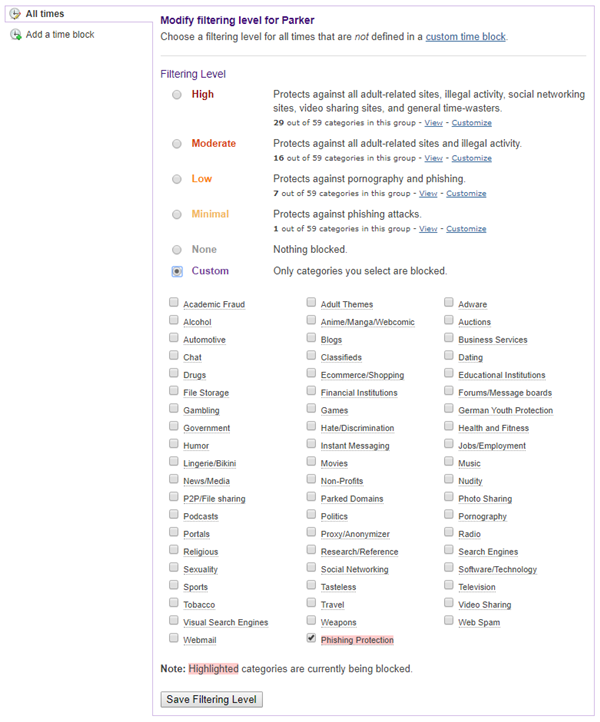
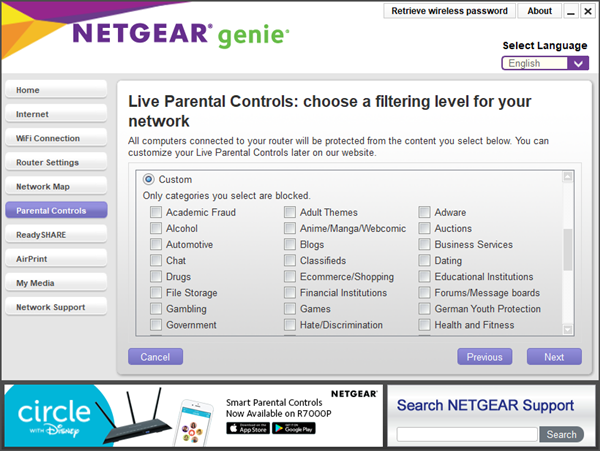
The Custom filtering option has a large list of categories available for restriction.
When you have finished making your filtering selections, click Save Filtering Level.
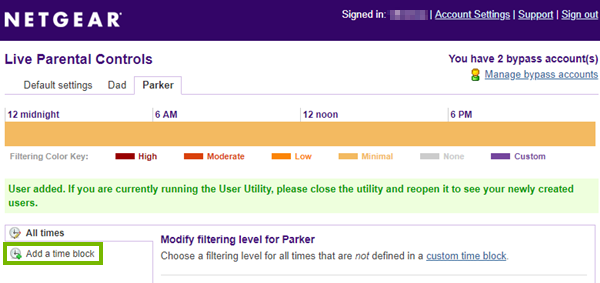
To add a separate set of restrictions to a specific time period, click Add a Time Block in the left hand column.
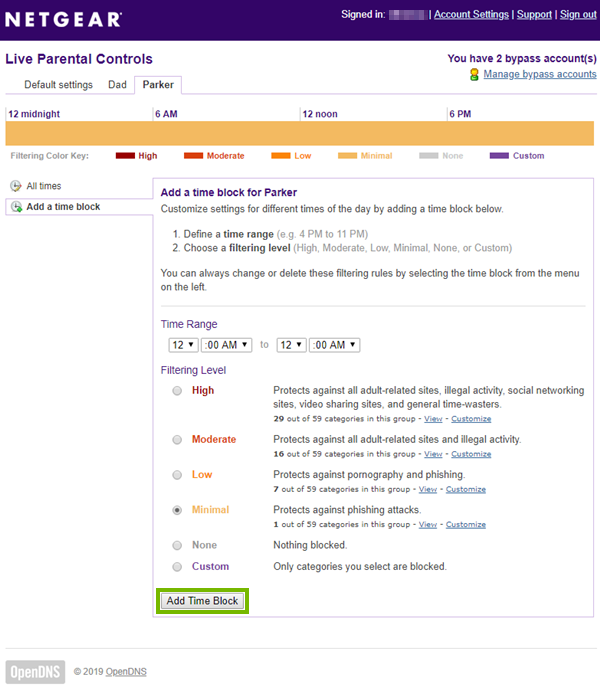
Select the desired time range, then set your desired level of filtering to apply to that time period. Click Add Time Block to save and apply these settings.
You must specify a time range of at least 15 minutes for a time block to be successfully applied.
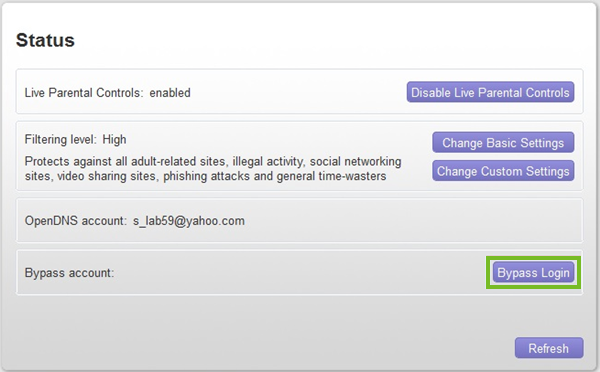
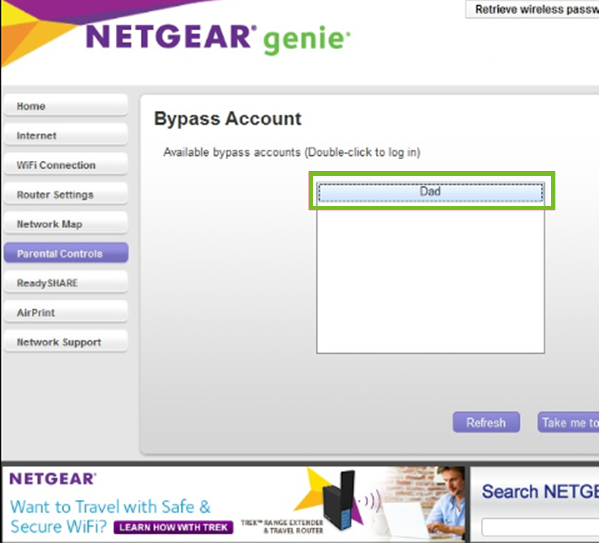
Close the browser window and return to the Netgear Genie software. From the Status window, click Bypass Login.
Double-click on the bypass account you wish to log into.
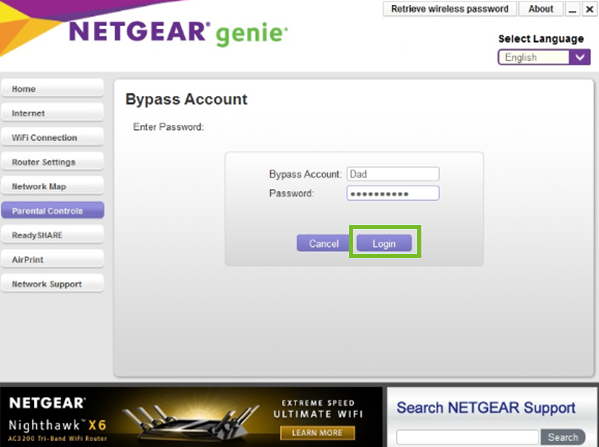
Enter the password for the account, then click Login.
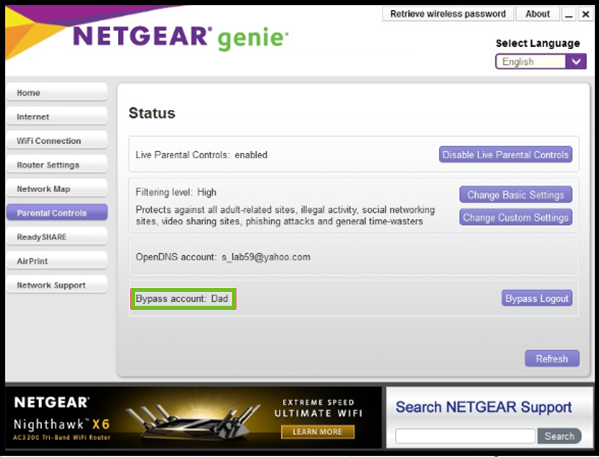
While logged into a bypass account, that device will only obey the filtering levels set for that individual bypass account.
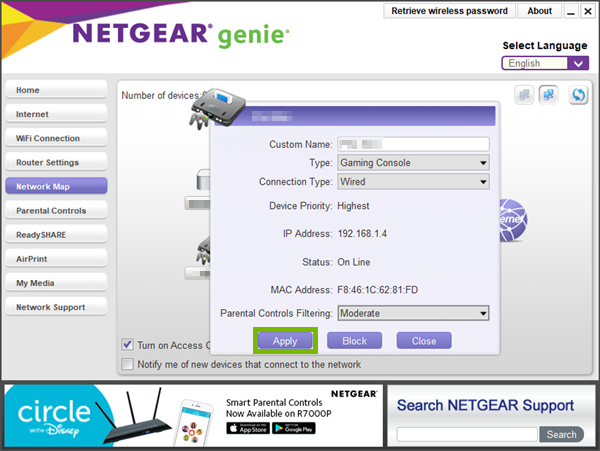
7. Set Restrictions on a Device (Computer)
Open the Netgear Genie application.
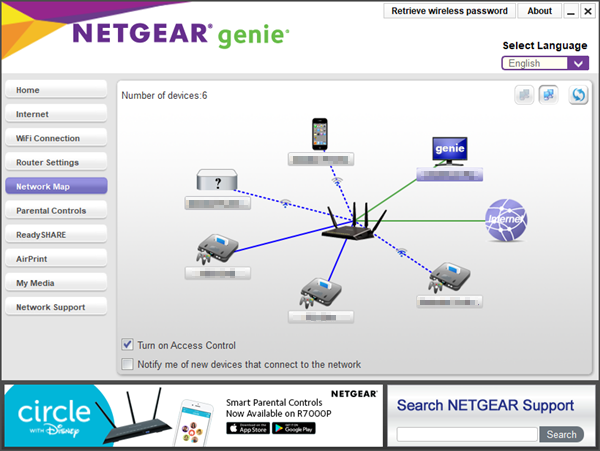
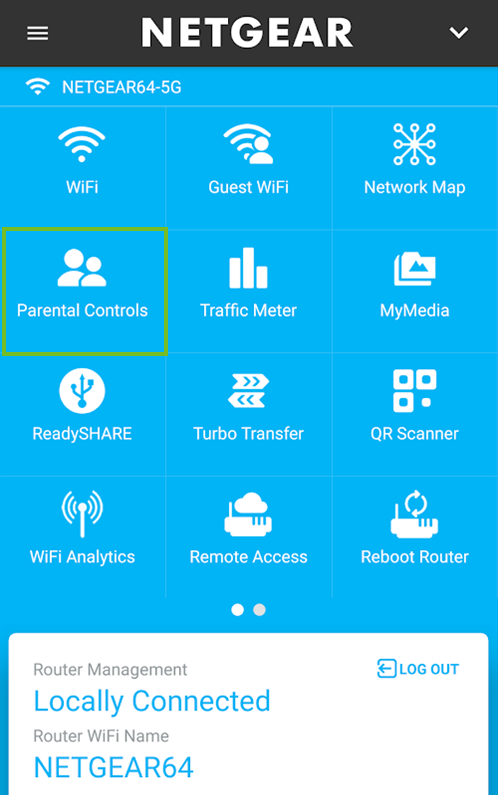
Click NetworkMap.
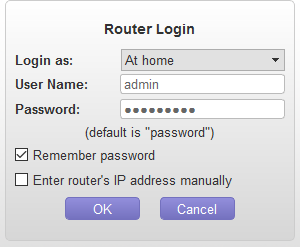
If prompted, sign into your router using its login credentials.
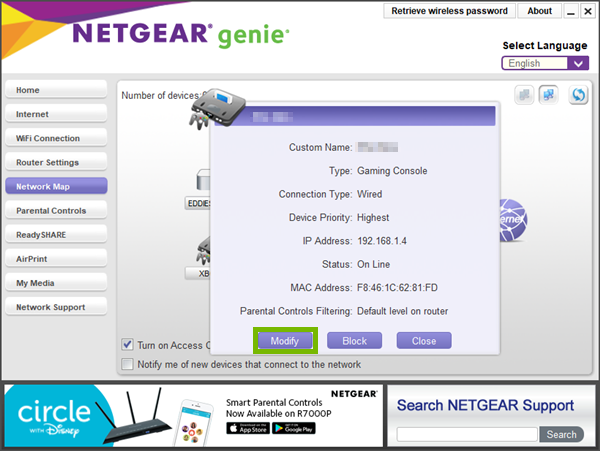
All of the devices currently connected to your network will be displayed within the Network Map. Click the device you wish to set restrictions on.
Click Modify.
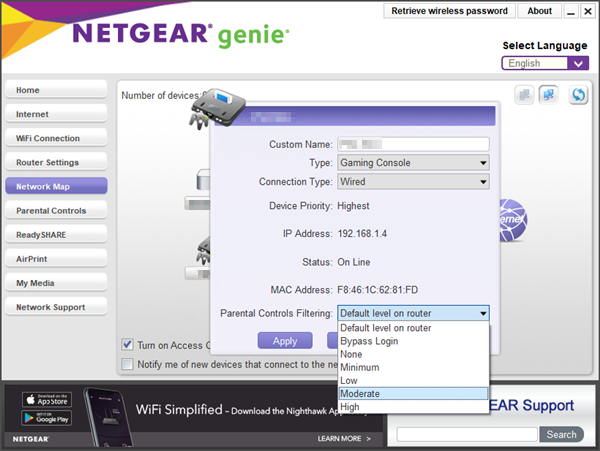
Select the Parental Control filtering level that you want.
Click Apply to save the settings.
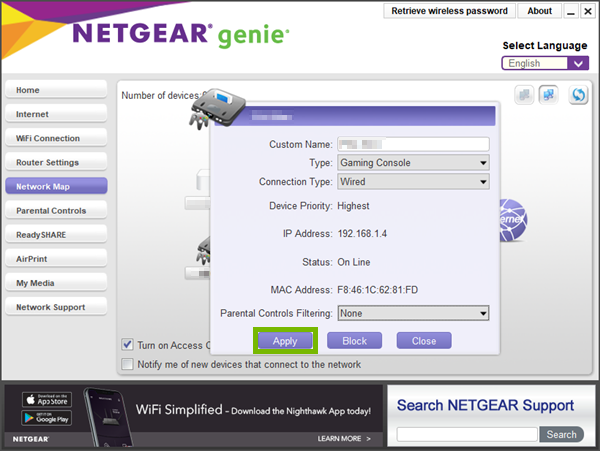
8. Omit a Device (Computer)
Open the Netgear Genie application.
Click NetworkMap.
You may need to log into your router.
All of the devices currently connected to your network will be displayed within the Network Map. Click the device you wish to set restrictions on.
Click Modify.
Select None under Parental Controls Filtering.
Click Apply to save the settings.
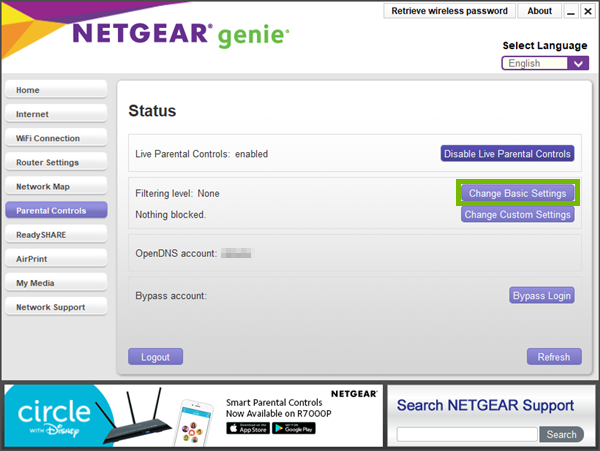
9. Adjust Default Filtering Levels (Computer)
If you find that the initial default filtering level you chose for your network is proving to be too restrictive, or perhaps not as restrictive as you'd like for it to be, you may want to adjust that default filtering level.
Adjusting the default parental control filtering settings will affect all the devices currently connected to your router and any new devices connected in the future.
To Adjust the Default Filtering Level
Open the Netgear Genie application.
Select ParentalControls.
Click Change Basic Settings on the Status page.
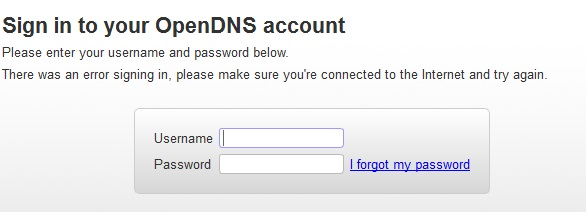
You may be prompted to sign into your OpenDNS account. Log into your account to proceed.
All available default parental control filtering levels will be displayed.
The Custom filtering option has a large list of categories available for restriction.
Once you have completed making changes to your default filtering levels, click Next.
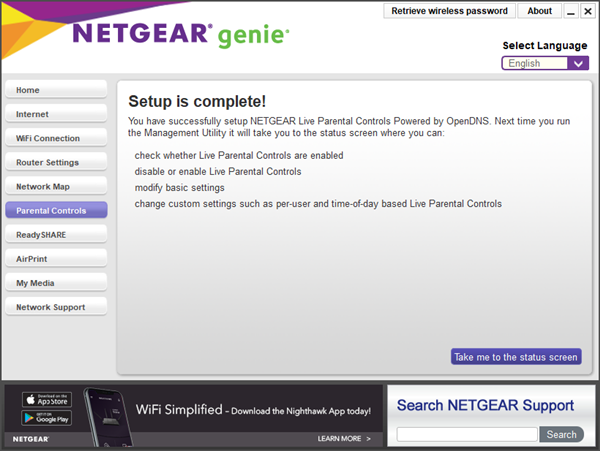
Your default parental control filtering levels have been successfully adjusted. Click Take me to the status screen to return to the main screen, or simply close the Genie software.
Safari browser will begin to download the file for you. Select to Show Downloads, then select to Show In Finder for the download.
Open the downloaded program.
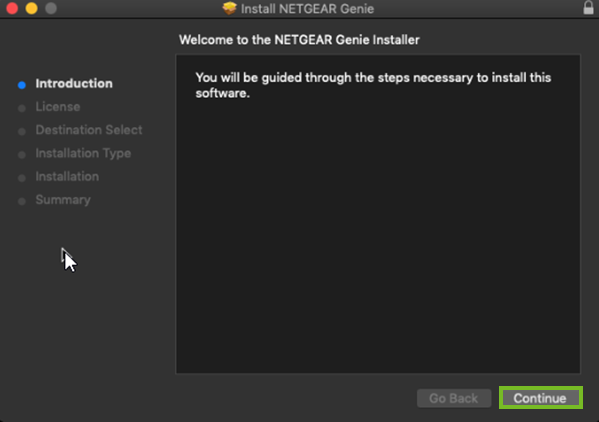
An introduction will be displayed. Select Continue.
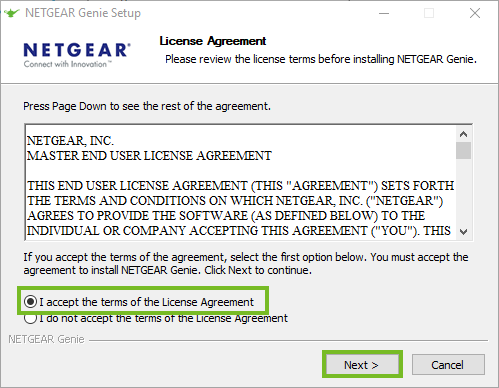
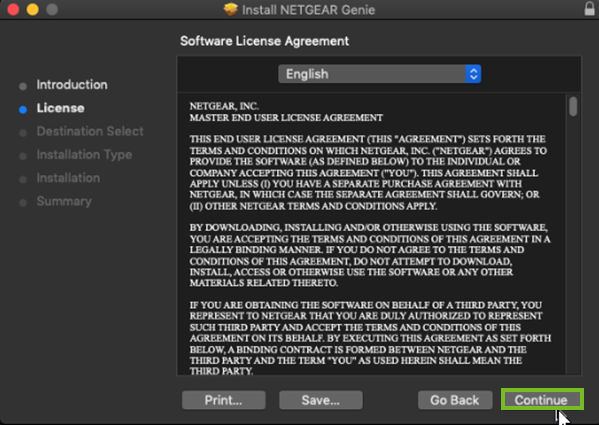
Carefully read the Licence Agreement. When you are ready to continue, select Continue.
You'll be asked if you agree with the Licence Agreement you just read. When you are ready to continue, select Agree.
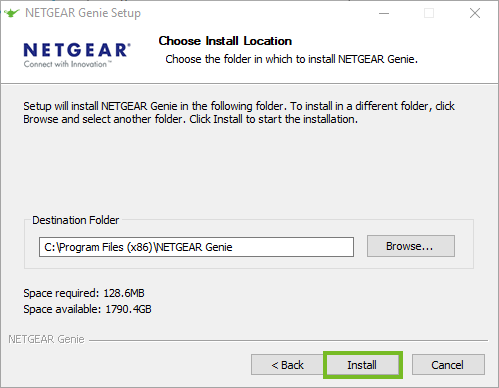
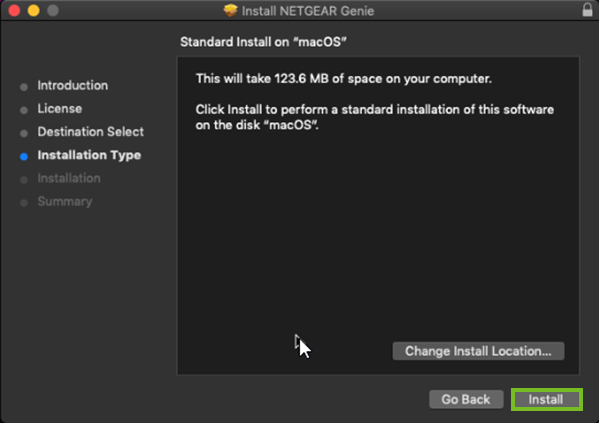
The installer will inform you how much space is needed, and where it will be installed. Select Install.
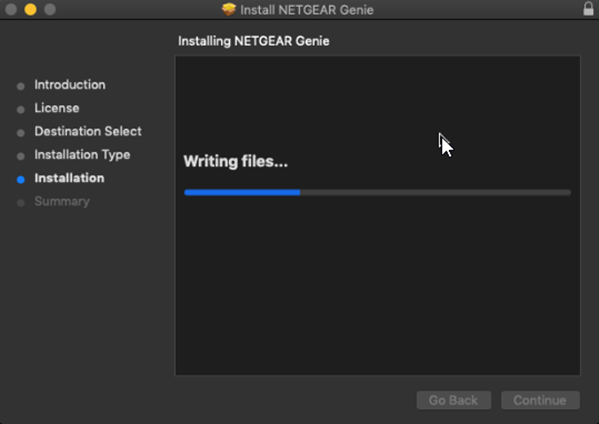
You will be prompted for your Mac's username and password to continue. Enter your Mac password, and select Install Software.
The software will install.
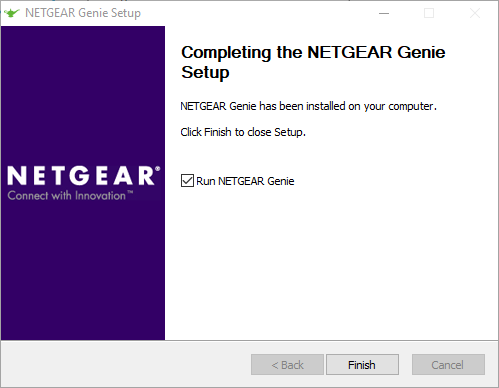
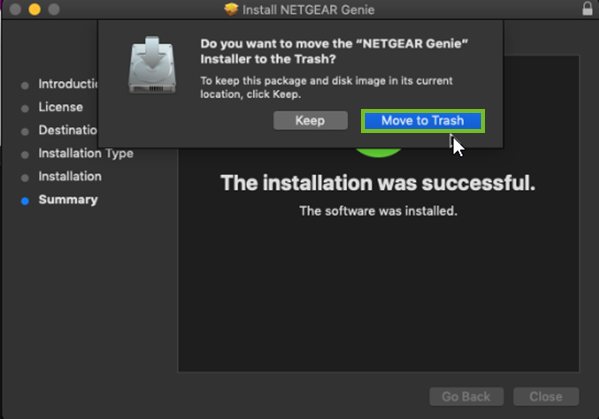
With the Netgear Genie installed, everything is complete and ready to use. Select Close to exit the installer.
You'll be asked if you wish to keep or Trash the installer. You do not need to keep the installer if you don't want to. Select Move to Trash.
11. Install Genie App (Android)
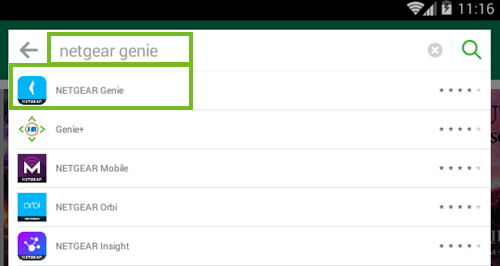
Launch the Play Store on your smartphone.
Select the search bar at the top.
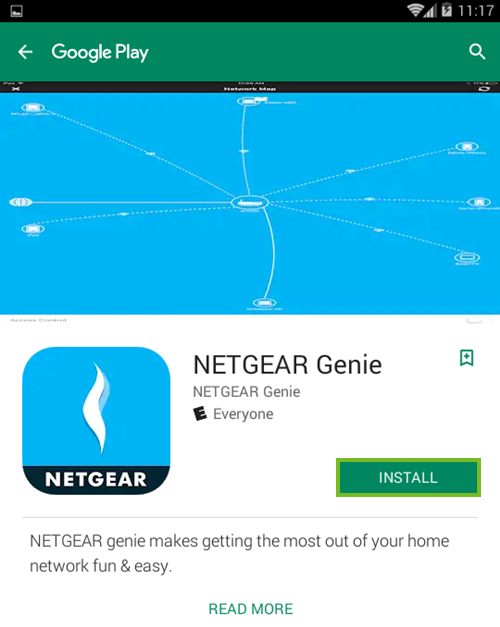
Type in Netgear Genie, then select NETGEAR Genie from the list.
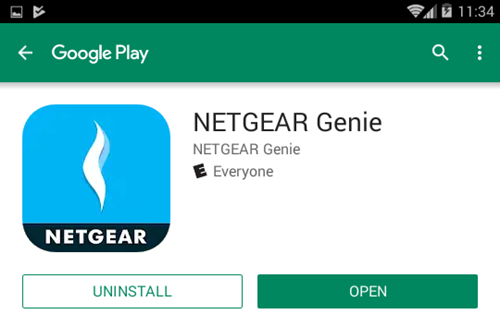
Select Install.
Select Open to open the app.
12. Create OpenDNS Account & Set Filtering (Mobile)
Open the Netgear Genie application.
Tap ParentalControls.
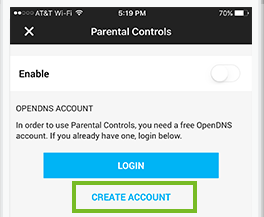
Netgear parental controls are powered by OpenDNS. Tap Create Account to proceed.
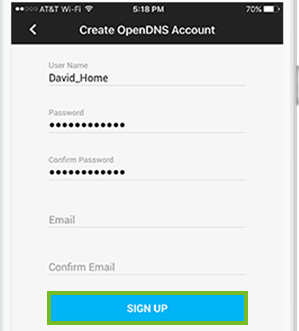
Fill out the form to create an OpenDNS account. Tap SIGN UP to proceed.
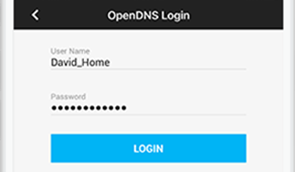
Once you've set up your account, you'll need to log into it. Type in your user name and password, then tap LOGIN.
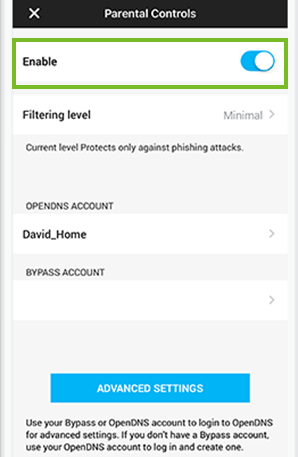
Slide the toggle to enable parental controls.
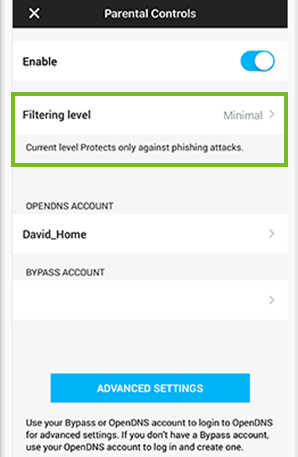
Next, the default level of filtering for your entire network must be selected. Tap FilteringLevel.
Choose a default level of filtering you're comfortable with by tapping your selection.
We recommend selecting None, Minimal, or Low. Keeping the default level of filtering low allows you to keep the majority of the devices in your home restriction-free. The Netgear Genie app can then be used to define customized levels of filtering for any devices you deem necessary.
Please be aware that the filtering level chosen here will impact all of the devices currently connected to your home network and any new device added in the future.
13. Create & Log Into a Bypass Account (Mobile)
Bypass accounts can be created and added to your OpenDNS account, then used in conjunction with the Netgear Genie software to bypass the default filtering levels your Netgear router enforces. The use of bypass accounts allows you to get creative with your network's restrictive settings. For example, one bypass account might be created for an adult so that their device is not affected by restrictive settings at all, and another bypass account might be created for a child who needs to have customized restrictive levels put into place, with a time block that becomes more strict at certain times of the day.
Bypass accounts can only be used with devices that can install and run the Netgear Genie app. Creating a Bypass Account requires access to the internet and your OpenDNS account.
Open the Netgear Genie application.
Tap ParentalControls.
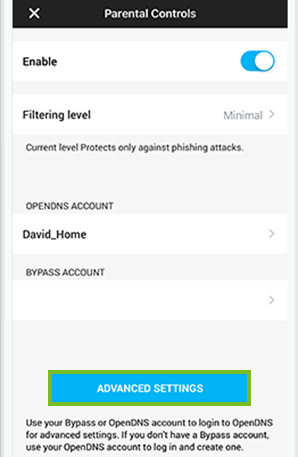
Tap Advanced Settings.
Your mobile device's default web browser will open and take you to http://netgear.opendns.com. Log into your OpenDNS account to proceed.
Click Add a Bypass Account to begin the creation of a bypass account.
If You Already Have a Bypass Account
If your OpenDNS account already has a bypass account present, click Manage Bypass Accounts.
Then click Add Another Bypass Account.
Create the username and password for your bypass account, then click Add Account.
Select the filtering level you would like the bypass account to use.
The Custom filtering option has a large list of categories available for restriction.
When you have finished making your filtering selections, tap Save Filtering Level.
To add a separate set of restrictions to a specific time period, click Add a Time Block in the left hand column.
Select the desired time range, then set your desired level of filtering to apply to that time period. Click Add Time Block to save and apply these settings.
You must specify a time range of at least 15 minutes for a time block to be successfully applied.
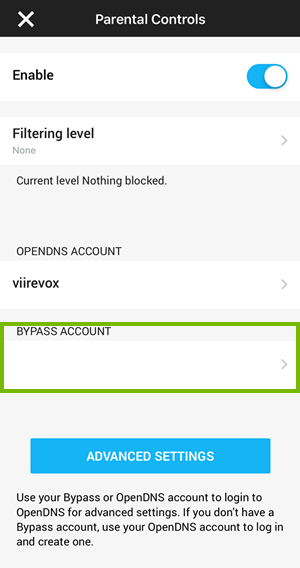
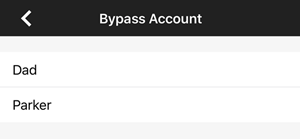
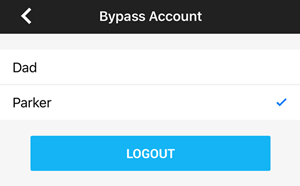
Return to the Netgear Genie app. Then tap the BYPASS ACCOUNT field.
Tap the bypass account you wish to log into.
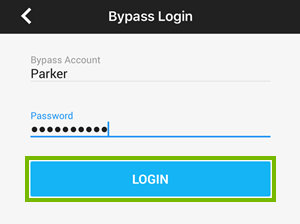
Enter the password for the account, then tap LOGIN.
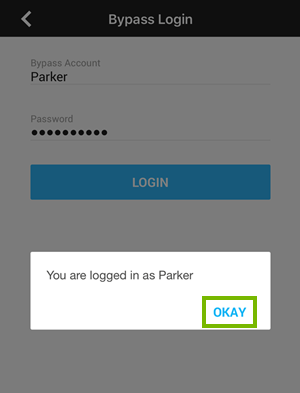
Tap OKAY to confirm you've logged into the bypass account.
While logged into a bypass account, that device will only obey the filtering levels set for that individual bypass account.
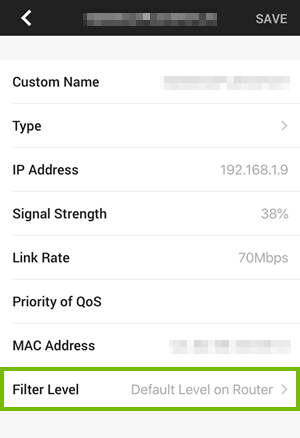
14. Set Restrictions on a Device (Mobile)
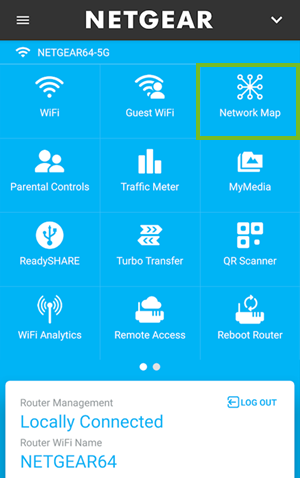
Open the Netgear Genie application.
Tap NetworkMap.
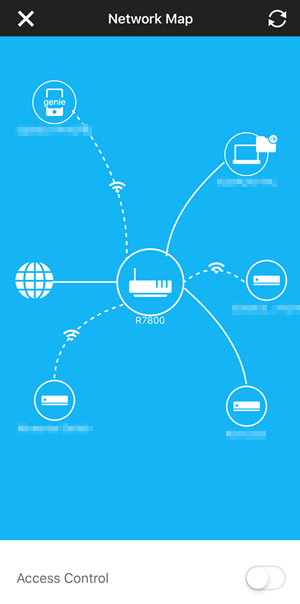
All of the devices currently connected to your network will be displayed within the Network Map. Tap the device you wish to set restrictions on.
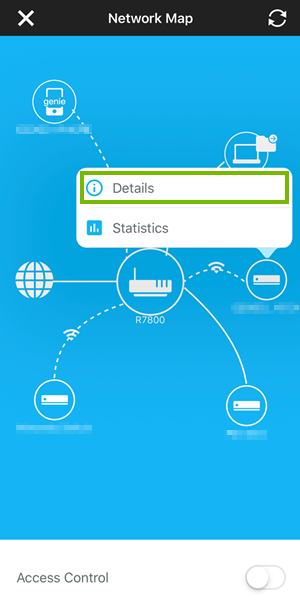
Tap Details.
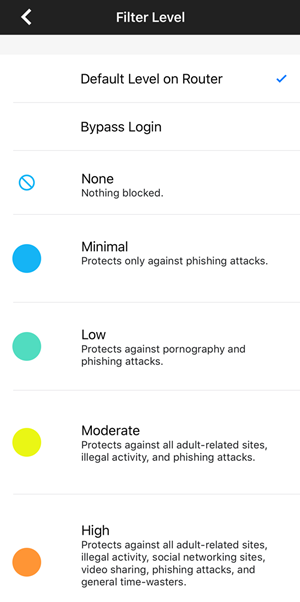
Tap the Filter Level field.
Select the Parental Control filtering level that you want.
Tap OKAY to confirm the setting.
15. Omit a Device (Mobile)
Open the Netgear Genie application.
Tap NetworkMap.
All of the devices currently connected to your network will be displayed within the Network Map. Tap the device you wish to set restrictions on.
Tap Details.
Tap the Filter Level field.
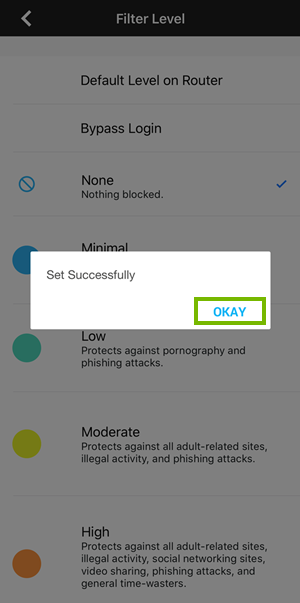
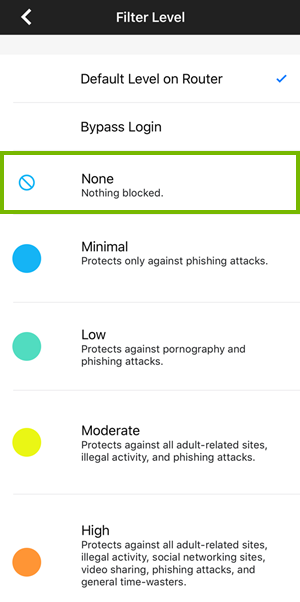
Select None from the list of available filter levels.
Tap OKAY to confirm the setting.
16. Adjust Default Filtering Levels (Mobile)
If you find that the initial default filtering level you chose for your network is proving to be too restrictive, or perhaps not as restrictive as you'd like for it to be, you may want to adjust that default filtering level.
Adjusting the default parental control filtering settings will affect all the devices currently connected to your router and any new devices connected in the future.
To Adjust the Default Filtering Level
Open the Netgear Genie application.
Tap ParentalControls.
If prompted, log into your OpenDNS account.
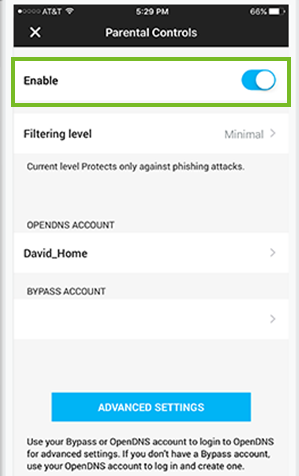
To Enable or Disable parental controls entirely, tap the toggle switch.
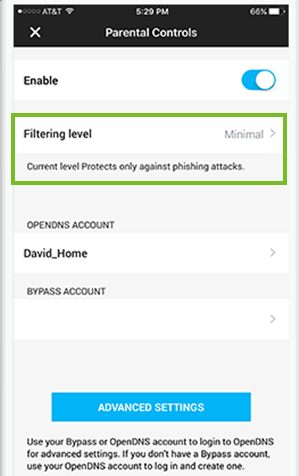
To adjust your router's base filtering levels, tap FilteringLevel.
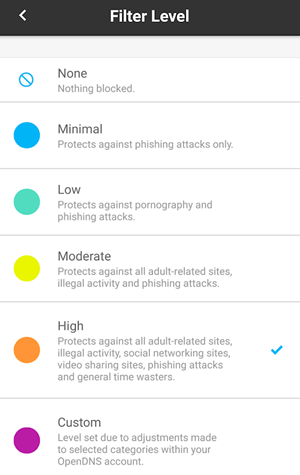
All available filtering levels will be displayed.
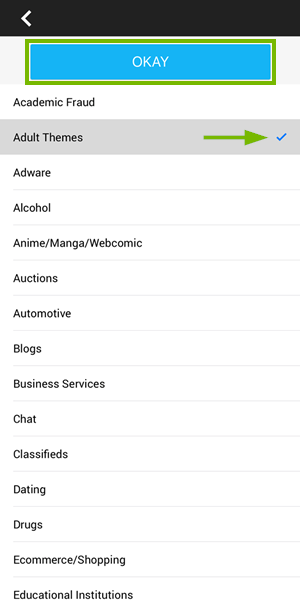
Choosing the Custom filtering option reveals a large list of categories available for restriction. Tap any category you wish to filter to select it. A check mark will appear. Once all the desired categories of filtering have been selected, tap OKAY.
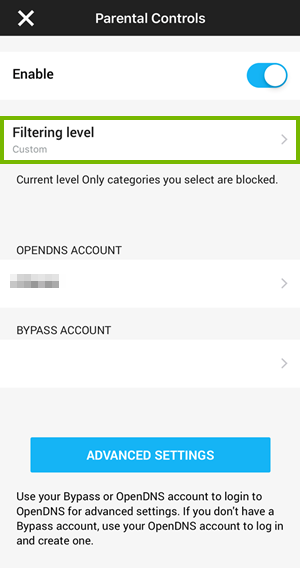
Your default parental control filtering levels have been successfully adjusted. The current default level of restriction will be shown within the Filtering level field.
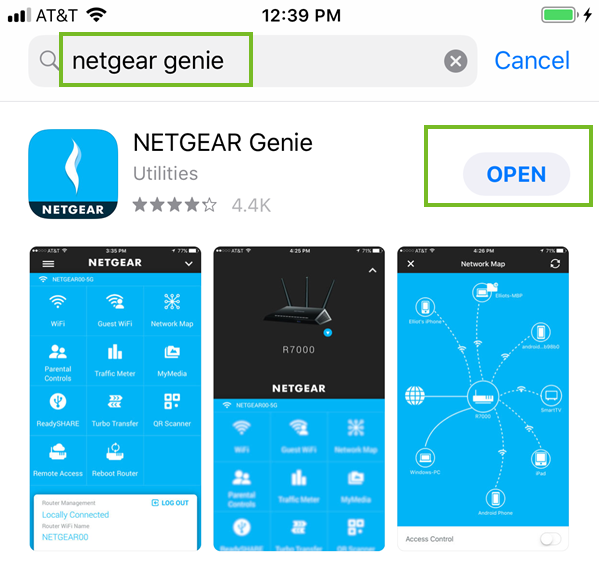
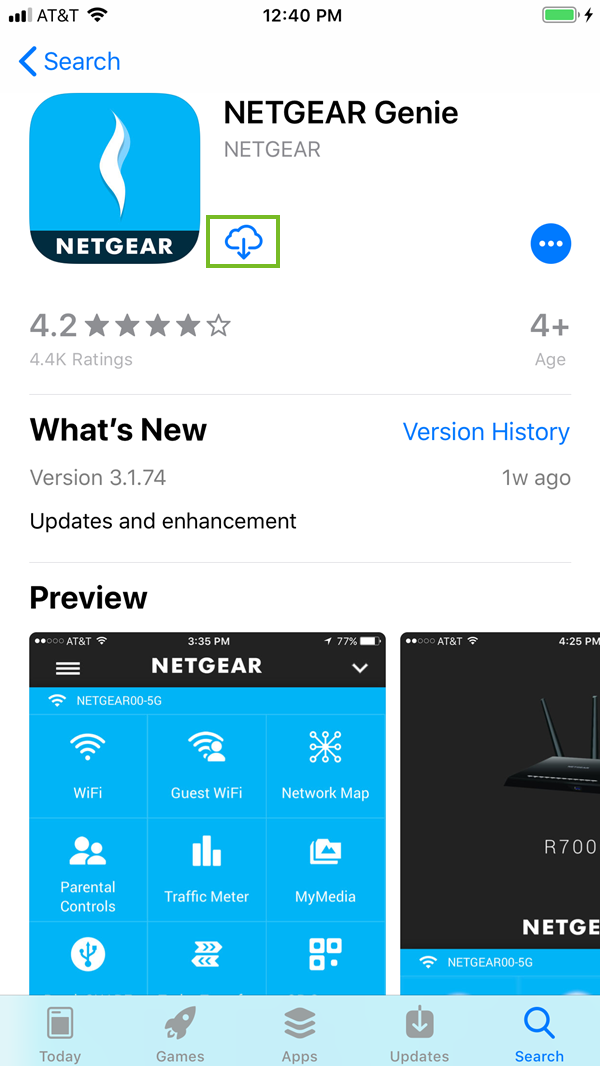
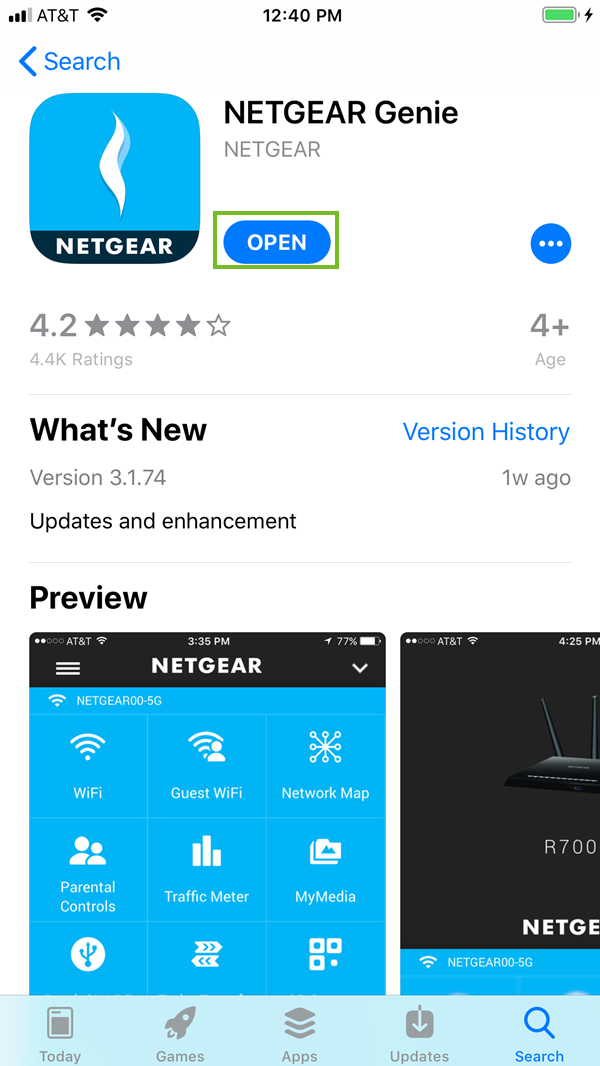
17. Install Genie App (iOS)
Open the App Store.
Select Search in the bottom right corner.
Type in Netgear Genie, and select Netgear Genie from the list.
Select Get for Netgear Genie.
Select Open.
Remove Hidden Spyware In Minutes For Free
Detect and remove spyware, keyloggers, tracking cookies, and other
threats that slow down your PC or steal your data.
65+ Million Downloads
Spyware scanner with AI-powered detection engine + database
.png)