.png)
Authored by: Support.com Tech Pro Team
How to setup bitwarden on macOS
Folders are a great way to make sure you can always find vault items when you need to use them. To create a folder:
Social Media, and select  Save.Now, let's add a login to your new folder. To create a new login item:
Twitter Account).https://twitter.com/login).Now that you've saved a new login, let's improve its security by replacing your password with a strong one:
Fido1234 to X@Ln@x9J@&u@5n##B can stop a would-be hacker in their tracks.Do you have multiple Bitwarden accounts, like one for personal use and one for work? The desktop app can be logged in to 5 accounts at once!
To login to a second account, select the currently logged-in account from the top-right of the desktop app and select  Add Account:
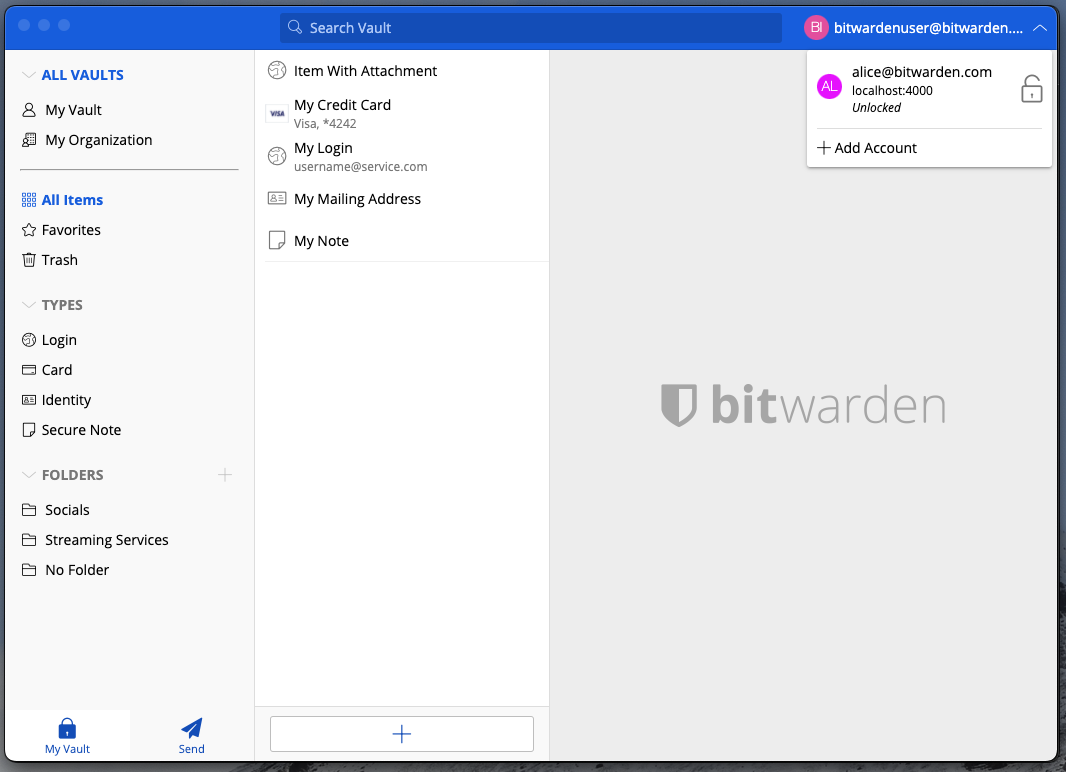
Once you log in to your second account, you can quickly swap between them from the same menu, which will also show the current status of each account's vault (locked or unlocked). If you log out of one of these accounts, it will be removed from this list.
Now that you've mastered the basics, you can customize your desktop app to work exactly the way you want it to:
To set your preferences, select Bitwarden → Preferences from the menu bar. You'll notice three sections; Security, Preferences, and App Settings.
Security and Preferences apply to the active account and should be set separately for each account, but App Settings apply to all accounts.
One of the most popular desktop app settings is Unlock with Biometrics, which allows seamless access to your desktop app using Touch ID technology. To setup biometric unlock:
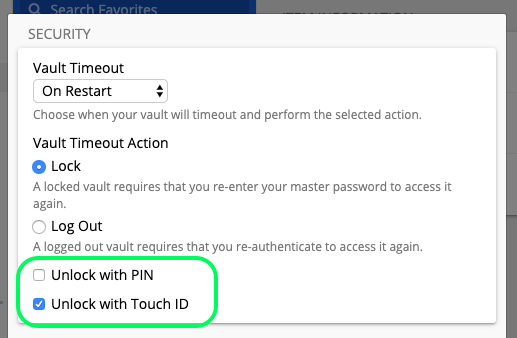

Remember; Security settings are set per-account, so if you want to enable biometric unlock for another account you'll need to go through these steps again!
Another helpful feature is to always start Bitwarden when you boot up your computer. To enable this, navigate to the App Settings section and check the Start automatically on login checkbox.
Unlike biometrics, this setting applies globally to all logged-in accounts!

Support.com is committed to your privacy
We do not share or sell your data to third parties. We do use cookies and other third-party technologies to improve our site and services. The California Consumer Privacy Act (CCPA) gives you the ability to opt out of the use of cookies, third-party technologies and/or the future sale of your data. Do not sell my personal information.

Support.com is committed to your privacy
Read our Privacy Policy for a clear explanation of how we collect, use, disclose and store your information
