How to Test GoToMeeting Audio and Video Settings

Authored by: Support.com Tech Pro Team

1. Introduction

GoToMeeting is a fast, simple way to collaborate with audio, video, and screen share remotely, and many people want to run a quick test before having to be present and ready at your next meeting.

This guide will show you how to test your audio and video settings, and get familiar with the GoToMeeting app, before your next conference.

Before You Begin:

  • If you're using a headset, make sure it's plugged into your computer.
  • If you're using an external speakers and microphone, make sure they're plugged into your computer.
GoToMeeting

2. Testing Audio and Video

GoToMeeting offers a test Webinar you can join to make sure all your settings are correct before your real conference.

Test Session
If you are using your computer and browser to view this guide, click the link below to jump right to the test session.

If you are following this guide on another device, use the instructions below to test your setup.

  1. Open your preferred browser, and visit support.goto.com/meeting/system-check.
Chrome browser with address filled in and highlighted.
  1. After the test, select Join a test session.
GoToMeeting test with Join a test session highlighted.
  1. Select Join Now.
Test Session information with Join Now highlighted.
  1. If prompted to open the Opener, select Open GoTo Opener.
  2. Some browsers will prompt you if it's okay to open the program associated. Select Open if you're prompted.
Open GoTo Opener prompt with Open GoTo Opener highlighted.

  1. You'll be able to see your webcam in the small tile, set your name, and adjust your audio properties all before your real meeting takes place!
Test Session.

3. Check Source and Destination for Audio

Your computer has many audio sources and destinations, many of which you may simply not be using, but got set as default on accident. A quick check of where GoToMeeting is listening and playing audio can solve many problems you may have.

  1. While on a conference, select Settings on your tile.
GoToMeeting

GoToMeeting Conference with settings gear highlighted.
  1. Make sure Computer is selected.
Settings with Computer highlighted.
  1. Make sure the proper Microphone and Speakers are selected.
Settings with Microphone and Speakers highlighted.
  1. Microphone
  2. Some computers have a "Line In" and "Microphone" option for inputs, try each if you're not sure.
  3. The small meter next to the microphone will light up to indicate if GoToMeeting can hear anything, try speaking after changing the setting to see if the lights change.
  4. Speakers
  5. Many computers will have many different audio out devices, and each setup will be slightly different.
  6. Click the Play button to the right to hear a test sound played on whichever speaker you have selected.

4. Others Can't See My Webcam

Covered Webcam

Many laptops and some desktop webcams have simple covers built-in for privacy, or one may have been added at some point. Make sure nothing is covering the lens of your webcam.

Webcam cover example with cover highlighted.

Proper Device Selected

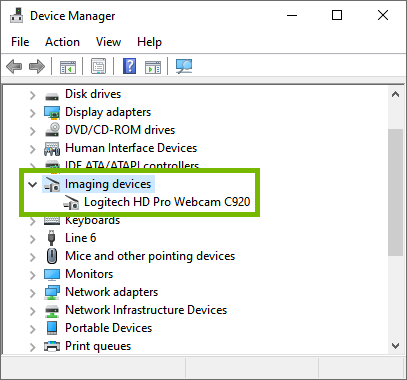
Some computers have multiple sources for video in. Make sure your webcam is selected.

  1. While on a conference, select the Settings gear next to your portrait.
GoToMeeting with Settings gear highlighted.
  1. On the right, make sure your webcam is selected for Camera, and you can see an image of yourself above.
GoToMeeting Settings with webcam preview and webcam selection highlighted.

Update the Camera Driver on the Computer

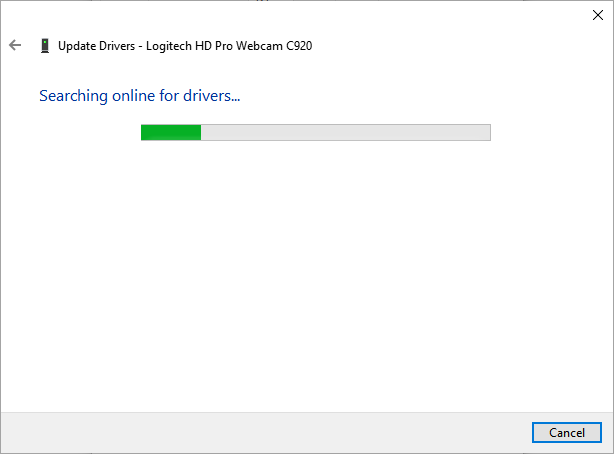
Camera issues can sometimes be caused by outdated or corrupted drivers. Drivers are specific software that tell the operating system how to operate the computer's internal components.

Windows

Update the Camera Driver on a Windows PC

  1. Search Device Manager.
Windows 10 search bar
  1. Select Device Manager.
Windows 10 search bar showing device manager
  1. Select the small arrow next to Imaging devices to expand that section. If Imaging devices doesn't show in the list, look for Cameras instead.
Windows 10 device manager showing Imaging devices.
  1. Double click the camera to show its properties. Select the Driver tab.
Camera properties with Driver tab highlighted.
  1. Select Update Driver.
Driver Properties with Update Driver highlighted.
  1. Select Search automatically for updated driver software.
Update Drivers with Search automatically for updated driver software highlighted.
  1. Windows will automatically locate any update available drivers.
Update Drivers searching for drivers.
  1. If any updated drivers are available, you'll be offered the chance to install them. Once installed, or if none are available, close the driver updater.
Driver up-to-date with Close highlighted.

Apple

Update the Camera Driver on a Mac

There are two areas to check for updates for your Mac, the System Software and the Apps installed from the App Store. When you update your Mac System, it will also update your video drivers.

Update System Software

  1. Open the Apple menu, and select System Preferences.
macOS Mojave Apple Menu with System Preferences highlighted.
  1. Select Software Update.
Software Update Preferences
  1. Any updates to your System Software will be offered here.
Software Update Preferences

Update App Store Apps

  1. Open the Apple menu, and select App Store.
macOS Mojave Apple Menu with App Store highlighted.
  1. Select Updates on the left. Any updates available will be offered here.
App Store with Updates highlighted.