How to update the firmware on your DJI drone and remote control.
You'll Need:
The drone and remote control batteries to be fully charged.
The provided USB cable.
A computer or mobile device with an internet connection.
The device specific app installed:
DJI GO 4 app on a mobile device,
DJI Assistant 2 on a computer.
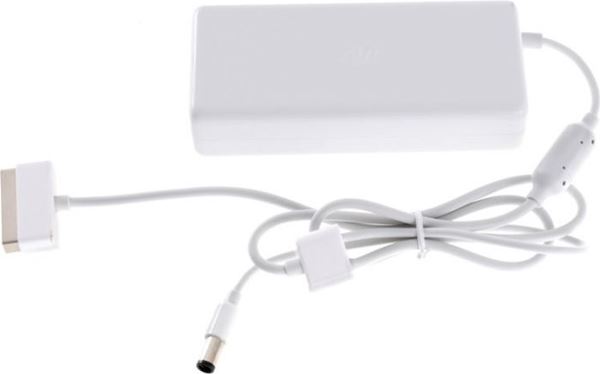
2. Charge Batteries
Plug the charger into a power outlet.
Plug the remote control charging cable into the right side of the remote control.
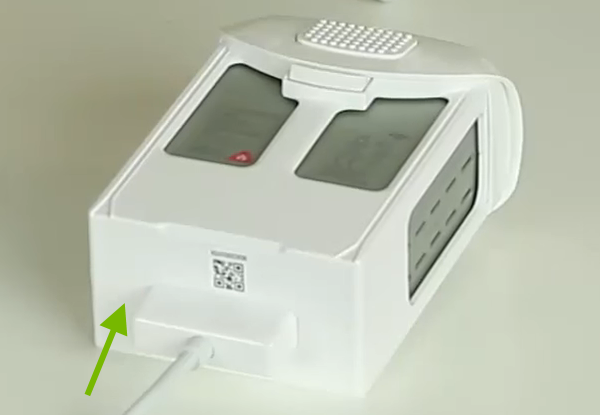
Plug the battery charging cable into the battery.
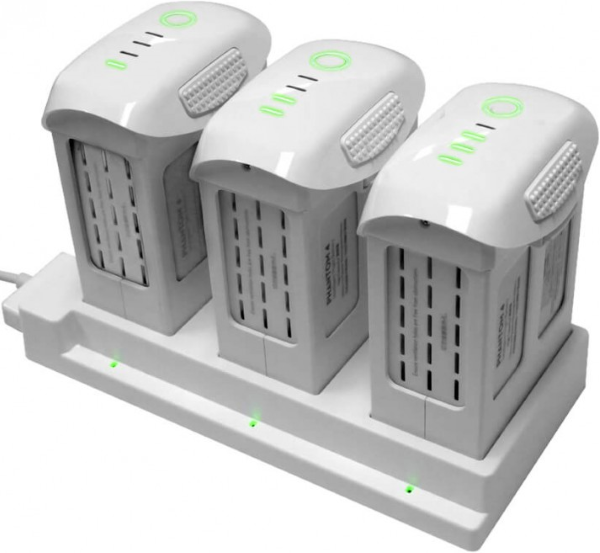
If you have more than one battery, plug them all into the charging hub.
You will see the battery indicator lights on the remote control and batteries scrolling until they will turn off meaning they are fully charged.
3. OS Choice
To continue, we need to know what Operating System your smartphone or tablet has.
There are 2 main Operating Systems for smartphones currently available, Android and iOS.
Android SmartphoneiOS SmartphoneAndroid smartphones are produced by multiple companies, such as Samsung, LG, Motorola, HTC, and OnePlus.Apple is the only company that makes iOS smartphones.
4. Check Wi-Fi
Depending on what device (Smartphone or Tablet) and which generation you have, the menu theme and options might look slightly different on your screen. However, the steps should be similar across all Android devices and generations.
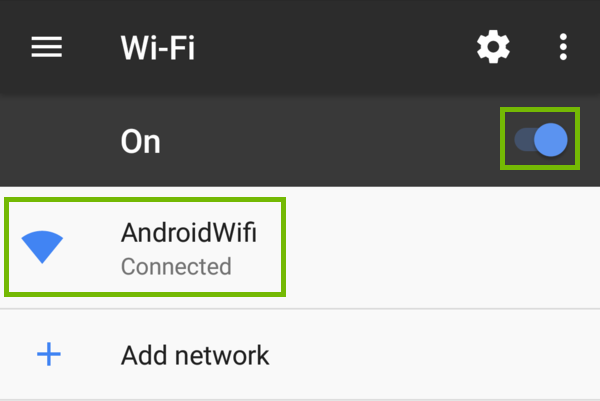
To check if your Android mobile device is connected to Wi-Fi:
Open Settings on your phone or tablet.
Select Wi-Fi.
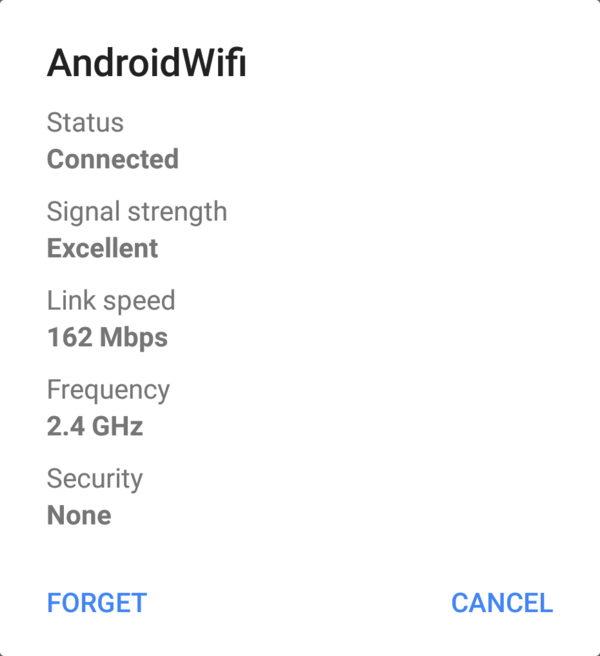
Make sure Wi-Fi is turned On, then select the Wi-Fi network that says Connected under it.
Here, you'll see the basics of your Wi-Fi connection, with the Wi-Fi network name at the top, and other information such as Signal Strength, Link Speed and the Frequency you're connected at and the Security type of the network.
More Details
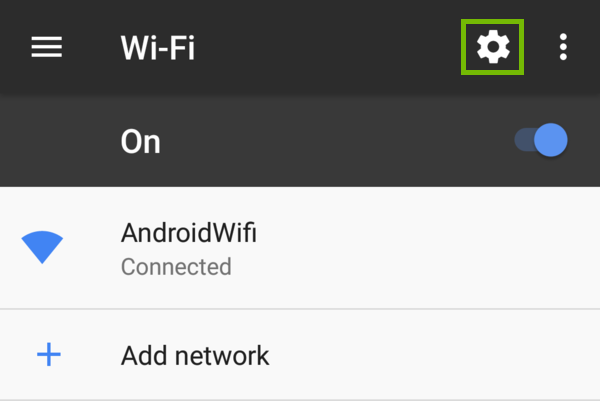
To see more information about your connection, select Cancel.
Select the Settings gear in the top right corner.
Here, you'll see a variety of information related to your connection at the bottom, such as the MAC (Media Access Control) address and IP addresses your Android device has been given.
5. Additional Information
To better assist you, please answer this question.
6. Launch App
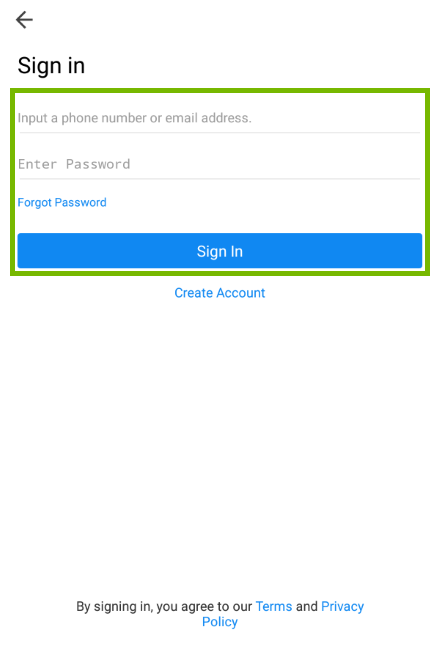
Launch the DJI GO 4 app on your mobile device.
If you're not logged in, tap Sign In.
Fill in your account information and tap Sign In.
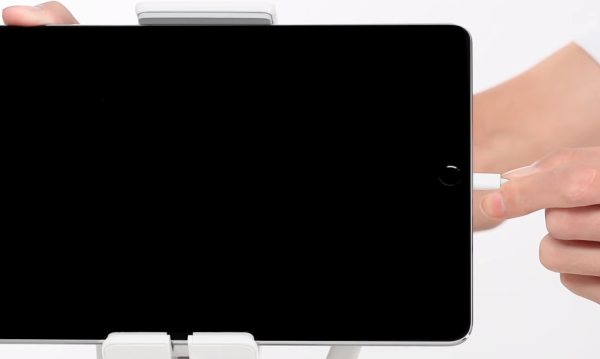
7. Connect Mobile Device to Drone
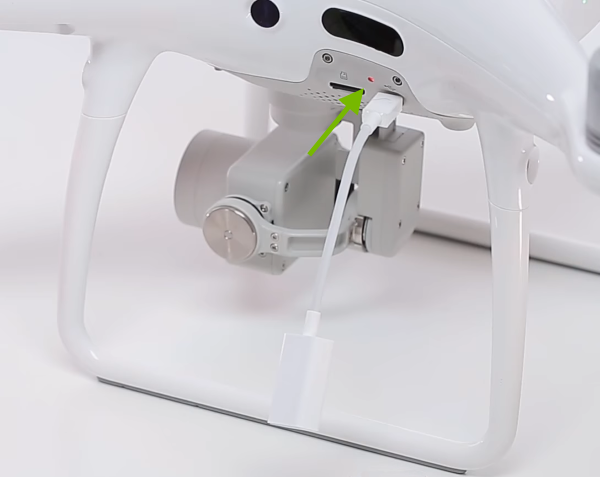
Plug the smaller connector of the provided USB-OTG adapter into the left side of the drone.
Plug the smaller end of the provided USB cable into your mobile device.
Plug the other end of the same cable into the USB-OTG adapter.
8. Turn On Drone
Make sure the gimbal cover is removed so the gimbal can move freely during the warm-up process.
Press and release the power button then press it again quickly and hold it until you hear it make the initialization sound.
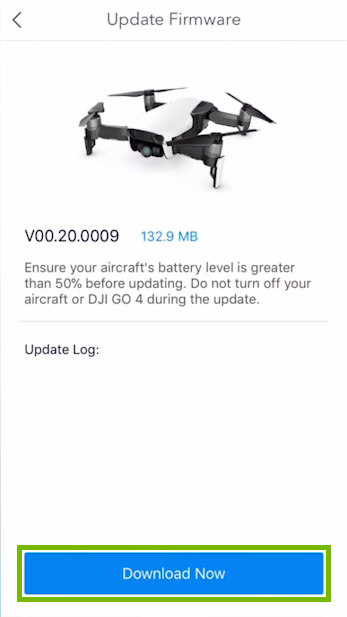
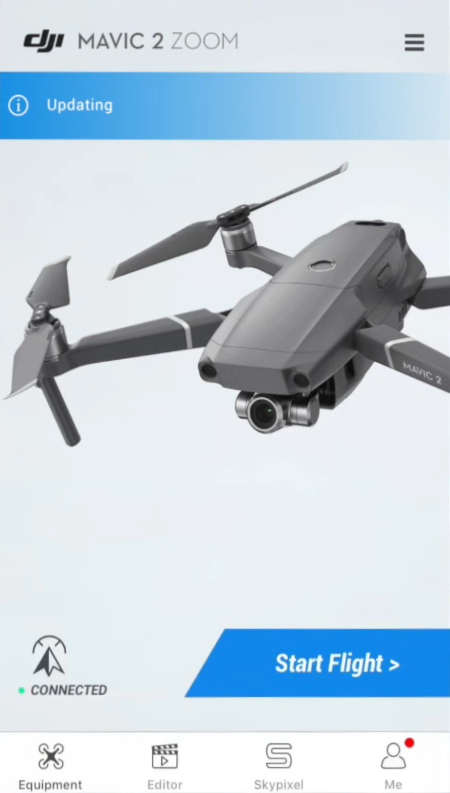
9. Update Drone
Depending on which DJI drone you have, the connected device may show a different name and image. However, the following procedure is the same for all DJI drones.
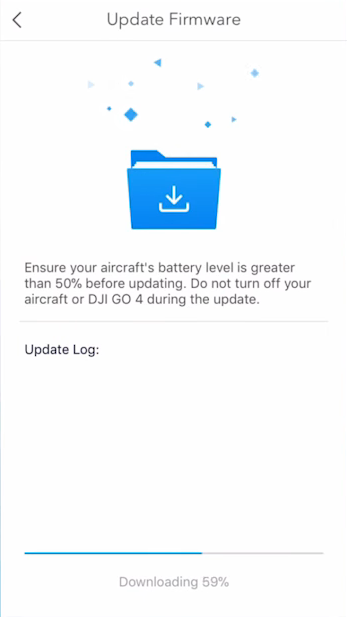
The DJI GO 4 app will notify you if there is a new firmware update available for your drone. Tap the notification in red.
Tap Download Now to initiate the update.
Wait for the process to complete.Do not turn off the drone and remote control or exit the mobile app during the update.
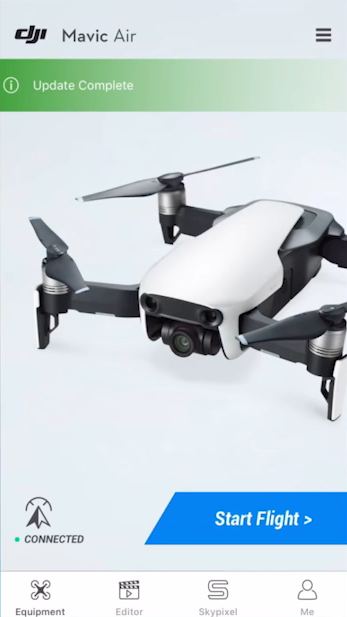
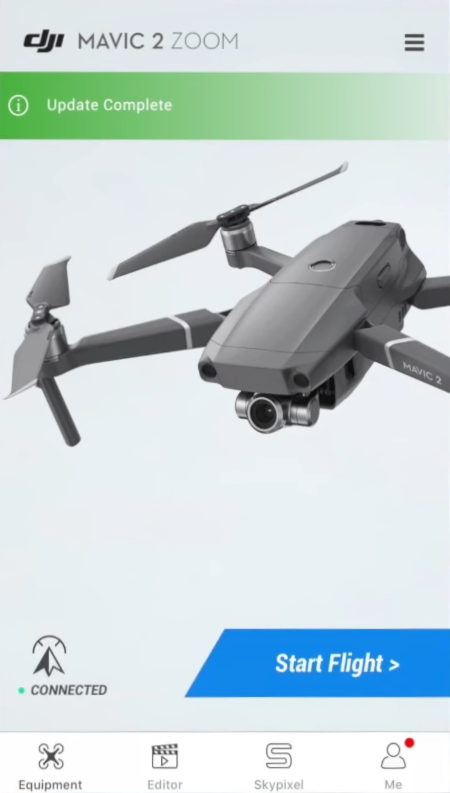
Once the update is completed you will be asked to restart the drone. We will do that next. Tap OK for now.
The app will notify you the update was completed.
10. Restart Drone
To turn off the drone, press and release the power button then press it again quickly and hold it until the lights turn off.
To turn it back on, press and release the power button then press it again quickly and hold it until you hear it make the initialization sound.
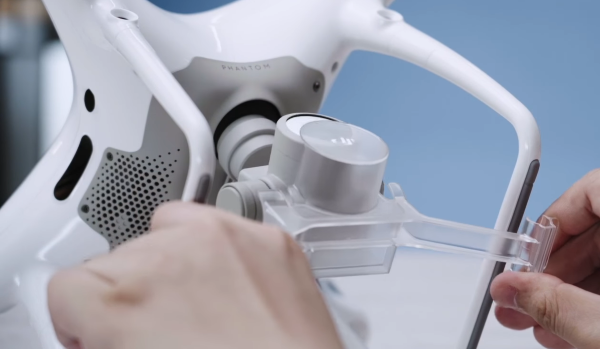
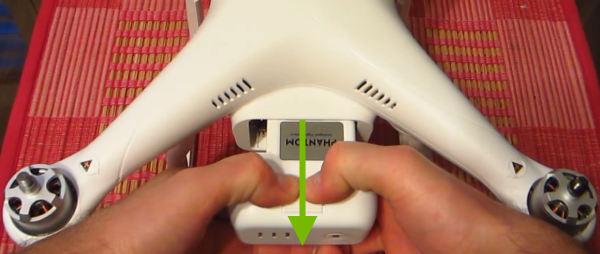
11. Reseat/Replace Battery
To reseat or replace the battery you have to perform the same steps:
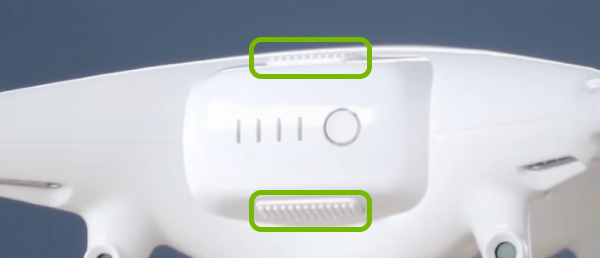
Notice the buckles on the upper and lower sides of the battery.
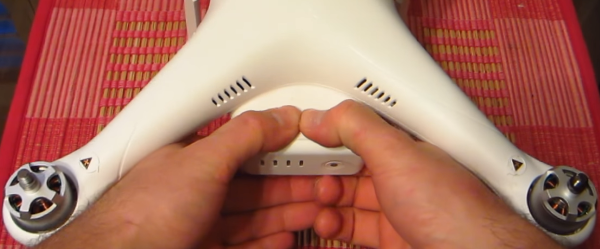
Place the back of your hands against the arms of the drone, to use them as leverage, and your index fingers and thumbs on the buckles.
Squeeze the buckles and pull the battery towards you.
Wait 10 seconds.
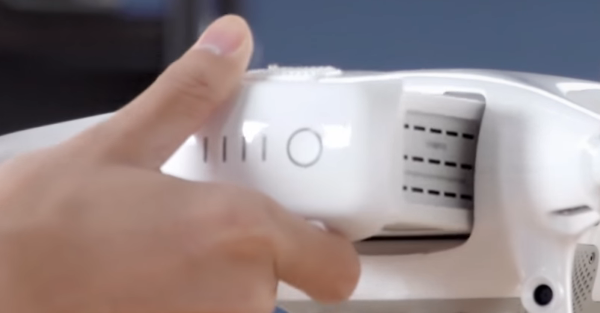
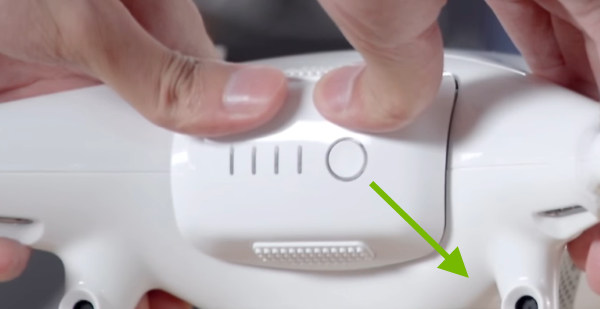
Slide in the same or replacement battery with the power button on the right side.
Grab the arms of the drone with your fingers for leverage and push the battery with your thumbs downward and to the right until you hear a click.
12. Turn On Drone
Make sure the gimbal cover is removed so the gimbal can move freely during the warm-up process.
Press and release the power button then press it again quickly and hold it until you hear it make the initialization sound.
13. Update Battery
The drone is powered by an intelligent battery which updates together with the drone. If you have any extra batteries, you will need to insert them one by one into the drone and check if they need to be updated to be compatible with the drone.
Depending on which DJI drone you have, the connected device may show a different name and image. However, the following procedure is the same for all DJI drones.
Replace the drone's battery.
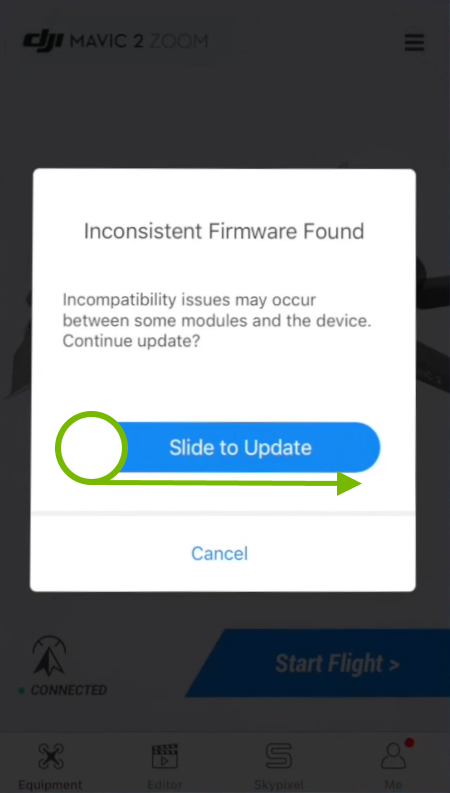
The DJI GO 4 app will be notify you if the battery's firmware is incompatible with the drone's firmware and needs to be updated. Slide the switch to the right side to initiate the update.
The app will notify you the update is in progress.Do not turn off the drone and remote control or exit the mobile app during the update.
Then it will notify you the update was completed.
14. Restart Drone
To turn off the drone, press and release the power button then press it again quickly and hold it until the lights turn off.
To turn it back on, press and release the power button then press it again quickly and hold it until you hear it make the initialization sound.
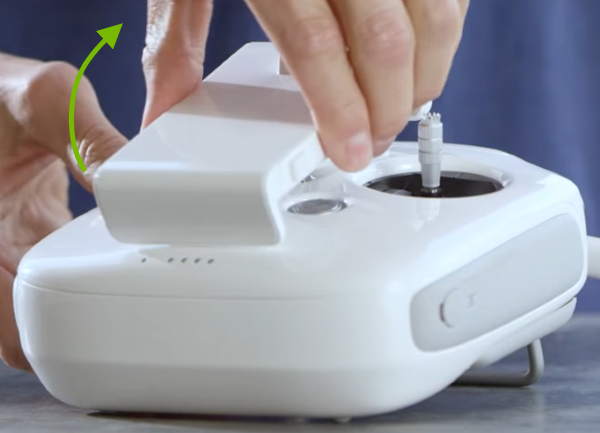
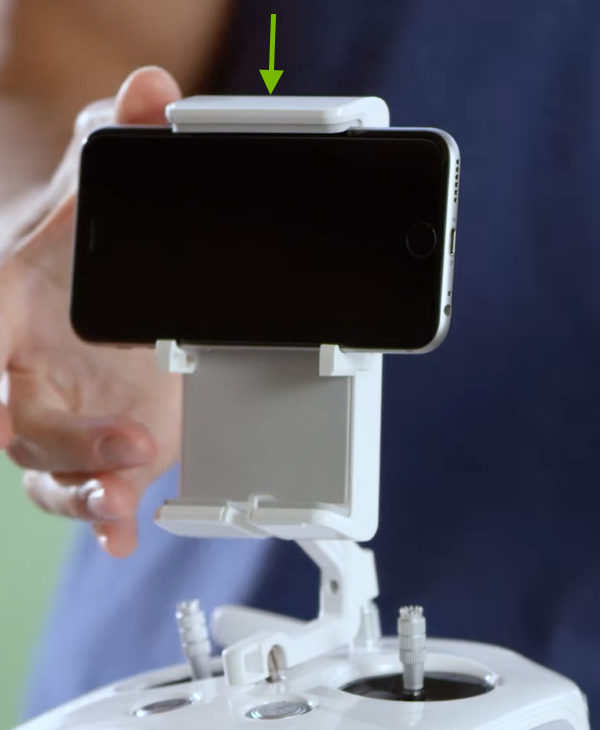
15. Connect Mobile Device to RC
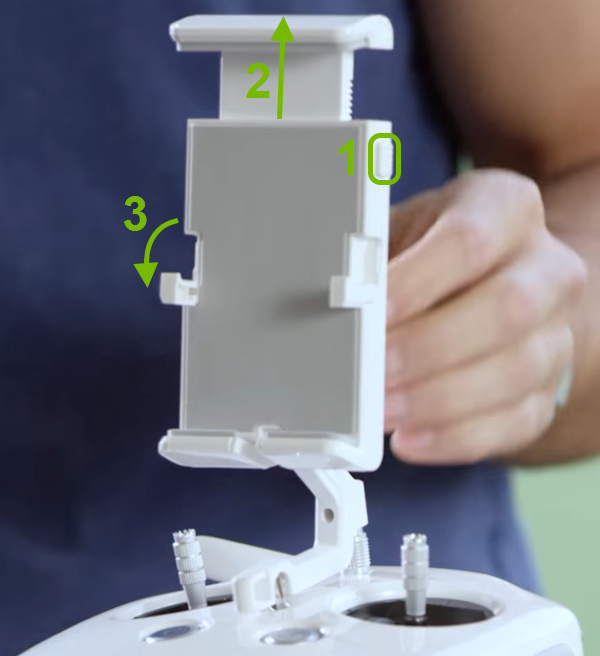
Unfold the mobile device holder.
Press the release button (1) on the holder and extend the clamp (2). If you're using a smartphone, unfold the supporting arms (3) as well.
Place your mobile device into the holder and secure it by pressing down the clamp.
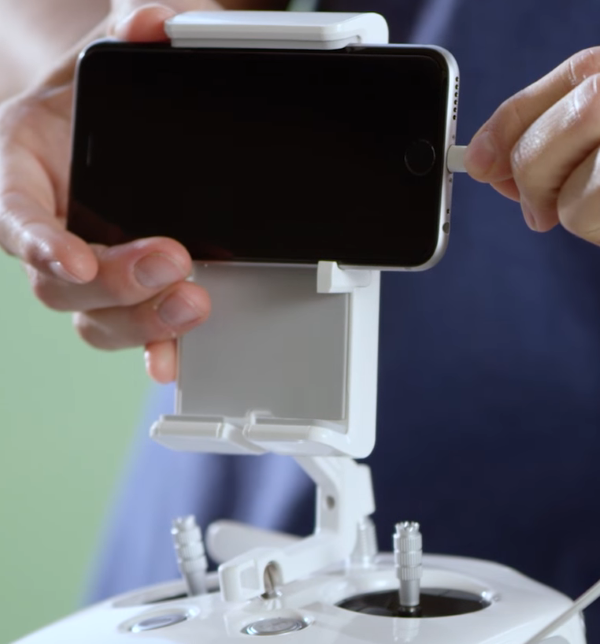
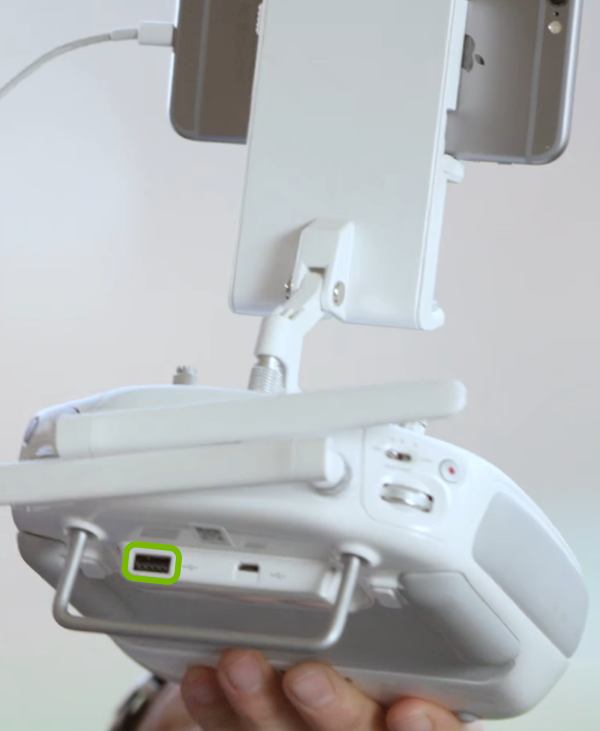
Plug the small end of the provided USB cable into your mobile device.
Then plug the other end of the same cable into the USB port on the rear of the remote control.
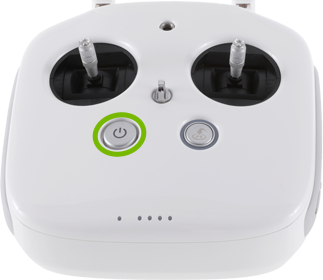
16. Turn On RC
Press and release the power button then press it again quickly and hold it until you hear it make the initialization sound.
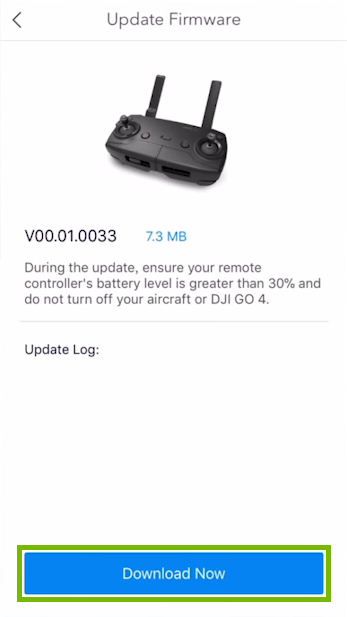
17. Update RC
Depending on which DJI drone you have, the connected device may show a different name and images. However, the following procedure is the same for all DJI drones.
The DJI GO 4 app will notify you if there is a new firmware update available for your remote control. Tap the notification in red.
Tap Download Now to initiate the update.
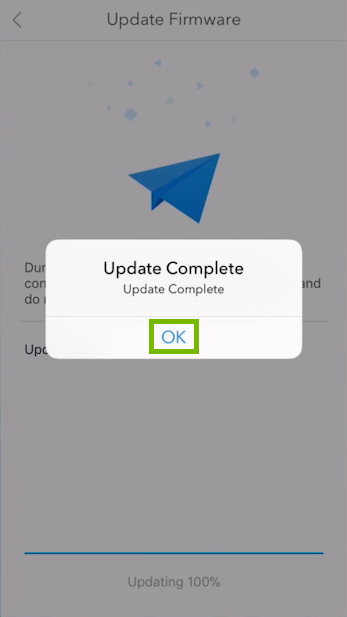
Wait for the process to complete.Do not turn off the drone and remote control or exit the mobile app during the update.
Once the update is completed you will be asked to restart the drone. We will do that next. Tap OK for now.
The app will notify you the update was completed.
18. Restart RC
To turn off the remote control, press and release the power button then press it again quickly and hold it until the lights turn off.
To turn it back on, press and release the power button then press it again quickly and hold it until you hear it make the initialization sound.
19. Additional Information
To better assist you, please answer this question.
20. Dealing with Firmware Update Issues on Your DJI Phantom 4 Advanced
Depending on what device (iPhone, iPad or iPod Touch) and which generation you have, the menu theme and options might look slightly different on your screen. However, the steps should be the same across all iOS devices and generations.
To check if your iOS mobile device is connected to Wi-Fi:
From the main screen of your device, look for and open Settings.
With Settings open, look for the Wi-Fi field. This field will display the current Wi-Fi status on the right hand side:
Off - the Wi-Fi antenna is currently disabled.
Not Connected - Wi-Fi is turned on, but your device is not currently connected to a network.
Wi-Fi network name - Wi-Fi is turned on, and the network name displayed is the network your device is currently connected to.
You can also tap on the Wi-Fi field and make sure the Wi-Fi switch is in the On position. The switch should be green in color and will display the network that you are currently connected to directly beneath it with a check mark to the left.
To continue, we need to know what Operating System your computer is using.
There are 2 main Operating Systems for personal computers currently available, Microsoft Windows and Apple macOS.
Microsoft WindowsApple macOSMicrosoft Windows runs on computers produced by multiple companies, such as Lenovo, Asus, Dell, Toshiba, Hewlett Packard, Acer, and Sony.Apple is the only company that makes macOS computers.
26. Verify Network Status
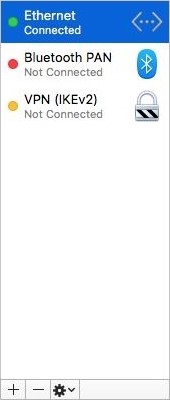
Click on the Apple Menu and go to System Preferences.
Click On Network.
Click on the Network Adapter which you are checking.
Here you will find the status of your internet connection.
27. Additional Information
To better assist you, please answer this question.
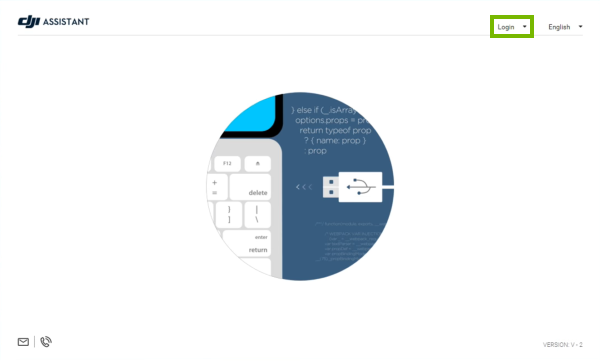
28. Launch App
Launch the DJI Assistant 2 app.
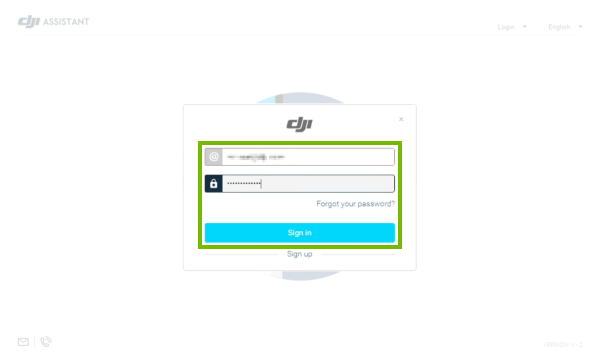
If you don't see your email address in the top right corner, click Login.
Fill in your DJI account information then click Sign In.
29. Connect Drone to Computer
Plug the smaller connector of the provided USB cable into the left side of the drone.
Plug the other connector of the USB cable into the computer.
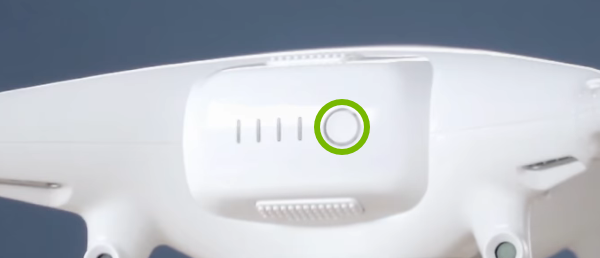
On the rear of the drone, press and release the power button then press it again quickly and hold it for about two seconds to turn it on.
30. Update Drone
Depending on which DJI drone you have, the connected device may show a different name. However, the following procedure is the same for all DJI drones.
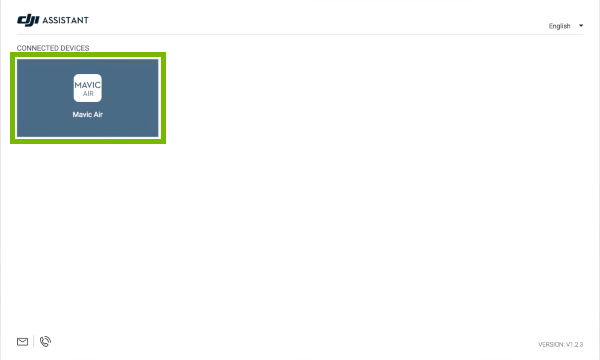
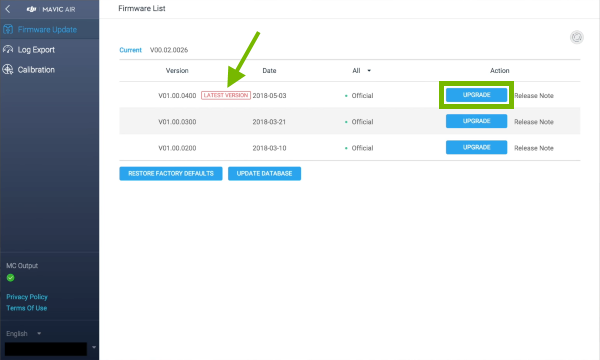
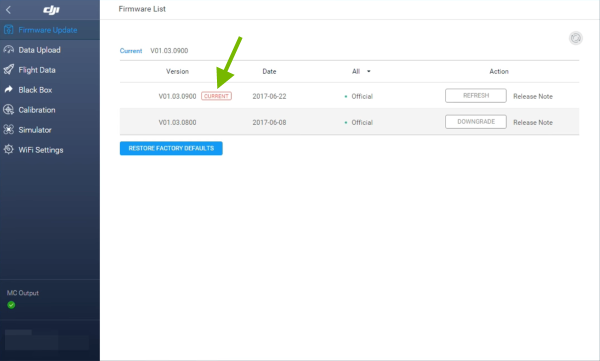
In the DJI Assistant 2 app, select your drone under Connected Devices.
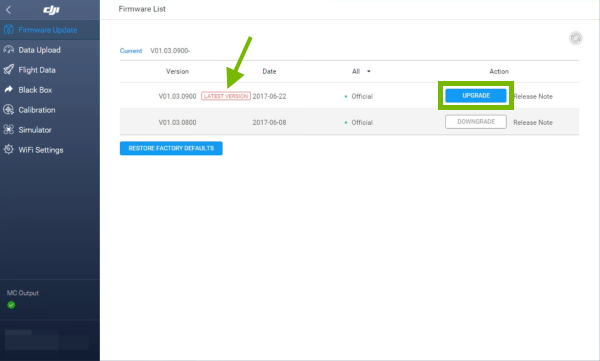
Look for the Latest Version available in the Firmware List and click Upgrade.
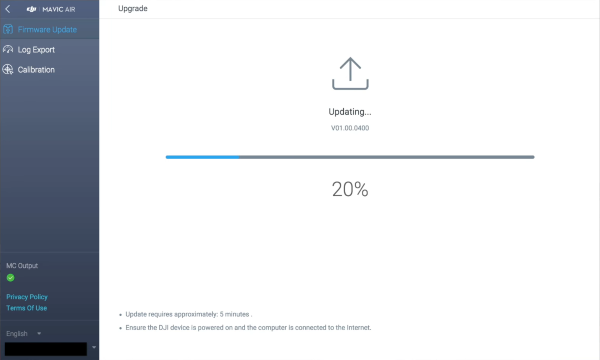
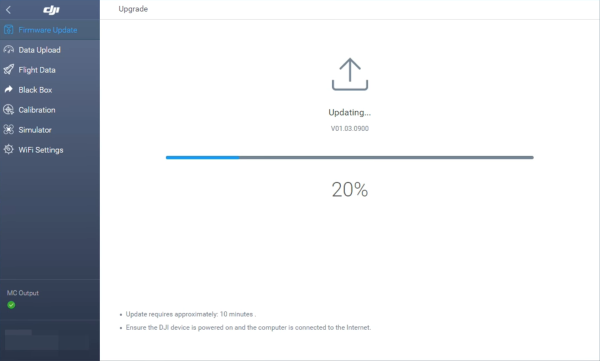
Wait for the update to complete. The process may take several minutes to finish.Do not turn off or disconnect the drone or exit the app during the update.
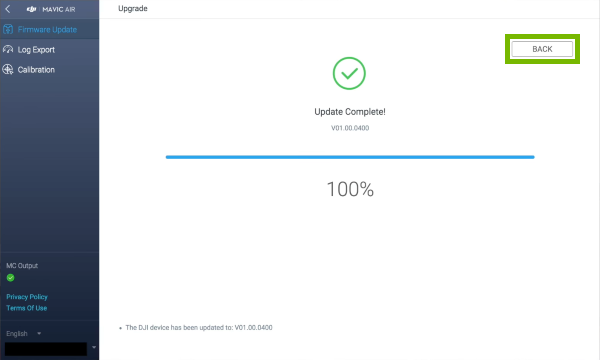
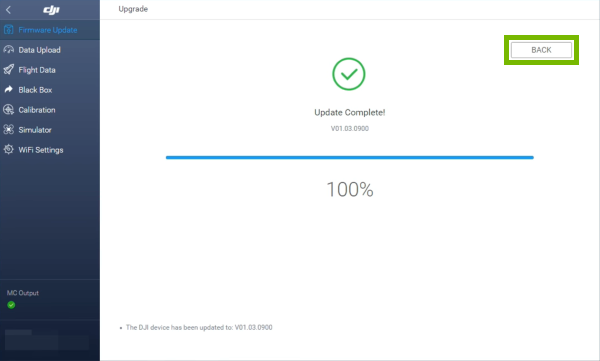
Once the update is completed, click Back.
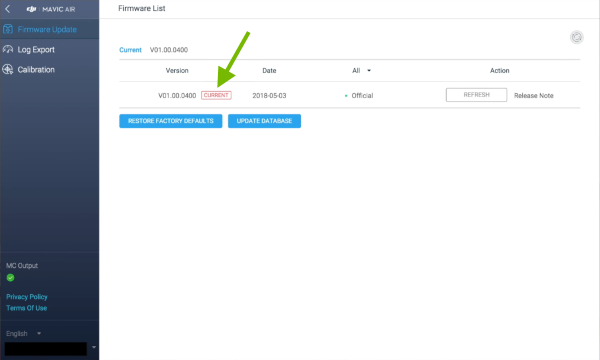
You will now see the firmware version to be Current.
You may have heard the drone make the initialization sound after the update was completed, meaning it was restarted automatically. If you haven't heard that sound, you will need to restart it manually.
31. Additional Information
To better assist you, please answer this question.
32. Reseat/Replace Battery
To reseat or replace the battery you have to perform the same steps:
Notice the buckles on the upper and lower sides of the battery.
Place the back of your hands against the arms of the drone, to use them as leverage, and your index fingers and thumbs on the buckles.
Squeeze the buckles and pull the battery towards you.
Wait 10 seconds.
Slide in the same or replacement battery with the power button on the right side.
Grab the arms of the drone with your fingers for leverage and push the battery with your thumbs downward and to the right until you hear a click.
33. Turn On Drone
Make sure the gimbal cover is removed so the gimbal can move freely during the warm-up process.
Press and release the power button then press it again quickly and hold it until you hear it make the initialization sound.
34. Update Battery
The drone is powered by an intelligent battery which updates together with the drone. If you have any extra batteries, you will need to insert them one by one into the drone and check if they need to be updated to be compatible with the drone.
Depending on which DJI drone you have, the connected device may show a different name. However, the following procedure is the same for all DJI drones.
Replace the drone's battery.
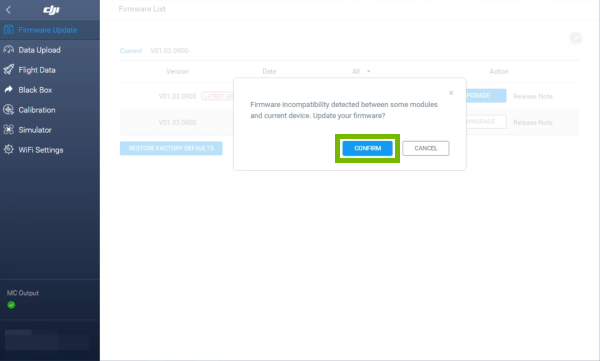
The DJI Assistant 2 app will notify you if the battery's firmware is incompatible with the drone's firmware and needs to be updated. Click Confirm to update.
If you don't get the firmware incompatibility notification within a few seconds, look for the Latest Version available in the Firmware List and click Upgrade.
Wait for the update to complete. The process may take several minutes to finish.Do not turn off or disconnect the drone or exit the app during the update.
Once the update is completed, click Back.
You will now see the firmware version to be Current.
You may have heard the drone make the initialization sound after the update was completed, meaning it was restarted automatically. If you haven't heard that sound, you will need to restart it manually.
35. Additional Information
To better assist you, please answer this question.
36. Dealing with Firmware Update Issues on Your DJI Phantom 4 Advanced
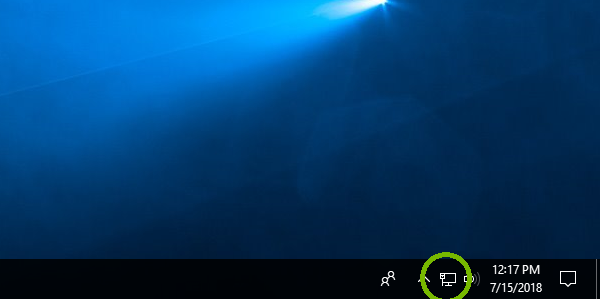
The Network icon in the lower right corner of the screen can tell you a lot about your network connection and the state it's in.
The Network icon represents the current status of your network connection. Depending on the current status of your connection, the appearance of this icon will change. The following are the different icons you might see and their corresponding meanings.
Represents an Ethernet connection and successful connection to the internet.
Represents an Ethernet connection with no connection to the internet.
No network adapters are detected or enabled.
You're connected to WiFi and the Internet.
Connected to WiFi, but no Internet connection is detected (also known as limited connectivity).
A wireless adapter is detected and there are wireless networks in range, but you're not connected to one.
Your wireless network adapter is recognized, but no WiFi networks are found and you're not connected to WiFi.
If you want to see even more information about your connection status, click the Network icon itself regardless of what status it currently displays.
or
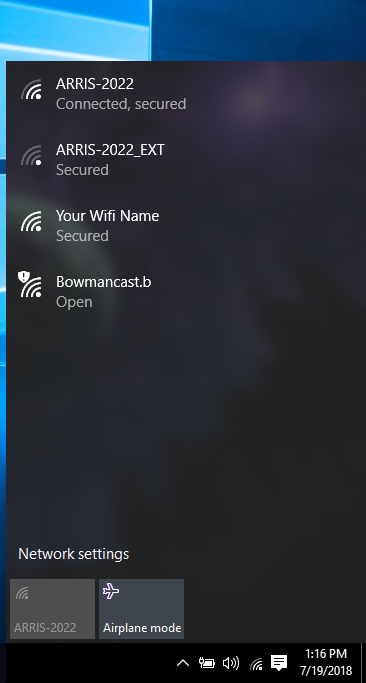
This will bring up the Network menu. Within your network menu, you can see the status of your current connection. If your device is capable of connecting to WiFi, you will also see a list of wireless networks your device is currently in range of.
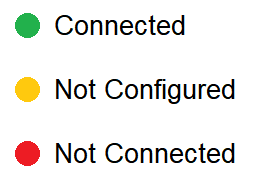
The status underneath each network name represent either your device's current connection status to that network, or additional attributes of that network.
Connected, Secured: This means you are connected to this WiFi network, and the network is secured with a password.
Connected: This means you are connected to this WiFi network. This network may not be password protected.
Secured: This is an available WiFi network that requires a password to successfully connect to.
Open: This is an available WiFi network with no password required.
The icons to the left of each network name indicate an individual network's signal strength. This will vary depending on your physical distance from each network's point of origin, among other factors.
WiFi network with very strong signal (Best).
WiFi network with strong signal (Good).
WiFi network with weak signal strength (OK).
WiFi network with very weak signal (Worst).
This WiFi network is not password-protected (Open network).
2nd Method
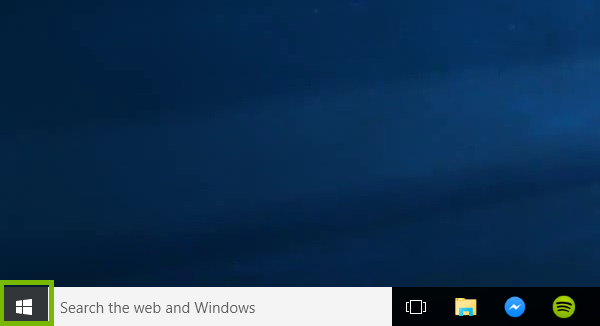
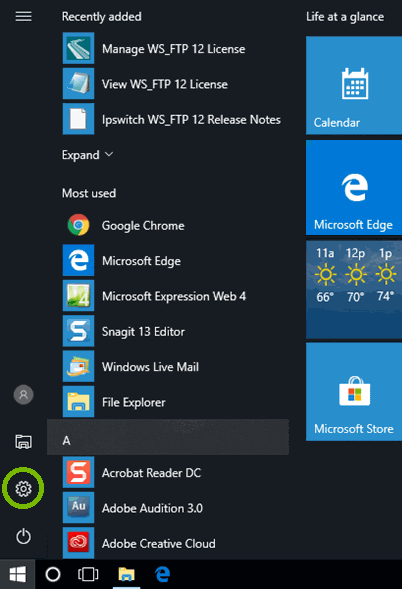
Select the Start button.
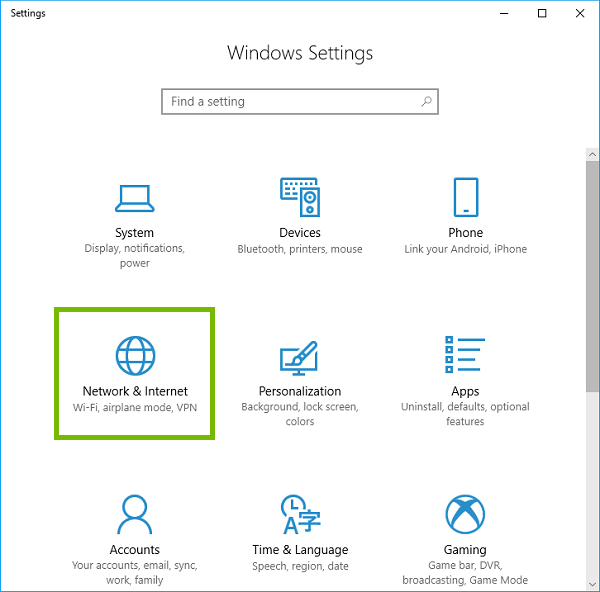
Select Settings.
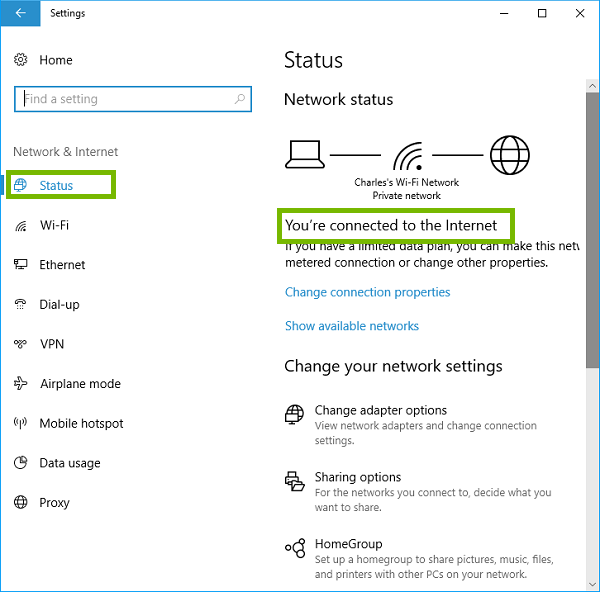
Select Network & Internet.
Select Status. Your current connection status will be displayed on the right side of the screen.
.png)