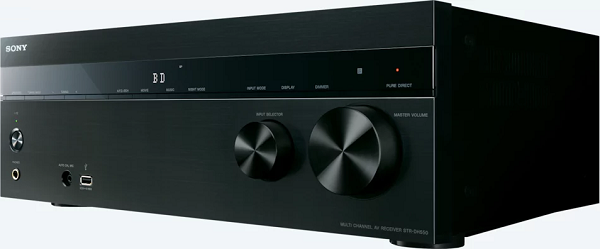
Be sure that your television is set to the input of your receiver so that you can see the on-screen menus that will be displayed.
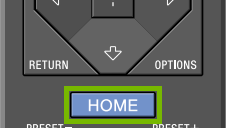
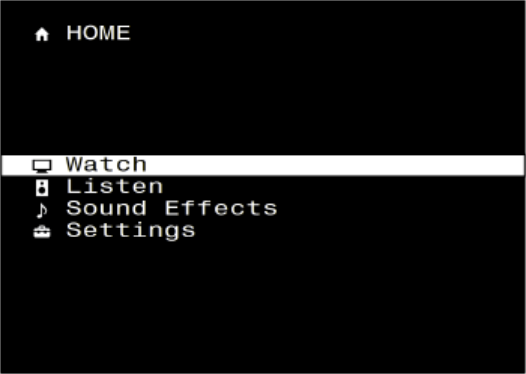
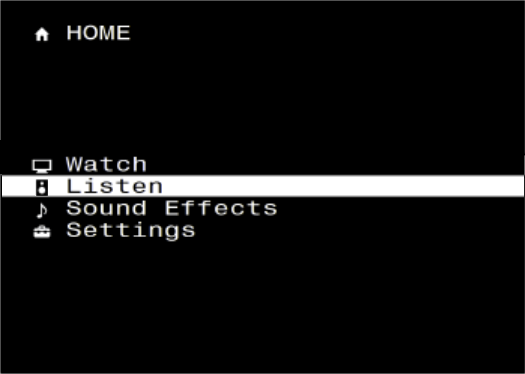
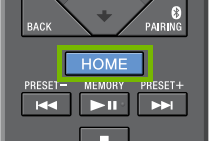
Press HOME. The home menu will display on your TV.
Playing Content from DVDs/CDs/TV
Select Watch or Listen from the menu.
You will be presented with playback options relevant to your home theater system such as DVD/Blu-Ray Player, TV, etc. Select the device you'd like to play from.
Using the remote for the device you've selected, playback can now be started.
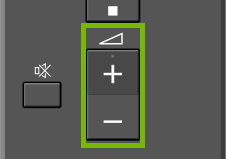
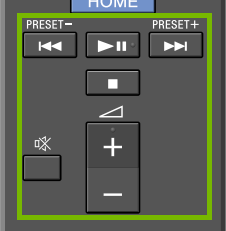
Use the VOLUME UP/DOWN button on your receiver's remote to adjust the volume during playback.
Playing from USB devices
Select Listen from the menu.
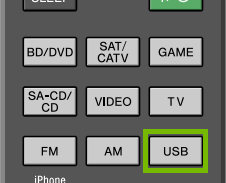
Select USB from the menu.
Plug in your USB device, it will appear on screen.
Press USB on the remote, before using standard playback buttons to listen.
Listening to the Radio
Select Listen from the menu.
Select either FM or AM from the menu.
From the menu choose Tuning + or Tuning - to start scanning for the next available station.
Pressing the VOLUME UP/DOWN button to adjust the volume.
5. BRAVIA Sync
The “BRAVIA†Sync function is exclusive to Sony branded devices. It functions by using "Control for HDMI" (also commonly referred to as HDMI CEC). "BRAVIA" Sync allows for more advanced and automated control between Sony products such as TVs, Blu-ray Disc players, DVD players, and AV amplifiers that have been deemed “BRAVIA†Sync-compatible. These devices can essentially "speak to" one another - allowing for automatic powering on and off, input switching, etc.
To use the “BRAVIA†Sync function with your home theater equipment, be sure that each device has Control for HDMI enabled.
Though your TV and other devices may have Control for HDMI features, it may not also be "BRAVIA" Sync-compatible. Consult your TV's manual/documentation to determine whether or not your TV is "BRAVIA" Sync-compatible.
To turn on Control for HDMI & "BRAVIA" Sync:
Press HOME. The home menu appears on the TV screen.
Select Settings.
Then HDMI Settings from the menu.
Select On. This turns on the Control for HDMI function, which also enables the "BRAVIA" Sync function to operate with compatible equipment.
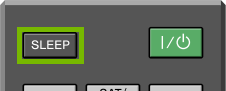
6. Sleep Timer
Using the Sleep timer, you can set your system to automatically turn itself off after a pre-set amount of time. The time can be preset in intervals of 30 minutes.
Press SLEEP.
Each time you press SLEEP, the display adds 30 mins to the sleep timer, up to two hours. After two hours, pressing SLEEP again, turns it off.
To check the remaining time Press SLEEP once.
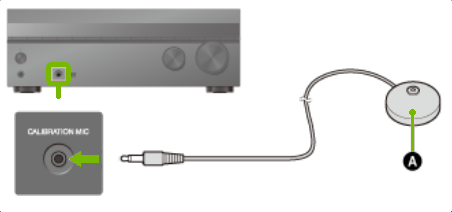
7. Auto Calibration
Just like an actual movie theater sound system, a home theater receiver needs to be fine tuned before it can perform at its best. No sound system is “one size fits all.†The size of your speakers, as well as your room’s dimensions, furniture, flooring, ceiling height and even building materials are all things that can affect and possibly degrade sound quality. Fortunately, your receiver comes with an auto-calibration feature. To properly prepare for auto-calibration:
Make sure all speakers you intend to use with your system are connected and working properly.
Do not connect any other microphones to the "AUTO CAL MIC" jack other than the supplied calibration microphone.
Disconnect any headphones you might normally use with your system.
Make sure there are no obstructions between the calibration microphone and your system's speakers.
For accurate measurement, make sure the environment is quiet and free from noise.
Your speakers will emit very loud sounds during the calibration process. Be considerate of your neighbors and any children who might be nearby.
If the muting function has been activated before you perform Auto Calibration, the muting function will shut off automatically. The volume of the calibration tones cannot be adjusted.
It may not be possible to take the correct measurements or to perform Auto Calibration at all if special speakers such as dipole speakers are used.
Connect the supplied calibration microphone to the AUTO CAL MIC jack.
Place the microphone where you sit at the same height as your ears.
Press HOME on the remote.
Select Easy Setup from the menu.
The Easy Setup menu will appear. Select Start. At this point, the Easy Setup process will begin. You will see information on your TV screen that will guide you through this process. Auto-calibration of your speakers takes about 30 seconds. Once the process has completed, you will hear a beep sound, and you will receive a completion message on-screen.
Select an option to proceed:
Retry: Restarts the Easy Setup process again.
Save&Exit: Saves the calibration measurement results and completes the calibration process.
Exit: Exits the calibration process without saving anything. Calibration is not complete.
.png)