Apple HomeKit is a framework to integrate and combine all your home automation devices, and allows you to control each using a single App or through Siri.
2. Setup Using Native App First
Before you can begin using Apple Home, you must setup the home automation devices in their native apps, first.
Follow the instructions included with your home automation device for setup, and make sure they work properly before starting.
Some home automation devices require you to perform major changes in the native app as well; but you will be able to use many of the features of the device with Apple Home.
3. Add Accessory
To add a new accessory or device to your HomeKit setup:
Open the Home app.
Choose Add Accessory, or tap the âž• symbol.
If you are asked to add an accessory, tap Allow.
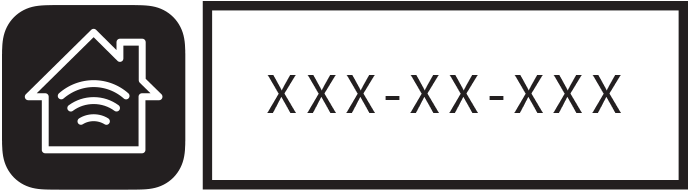
Use a camera to take a picture of the HomeKit code or QR code on the accessory or documentation.
If you have an iPhone 7 or later, and see the the below symbol instead, just hold your phone next to the accessory for a few moments.
You'll be asked to enter the details about the device, such as what room the device is in, the name you want to give it. Enter this information so it's easier to find in the future.
Tap Done when you've got all the information entered.
4. More Information
For more information about HomeKit in general you can always visit https://www.apple.com/ios/home/ on your home computer.
if you are purchasing a new home automation device, look for this symbol to ensure it will work with Apple HomeKit:
If you'd like to check if your home automation devices are compatible, you can visit this page on your computer: https://www.apple.com/ios/home/accessories/
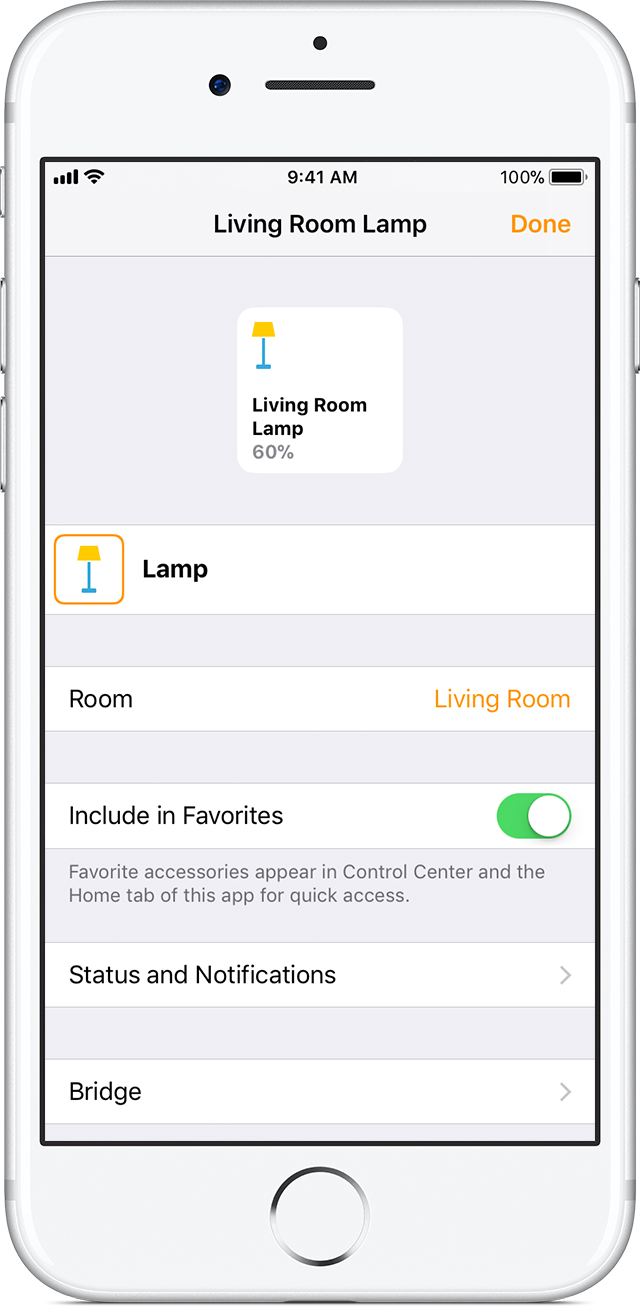
5. Edit Accessory
To edit an accessory or device within your HomeKit setup:
Tap the Home tab.
Touch and hold an accessory.
Tap Details.
You'll be asked to enter the details about the device, such as what room the device is in, the name you want to give it. Enter this information so it's easier to find in the future.
Tap Done.
6. Add a Room
Rooms make it easier to organize and control your accessories and devices within HomeKit.
To add a room:
Tap the Rooms tab.
Tap the menu icon in the top-left corner.
Tap Add Room.
Give the room a name, such as Washroom or Bedroom.
For the wallpaper used to represent the room, tap Take Photo to take your own photo with your phone or tablet, or Choose from Existing if you already have a photo.
Tap Save.
To add an accessory to a room:
In the Home or Rooms tab, touch and hold an accessory.
Tap Details.
Tap Room.
Select which room the accessory is in.
Tap Done.
To navigate between rooms:
Tap the Rooms tab.
Swipe left and right.
Tap the menu icon in the top-left corner for a drop-down list of rooms, if you prefer.
7. Organize Rooms into Zones
Zones are 'rooms of rooms'. For example, the first and second floor, or in an open floor-plan home, the kitchen, living, and dining rooms may all be connected, and you'd prefer to control them as one.
Tap the Rooms tab.
Tap the menu icon in the upper left-hand corner.
Tap Room Settings.
Tap a room, for example, Kitchen.
Tap Zone.
Choose an existing zone, or create a new one by tapping Create New and giving it a name.
Tap Done.
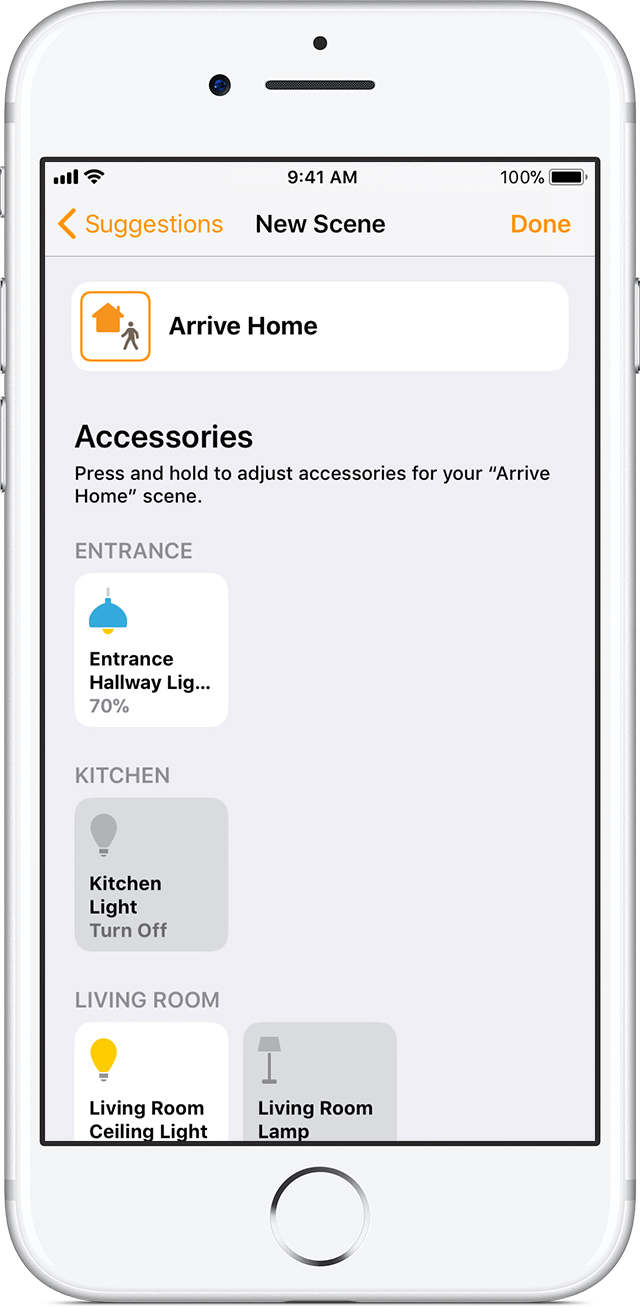
8. Create Scenes
Scenes allow you to automate multiple accessories and devices across your home. They can be based on events, such as when you arrive home, or on times of day (when the sun sets, for example), or triggered manually, like when you put on a movie.
Tap the Home or Rooms tab.
Tap the Add icon in the corner.
Tap Add Scene.
You can create a new Scene, or use one of the suggestions.
Tap Add or Remove Accessories.
Tap each accessory you want in the scene.
Tap Done.
Touch and hold an accessory to adjust it's properties, such as how bright or dim a light should be for that scene.
Tap Test This Scene to make sure it is setup just the way you want.
If you intend to use this scene regularly, turn on Show in Favorites, so it will appear on HomeKit's home screen.
9. Share Control
If other people in your home also have an iPhone or iPad, you can invite others to your HomeKit setup, and allow them to control the accessories you've setup, as well.
Tap the Home tab.
Tap the Invite icon in the upper left corner.
Tap Invite.
Enter the person's Apple ID that they use with iCloud.
Tap Send Invite.
The person you've invited will receive a notification in the Home app on their iPhone or iPad. To accept the invitation:
Open the Home app.
Tap the Invite icon in the upper left corner.
Tap Home Settings.
Tap Accept.
Tap Done.
10. Create Home Hub
A HomeKit Hub allows you to control your devices remotely, and more easily grant access to the people you trust.
You can use your Apple TV, or an iPad you intend to leave at home as a Hub.
If you choose to use an iPad as a hub, keep in mind it must be at home, in range of all your devices, for any remote access to work.
If you remove the iPad you've setup as a Hub from your home, it will still function as an iPad, but your HomeKit devices will not work properly.
11. iPad HomeKit Hub Setup
Remember, your iPad will need to remain at home if you wish to use any of the remote access features.
On your iPad:
Select Settings.
Tap your name, at the top.
Tap iCloud.
Sign in with your Apple ID, the same one that is on your iPhone.
Make sure iCloud Keychain and Home are both turned on.
Tap Settings.
Tap Home.
Turn on Use this iPad as a Home Hub.
To check and make sure, on your iPhone:
Open the Home app.
Tap the Invite icon in the upper left corner.
Look under Home Hubs, your Apple TV should be listed.
12. Remote Access
You're now able to control all your HomeKit accessories from anywhere.
For example:
You could check a smart plug you've setup in the bathroom, from the office, to make sure the hair dryer is off.
You can turn on and off your lights, either on schedule or from your phone, while on vacation.
With a smart door lock accessory, you can see when your front door is opened during the day, to make sure the kids got home safe.
As you arrive home, your outdoor lights, and the kitchen lights can turn on.
For more ideas on how to use your smart accessories with HomeKit, on your computer, visit https://www.apple.com/ios/home/.
13. Apple TV HomeKit Hub Setup
On your Apple TV:
Choose Settings.
Choose Accounts.
Make sure you're signed into the same Apple ID account as you are on your iPhone.
After you sign in, your Apple TV will automatically set itself up as a HomeKit Hub.
To check and make sure, on your iPhone:
Open the Home app.
Tap the Invite icon in the upper left corner.
Look under Home Hubs, your Apple TV should be listed.
Remove Hidden Spyware In Minutes For Free
Detect and remove spyware, keyloggers, tracking cookies, and other
threats that slow down your PC or steal your data.
65+ Million Downloads
Spyware scanner with AI-powered detection engine + database
.png)