The Bose QuietComfort 35 Wireless Headphones II offer excellent noise cancellation, great sound, and easy-to-use controls.
This guide will take you through the basics of using your headphones.
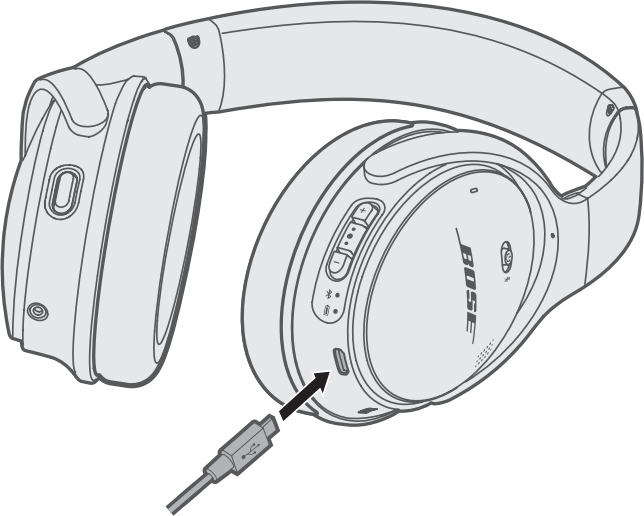
2. Charge
Connect the USB cable to a wall charger or computer that is turned on.
Connect the USB cable to the charging port on your headphones.
Allow the headset to charge till the battery light goes green for a full charge.
3. More Information
Using your browser on your computer, visit https://www.bose.com/en_us/support/products/over_ear_headphones_support/quietcomfort-35-wireless-ii.html to view your user manual, order parts or accessories, and visit the community forum.
4. Basic Controls
Common activities
Change Language
Push and hold Volume Up and Volume Down till a language is announced in the headset.
Use Volume Up and Volume Down to scroll through the languages.
Push the Multi-function button to select the language.
Clear Bluetooth Device List
Push the Power & Bluetooth Switch all the way over, and hold it for 10 seconds.
A voice prompt will let you know the list is cleared.
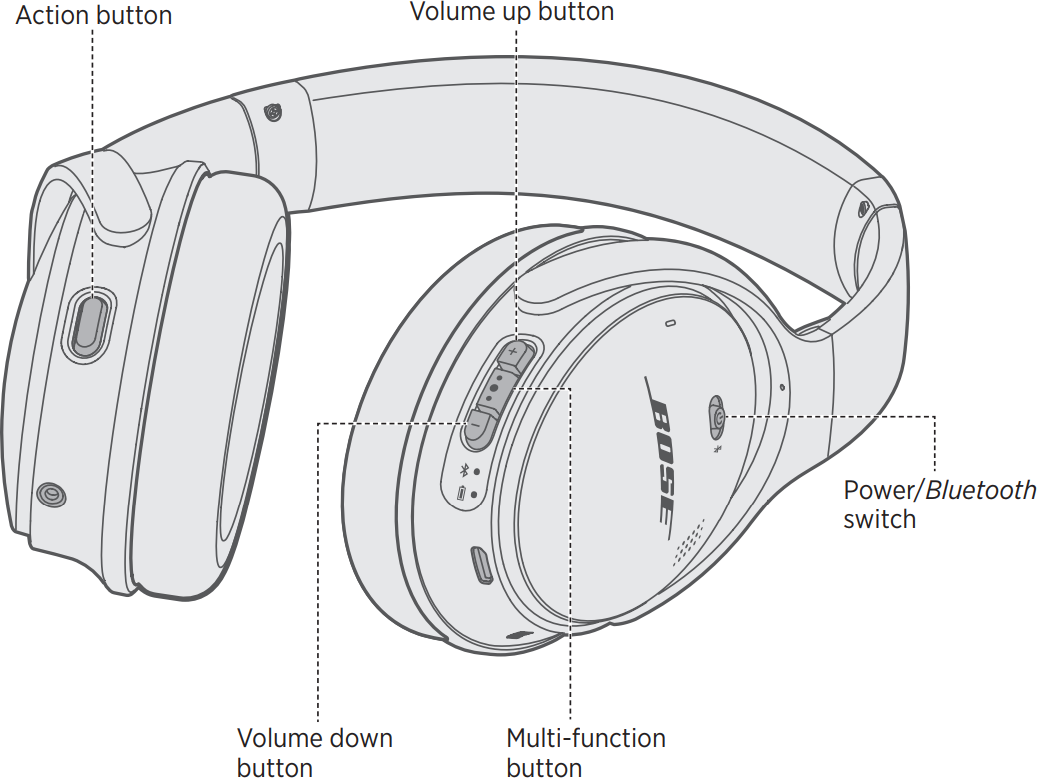
Basic Controls
Action Button
Open Google Assistant (if your device has it installed).
Turn on or off active noise cancellation.
To switch between modes, push and hold the button, a voice prompt on the headset will notify you which is being used.Volume Up
Increase volume.Multi-function ButtonThe Multi-function Button changes action, depending on what you are doing.
Play / Pause, when listening to music.
Answer an incoming call.
Hang up a call in progress.
Volume Down
Decrease volume.Power & Bluetooth Switch
Turn on or off your headphones.
Push all the way over to pair a bluetooth device.
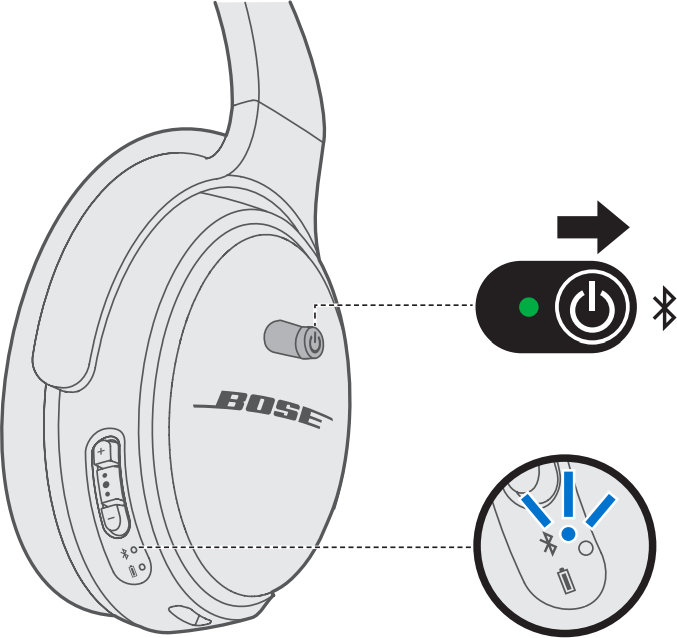
5. Pair Mode
Slide the Power Switch to the right, and hold it for 2 seconds.
The Bluetooth light will blink.
6. Pair Bluetooth Devices
Some Bluetooth accessories are configured with a PIN or a passkey that is often listed in its manual. Check your Bluetooth accessory manual for the correct PIN or passkey.
Depending on what device (Smartphone or Tablet) and which generation you have, the menu theme and options might look slightly different on your screen. However, the steps should be similar to all Android devices and generations.
Use one of the following connection methods:
Method 1 - The Drop Down Menu
Method 2 - Settings
Drop down menu
Swipe down from the top of the device screen if it's a phone or up from the bottom of the device screen if it's a tablet to access the menu.
Locate the Bluetooth icon.
Press and hold the Bluetooth icon.
Swipe the switch to your right to set the Bluetooth accessory in pairing/discovery mode.
A list of nearby devices and previously paired devices will be shown.
In the list of Available Devices, choose the Bluetooth accessory you wish to pair with.
If you are prompted for a passkey, put it in. If there is no passkey, then your Bluetooth accessory should be paired now.
Android menu settings
Locate and tap the Apps Menu.
Locate and tap the Settings icon.
Select the Bluetooth. You may need to select Connections first.
Swipe the switch to your right to set the Bluetooth accessory in pairing/discovery mode.
A list of nearby devices and previously paired devices will be shown.
In the list of Available Devices, choose the Bluetooth accessory you wish to pair with.
If you are prompted for a passkey, put it in. If there is no passkey, then your Bluetooth accessory should be paired now.
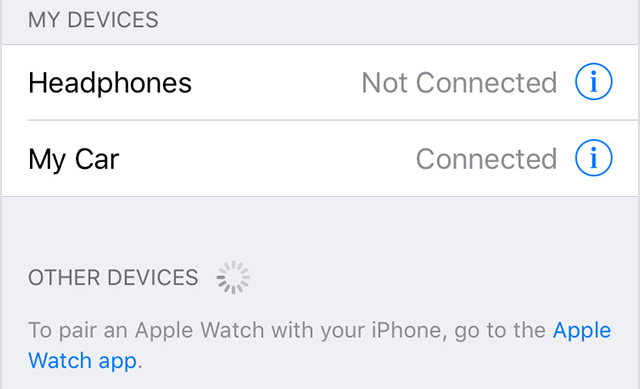
7. Pair Bluetooth Devices
Next to "Bluetooth", slide the switch to the on position.
Place your accessory in discovery mode and wait for it to appear on your iPod.
If you don't see it or aren't sure how to make it discoverable, check the instructions that came with your accessory.
Wait for the bluetooth device's name to appear in the My Devices list.
Tap your accessory name in the list to connect.
You might be asked to enter the PIN or passkey. If you aren't sure what your PIN or passkey is, check the accessory's documentation.
8. Pair Bluetooth Device
Some Bluetooth devices are configured with a PIN or a passkey that is often listed in its information manual. Check your Bluetooth device documentation for the correct PIN or passkey.
Set the Bluetooth accessory in pairing/discovery mode. This process will vary depending on what kind of device you have. Refer to your device's documentation for specifics on how to accomplish this.
Click the Action Center icon in the bottom right corner of the screen.
Tap on the All Settings tile after that.
Then go to Devices.
Select Bluetooth from the left-hand column and ensure the Bluetooth switch is in the On position to the right. Your Windows 10 device will become discoverable and start searching for devices.
Once you see the device you want to pair the system with, select it then tap on Pair.
If asked to compare the passcode showing up on both devices, do so.
After the pairing was successful the device will show the Paired status under its name.
9. Pair Bluetooth Device
Set your device to pairing mode. The way you do this may be differ from device to device. In many cases, you can place your device in pairing mode by having the device off, then pressing and holding the power button to start it up. Usually, after a few moments, it will indicate it is in paring mode (flashing its indicator light, for example), and you can release the power button.
On the menu bar, click the Apple menu (1), then System Preferences (2).
Select Bluetooth.
Ensure that it says Bluetooth: On. Turn it on with the button if it isn't.
Your computer will search for any Bluetooth devices in range.
Once your device is located, click Pair.
Once the pairing process is complete, your Mac will automatically connect to the device whenever it is in range.
10. Installed Check
Bose Connect provides a number of additional features to your Bose headphones or speaker.
The Bose Connect app may ask you to perform basic connection steps if your Bose device has not already been paired via Bluetooth with the device you intend to use it with.
11. Setup App
Update firmware:
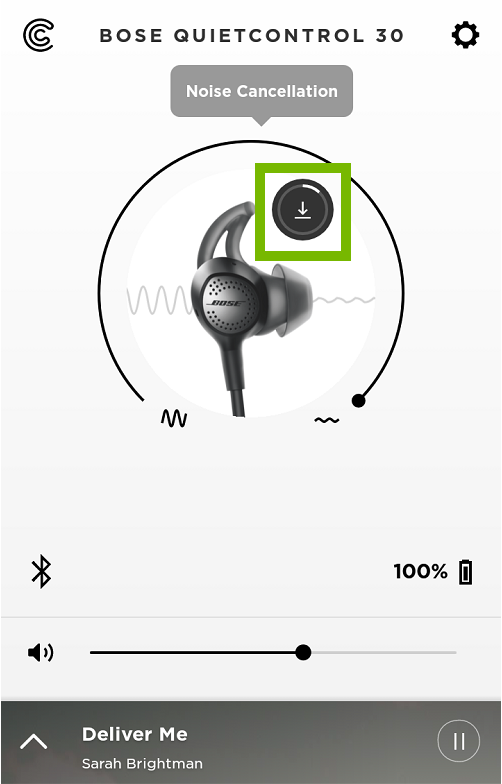
Launch the Bose Connect app from your home screen.
If you have an available update, you will seen an icon indicating a firmware update. Tap the icon to start the update process.
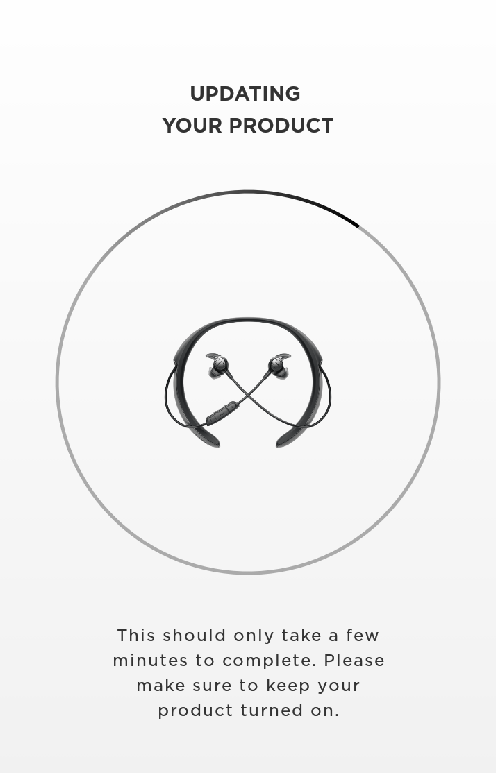
Once the update is done downloading, it will start updating your headset.
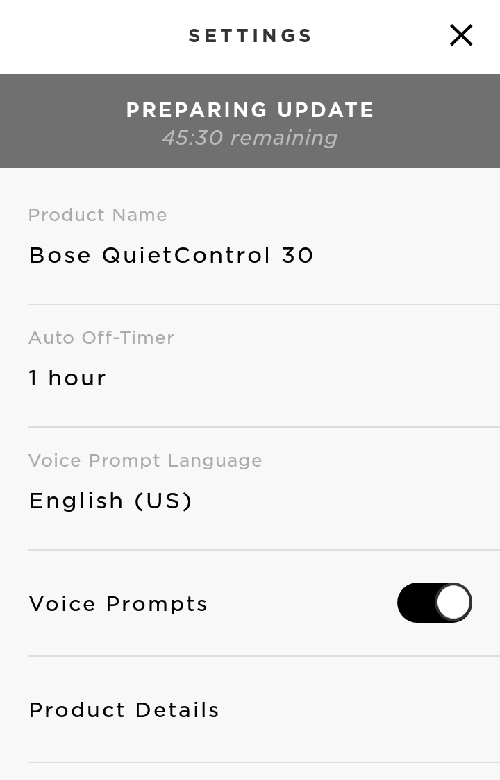
Modify Settings:
Open the Bose Connect app from the home screen.
Tap on the settings cog.
You can now modify settings for your headphones.
12. Android or iOS
The next steps depend on what kind of mobile device you use.
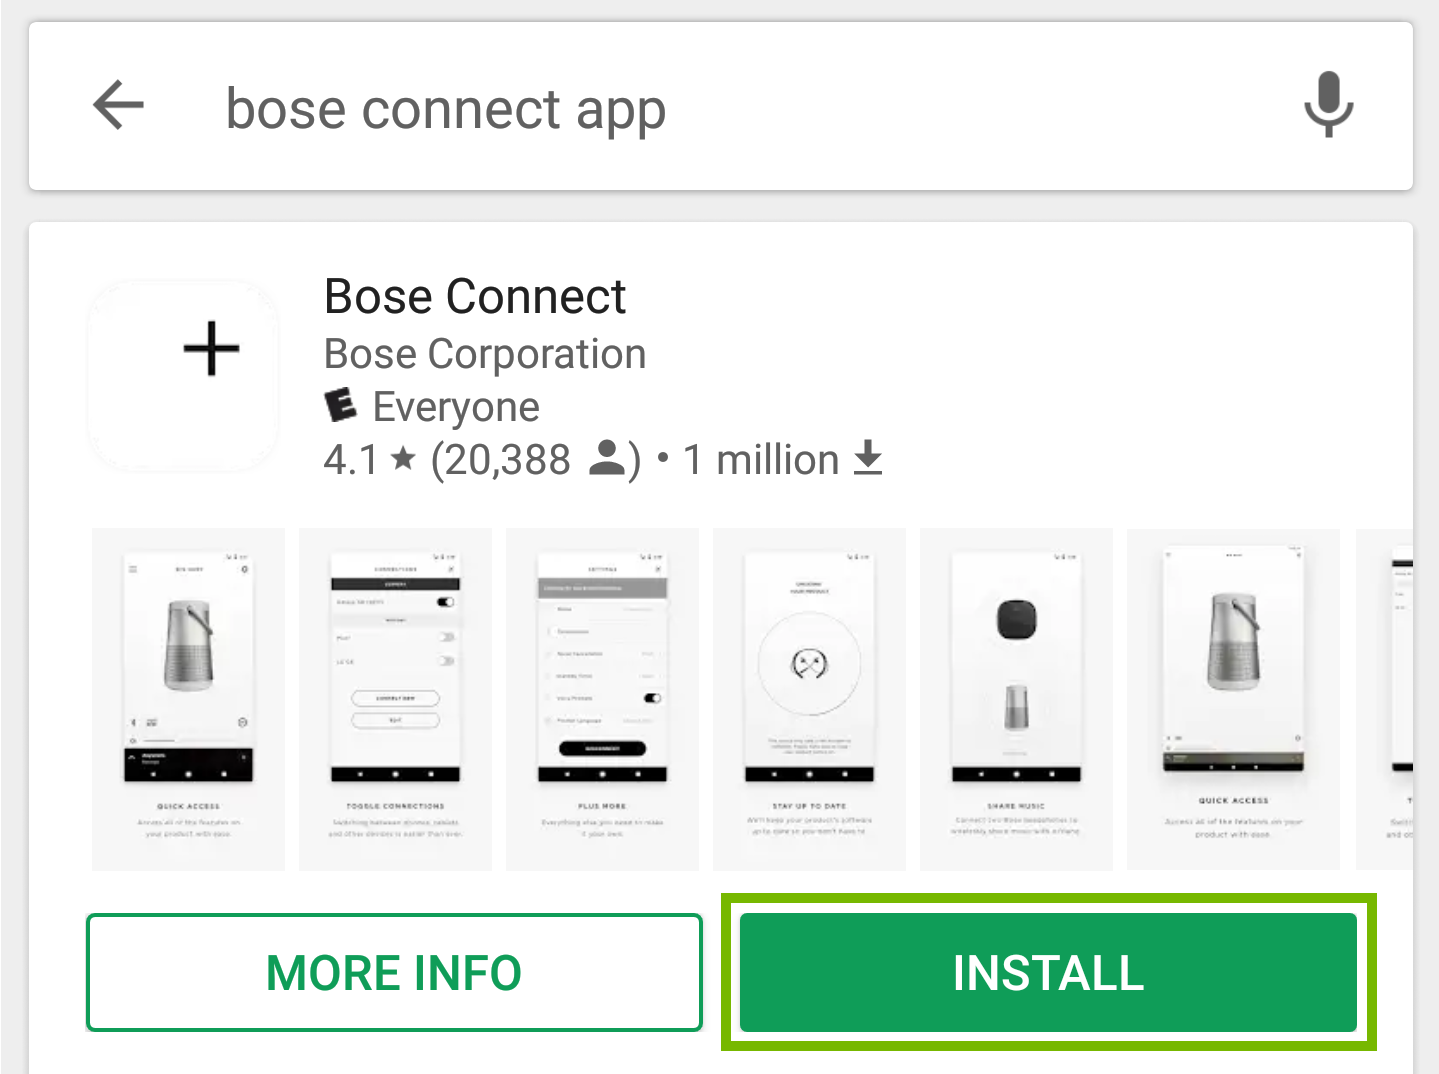
13. Install Android App
Open Play Store.
Type Bose Connect in the search bar and tap Install.
Once installed, tap Open to proceed to the setup.
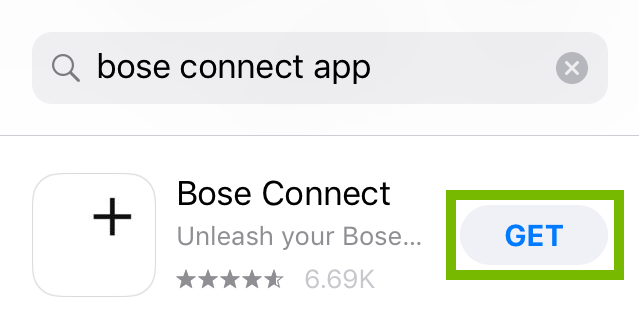
14. Install iOS App
Open the App Store.
Type in "Bose Connect" in the search bar.
Find Bose Connect in the search results and tap on GET.
Tap on Install to start download.
15. Update Firmware
Updating the firmware on your headphones or speaker can help provide a number of enhancements to your listening experience, or help solve problems you may have with your device.
The Bose Connect app takes care of updating the firmware for you.
16. Installed Check
Bose Connect provides a number of additional features to your Bose headphones or speaker.
The Bose Connect app may ask you to perform basic connection steps if your Bose device has not already been paired via Bluetooth with the device you intend to use it with.
17. Setup App
Update firmware:
Launch the Bose Connect app from your home screen.
If you have an available update, you will seen an icon indicating a firmware update. Tap the icon to start the update process.
Once the update is done downloading, it will start updating your headset.
Modify Settings:
Open the Bose Connect app from the home screen.
Tap on the settings cog.
You can now modify settings for your headphones.
18. Android or iOS
The next steps depend on what kind of mobile device you use.
19. Install Android App
Open Play Store.
Type Bose Connect in the search bar and tap Install.
Once installed, tap Open to proceed to the setup.
20. Install iOS App
Open the App Store.
Type in "Bose Connect" in the search bar.
Find Bose Connect in the search results and tap on GET.
Tap on Install to start download.
21. Pair Mode
Slide the Power Switch to the right, and hold it for 2 seconds.
The Bluetooth light will blink.
22. Pair Bluetooth Devices
Some Bluetooth accessories are configured with a PIN or a passkey that is often listed in its manual. Check your Bluetooth accessory manual for the correct PIN or passkey.
Depending on what device (Smartphone or Tablet) and which generation you have, the menu theme and options might look slightly different on your screen. However, the steps should be similar to all Android devices and generations.
Use one of the following connection methods:
Method 1 - The Drop Down Menu
Method 2 - Settings
Drop down menu
Swipe down from the top of the device screen if it's a phone or up from the bottom of the device screen if it's a tablet to access the menu.
Locate the Bluetooth icon.
Press and hold the Bluetooth icon.
Swipe the switch to your right to set the Bluetooth accessory in pairing/discovery mode.
A list of nearby devices and previously paired devices will be shown.
In the list of Available Devices, choose the Bluetooth accessory you wish to pair with.
If you are prompted for a passkey, put it in. If there is no passkey, then your Bluetooth accessory should be paired now.
Android menu settings
Locate and tap the Apps Menu.
Locate and tap the Settings icon.
Select the Bluetooth. You may need to select Connections first.
Swipe the switch to your right to set the Bluetooth accessory in pairing/discovery mode.
A list of nearby devices and previously paired devices will be shown.
In the list of Available Devices, choose the Bluetooth accessory you wish to pair with.
If you are prompted for a passkey, put it in. If there is no passkey, then your Bluetooth accessory should be paired now.
23. Pair Bluetooth Devices
Next to "Bluetooth", slide the switch to the on position.
Place your accessory in discovery mode and wait for it to appear on your iPod.
If you don't see it or aren't sure how to make it discoverable, check the instructions that came with your accessory.
Wait for the bluetooth device's name to appear in the My Devices list.
Tap your accessory name in the list to connect.
You might be asked to enter the PIN or passkey. If you aren't sure what your PIN or passkey is, check the accessory's documentation.
.png)