I Keep Getting Security Warnings While I Browse the Web
Authored by: Support.com Tech Pro Team
1. Introduction: Security Warnings While Browsing the Internet
Security warnings while browsing can be frustrating. In many cases, they are caused by a website that's not configured properly, but there are a few computer and browser settings we can check to ensure the problem isn't happening because of a mistaken setting.
This guide will take you through the basic settings to ensure your computer and your web browser aren't the cause of these security errors. We will check:
Computer date and time
Browser cache and cookies
Browser security settings
In today's digital age, browsing the web has become a daily activity for most of us. However, this routine can be disrupted by frequent security warnings, which are a common occurrence for both PC and Mac users. While these warnings play a crucial role in protecting us from potential threats, they can also be confusing and concerning.
Understanding Security Warnings
What are Security Warnings?
Security warnings are alerts generated by your web browser when it encounters potentially risky or unsecured content. These warnings serve as a precautionary measure to prevent you from visiting websites that might be harmful.
Common Types of Warnings
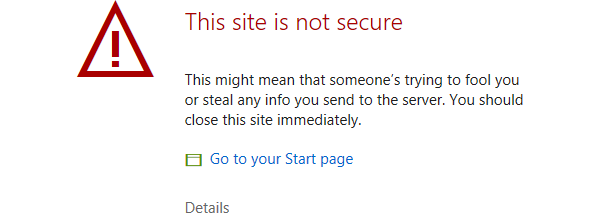
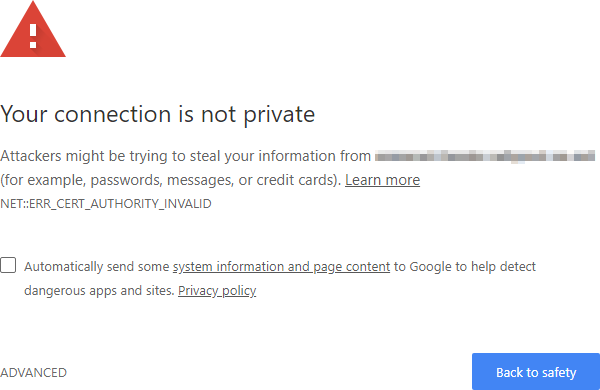
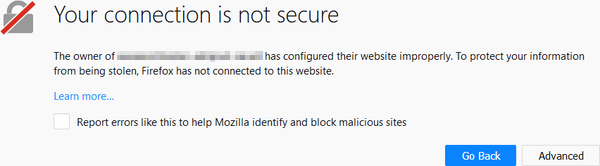
Expired SSL Certificates: A warning about a site’s security certificate not being up-to-date.
Unsecured Sites (HTTP): Alerts indicating you’re about to access a site that isn’t encrypted (HTTP instead of HTTPS).
Suspicious Downloads: Warnings about files that could potentially be malware or harmful software.
Phishing Attempts: Alerts about websites that might be trying to trick you into giving away personal information.
Handling Security Warnings on PC and Mac
For PC Users (Windows Operating System)
1. Check the URL
Carefully check the website's URL. Typos can lead you to malicious sites (a practice known as “typosquattingâ€).
2. Update Your Browser
Ensure your web browser is up-to-date. Browsers like Chrome, Firefox, and Edge regularly update their security features.
3. Use Antivirus Software
Use reliable antivirus software. It can provide an additional layer of protection and scan websites before you access them.
4. Enable Security Features
Most browsers have built-in security features. Make sure these are enabled in your browser’s settings.
For Mac Users (macOS)
1. Use Safari’s Security Features
Safari has several built-in features like Fraudulent Website Warning and cross-site tracking prevention. Ensure these are enabled in Safari’s preferences.
2. Keep macOS Updated
Regular macOS updates often include security patches and enhancements that can minimize security risks while browsing.
3. Be Cautious with Downloads
Only download files from trusted sources. macOS typically warns you when you're about to open a file from the internet.
4. Consider a Third-Party Security Solution
While macOS is known for its robust security, additional security software can offer extra protection, especially when browsing unfamiliar websites.
General Best Practices for Safe Web Browsing
Stay Informed
Be aware of the latest phishing scams and malware threats. Cyber threats are constantly evolving.
Use Secure Connections
Look for “HTTPS†in the URL, especially when performing transactions or entering personal information.
Adjust Privacy Settings
Customize the privacy settings in your browser to control how much data is shared online.
Use a VPN
A Virtual Private Network (VPN) can provide an additional layer of security, especially when using public Wi-Fi networks.
Trust Your Instincts
If a website looks suspicious, it’s better to err on the side of caution and avoid it.
Conclusion
Security warnings while browsing the web can be disruptive, but they play a vital role in safeguarding your online experience. By understanding what these warnings mean and how to respond to them, you can significantly reduce your risk of encountering cyber threats. Whether you are a PC or Mac user, staying vigilant, keeping your software updated, and adhering to safe browsing practices are key to navigating the web securely. Remember, in the realm of cyber security, being proactive is always better than being reactive.
If you are still having problems, please follow the below steps.
2. Computer: OS Choice
To continue, we need to know what Operating System your computer is using.
There are 2 main Operating Systems for personal computers currently available, Microsoft Windows and Apple macOS.
Microsoft WindowsApple macOSMicrosoft Windows runs on computers produced by multiple companies, such as Lenovo, Asus, Dell, Toshiba, Hewlett Packard, Acer, and Sony.Apple is the only company that makes macOS computers.
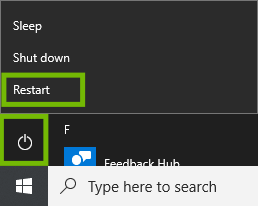
3. Windows 10: Restart Your PC
Before your restart or shut down your PC, make sure to save all necessary work to prevent data loss.
Using the Mouse
Select the Start menu.
By default it is in the lower left corner of your screen.
Select Power, then select Restart.
Using the Keyboard
Press the Windows and X keys at the same time. This minimizes any open windows you may have.
Press the Alt and F4 keys at the same time. This tells Windows to close the desktop.
Select Restart, then OK.
4. Windows: Check Date and Time
Look at the date and time displayed at the far end of your Task Bar.This is usually at the bottom-right corner of your screen.
5. Browser: Test Site
Open your browser, and visit the website you had problems with at the start.
On a Desktop or Laptop, look for one of these icons:
On a Smartphone or Tablet, look for one of these icons:
Make sure the page loads properly, and try following a few of the links from the page.
6. Windows: Browser Choice
To continue we need to know which browser you are using.
The easiest way to determine this is by the icon you double-clicked on to open it.
Internet ExplorerMicrosoft EdgeGoogle ChromeMozilla Firefox
The icons for Internet Explorer and Microsoft Edge are similar, but not the same. Be sure of which one you are choosing by looking at the text beneath it, or the text note that pops up before you click on it.
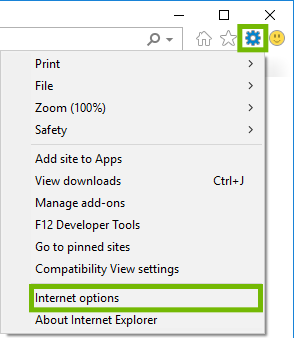
7. Internet Explorer: Clear Cache and History
Open Internet Explorer.
Select the Gear icon in the top-right corner, then select Internet options.
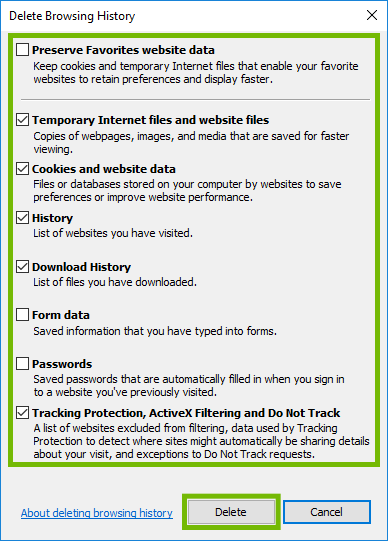
Under Browsing history, select Delete.
Go through the list of options here, to ensure the proper items are cleared. Once you have chosen your options, select Delete.
SettingCheckboxPreserve Favorites website dataUncheckedInternet Explorer segments out pages you have marked as favorites. We need to be sure to clear all data, not just some of it.Temporary Internet files and website filesCheckedThis clears your cache, making your browser get a new copy of the webpage, images, etc. It's important to clear this to get a fresh copy the next time you visit, as the copy your browser has may simply be corrupt.Cookies and website dataCheckedCookies are how websites 'know' you when you visit them multiple times. This file can become corrupt, and simply downloading a new one can fix many problems.
You will have to log back into any pages you use, such as mail or social media.
HistoryCheckedWhile you browse Your browser will keep track of every page you visit, to try to make it easier to return. This can become corrupt due to modern active web pages.Download HistoryPersonal ChoiceThese are a list of files you've downloaded recently. It is entirely safe to delete, or keep this list, as it won't affect pages. Checking this option does not delete the files you've downloaded, just the list the browser keeps.Form DataUncheckedInformation from entering forms online, such as your name, address, or other filled-in information. This does not affect how a page loads, and can slow you down on your most commonly used pages.PasswordsUncheckedYour browser will save your passwords while you browse, making it easier to log into your most common websites later. This does not affect how a page loads, and can slow you down on your most commonly used pages.Tracking Protection, ActiveX filtering and Do Not TrackPersonal ChoiceA number of pages will track your use of those pages, and if you've opted out of such tracking. This setting tends not to be well-respected from page to page, and some pages simply do not give you the option. While it can affect how a page is displayed, it will only do so in the advertising or other 'personalized content' on that page; not the page itself. It is okay to check or uncheck this option.
When complete, a message will open at the bottom of your browser letting you know the history has been deleted.
It can take quite a while to delete the cache and history, please be patient.
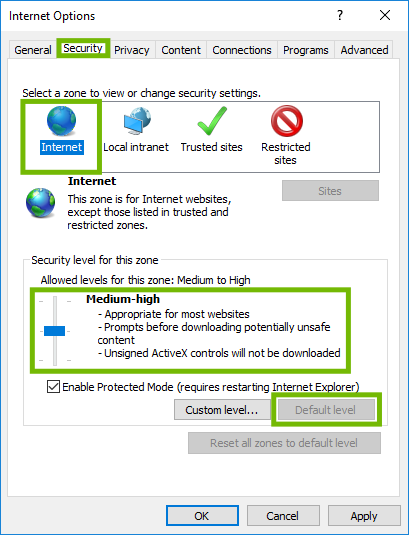
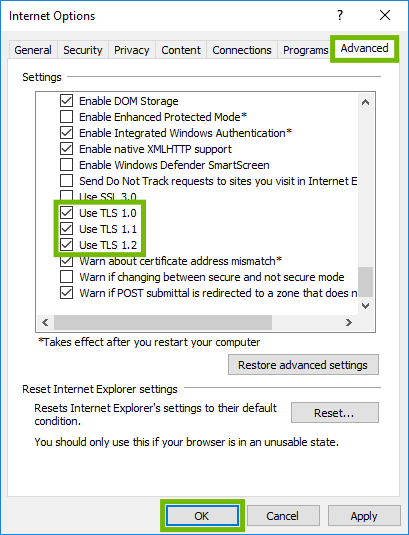
8. Internet Explorer: Security-Related Settings
Checking the security-related settings in Internet Explorer can help resolve these problems.
Open Internet Explorer.
Select the Gear icon in the top-right corner, then select Internet options.
Select the Security tab at the top. Then, make sure Internet is selected for zone, and choose the Default level of Medium-high.
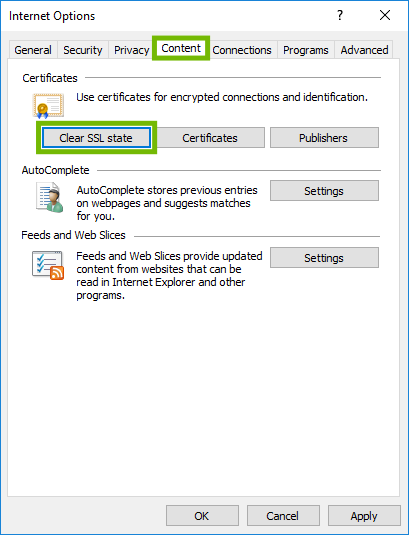
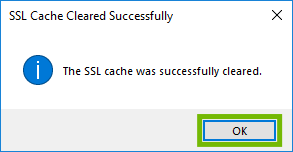
Select the Content tab at the top. Then, select Clear SSL state.
A box will open letting you know the SSL cache was cleared. Select OK.
Select the Advanced tab at the top. Scroll to the bottom of the long list of settings. Make sure Use TLS 1.0, Use TLS 1.1, and Use TLS 1.2 are checked. Then, select OK.
9. Browser: Test Site
Open your browser, and visit the website you had problems with at the start.
On a Desktop or Laptop, look for one of these icons:
On a Smartphone or Tablet, look for one of these icons:
Make sure the page loads properly, and try following a few of the links from the page.
10. Browser: Test Other Browser
The issue you are experiencing may not be due to an internet or website issue. It may actually be an issue with the web browser you are using. Depending on your device and what is currently installed, you may have a backup or alternative web browser available.
Check your device to see if there is a different web browser available.
On a Desktop or Laptop, look for one of these icons:
On a Smartphone or Tablet, look for one of these icons:
If you have access to a different browser, try using it to access the website you've having difficulty reaching.
11. Internet Explorer: Not Compatible
The webpage you are trying to reach is not compatible with Internet Explorer.
Microsoft is discontinuing Internet Explorer. You can try contacting the website developer to make their page compatible with Internet Explorer, but that will be unlikely.
A simpler solution is to use your other browser for access to the page.
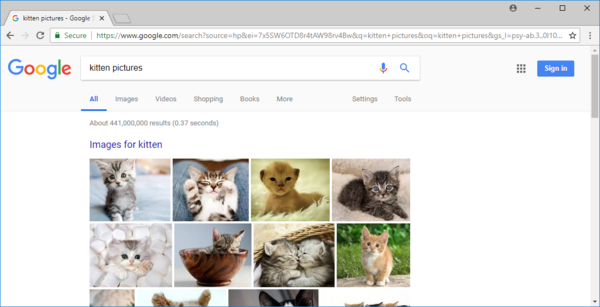
12. Browser: Test: Google
Open your browser.
On a Desktop or Laptop, look for one of these icons:
On a Smartphone or Tablet, look for one of these icons:
In the address bar at the top, type in google.com, then push Enter or Return.
Make sure the Google page comes up. Type in something to search for, and select Google Search.
Make sure your search results come up.
13. What's next?
14. What's next?
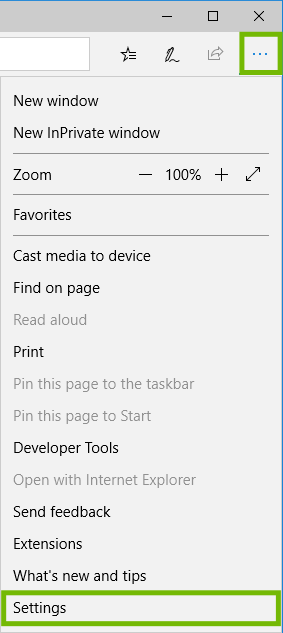
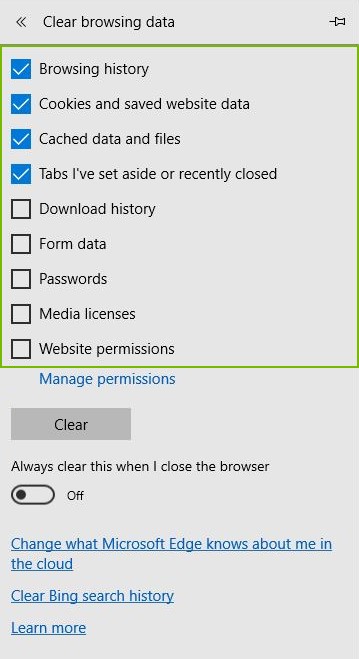
15. Microsoft Edge: Clear Cache and History
Open Microsoft Edge.
Select the Menu in the top-right corner, then select Settings.
Click the Choose what to clear button.
Select the item categories you wish to clear.
SettingCheckboxBrowsing HistoryCheckedWhile you browse Your browser will keep track of every page you visit, to try to make it easier to return. This can become corrupt due to modern active web pages.Cookies and saved website dataCheckedThis clears your cache, making your browser get a new copy of the webpage, images, etc. It's important to clear this to get a fresh copy the next time you visit, as the copy your browser has may simply be corrupt.
You will have to log back into any pages you use, such as mail or social media.
Cached data and filesCheckedThis clears your cache, making your browser get a new copy of the webpage, images, etc. It's important to clear this to get a fresh copy the next time you visit, as the copy your browser has may simply be corrupt.Tabs I've set aside or recently closedCheckedThis clears tabs that you have set aside, as well as tabs that you've recently closed.Download HistoryPersonal ChoiceThese are a list of files you've downloaded recently. It is entirely safe to delete, or keep this list, as it won't affect pages. Checking this option does not delete the files you've downloaded, just the list the browser keeps.Form DataUncheckedInformation from entering forms online, such as your name, address, or other filled-in information. This does not affect how a page loads, and can slow you down on your most commonly used pages.PasswordsUncheckedYour browser will save your passwords while you browse, making it easier to log into your most common websites later. This does not affect how a page loads, and can slow you down on your most commonly used pages.Media LicensesUncheckedClears any saved media licenses. These are typically used for streaming sites that you may have purchased content from.Website PermissionsUncheckedClears any permission granted to web sites. These permissions include permissions to access your audio devices such as your mic,and location services.
Click the Clear button.
16. Browser: Test Site
Open your browser, and visit the website you had problems with at the start.
On a Desktop or Laptop, look for one of these icons:
On a Smartphone or Tablet, look for one of these icons:
Make sure the page loads properly, and try following a few of the links from the page.
17. Browser: Test Other Browser
The issue you are experiencing may not be due to an internet or website issue. It may actually be an issue with the web browser you are using. Depending on your device and what is currently installed, you may have a backup or alternative web browser available.
Check your device to see if there is a different web browser available.
On a Desktop or Laptop, look for one of these icons:
On a Smartphone or Tablet, look for one of these icons:
If you have access to a different browser, try using it to access the website you've having difficulty reaching.
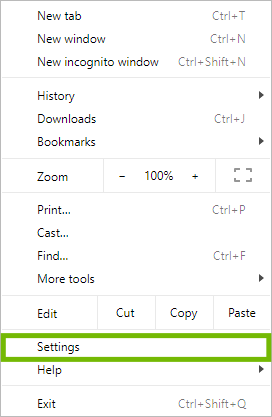
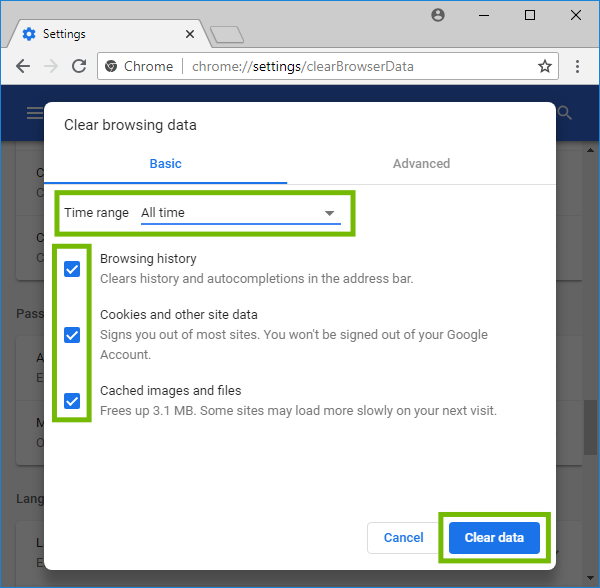
18. Google Chrome: Clear Browser History
Open Google Chrome.
Select the Menu button located in the top right corner of the window.
Select Settings.
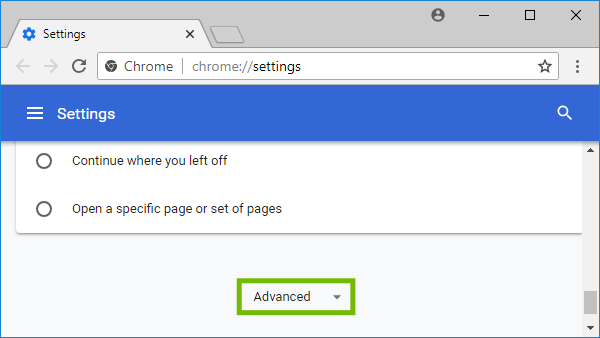
Scroll to the bottom of the page, then select Advanced.
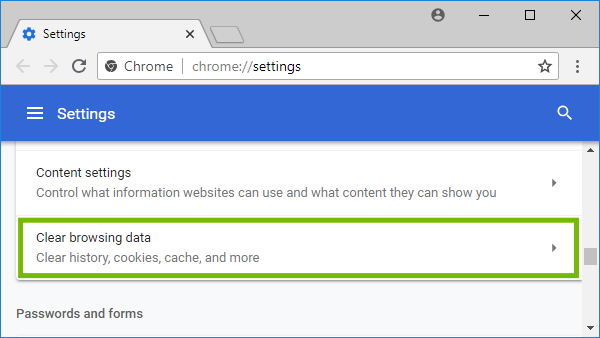
Under Privacy and security, select Clear browsing data.
Remain on the "Basic" tab. For "Time range," select All time. Make sure all three check boxes are checked, then select Clear data.
SettingCheckboxBrowsing HistoryCheckedClears the history and autocompletions in the address bar.Cookies and other site dataChecked
Cookies are how websites 'know' you when you visit them multiple times. This file can become corrupt, and simply downloading a new one can fix many problems.
You will have to log back into any pages you use, such as mail or social media
Cached images and filesCheckedThis clears your cache, making your browser get a new copy of the webpage, images, etc. It's important to clear this to get a fresh copy the next time you visit, as the copy your browser has may simply be corrupt.
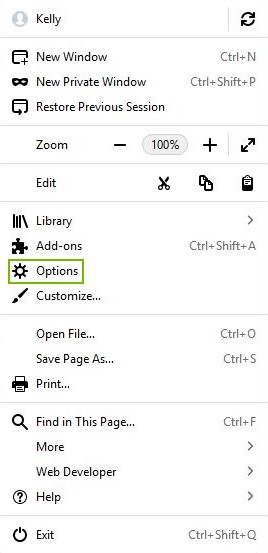
19. Mozilla Firefox: Clear Browser History
Open Mozilla Firefox.
Click the Menu button in the top right of the screen.
Click on Options.
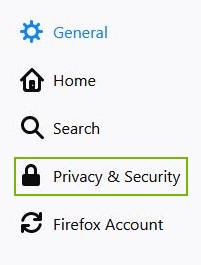
Click on Privacy & Security.
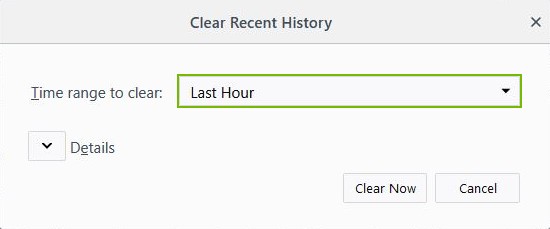
Click the Clear History button located unther the History category.
Select the time range you wish to clear.
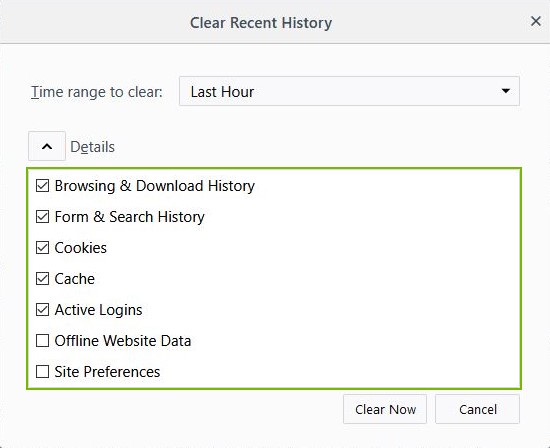
Click the Details button to expand them.
Choose the item categories you wish to clear.
SettingCheckboxBrowsing & Download HistoryChecked
Browsing History - While you browse Your browser will keep track of every page you visit, to try to make it easier to return. This can become corrupt due to modern active web pages.
Download History -
These are a list of files you've downloaded recently. It is entirely safe to delete, or keep this list, as it won't affect pages. Checking this option does not delete the files you've downloaded, just the list the browser keeps.
Form & Search HistoryCheckedInformation from entering forms online, such as your name, address, or other filled-in information. This does not affect how a page loads, and can slow you down on your most commonly used pages.CookiesCheckedCookies are how websites 'know' you when you visit them multiple times. This file can become corrupt, and simply downloading a new one can fix many problems.
You will have to log back into any pages you use, such as mail or social media.
Active LoginsCheckedActive logins are sites that you are currently logged into that you have asked to remember that you are logged into. Clearing them just logs you out of these sites.Offline Website DataUncheckedIf you've allowed it, a website can store files on your computer so that you can continue to use it when you are not connected to the Internet.Site PreferencesUncheckedSite-specific preferences, including the saved zoom level for sites, character encoding, and the permissions for sites.
Click the Clear Now button.
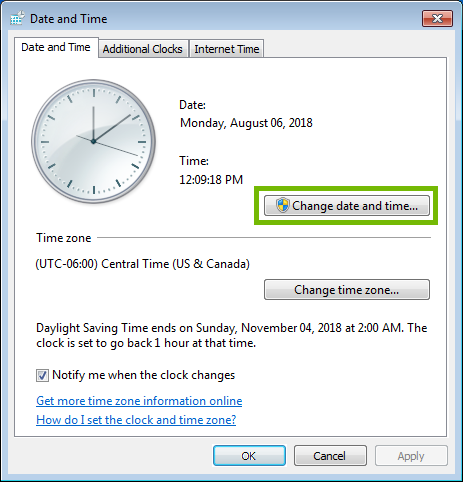
20. Windows: Change Date and Time
If you notice that your Date and Time keeps becoming unsynced, you should speak to your computer manufacturer about replacing your CMOS battery.
Windows 10
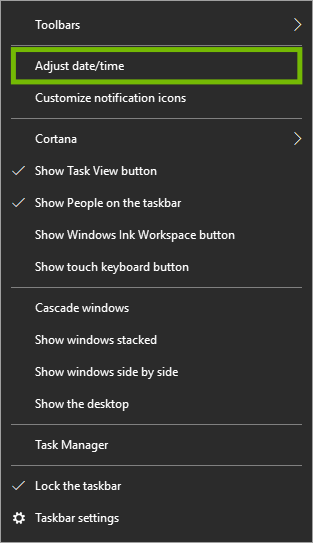
Using your right mouse button, right-click on the date and time on your Task Bar.This is usually at the bottom-right corner of your screen.
Select Adjust date/time.
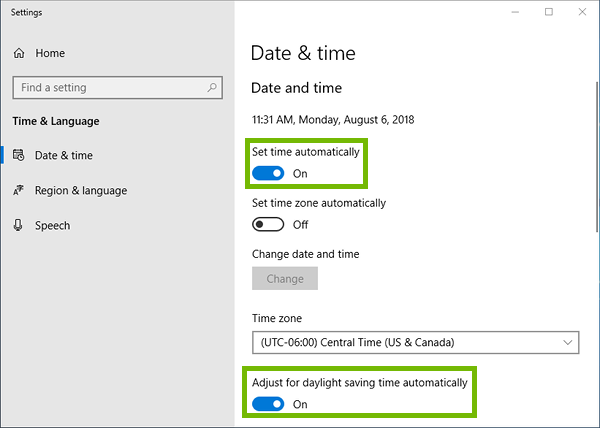
For most, letting Windows manage the date and time, as well as automatically setting it is the best choice.
Make sure Set time automatically and Adjust for daylight saving time automatically are both turned On.
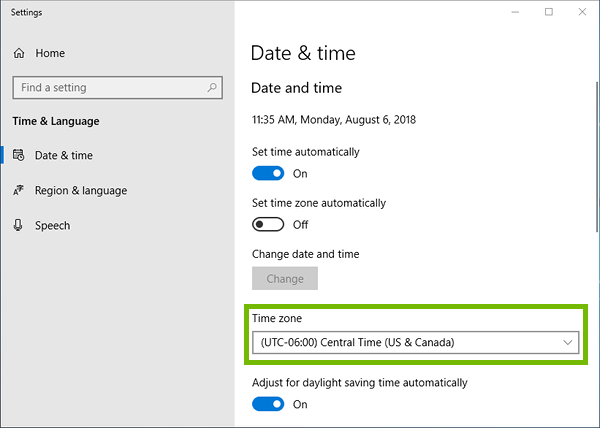
Make sure your time zone is selected for Time zone.
If you want, you can manually set the Date and time.Make certain the date and time is set correctly if you are setting them manually.
Web pages will give security warnings, other secure programs such as work VPNs, banking apps, and most social network apps will not function, as their security is based closely on the time and date of both your computer and the service being the same.
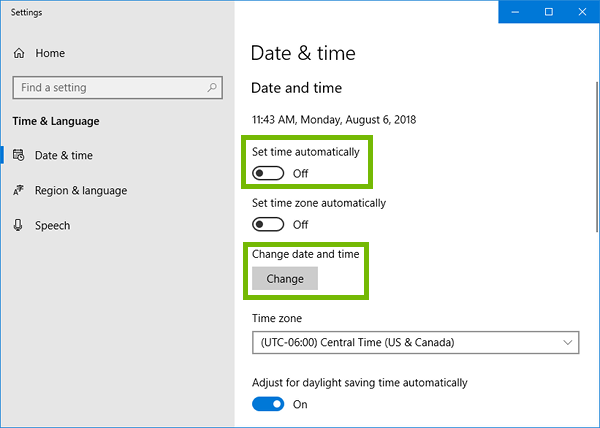
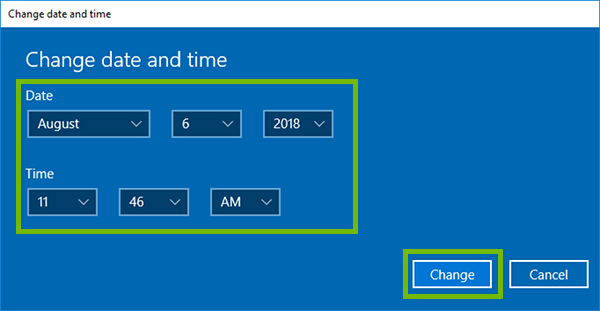
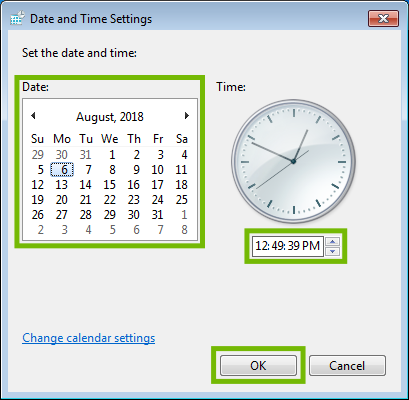
Make sure Set time automatically is set to Off, then select Change for Change date and time.
Set the Date and Time correctly, then select Change.
Other Windows Versions
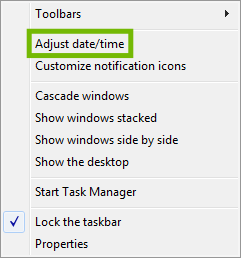
Using your right mouse button, right-click on the date and time on your Task Bar.This is usually at the bottom-right corner of your screen.
Select Adjust date/time.
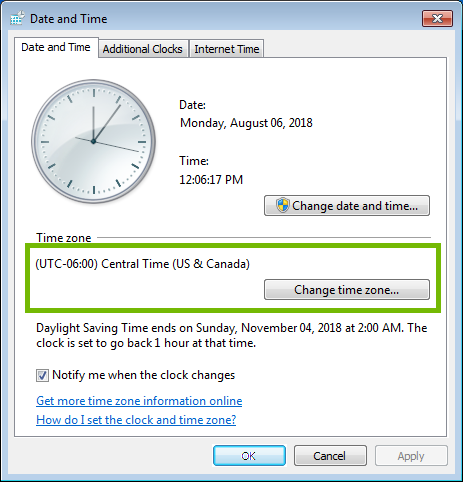
Make sure the proper Time zone is selected.
Select Change date and time.
Correct the Date and Time, then select OK.
You may wish to have Windows set the date and time for you in the future.
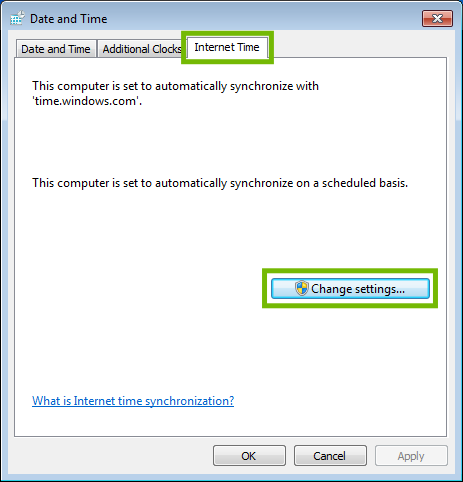
Select the Internet Time tab at the top, then select Change settings.
Make sure Synchronize with an Internet time server is checked, then select OK.
21. macOS: Restart
From the menu bar across the top of the screen, select the Apple menu (1), then select Restart... (2).
Any unsaved work will be lost.
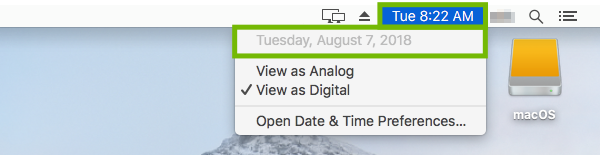
22. macOS: Check Date and Time
Select the time display in the top-right corner of your screen. This will display the date and time set on your computer.
Make sure both the date and time are correct.
23. Browser: Test Site
Open your browser, and visit the website you had problems with at the start.
On a Desktop or Laptop, look for one of these icons:
On a Smartphone or Tablet, look for one of these icons:
Make sure the page loads properly, and try following a few of the links from the page.
24. macOS: Browser Choice
To continue we need to know which browser you are using.
The easiest way to determine this is by the icon you clicked on to open it.
Apple SafariGoogle ChromeMozilla Firefox
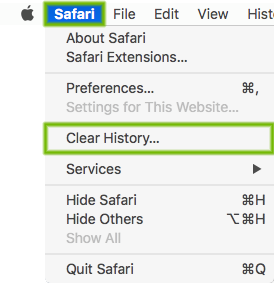
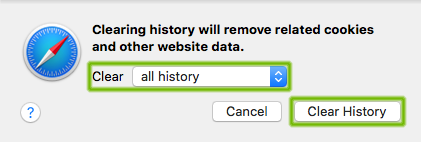
25. macOS: Safari: Clear Browser History
Open Safari.
Select the Safari menu, then select Clear History.
Select Clear all history, then select Clear History.
26. Google Chrome: Clear Browser History
Open Google Chrome.
Select the Menu button located in the top right corner of the window.
Select Settings.
Scroll to the bottom of the page, then select Advanced.
Under Privacy and security, select Clear browsing data.
Remain on the "Basic" tab. For "Time range," select All time. Make sure all three check boxes are checked, then select Clear data.
SettingCheckboxBrowsing HistoryCheckedClears the history and autocompletions in the address bar.Cookies and other site dataChecked
Cookies are how websites 'know' you when you visit them multiple times. This file can become corrupt, and simply downloading a new one can fix many problems.
You will have to log back into any pages you use, such as mail or social media
Cached images and filesCheckedThis clears your cache, making your browser get a new copy of the webpage, images, etc. It's important to clear this to get a fresh copy the next time you visit, as the copy your browser has may simply be corrupt.
27. Mozilla Firefox: Clear Browser History
Open Mozilla Firefox.
Click the Menu button in the top right of the screen.
Click on Options.
Click on Privacy & Security.
Click the Clear History button located unther the History category.
Select the time range you wish to clear.
Click the Details button to expand them.
Choose the item categories you wish to clear.
SettingCheckboxBrowsing & Download HistoryChecked
Browsing History - While you browse Your browser will keep track of every page you visit, to try to make it easier to return. This can become corrupt due to modern active web pages.
Download History -
These are a list of files you've downloaded recently. It is entirely safe to delete, or keep this list, as it won't affect pages. Checking this option does not delete the files you've downloaded, just the list the browser keeps.
Form & Search HistoryCheckedInformation from entering forms online, such as your name, address, or other filled-in information. This does not affect how a page loads, and can slow you down on your most commonly used pages.CookiesCheckedCookies are how websites 'know' you when you visit them multiple times. This file can become corrupt, and simply downloading a new one can fix many problems.
You will have to log back into any pages you use, such as mail or social media.
Active LoginsCheckedActive logins are sites that you are currently logged into that you have asked to remember that you are logged into. Clearing them just logs you out of these sites.Offline Website DataUncheckedIf you've allowed it, a website can store files on your computer so that you can continue to use it when you are not connected to the Internet.Site PreferencesUncheckedSite-specific preferences, including the saved zoom level for sites, character encoding, and the permissions for sites.
Click the Clear Now button.
28. macOS: Change Date and Time
If you notice that your Date and Time keeps becoming unsynced, you should speak to Apple about replacing your CMOS battery.
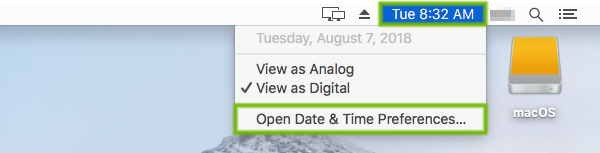
Select the time display in the top-right corner of your screen, then select Open Date & Time Preferences.
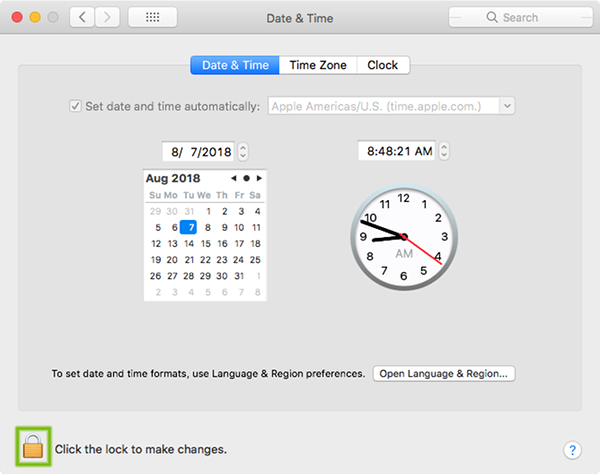
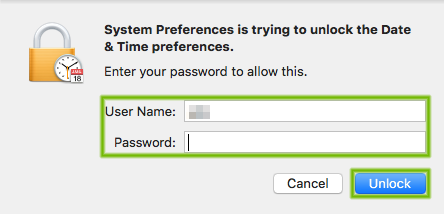
Select the lock in the bottom-left corner to make changes.
Enter your Mac's username and password, then select Unlock.
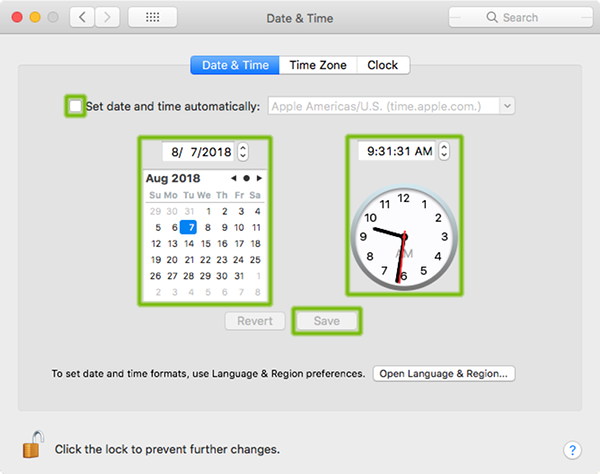
In most cases, letting your Mac take care of setting the time is the best choice.
Make sure there is a check for Set date and time automatically, and make sure a time server close to you is chosen.
If you want, you can set the time manually.
Remove the check for Set date and time automatically, then enter the correct date and time. Then select Save.
Select Time Zone, then select your closest region on the map, and refine it by choosing the city you are in, or the city closest to you, from the list below.
Remove Hidden Spyware In Minutes For Free
Detect and remove spyware, keyloggers, tracking cookies, and other
threats that slow down your PC or steal your data.
65+ Million Downloads
Spyware scanner with AI-powered detection engine + database
.png)