You may have a drive that just won't read a disc, or the drive may no longer show up in the system at all. There are several reasons this may start happening. For instance, there could be a hardware issue or even an issue caused by third party software. Whatever the case, we can help.
This guide will take you through some troubleshooting steps to help resolve the issue.
2. Computer: OS Choice
To continue, we need to know what Operating System your computer is using.
There are 2 main Operating Systems for personal computers currently available, Microsoft Windows and Apple macOS.
Microsoft WindowsApple macOSMicrosoft Windows runs on computers produced by multiple companies, such as Lenovo, Asus, Dell, Toshiba, Hewlett Packard, Acer, and Sony.Apple is the only company that makes macOS computers.
3. Windows 10: Restart
Before your restart or shut down your PC, make sure to save all necessary work to prevent data loss.
Using the Mouse
Select the Start menu.
By default it is in the lower left corner of your screen.
Select Power, then select Restart.
Using the Keyboard
Press the Windows and X keys at the same time. This minimizes any open windows you may have.
Press the Alt and F4 keys at the same time. This tells Windows to close the desktop.
Select Restart, then OK.
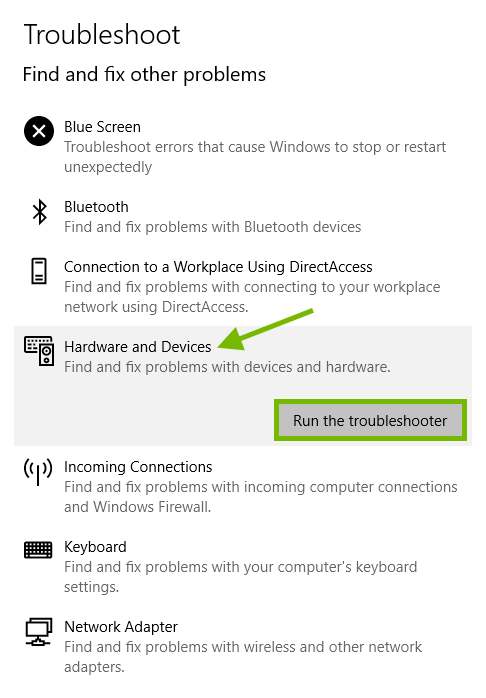
4. Windows 10: Run Troubleshooter
Launch the Device Manager by typing device manager in the search field at the bottom left corner of your screen then clicking the search result with the same name.
Select Hardware and Devices then click on Run the troubleshooter.
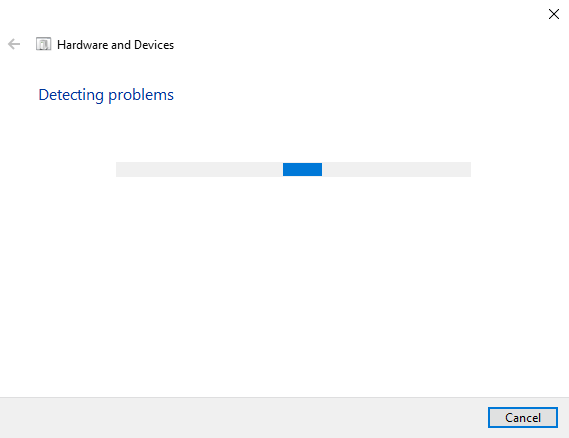
Wait for the troubleshooter to detect problems.
If problems are found, the troubleshooter will offer fix suggestions to pick from. Choose a fix based on the issue your system is having.
Once the troubleshooting has completed, you will be shown what steps were taken or what other further steps can be taken to fix the issue with your system.
5. Windows 10: Uninstall Disc Drive Driver
Launch the Device Manager by typing device manager in the search field at the bottom left corner of your screen then clicking the search result with the same name.
Expand the DVD/CD-ROM drives category.
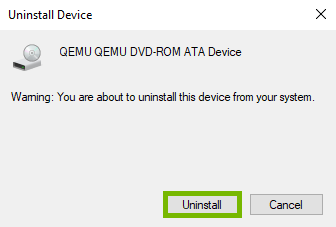
Right click the disc drive you want to remove and select Uninstall device.
Confirm you want to remove the disc drive by choosing Uninstall.
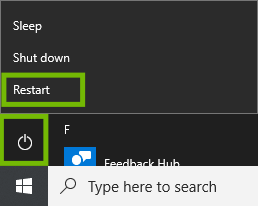
6. Windows 10: Restart
Before your restart or shut down your PC, make sure to save all necessary work to prevent data loss.
Using the Mouse
Select the Start menu.
By default it is in the lower left corner of your screen.
Select Power, then select Restart.
Using the Keyboard
Press the Windows and X keys at the same time. This minimizes any open windows you may have.
Press the Alt and F4 keys at the same time. This tells Windows to close the desktop.
Select Restart, then OK.
7. Windows 10: Registry: Delete Upper and Lower Filters
Use caution when performing this procedure as incorrect Windows Registry modifications may cause serious problems with your system. You may skip this process if you don't feel comfortable.
Launch the Registry Editor by typing "regedit" in the search field at the bottom left corner of your screen, then clicking the search result with the same name.
If you get a prompt asking you if you want to allow the app to make changes to your device, choose Yes.
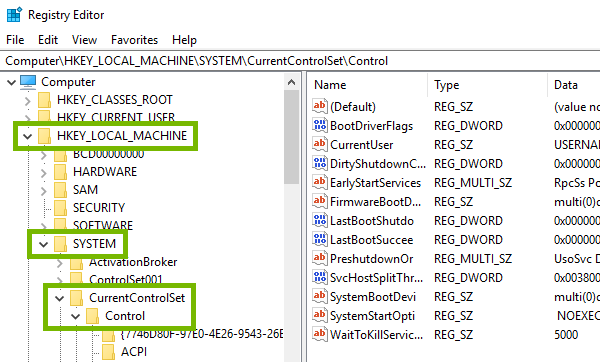
Within the Registry Editor, expand the HKEY_LOCAL_MACHINE key and the following subkeys SYSTEM > CurrentControlSet > Control.
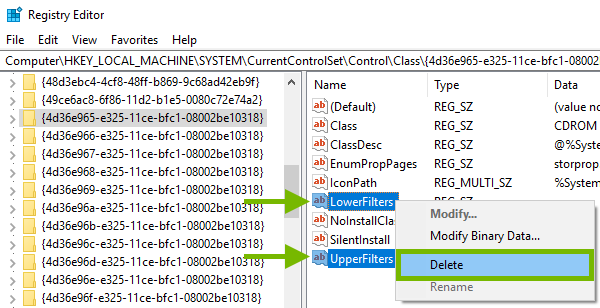
Scroll down and locate the Class subkey. Right click it and select Find.
Type in the following {4d36e965-e325-11ce-bfc1-08002be10318} and click Find Next.
Confirm the name of the found subkey is the same with what was provided above and doesn't have any extra characters.
In the right pane, look for the LowerFilters and UpperFilters values. You may find one of them, both or neither. If they aren't there, you can skip to the end. If you find any of the values, right click each of them and select Delete.
Confirm you want to delete each of the values by choosing Yes.
8. Windows 10: Restart
Before your restart or shut down your PC, make sure to save all necessary work to prevent data loss.
Using the Mouse
Select the Start menu.
By default it is in the lower left corner of your screen.
Select Power, then select Restart.
Using the Keyboard
Press the Windows and X keys at the same time. This minimizes any open windows you may have.
Press the Alt and F4 keys at the same time. This tells Windows to close the desktop.
Select Restart, then OK.
9. Windows 10: System Restore
Turning the system off while System Restore is running can cause corruption. If your device is battery-operated, connect it to a power outlet first as System Restore may take time and should not be interrupted.
System restore will remove any programs installed and settings made after the selected date.
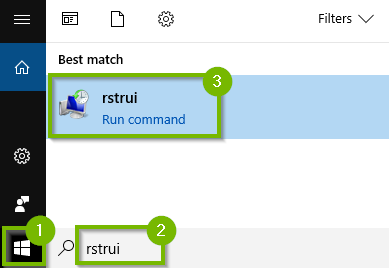
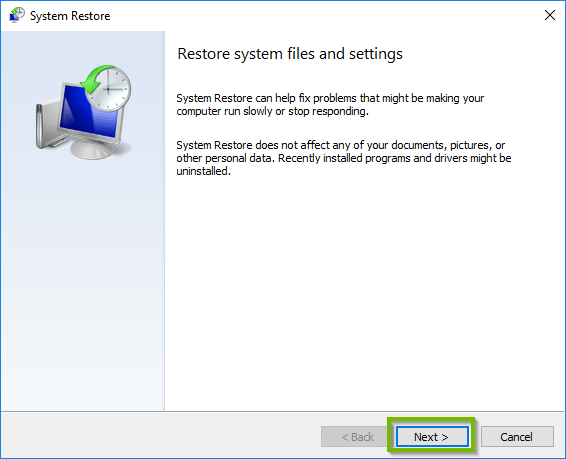
Open the Start Menu, type "rstrui" in the search box and then click rstrui.
System Restore will open. Click Next.
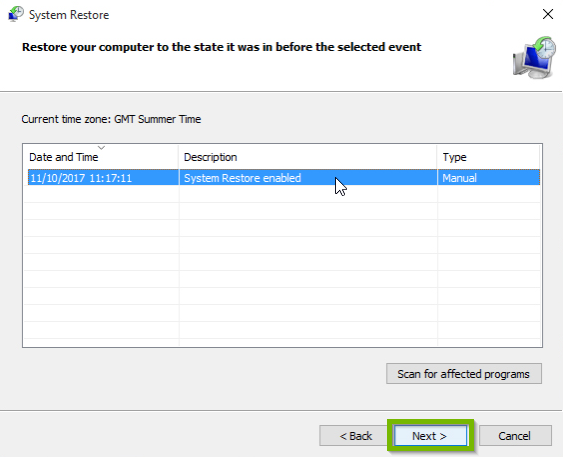
Select a date before the issue started, you may see more than 1 restore point. Click Next afterwards.
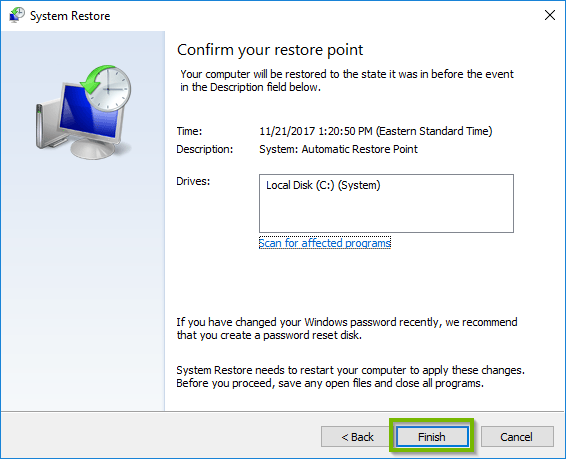
Confirm your restore point by clicking Finish. Click Back if you wish to change the restore point.
The process will take some time to finish. The system will also reboot shortly.
10. What's next?
11. macOS: Restart
From the menu bar across the top of the screen, select the Apple menu (1), then select Restart... (2).
Any unsaved work will be lost.
12. What's next?
13. Additional Information
To better assist you, please answer this question.
14. Disc Drive: Requirements
For an optical disc to be read properly:
Make sure the disc drive is capable of reading the disc type you are inserting (CD, DVD, Blu-ray Disc).
Make sure your device containing the disc drive is placed on a stable flat surface in the position it's intended to be used in.
Make sure you are inserting the disc correctly in the drive. Most optical disc drives can only read discs placed in a horizontal position with the label facing upward, whereas others can read discs in a vertical position as well.
Check your devices documentation if you're unsure what types of discs it can read, how to position your device or how to place the disc into the drive.
15. Check Disc
Hold the disc by the edges without touching the top or bottom surfaces.
Inspect the disc for dirt, scratches or visible defects.
If the disc is dirty, use a soft, clean, slightly damp cloth to clean it by lightly wiping from the center of the disc outward.
Use water only. Do not use solvents to clean the disc.
If the disc still can't be recognized or played, try it in another unit of the same type or try another disc of the same type in the unit.
16. Additional Information
To better assist you, please answer this question.
17. Disc Contents
Optical discs can store a variety of content types, such as miscellaneous documents, photos, movies, music or software. All this content can either be universally accessed with any type of device or software, or it can be specific to only a device type, such as a computer (PC or Mac), gaming console, disc player, etc. In the case of computers, using the right software is also very important. Certain software can be ran only on specific operating systems, such as Windows or macOS, and certain content can only be read with specific software, such as a document processor, image editor, media player, etc.
The packaging of commercially sold optical discs may provide general usage information and details regarding the requirements needed to access their content.
18. What's next?
19. What's next?
20. What's next?
21. Computer: OS Choice
To continue, we need to know what Operating System your computer is using.
There are 2 main Operating Systems for personal computers currently available, Microsoft Windows and Apple macOS.
Microsoft WindowsApple macOSMicrosoft Windows runs on computers produced by multiple companies, such as Lenovo, Asus, Dell, Toshiba, Hewlett Packard, Acer, and Sony.Apple is the only company that makes macOS computers.
22. Windows 10: Toggle AutoPlay
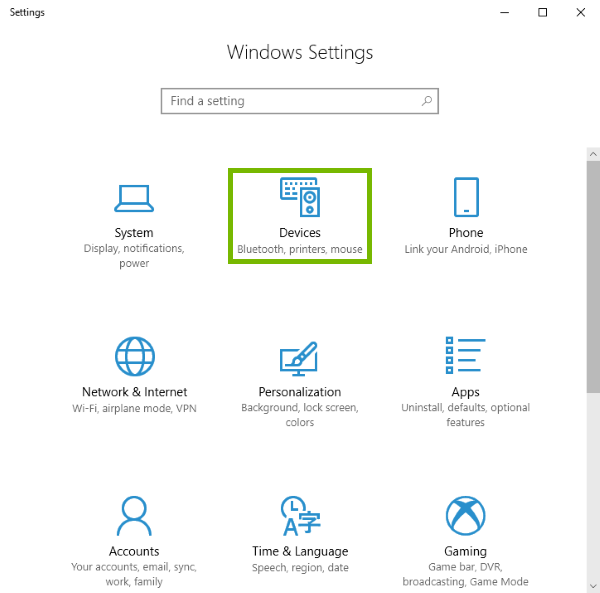
Click on Start and go to Settings.
Then go to Devices.
Select AutoPlay from the left menu. For removable media such as CDs/DVDs, USB drives or SD cards contents to pop-up on screen when inserted into the computer, make sure the AutoPlay feature is turned On. Otherwise turn it Off.
23. Windows 10: Restart
Before your restart or shut down your PC, make sure to save all necessary work to prevent data loss.
Using the Mouse
Select the Start menu.
By default it is in the lower left corner of your screen.
Select Power, then select Restart.
Using the Keyboard
Press the Windows and X keys at the same time. This minimizes any open windows you may have.
Press the Alt and F4 keys at the same time. This tells Windows to close the desktop.
Select Restart, then OK.
24. What's next?
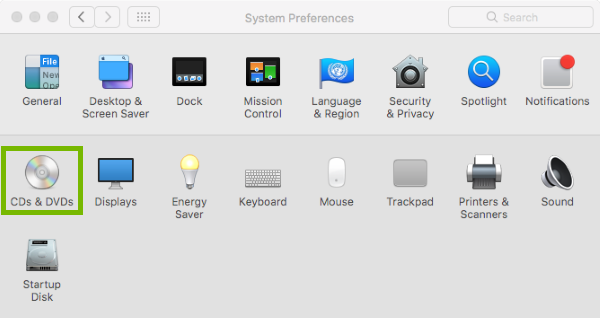
25. macOS: Toggle AutoPlay
Go to the Apple menu and select System Preferences.
Then select CDs & DVDs.
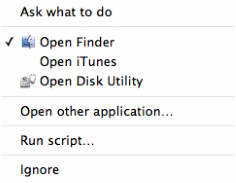
You will be able to choose what happens automatically for each type of disc that is inserted into the computer.
If you want to turn the feature off, select Ignore. Otherwise, select any other option that fits your preference. If unsure, select Ask what to do.
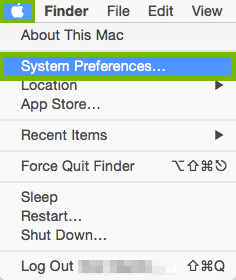
26. macOS: Restart
From the menu bar across the top of the screen, select the Apple menu (1), then select Restart... (2).
.png)