It can be an awful feeling to press the power button on your computer and for it to not turn on. If you don't hear any beeps or a startup chime, you don't hear any fan or drive noise, you don't see any indicator lights turn on and the screen is blank, then your computer may not be getting power. Do not panic! This guide will provide some basic troubleshooting steps that may get your computer up and running in no time.
When your computer won't turn on, it can be a source of significant stress, especially if you rely on it for work or personal use. Both Mac and PC users can encounter this issue, and it can stem from a variety of causes ranging from simple power issues to more complex hardware failures. In this guid, we will explore various troubleshooting steps for both Mac and PC users to help diagnose and fix the problem.
For Mac Users
1. Check the Power Source
Ensure Connection: Make sure your Mac is properly plugged into a working power outlet.
Battery Check: For MacBooks, check if the battery is charged. Sometimes, the battery might be completely drained.
2. Try a Power Cycle
For MacBooks: Hold down the power button for 10 seconds, release, then press it again to see if it turns on.
For Desktop Macs: Unplug the power cord, wait 15 seconds, plug it back in, and then press the power button.
3. Reset the System Management Controller (SMC)
The SMC controls various power functions. Resetting it can solve the issue. The process varies depending on the Mac model, so refer to Apple’s official guide for your specific model.
4. Reset NVRAM or PRAM
These memory areas store certain settings and can be reset to fix power issues. Turn on your Mac and immediately press Option, Command, P, and R for about 20 seconds.
5. Check for Signs of Life
Listen for fan noise, disk spinning, or other sounds when you attempt to turn on your Mac.
Look for any lights that turn on, such as the Caps Lock key on a MacBook.
For PC Users
1. Inspect the Power Supply
Power Connection: Ensure your PC and monitor are connected to a working power outlet.
Power Supply Unit (PSU) Check: For desktops, a faulty PSU could be the culprit. Listen for the fan inside the PSU. If it’s silent, the PSU might need replacing.
2. Perform a Power Cycle
For Desktops: Turn off the power supply switch, unplug the power cord, hold the power button for 30 seconds, plug it back in, and try turning it on.
For Laptops: Remove the battery if possible, then hold down the power button for 30 seconds, reinsert the battery, and try to power up.
3. Check External Devices
Disconnect all external devices (USB drives, printers, etc.). A faulty external device can sometimes prevent a PC from booting.
4. Listen for Beep Codes
If your PC beeps when you turn it on, these beep codes can indicate specific hardware problems.
5. Check the Monitor
Make sure your monitor is turned on and properly connected to your PC. Sometimes the computer is running, but the monitor isn’t displaying anything.
6. Inspect Internal Components
If comfortable, open the PC case and check for loose components, especially the RAM, graphics card, and power cables.
7. Try Booting in Safe Mode
If you can reach the startup screen, try booting in Safe Mode. This can help if the issue is software-related.
Preventive Measures
Regularly update your operating system and drivers.
Keep your computer clean and dust-free.
Use surge protectors to protect against power surges.
Regularly back up your data to avoid loss in case of hardware failure.
Conclusion
A computer that won’t turn on can be caused by various issues, ranging from simple power problems to more serious hardware failures. The key is to start with basic troubleshooting – checking power sources, performing power cycles, and ensuring no external devices are causing a conflict. If these steps don’t resolve the issue, it may be a more serious hardware problem, and professional help is recommended. Regular maintenance and taking preventive measures can help minimize the chances of such problems in the future.
Contact Support.Com
If you are still having trouble, refer to the Step-By-Step Guide below, or Contact Support.Com for Personalized Assistance.
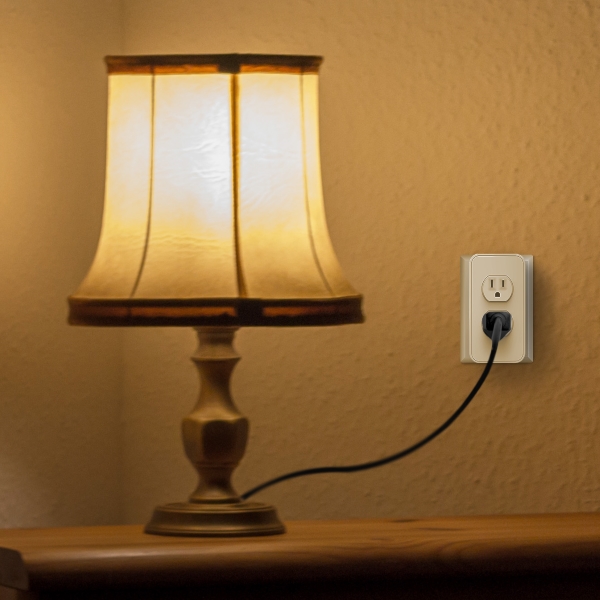
2. Check Power
Make sure you are using a working power outlet. You can test another electric device, such as a lamp, with the same power outlet. Bypass any power strips for troubleshooting purposes.
Once you made sure the power outlet is working, firmly plug in your device into the working outlet.
If the device has buttons or a remote control, press the power button to turn the device on.
3. Additional Information
To better assist you, please answer this question.
4. PC: Laptop: Check Power
A laptop PC has an external power supply and connects like below:
One connector (1) plugs into the computer
The other connector (2) plugs into a power socket
And sometimes, a third (3) connector plugs into the supply itself
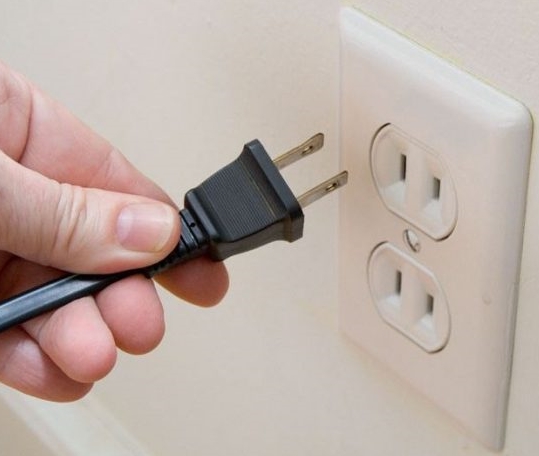
Examine all cables and connectors for visible damage. If they are damaged, they may need to be replaced.
Make sure all connectors are firmly plugged in.
5. PC: Discharge Capacitors
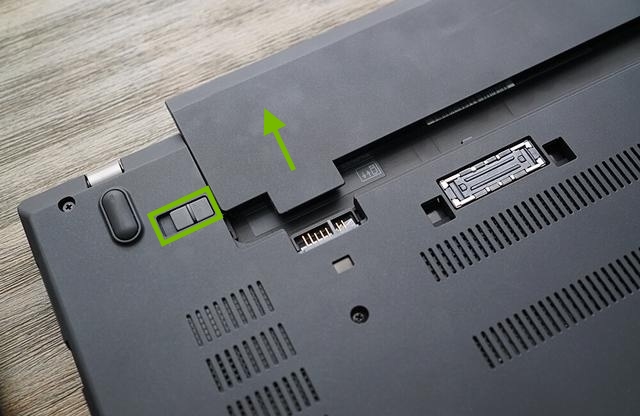
If you have a desktop computer, unplug the tower from the power outlet. If it is a laptop computer, unplug its charger.
If you have a laptop with a removable battery, remove the battery as well. Flip the lock switch then pull the battery out. Certain laptops may have a second lock switch that needs to be held while removing the battery.
Press and hold the power button for 10 seconds then release it.
If you removed the battery from a laptop, you can insert it back in it's place and lock it in.
Plug the computer back into the power outlet and press the power button to turn it on.
6. What's next?
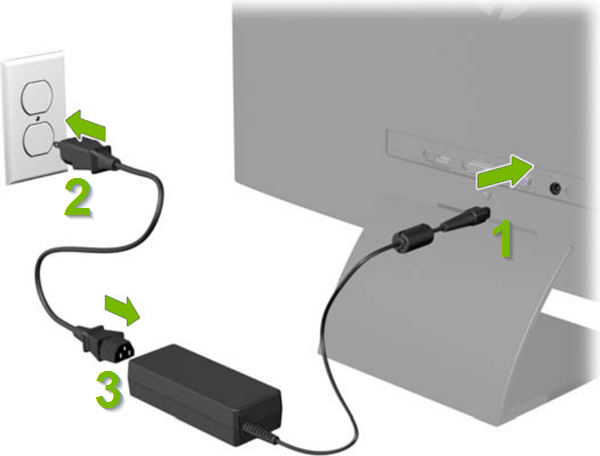
7. PC: AIO Desktop: Check Power
An All-In-One desktop PC has an external power supply just like a laptop PC has:
One connector (1) plugs into the computer
The other connector (2) plugs into a power socket
And sometimes, a third (3) connector plugs into the supply itself
Examine all cables and connectors for visible damage. If they are damaged, they may need to be replaced.
Make sure all connectors are firmly plugged in.
8. PC: Desktop: Check Power
This type of desktop PC has an internal power supply included in the PC case.
The power cable looks like below. Examine the cable and connectors for visible damage. If you find any damage, the cable may need to be replaced.
Make sure one end of the cable is firmly plugged into a wall outlet.
Make sure the other end is firmly plugged into the power socket on the rear side of the PC case.
Some power supplies have an I/O switch. Ensure this is set to the on position. If the I (1) is pressed in, it means the power supply is turned on. If the O (2) is pressed in, the power supply is turned off.
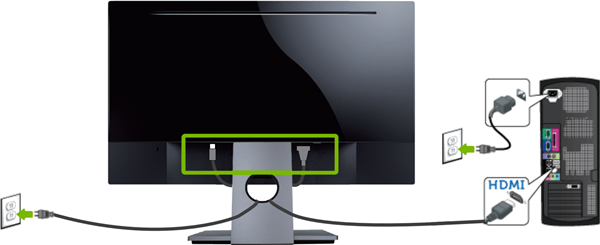
9. Monitor: Check Connections
Examine all cables and connectors for visible damage. If they are damaged, they may need to be replaced.
Make sure one end of the power cable is firmly connected to the back panel of the monitor and the other end into a power socket.
Make sure one end of the video cable is firmly connected to the back panel of the monitor and the other end into video source device, such as a computer, gaming console, media player, etc.
If the monitor has an external power supply, make sure all connectors are firmly plugged in:
One connector (1) plugs into the monitor
The other connector (2) plugs into a power socket
And sometimes, a third (3) connector plugs into the supply itself
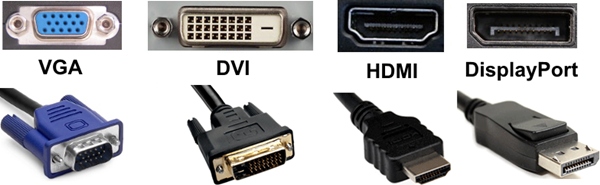
Monitors can be connected to video source devices through a variety of connection types. The most common ones are shown below:
Make sure the monitor is powered on and set to the video input source matching the connection type. This varies greatly by brand and model. If you're unsure how to do this please refer to the monitors documentation.
10. Additional Information
To better assist you, please answer this question.
11. Mac: MacBook: Check Power
There are two ways to power up a MacBook:
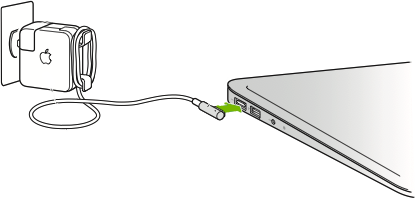
Using the power supply without the extension cord:
Examine the cable and connectors for visible damage. If they are damaged, they may need to be replaced.
Make sure the power supply is firmly plugged into the power socket and power connector into the computer.
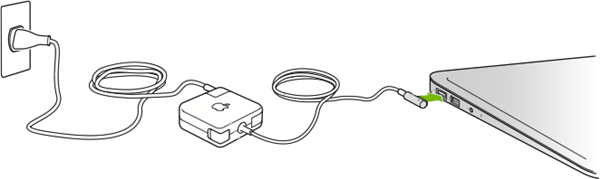
Using the power supply with the extension cord:
Examine all cables and connectors for visible damage. If they are damaged, they may need to be replaced.
Make sure the power supply is firmly plugged into the power socket, the extension cord into the power supply and power connector into the computer.
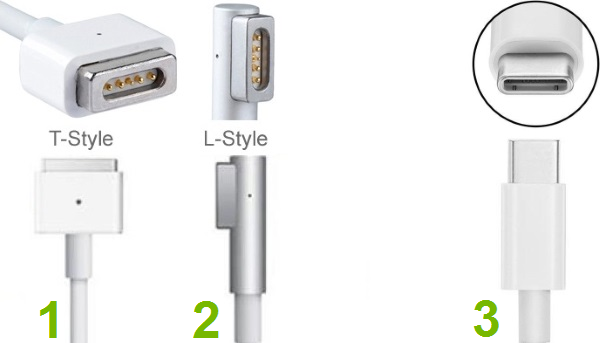
The power adapter shapes and way of connecting them have stayed the same over the years, however the connector types that plug into the computer have changed somewhat and can be of the following types:
Magnetic T style
Magnetic L style
USB-C style
12. Mac: Discharge Capacitors
Unplug the computer from the power outlet.
Press and hold the power button for 10 seconds then release it.
Plug the computer back into the power outlet and press the power button to turn it on.
13. What's next?
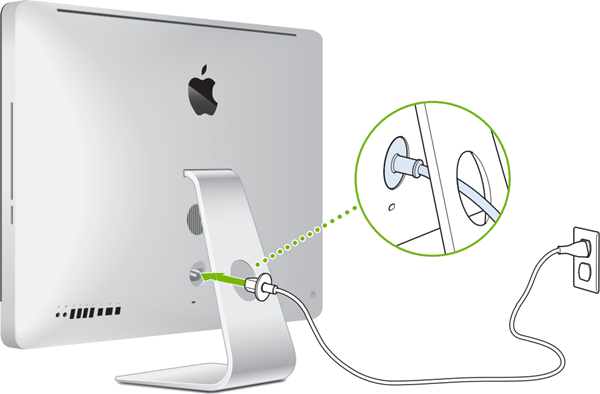
14. Mac: iMac: Check Power
An iMac is powered up by plugging it in directly into a power socket.
Examine the cable and connectors for visible damage. If they are damaged, they may need to be replaced.
Make sure one end is firmly plugged into the back panel of the iMac and the other end into a power socket.
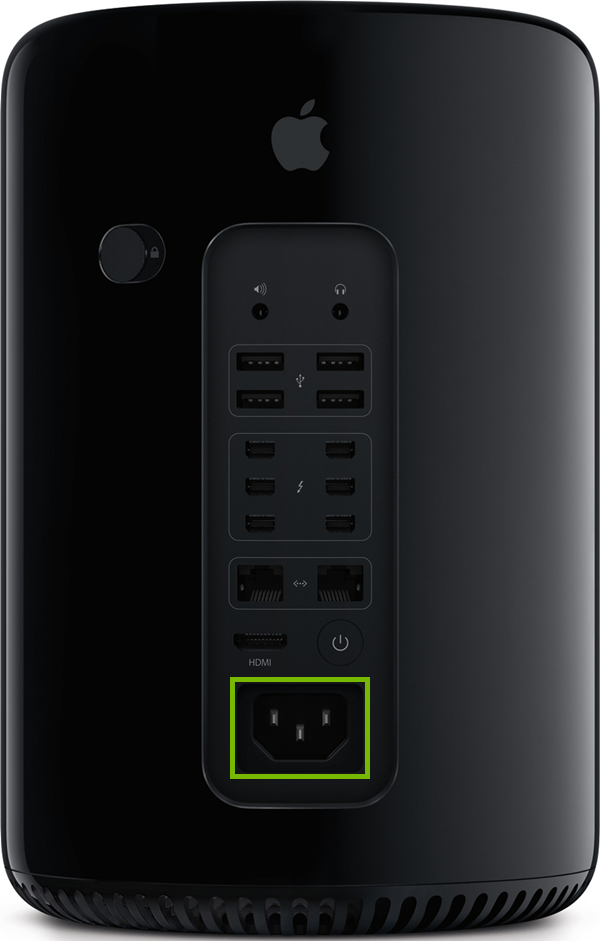
15. Mac: Pro: Check Power
A Mac Pro has an internal power supply included in the case.
The power cable looks like below. Examine the cable and connectors for visible damage. If you find any damage, the cable may need to be replaced.
Make sure one end of the cable is firmly plugged into a wall outlet.
Make sure the other end is firmly plugged into the power socket on the rear side of the case.
16. Monitor: Check Connections
Examine all cables and connectors for visible damage. If they are damaged, they may need to be replaced.
Make sure one end of the power cable is firmly connected to the back panel of the monitor and the other end into a power socket.
Make sure one end of the video cable is firmly connected to the back panel of the monitor and the other end into video source device, such as a computer, gaming console, media player, etc.
If the monitor has an external power supply, make sure all connectors are firmly plugged in:
One connector (1) plugs into the monitor
The other connector (2) plugs into a power socket
And sometimes, a third (3) connector plugs into the supply itself
Monitors can be connected to video source devices through a variety of connection types. The most common ones are shown below:
Make sure the monitor is powered on and set to the video input source matching the connection type. This varies greatly by brand and model. If you're unsure how to do this please refer to the monitors documentation.
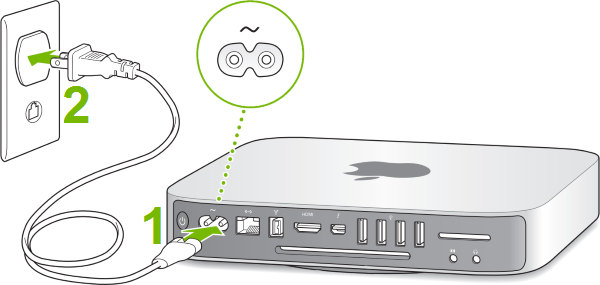
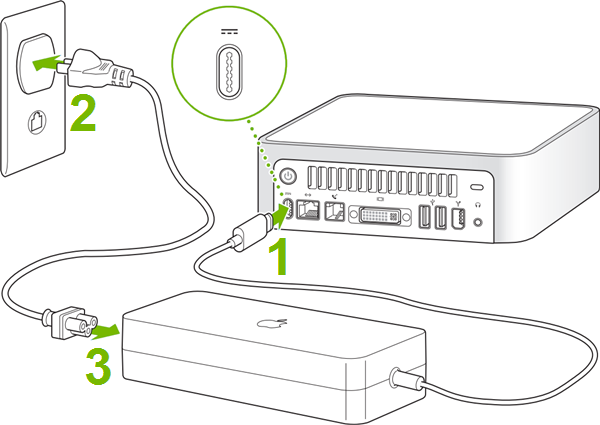
17. Mac: Mini: Check Power
Mac Mini with internal power supply
Some Mac Mini computers have an internal power supply:
One connector (1) plugs into the computer
The other connector (2) plugs into a power socket
Examine all cables and connectors for visible damage. If they are damaged, they may need to be replaced.
Make sure all connectors are firmly plugged in.
Mac Mini with external power supply
Other Mac Mini computers have an external power supply and plugs in like below:
One connector (1) plugs into the computer
The other connector (2) plugs into a power socket
A third (3) connector plugs into the supply itself
Examine all cables and connectors for visible damage. If they are damaged, they may need to be replaced.
.png)