1. Introduction: Google Home Companion App Troubleshooting
Google Home has a range of devices under it. This guide will assist with troubleshooting issues that may arise when using Google Home.
Google Home Speakers:
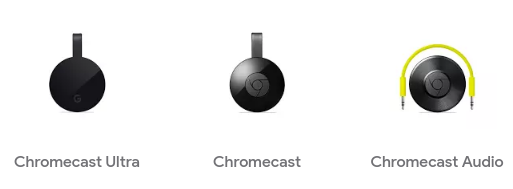
Google Chromecast:
2. Google Home: Power
Tap the top of the device, and make sure you see the 4 dots light up. If they don't, make sure the power cable is connected to the back of the speaker, and to the power outlet.
3. Google Home: Installed Check
Launch the Google Home app.
If you do not see it, it may not be installed.
4. Mobile: Connected to Wireless
Before continuing, we need to ensure that your mobile device is connected to the internet.
5. Google Home: Ensure Device Is Listed
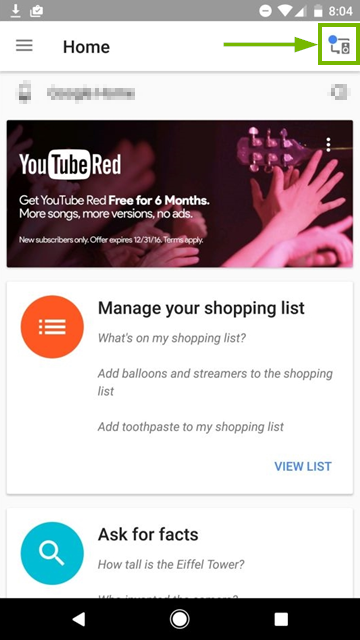
In the Google Home app, tap the Menu button in the upper-corner, and choose Devices.
6. Google Home: Test Connection to Home Device
Connect your Android or iOS device to the same Wi-Fi network as Google Home.
Open the Google Home app
.
In the top left corner of the Home screen, tap Menu
Tap Cast Screen / audio.
Tap Cast Screen / audio again on the next screen.
In the list, select the device you wish to cast to.
You will hear a tone played on the speaker when it connects and a Disconnect button will appear.
Start playing audio content on your phone or tablet.
If you heard the tone or can cast, the app is now working properly. You can disconnect here and start using it as you normally would.
7. Google Home: Reboot
Unplug the power cord from your Google Home device.
Leave it unplugged for ~1 minute.
Plug the power cord back in.
8. Google Home: Factory Data Reset
This action will clear your data from the device and can't be undone. You'll have to set up Google Home and re-link any previously linked home control smart devices (thermostats, plugs and switches, lights) again.
Google Home
Press and hold the microphone mute button on the back of Google Home for about 15 seconds. You'll hear your Google Assistant confirm that it's resetting Google Home.
Google Home Mini
Press and hold the FDR button located below the power cord on the bottom of Mini for about 15 seconds. Look for a circle etched into the base. You'll hear your Google Assistant confirm that it's resetting Mini.
Google Home Max
Press and hold the FDR button located near the power cord on the back of Max for about 12 seconds. You'll hear your Google Assistant confirm that it's resetting Max.
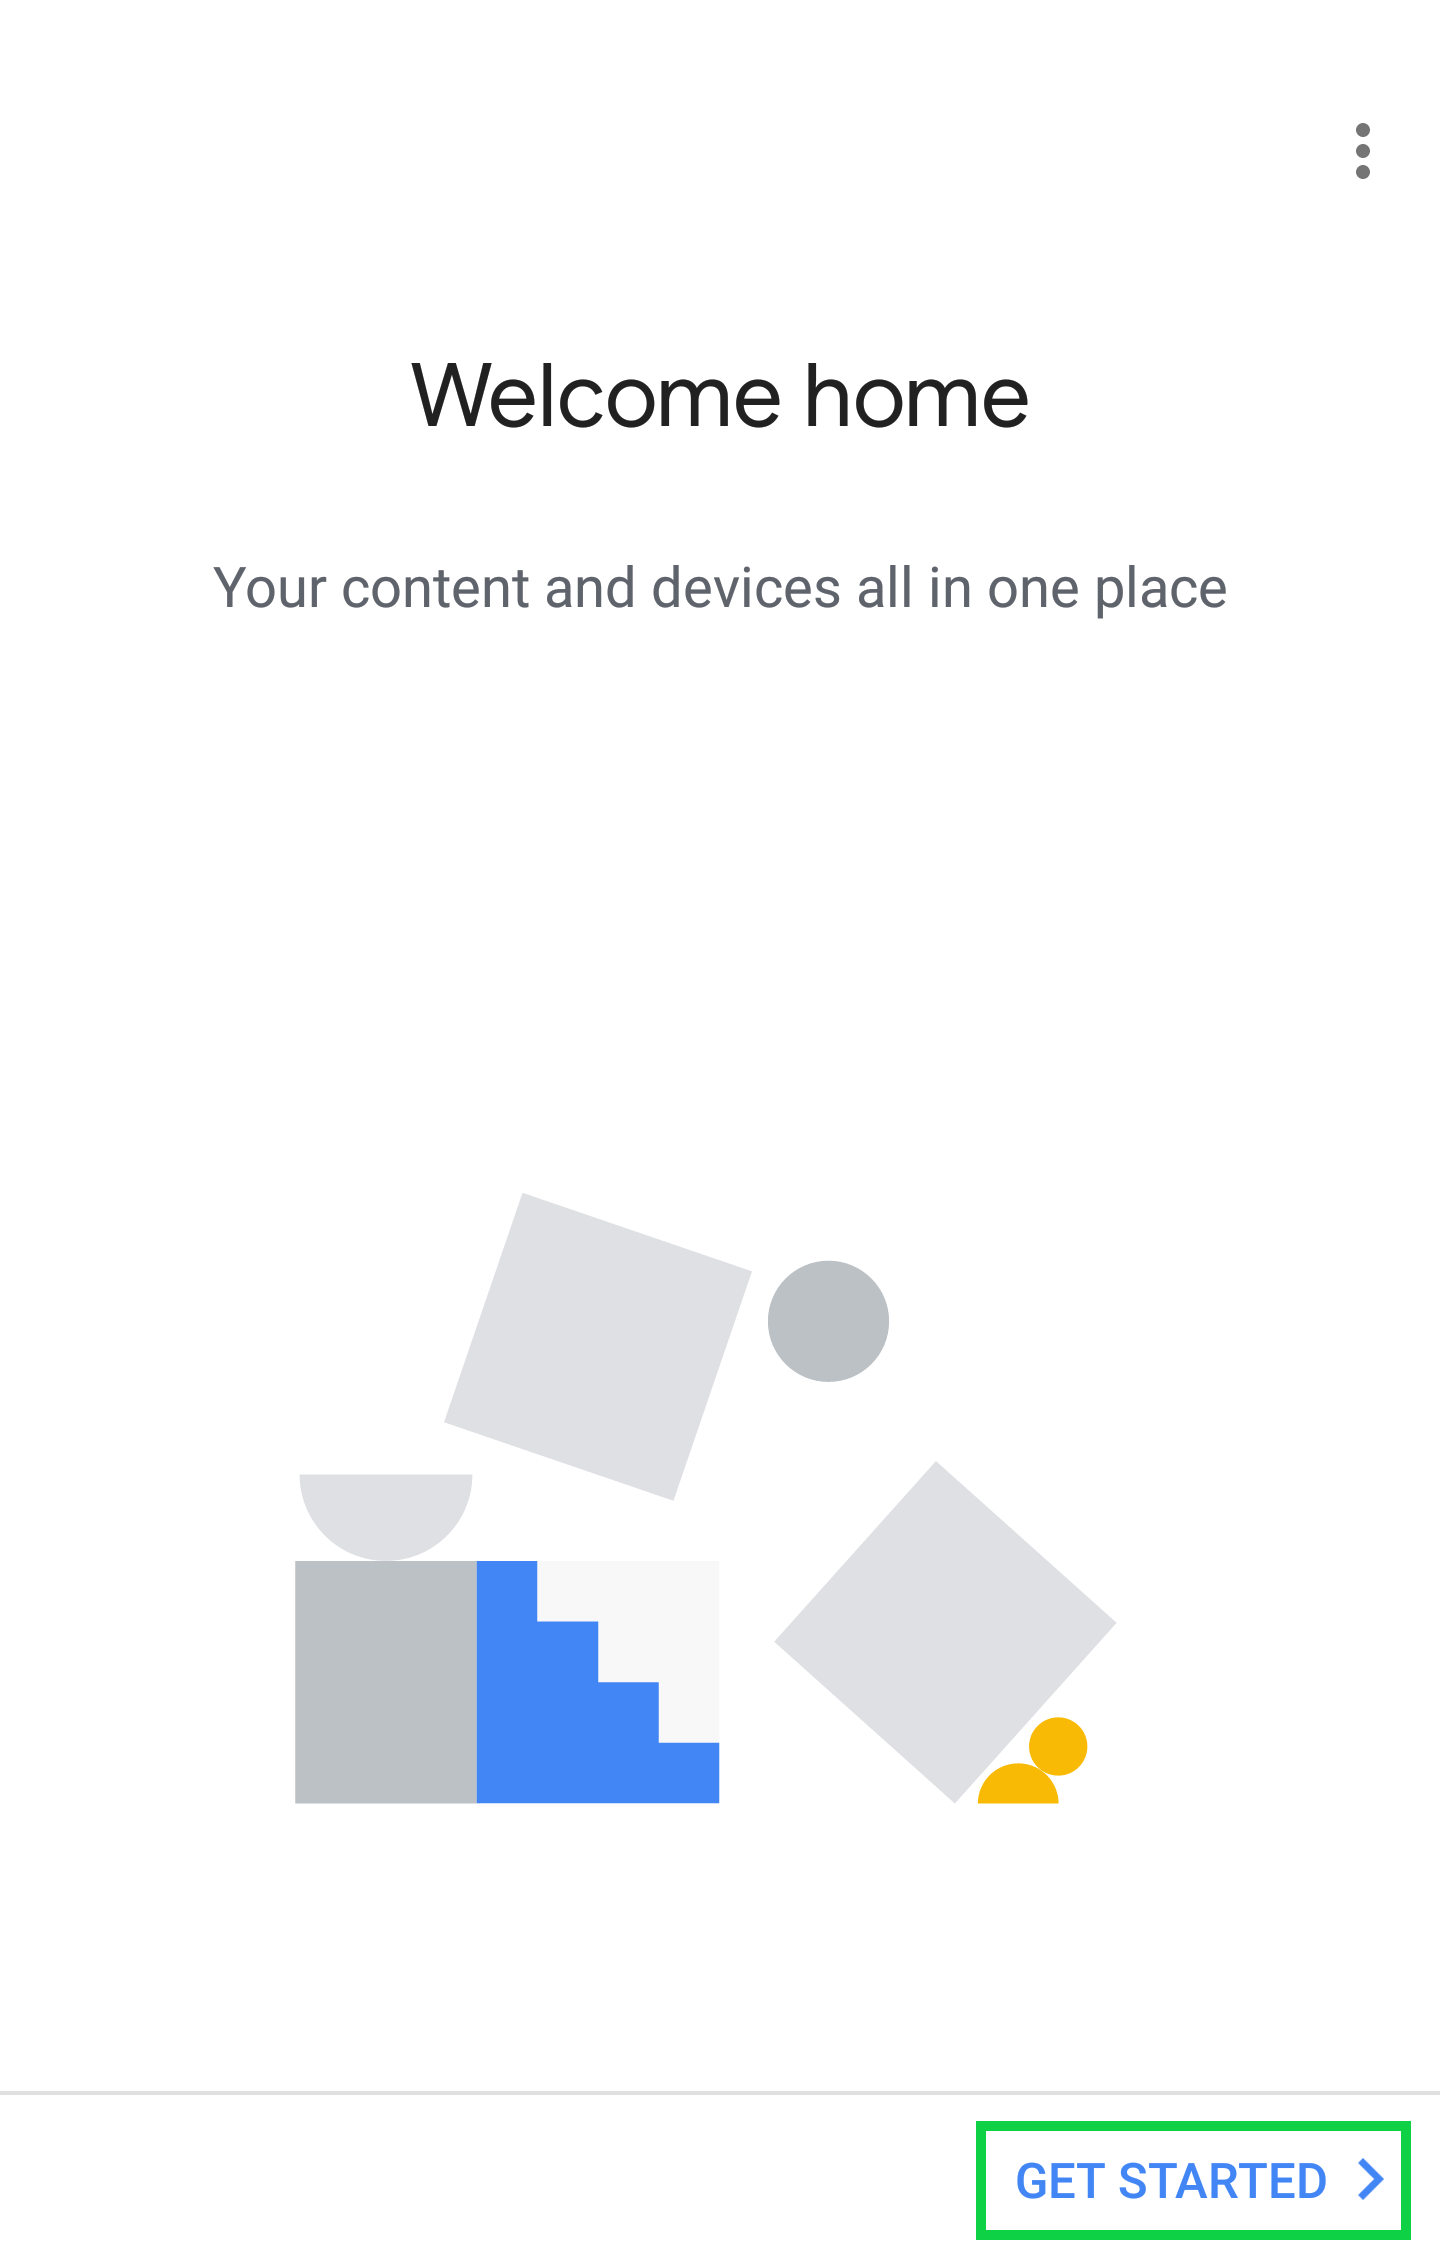
9. Google Home: Basic Setup
To setup your Google Home speaker:
Plug the power adapter cord into the base of the Google Home and the power adapter into a power outlet.
Allow it to boot up. You will know it's booted up once it starts talking to you and welcomes you to Google Home.
Open the Google Home app on your mobile device
.
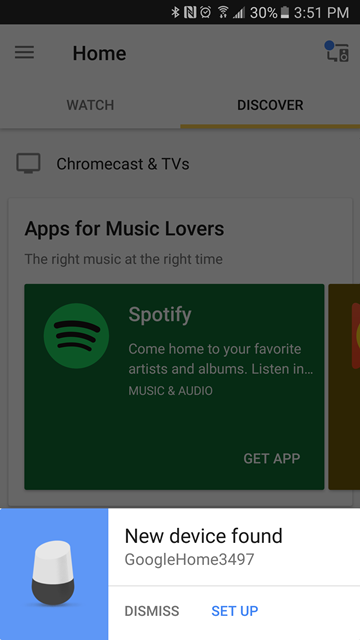
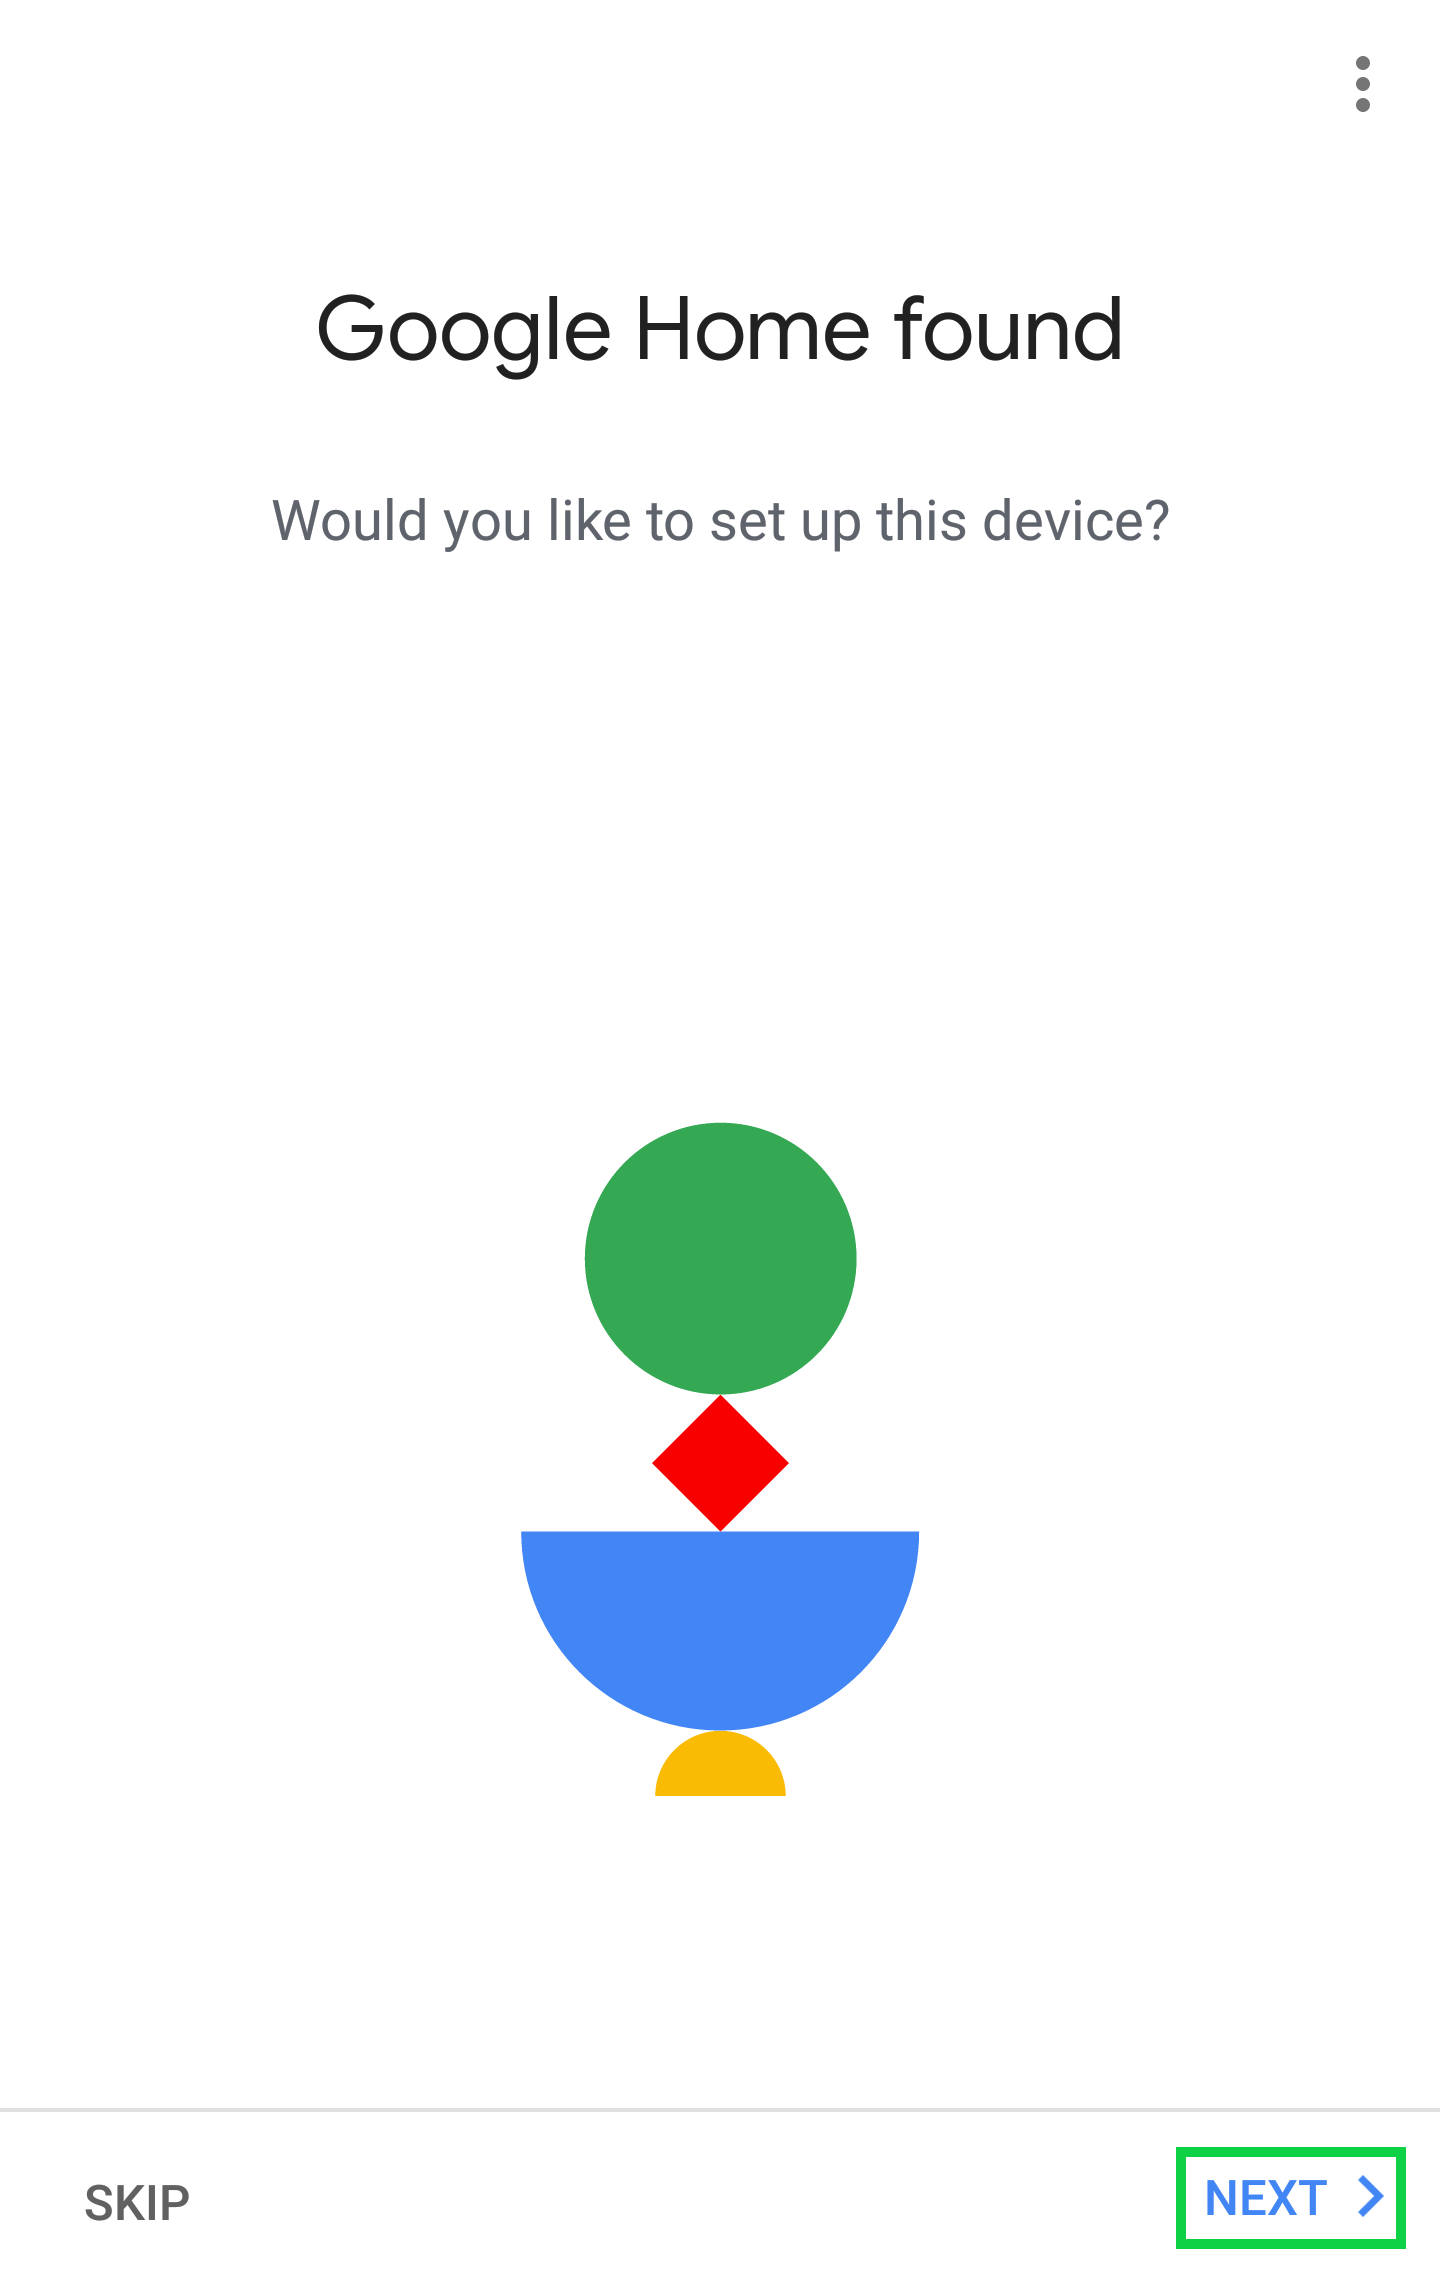
The Google Home app will automatically detect the new device. Tap on Set Up.
If it doesn't detect it, then tap on the Devices icon on the top right corner of the screen.
On the Devices screen tap on Set Up on the Google Home device card.
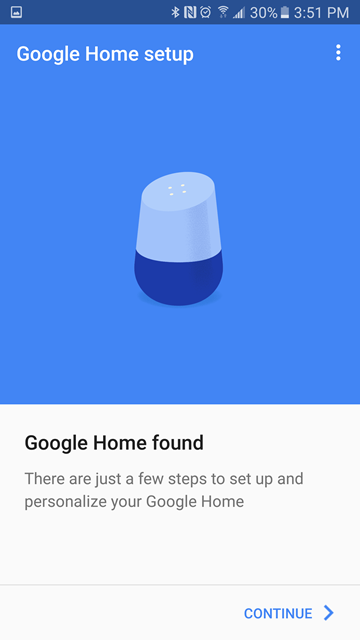
The app will let you know the Google Home was found. Tap on Continue.
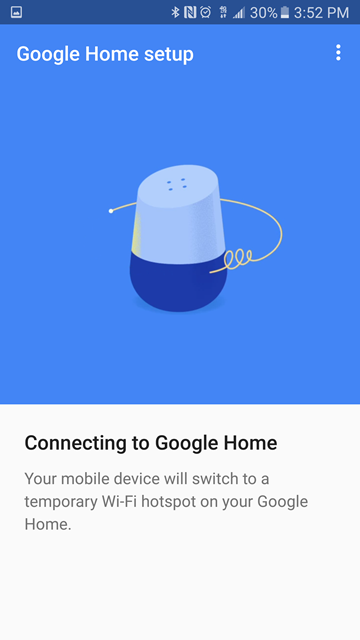
It will disconnect your mobile device from the Wi-Fi network it is connected to and connect it temporarily to the Google Home Wi-Fi hotspot.
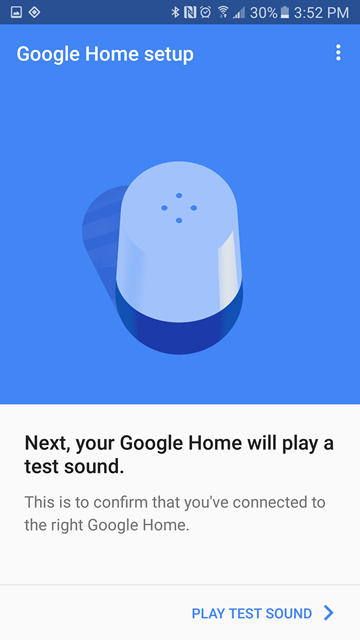
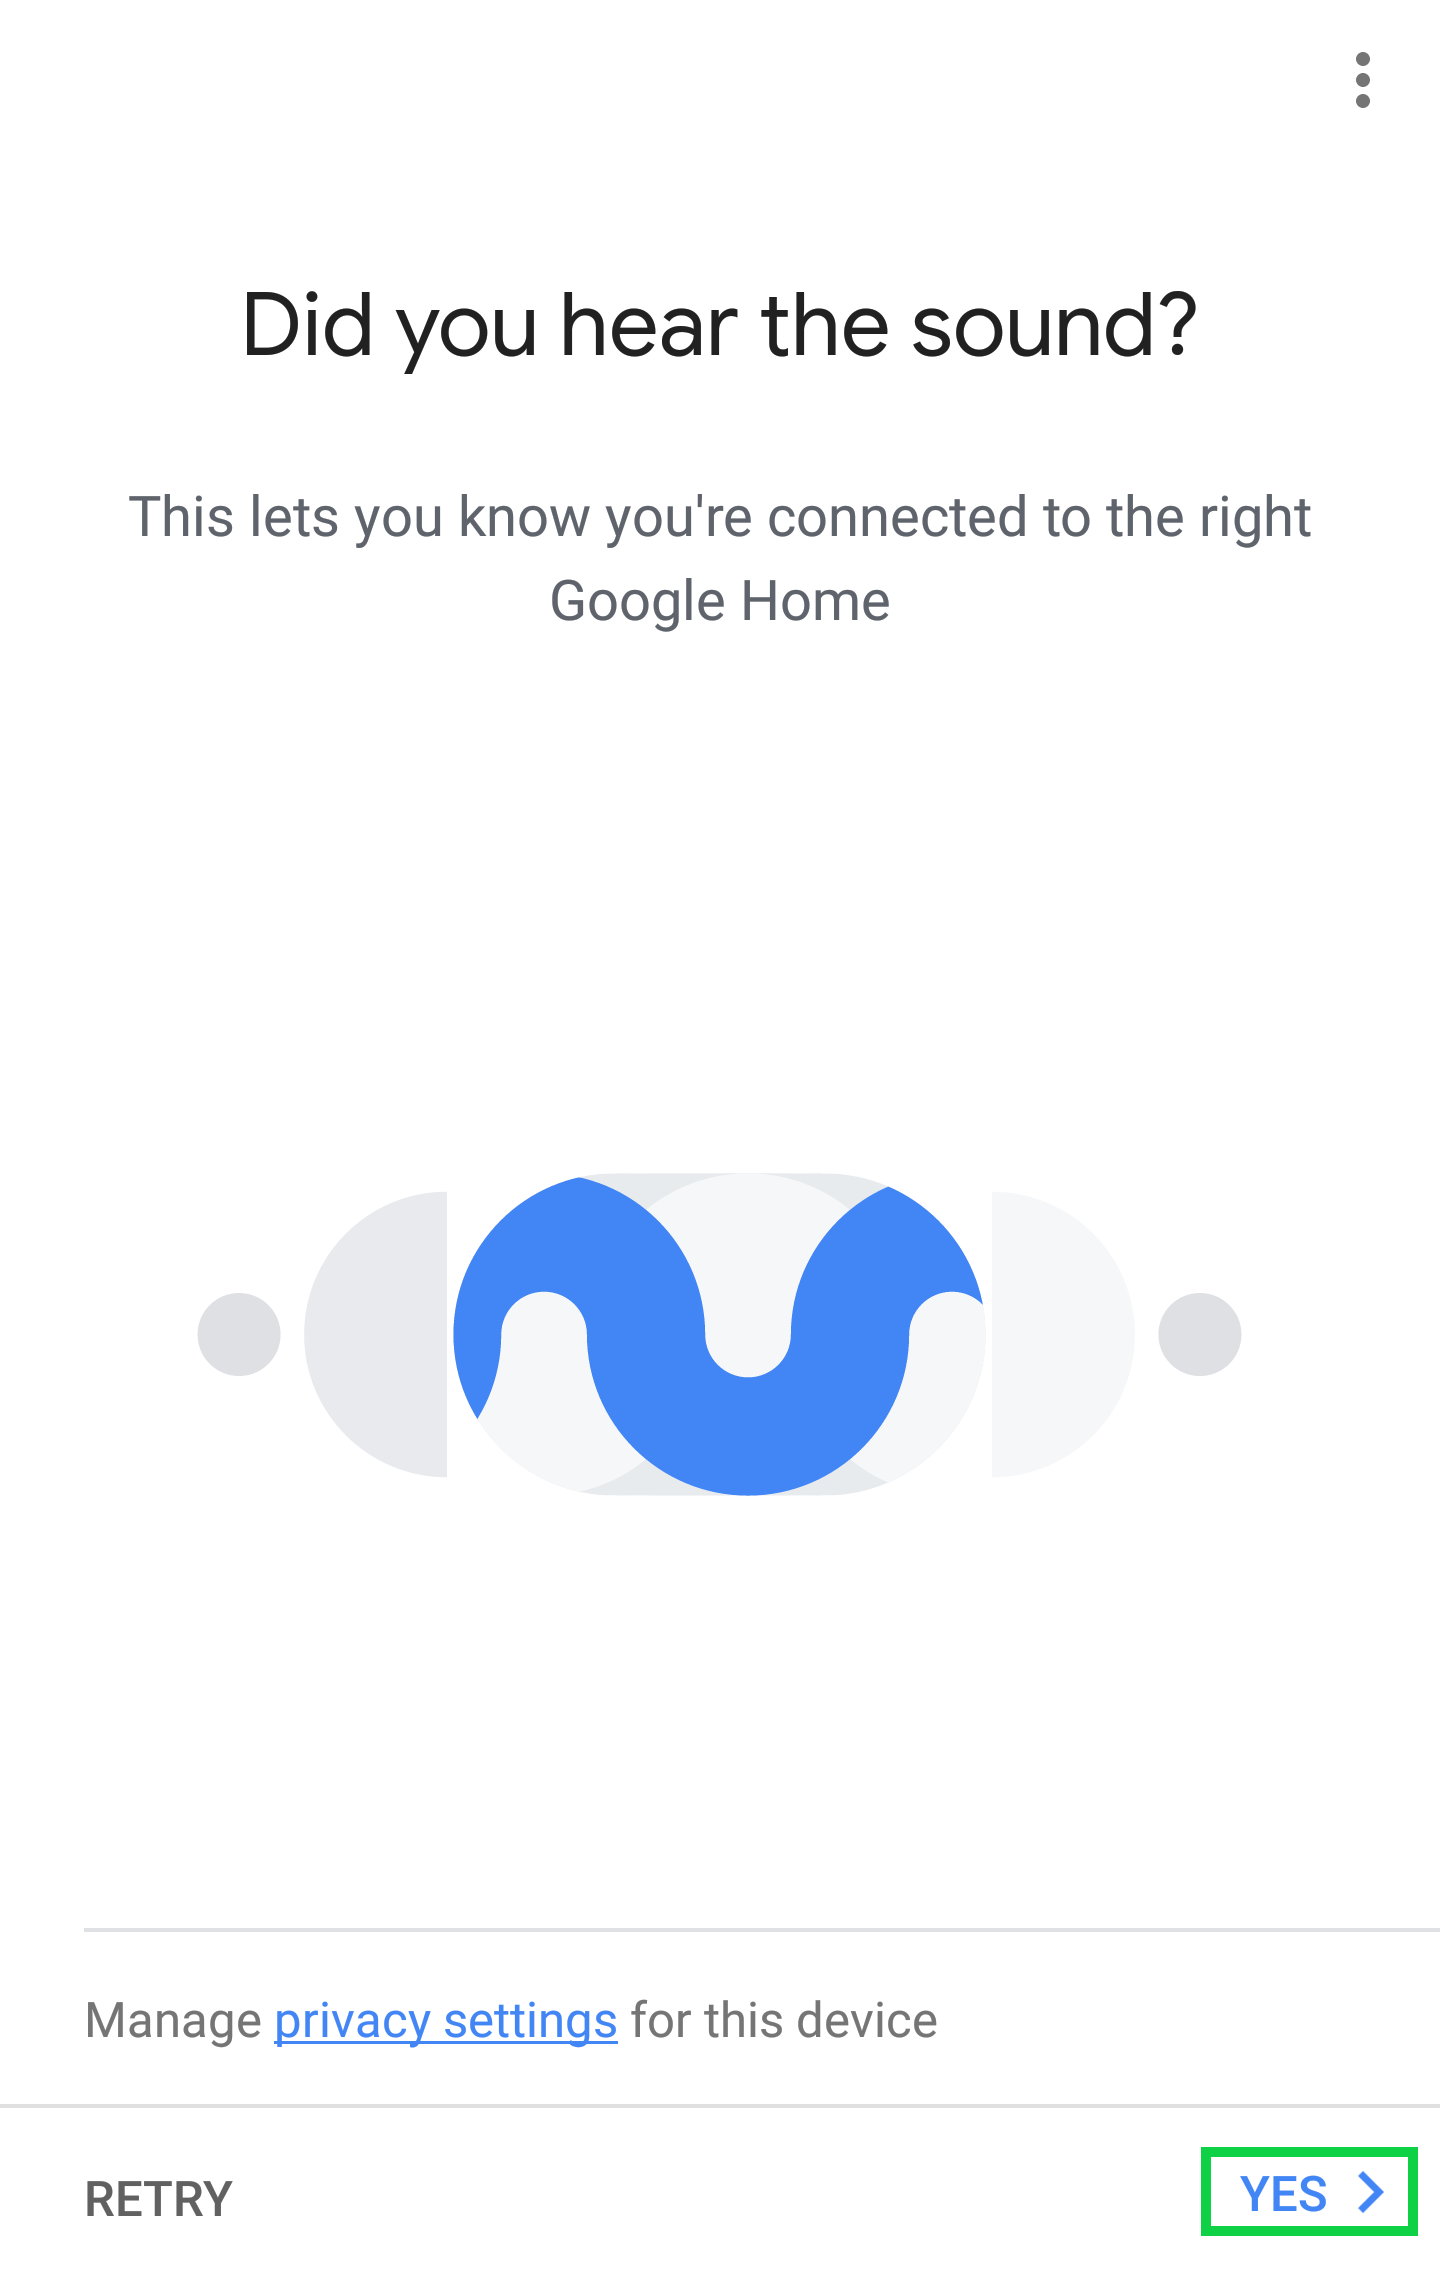
It will need to play a test sound to make sure you connected to the right device. Tap on Play Test Sound.
If you heard the sound confirm it by tapping on I Heard It to continue, otherwise tap on Try Again.
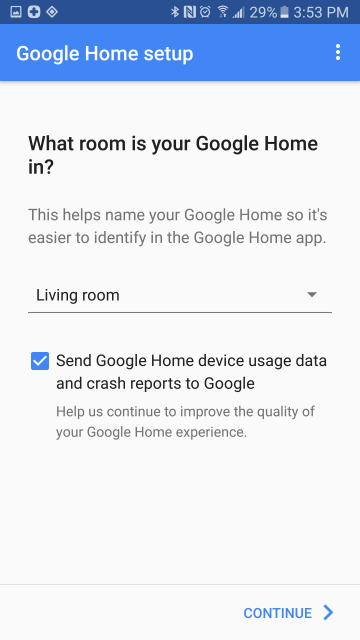
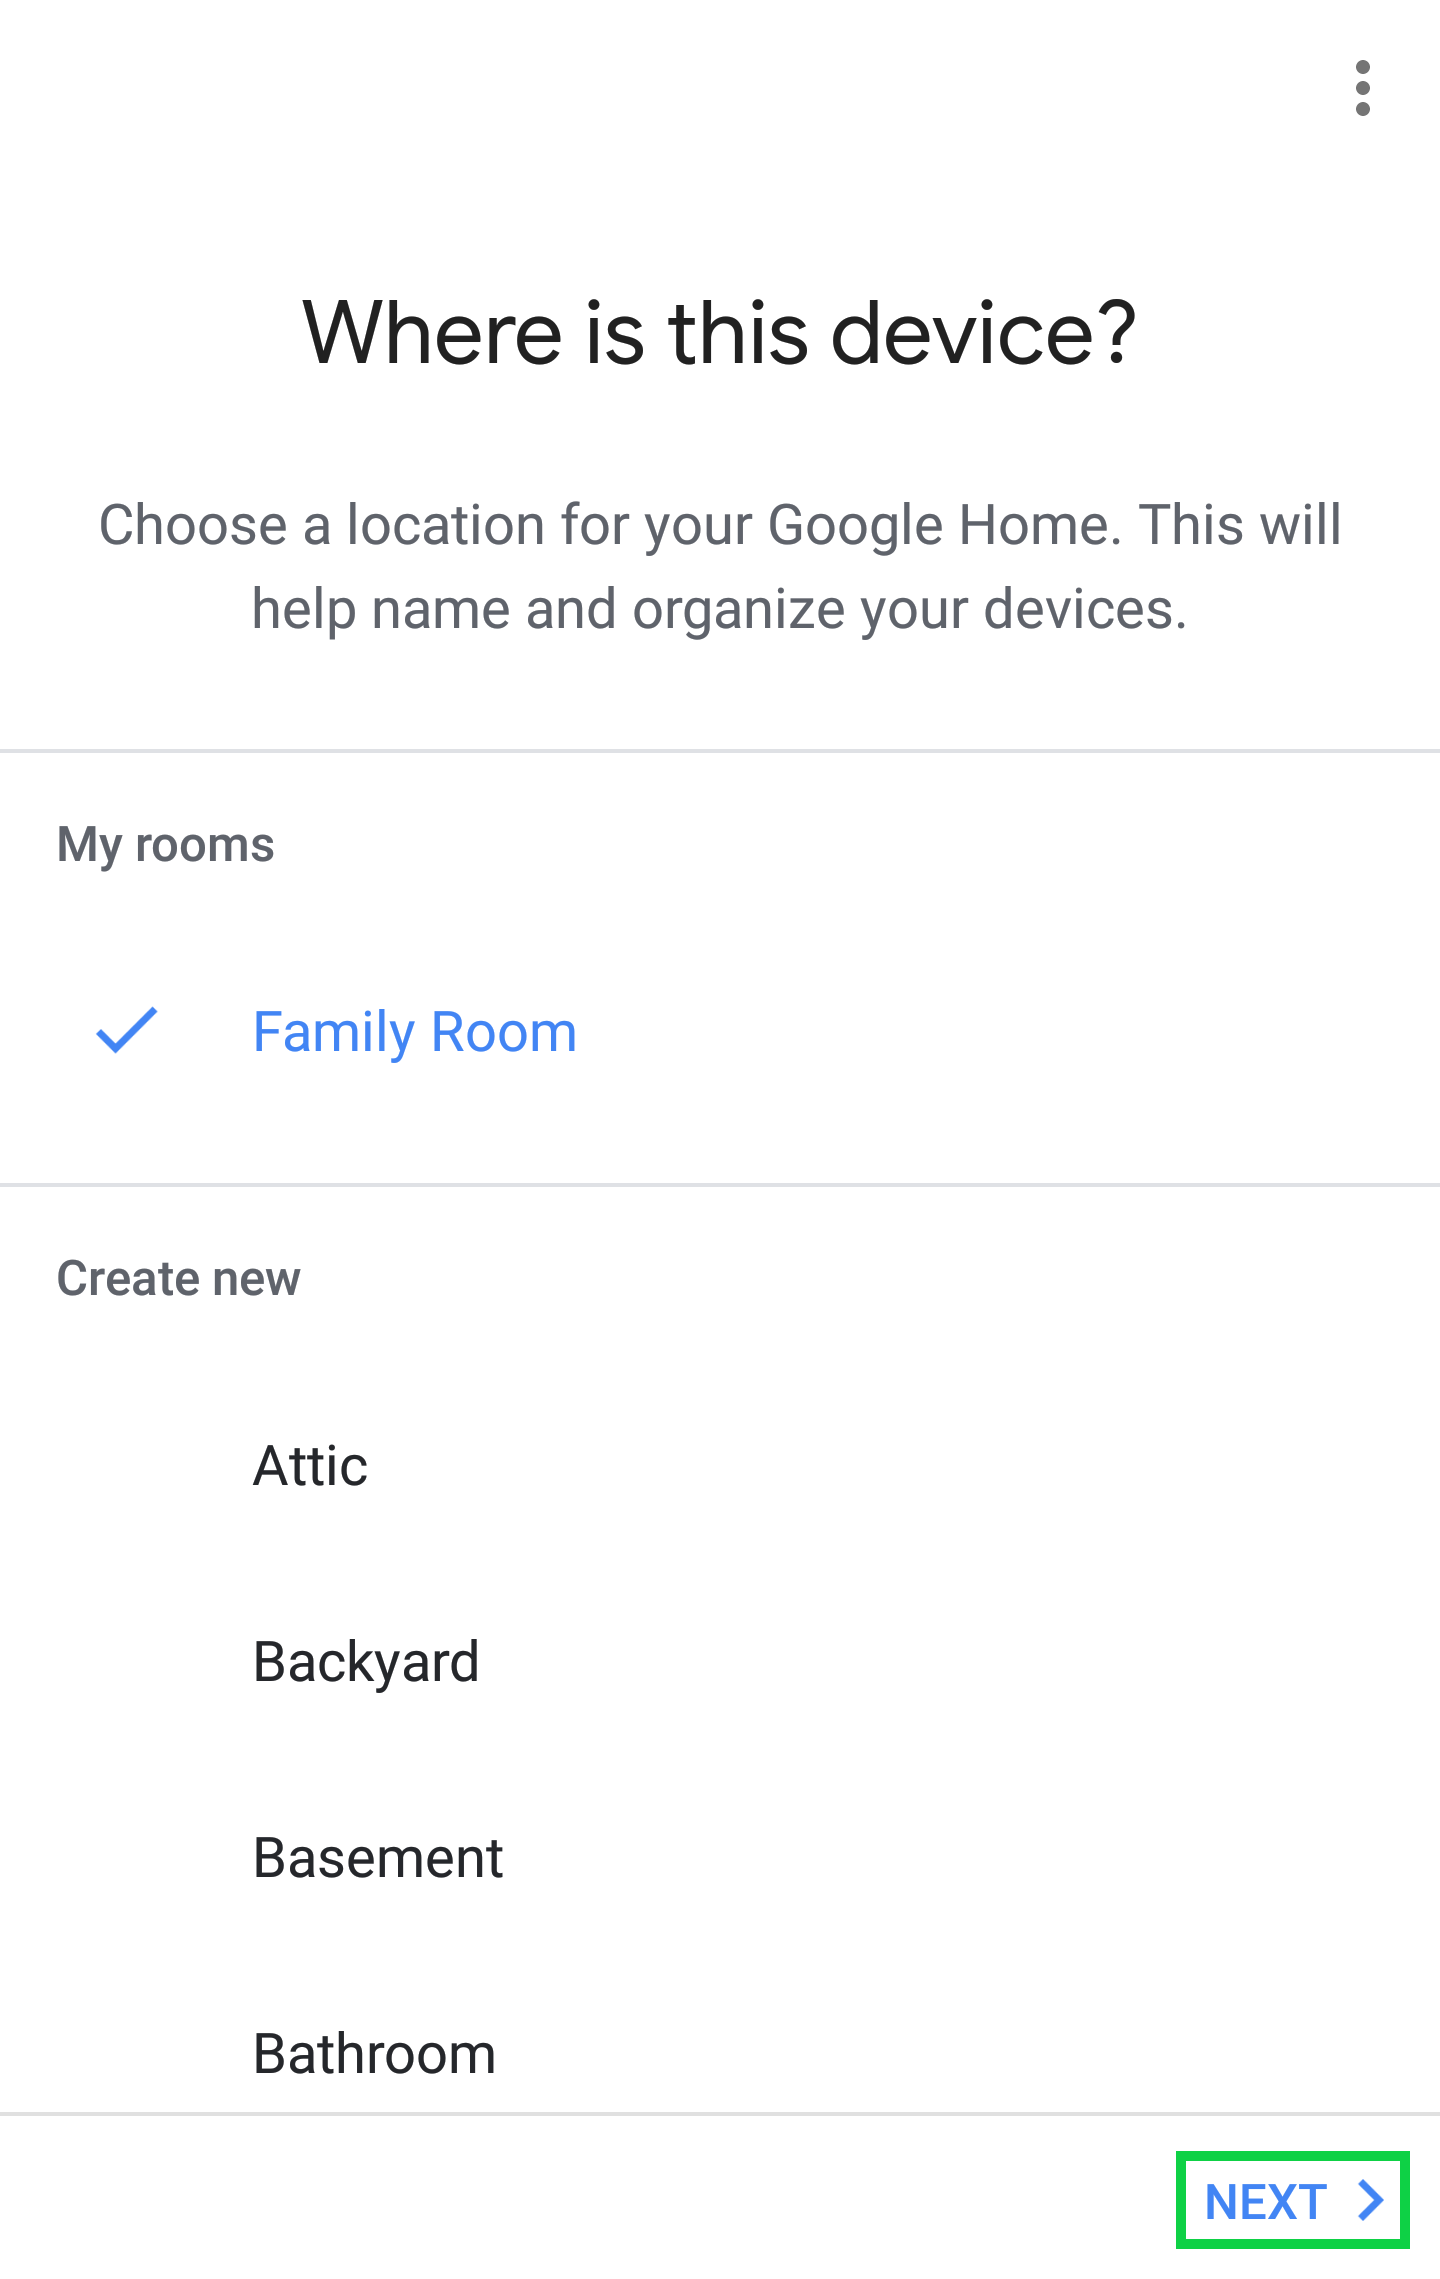
Next, you'll have to select the room you want to place the Google Home device in. Check or uncheck the box for sending device usage data to Google and tap on Continue.
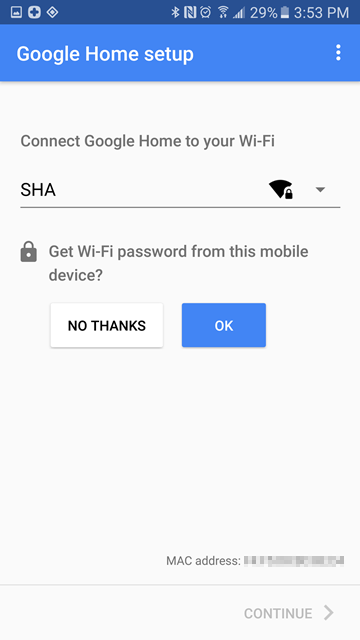
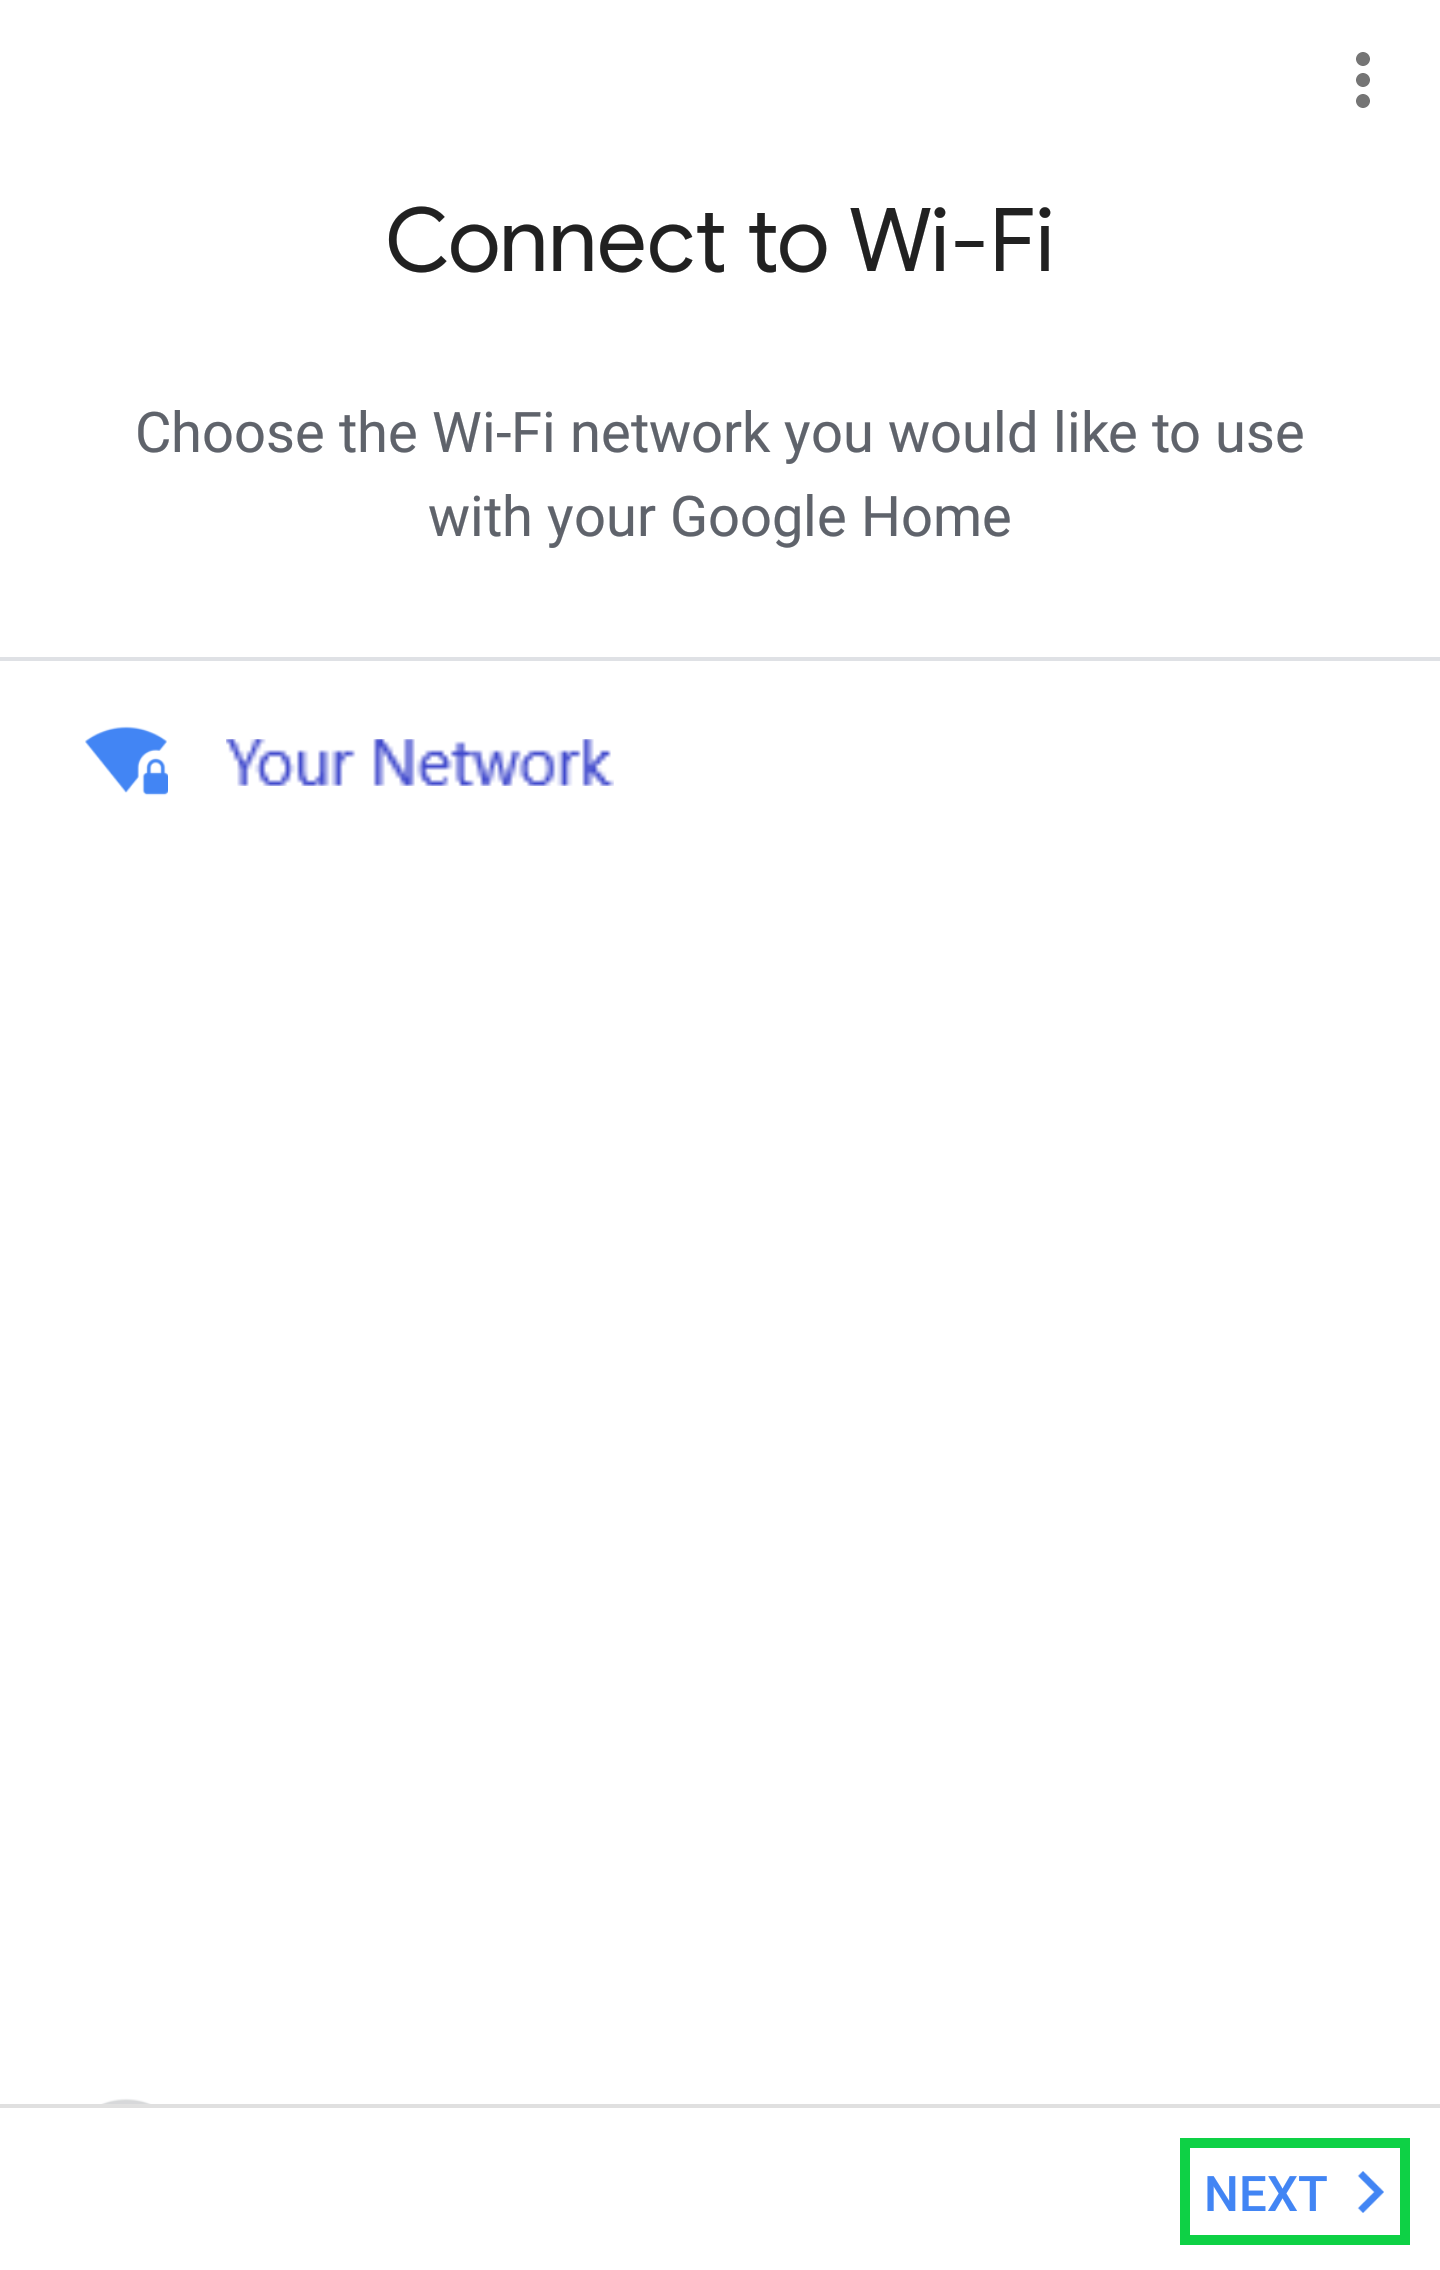
Then you'll have to select the Wi-Fi network you want it connected to. Should be the same with the Wi-Fi network your mobile device is connected to as well.
The app can retrieve the Wi-Fi password that is saved in your mobile device so you don't have to type it in again. Tap on OK to do that then on Continue.
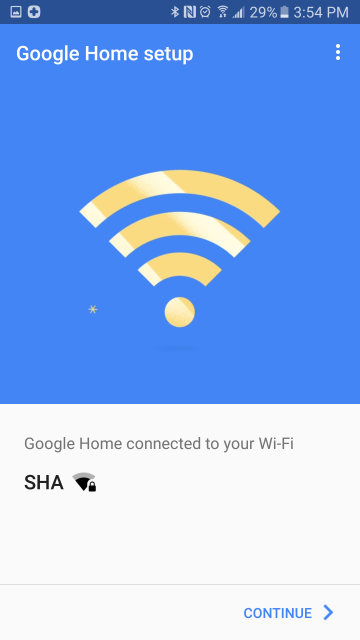
Once you're connected to the Wi-Fi tap on Continue.
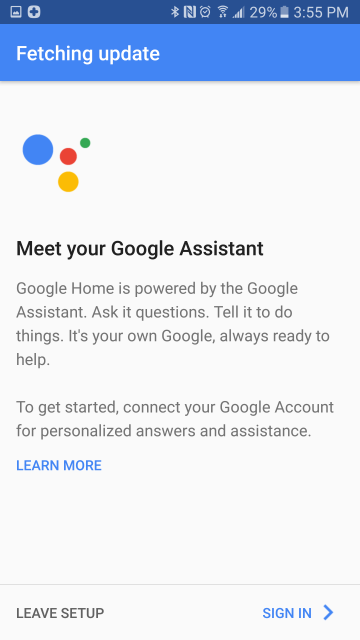
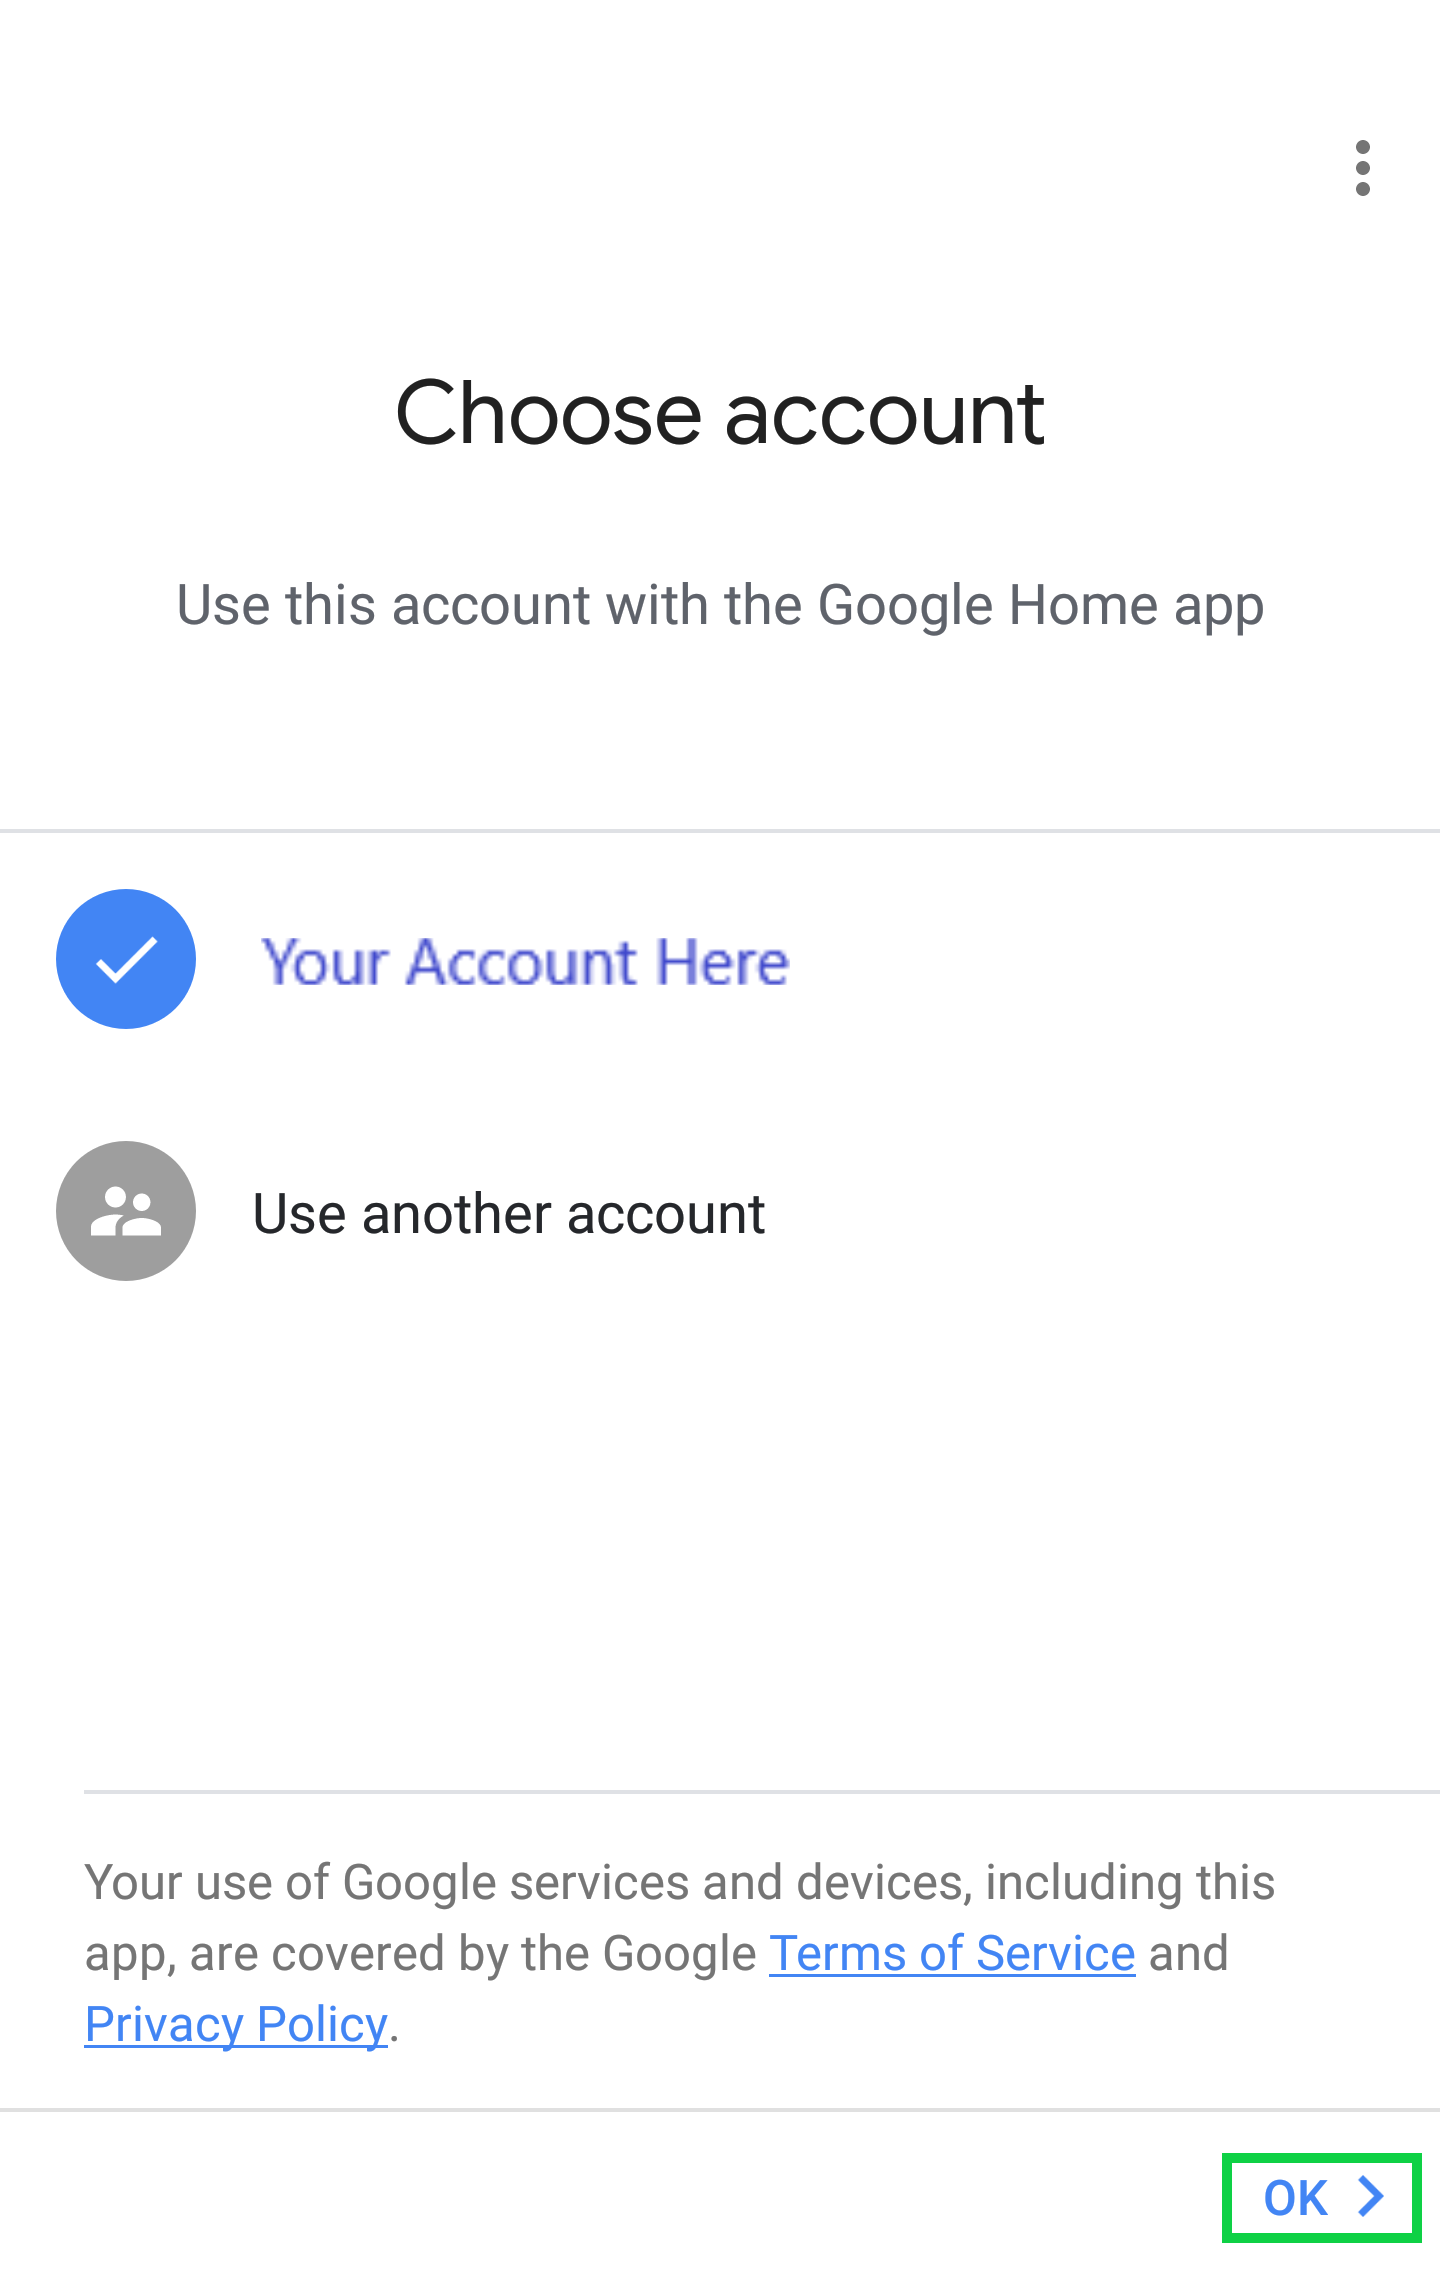
Next, you'll have to setup the Google Assistant. Go ahead and Sign In with your Google account.
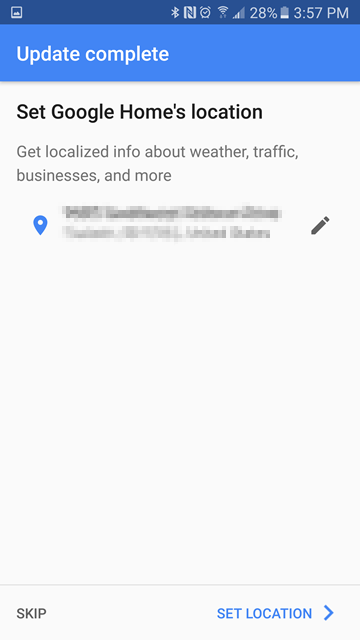
Set the location where Google Home is installed to get localized information then tap on Set Location.
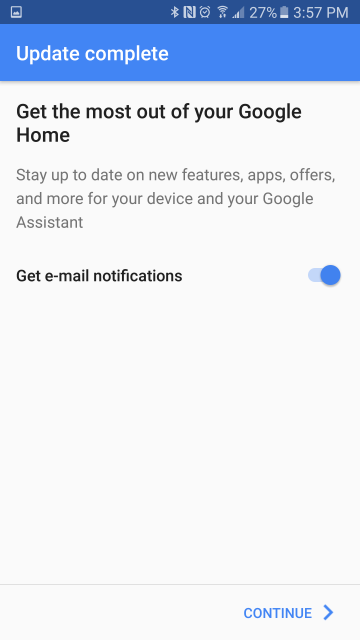
Choose whether you want to get notifications about updates on Google Home and tap on Continue.
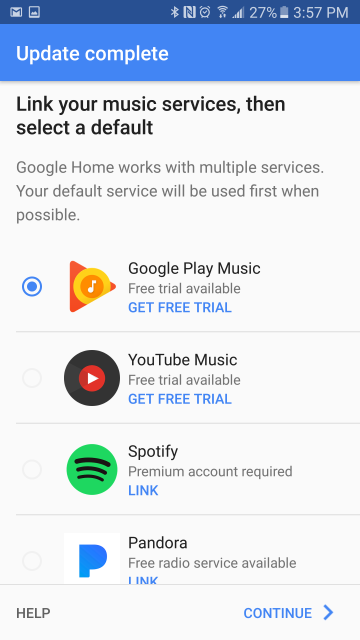
Link the music services that you want Google Home to play songs from and select your preferred one to be the default then tap on Continue.
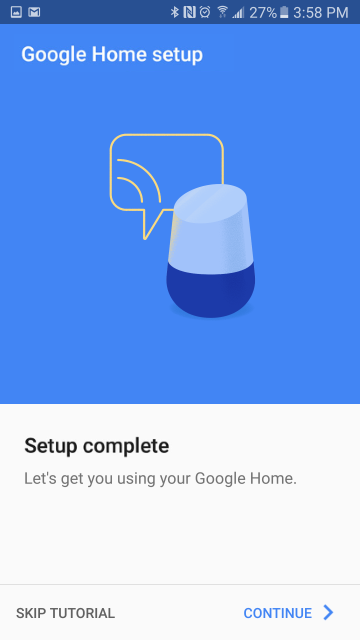
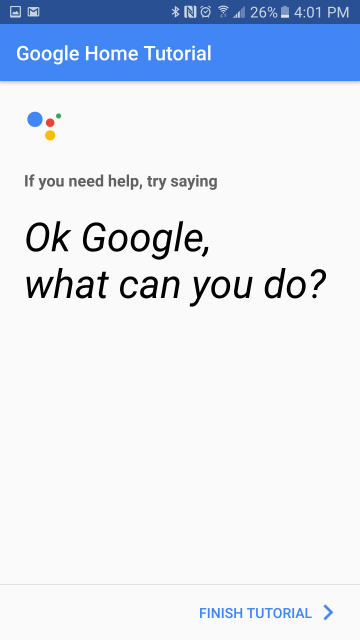
Once the setup is completed you can also take the tutorial to learn how to use your Google Home. Tap on Continue to do so or Skip Tutorial if you're already familiar with how to use it.
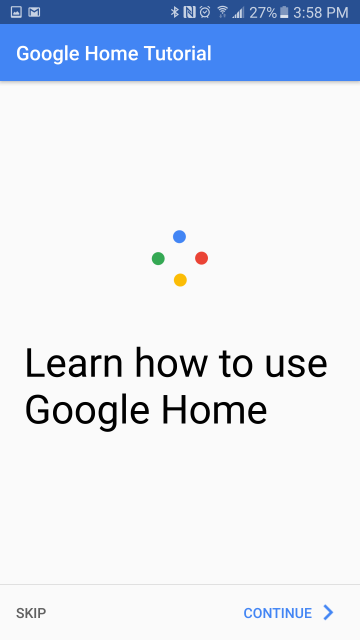
Start the tutorial by tapping on Continue. Follow the instructions to learn the basics on using Google Home.
Once done with the tutorial just tap on Finish Tutorial. At this point you can enjoy your Google Home.
10. Google Home: Setup Android App
Open the Google Home app.
Tap on Get Started.
Confirm which Google Account to use and tap OK.
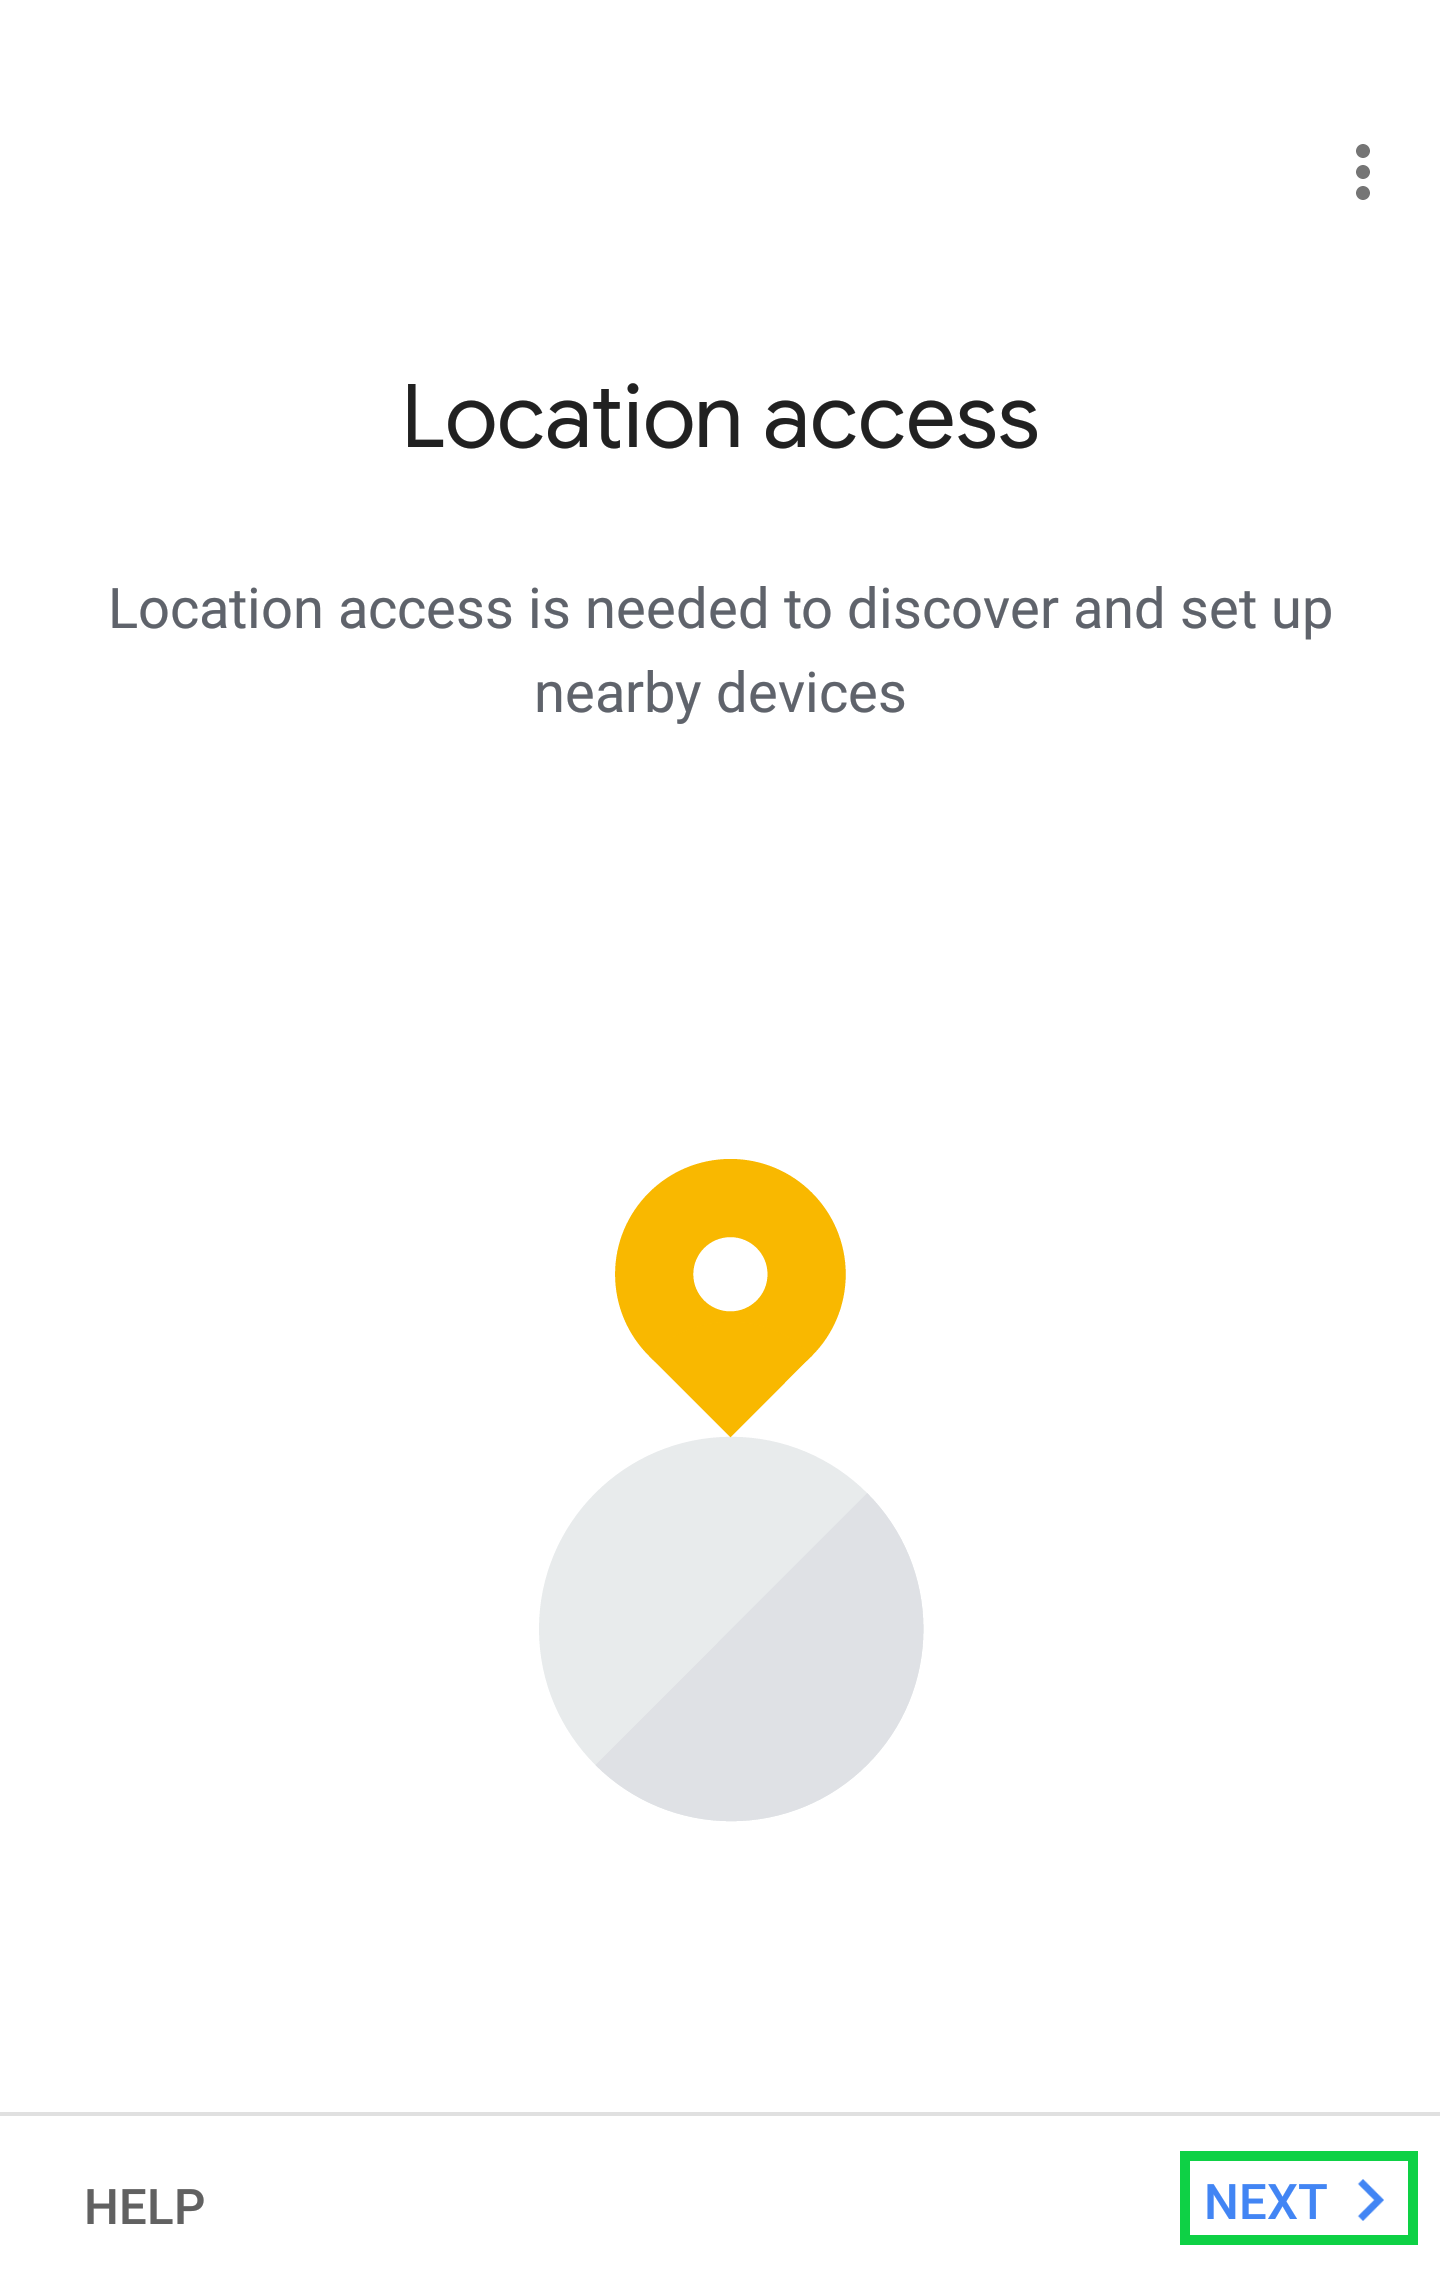
Tap Next and then tap Allow for permissions that are requested.
Google Home will search for Google devices. Pick your device from the list and then click Next.
Tap Yes to confirm you heard noise from the Google Home device you're setting up.
If prompted, tap the region list and then select your region and then Continue.
Choose a language and tap Next.
Choose the room where your device is located and tap Next.
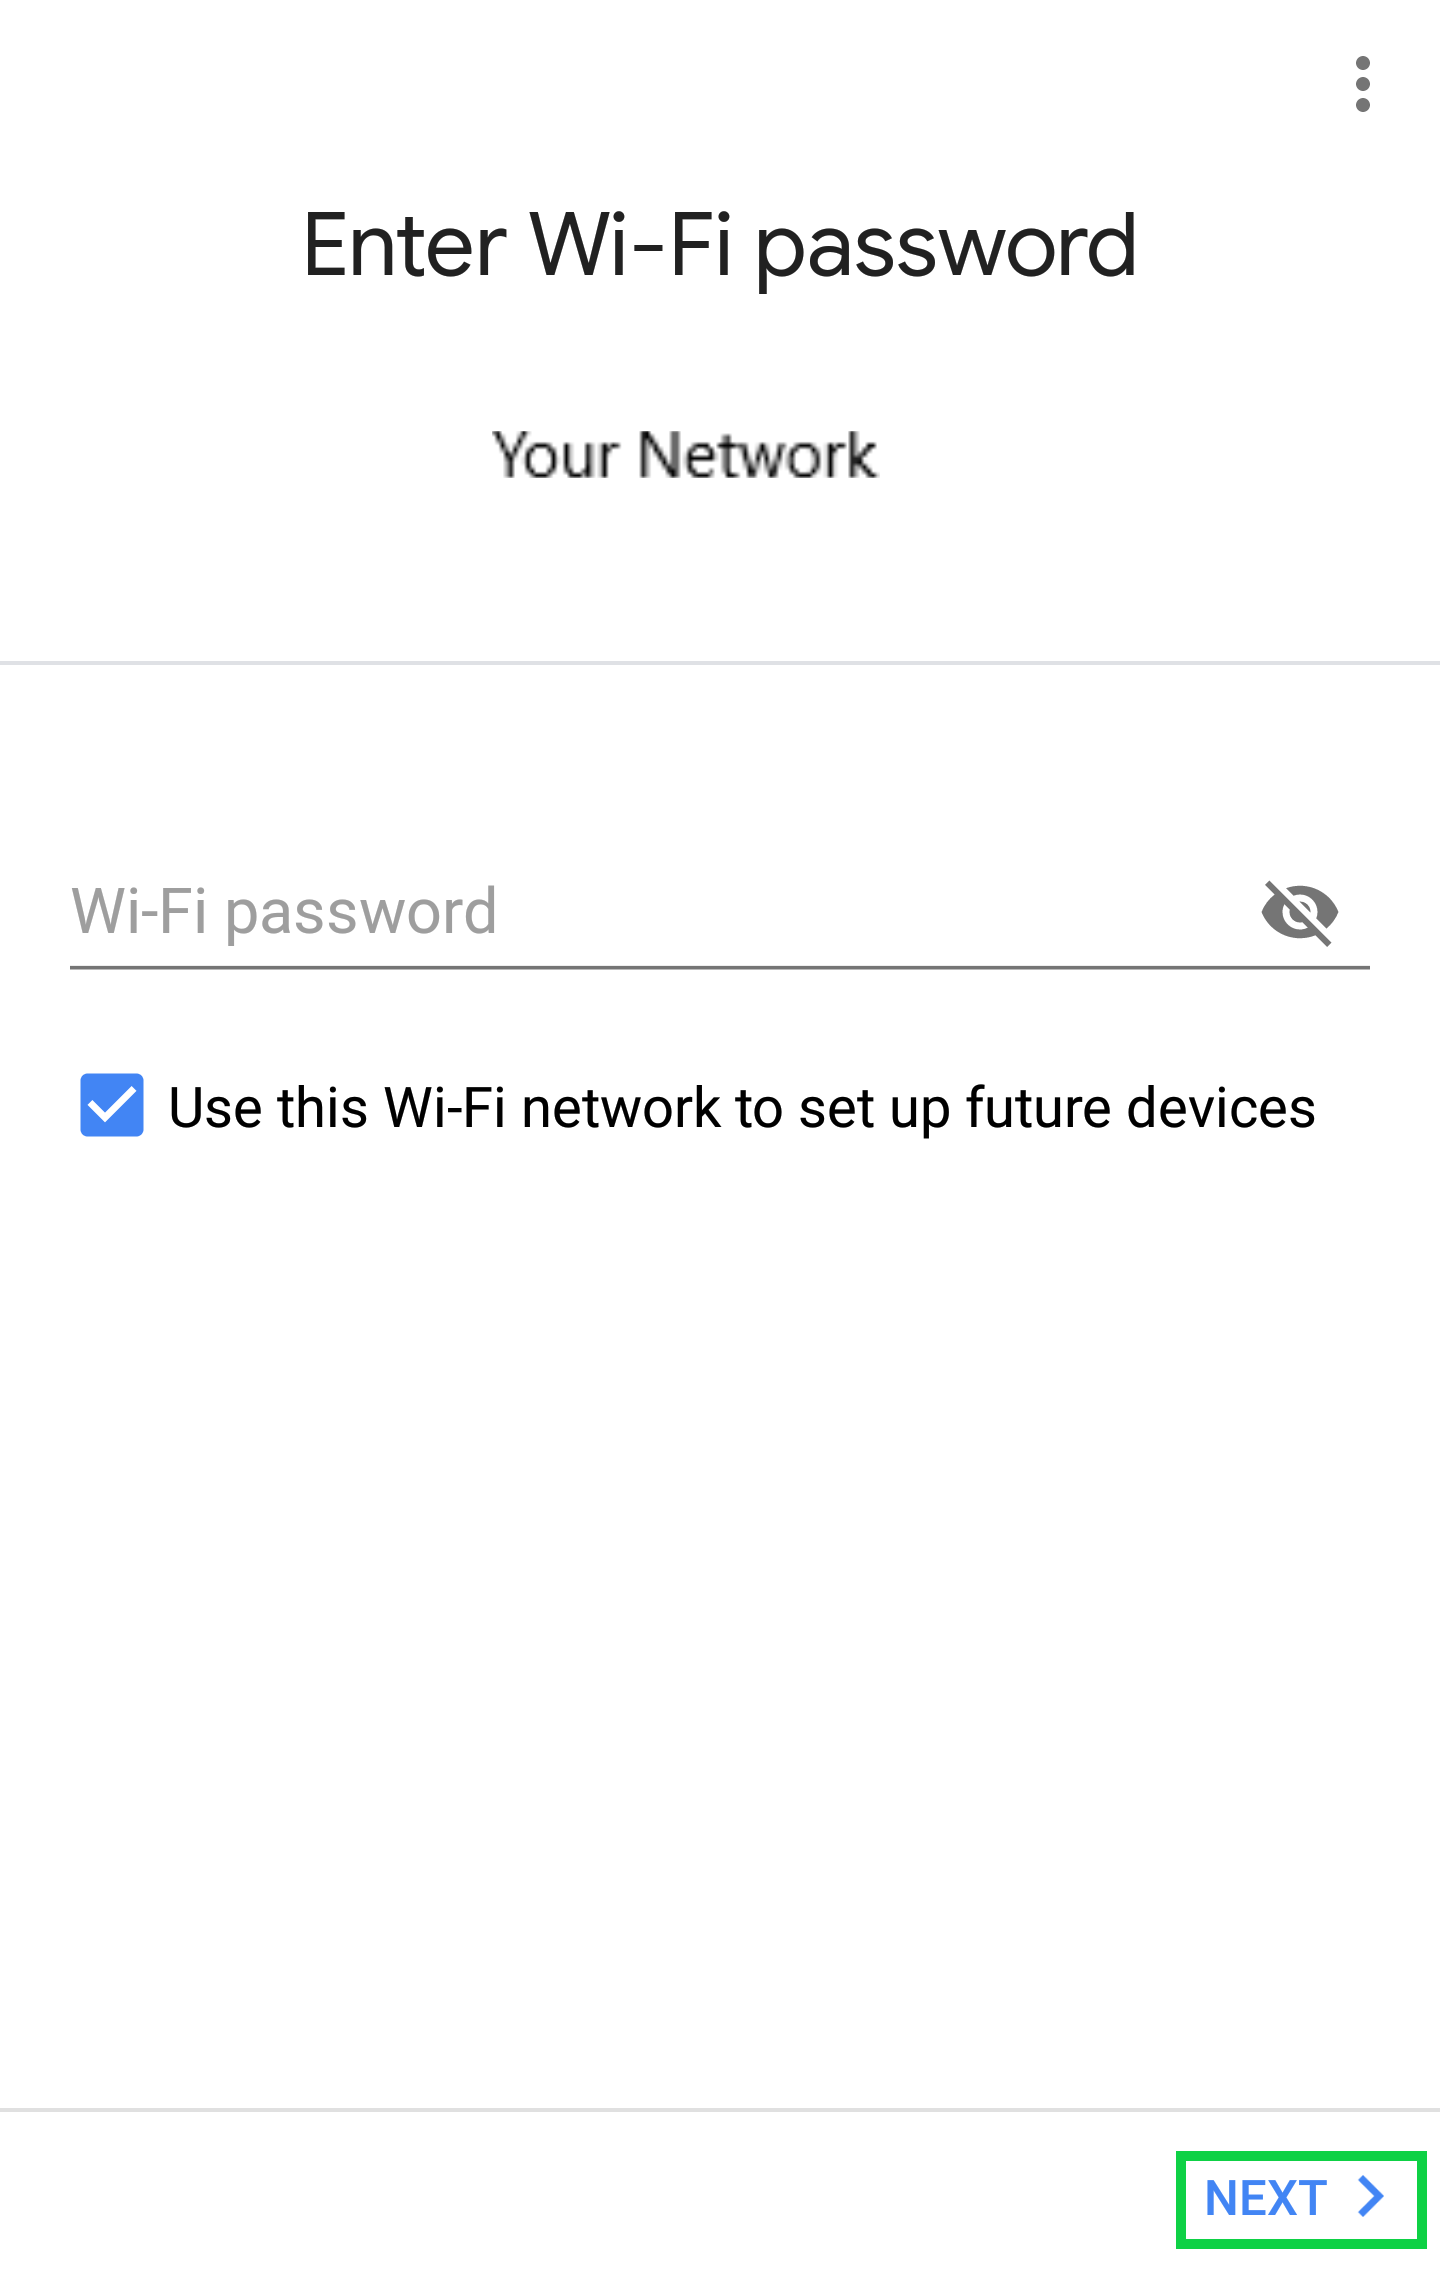
Choose the Wi-Fi network you want to connect to and tap Next.
Type you Network Security Key (Wi-Fi Password) and tap Connect.
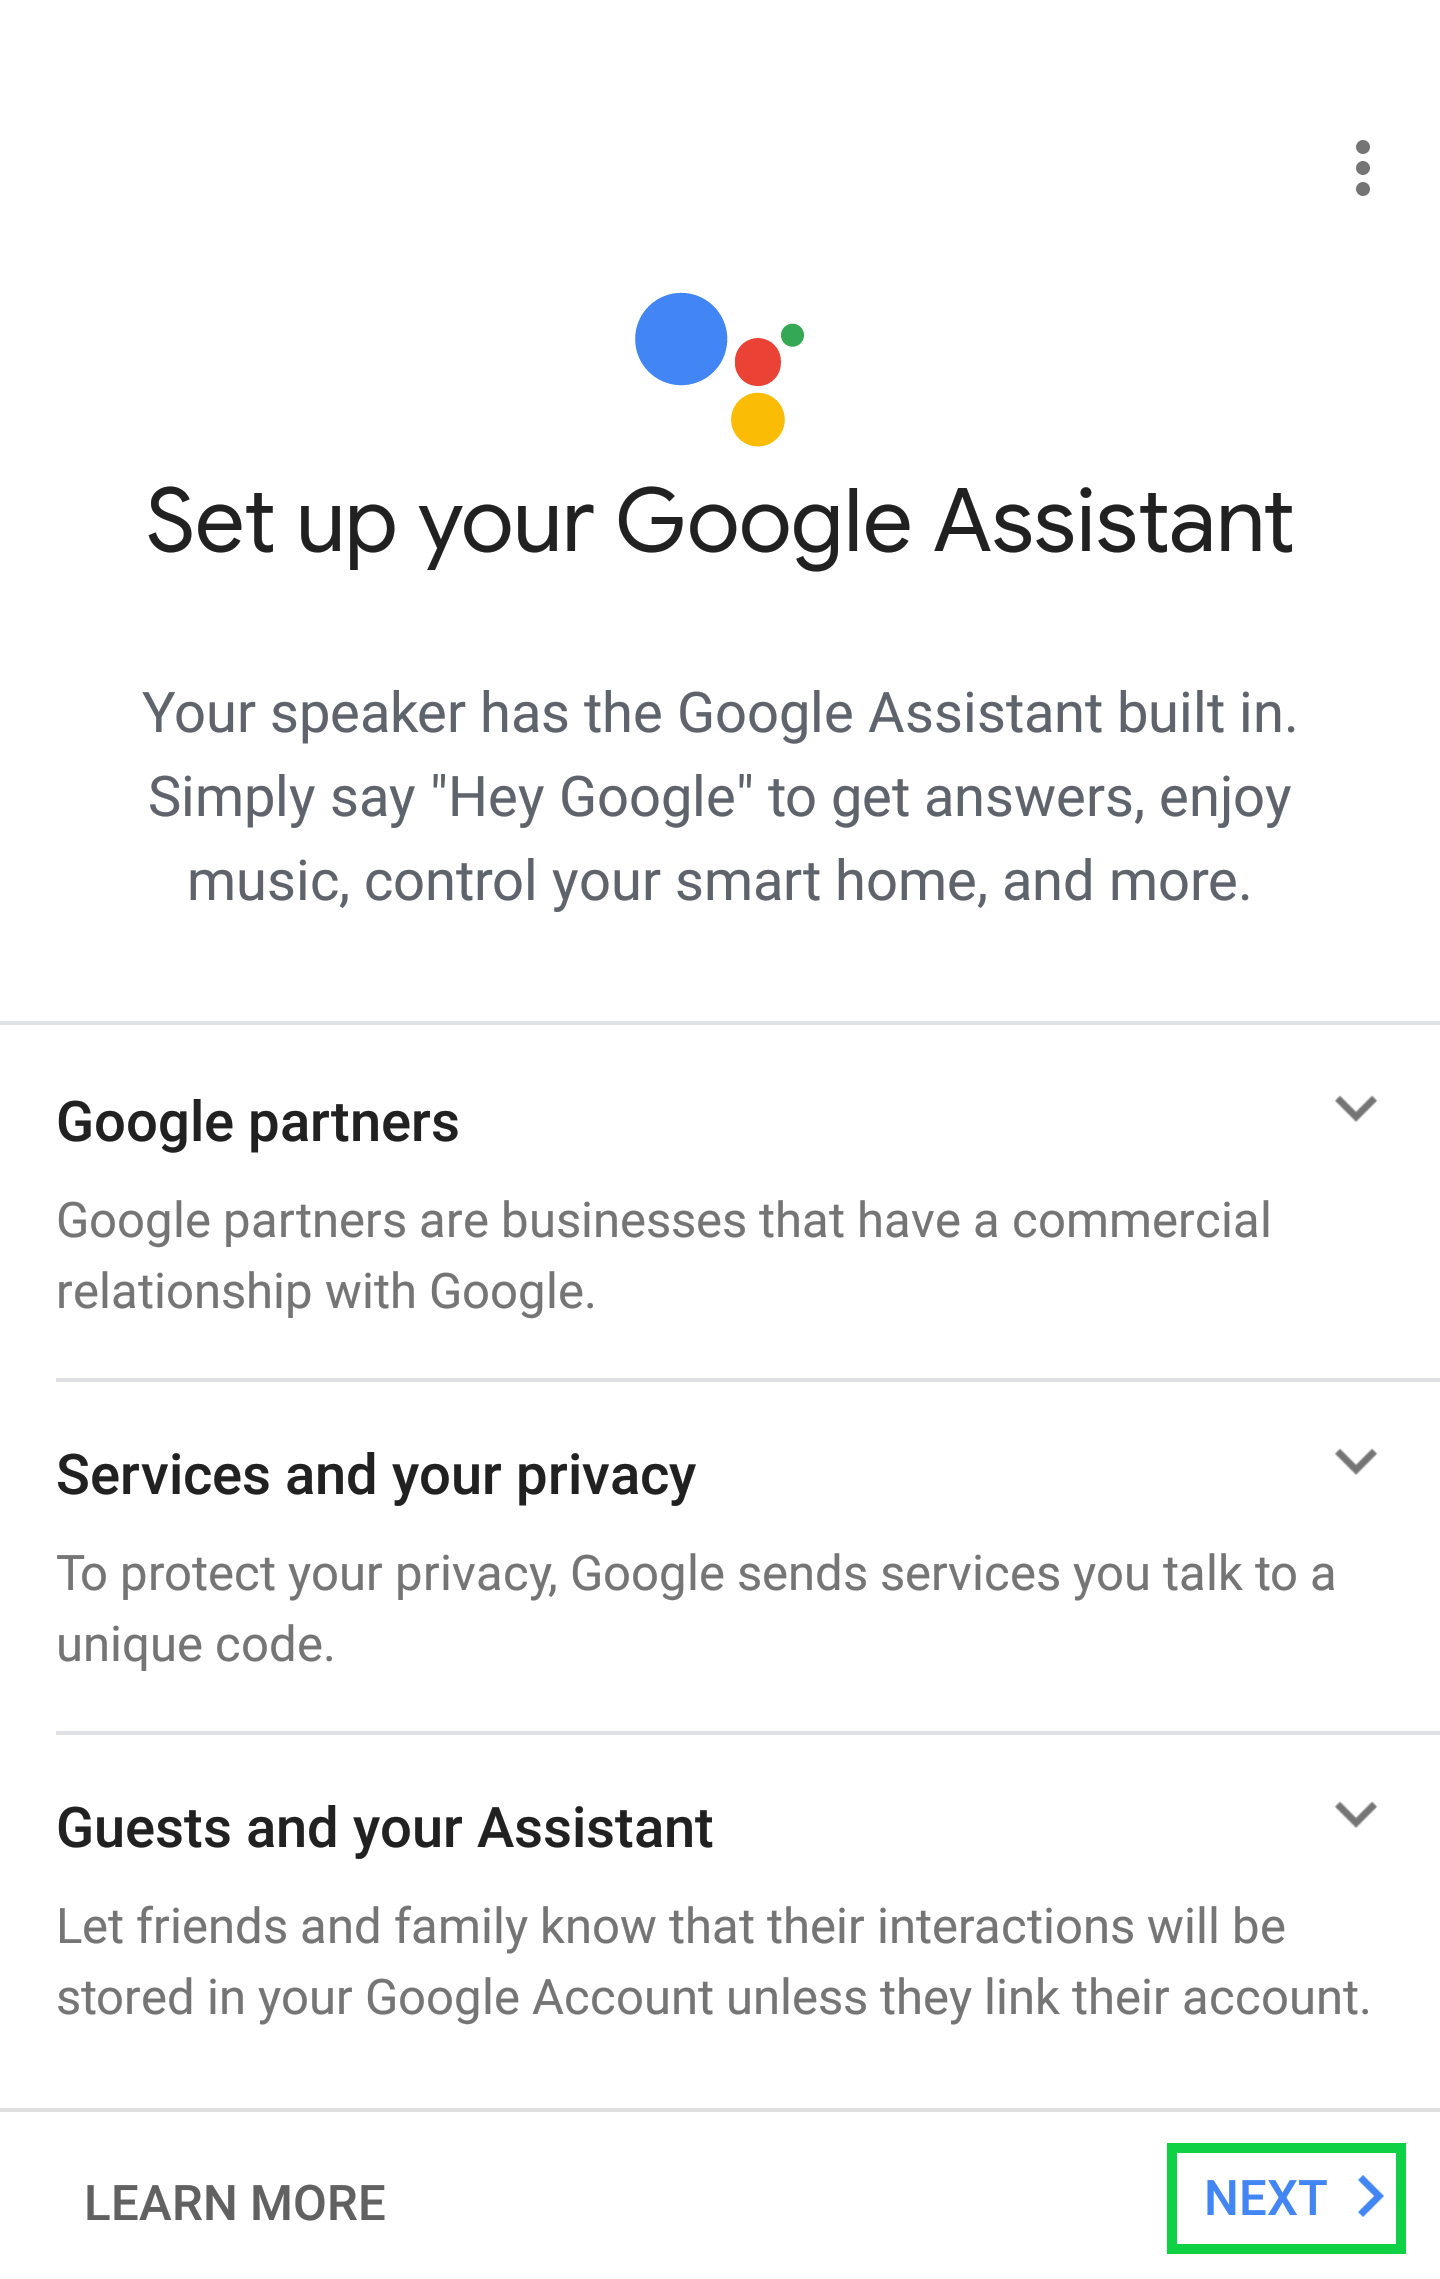
Tap Next to setup your Google Assistant.
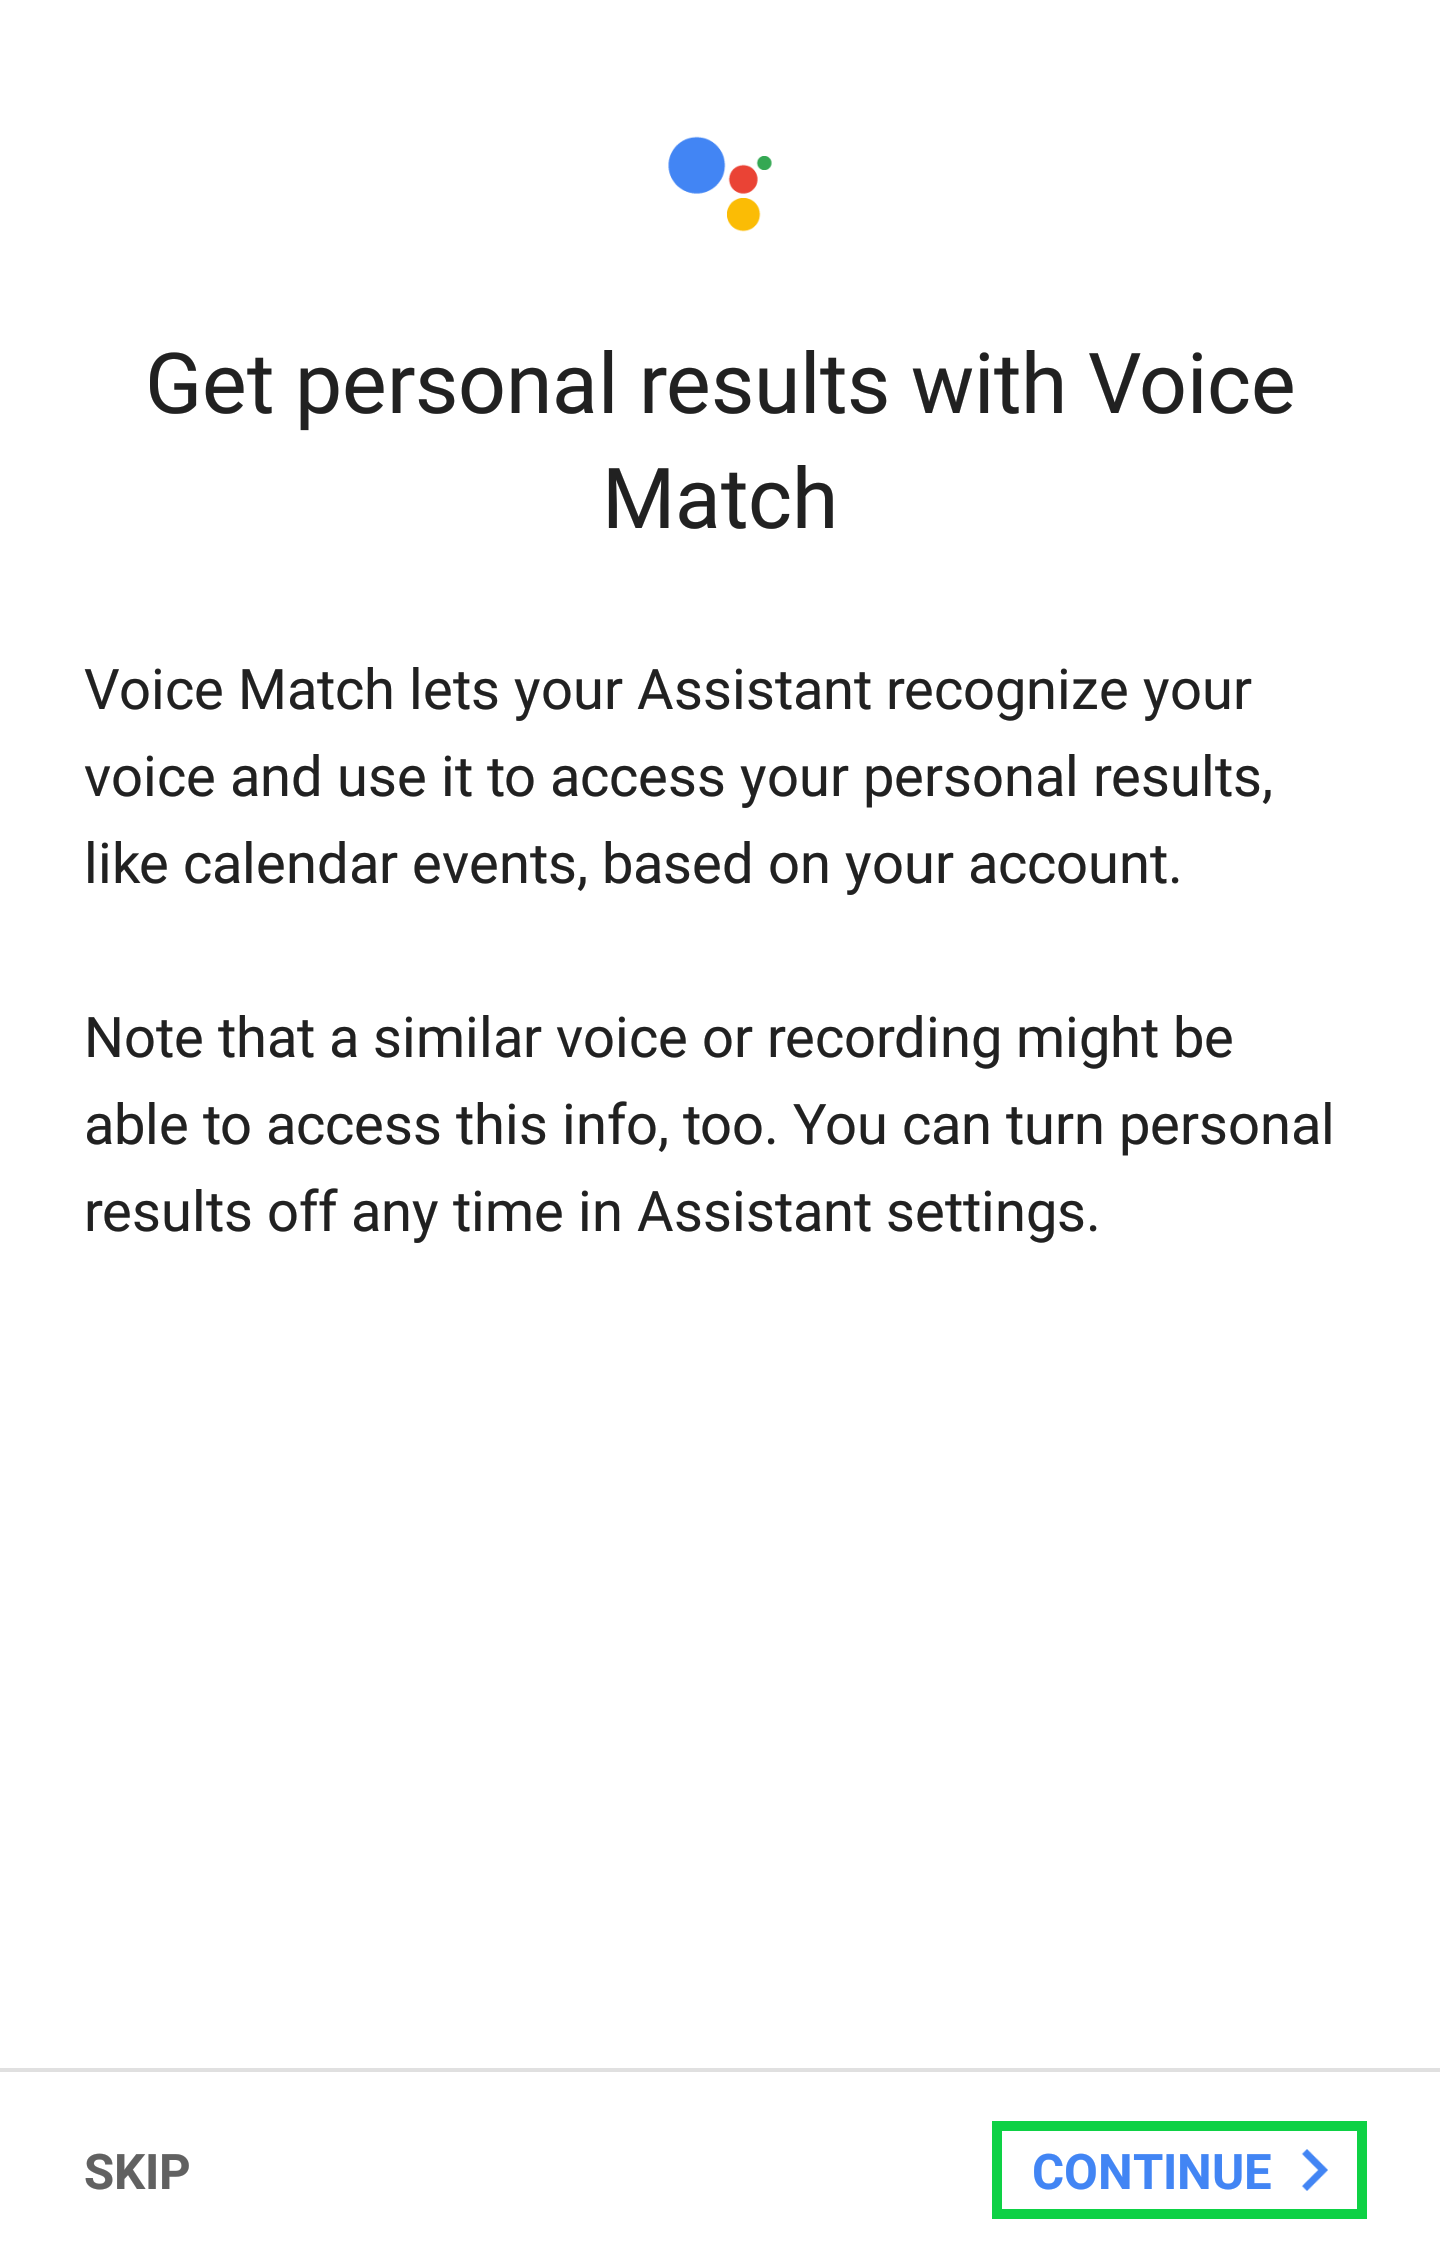
Get personal results with Voice Match by tapping Continue.
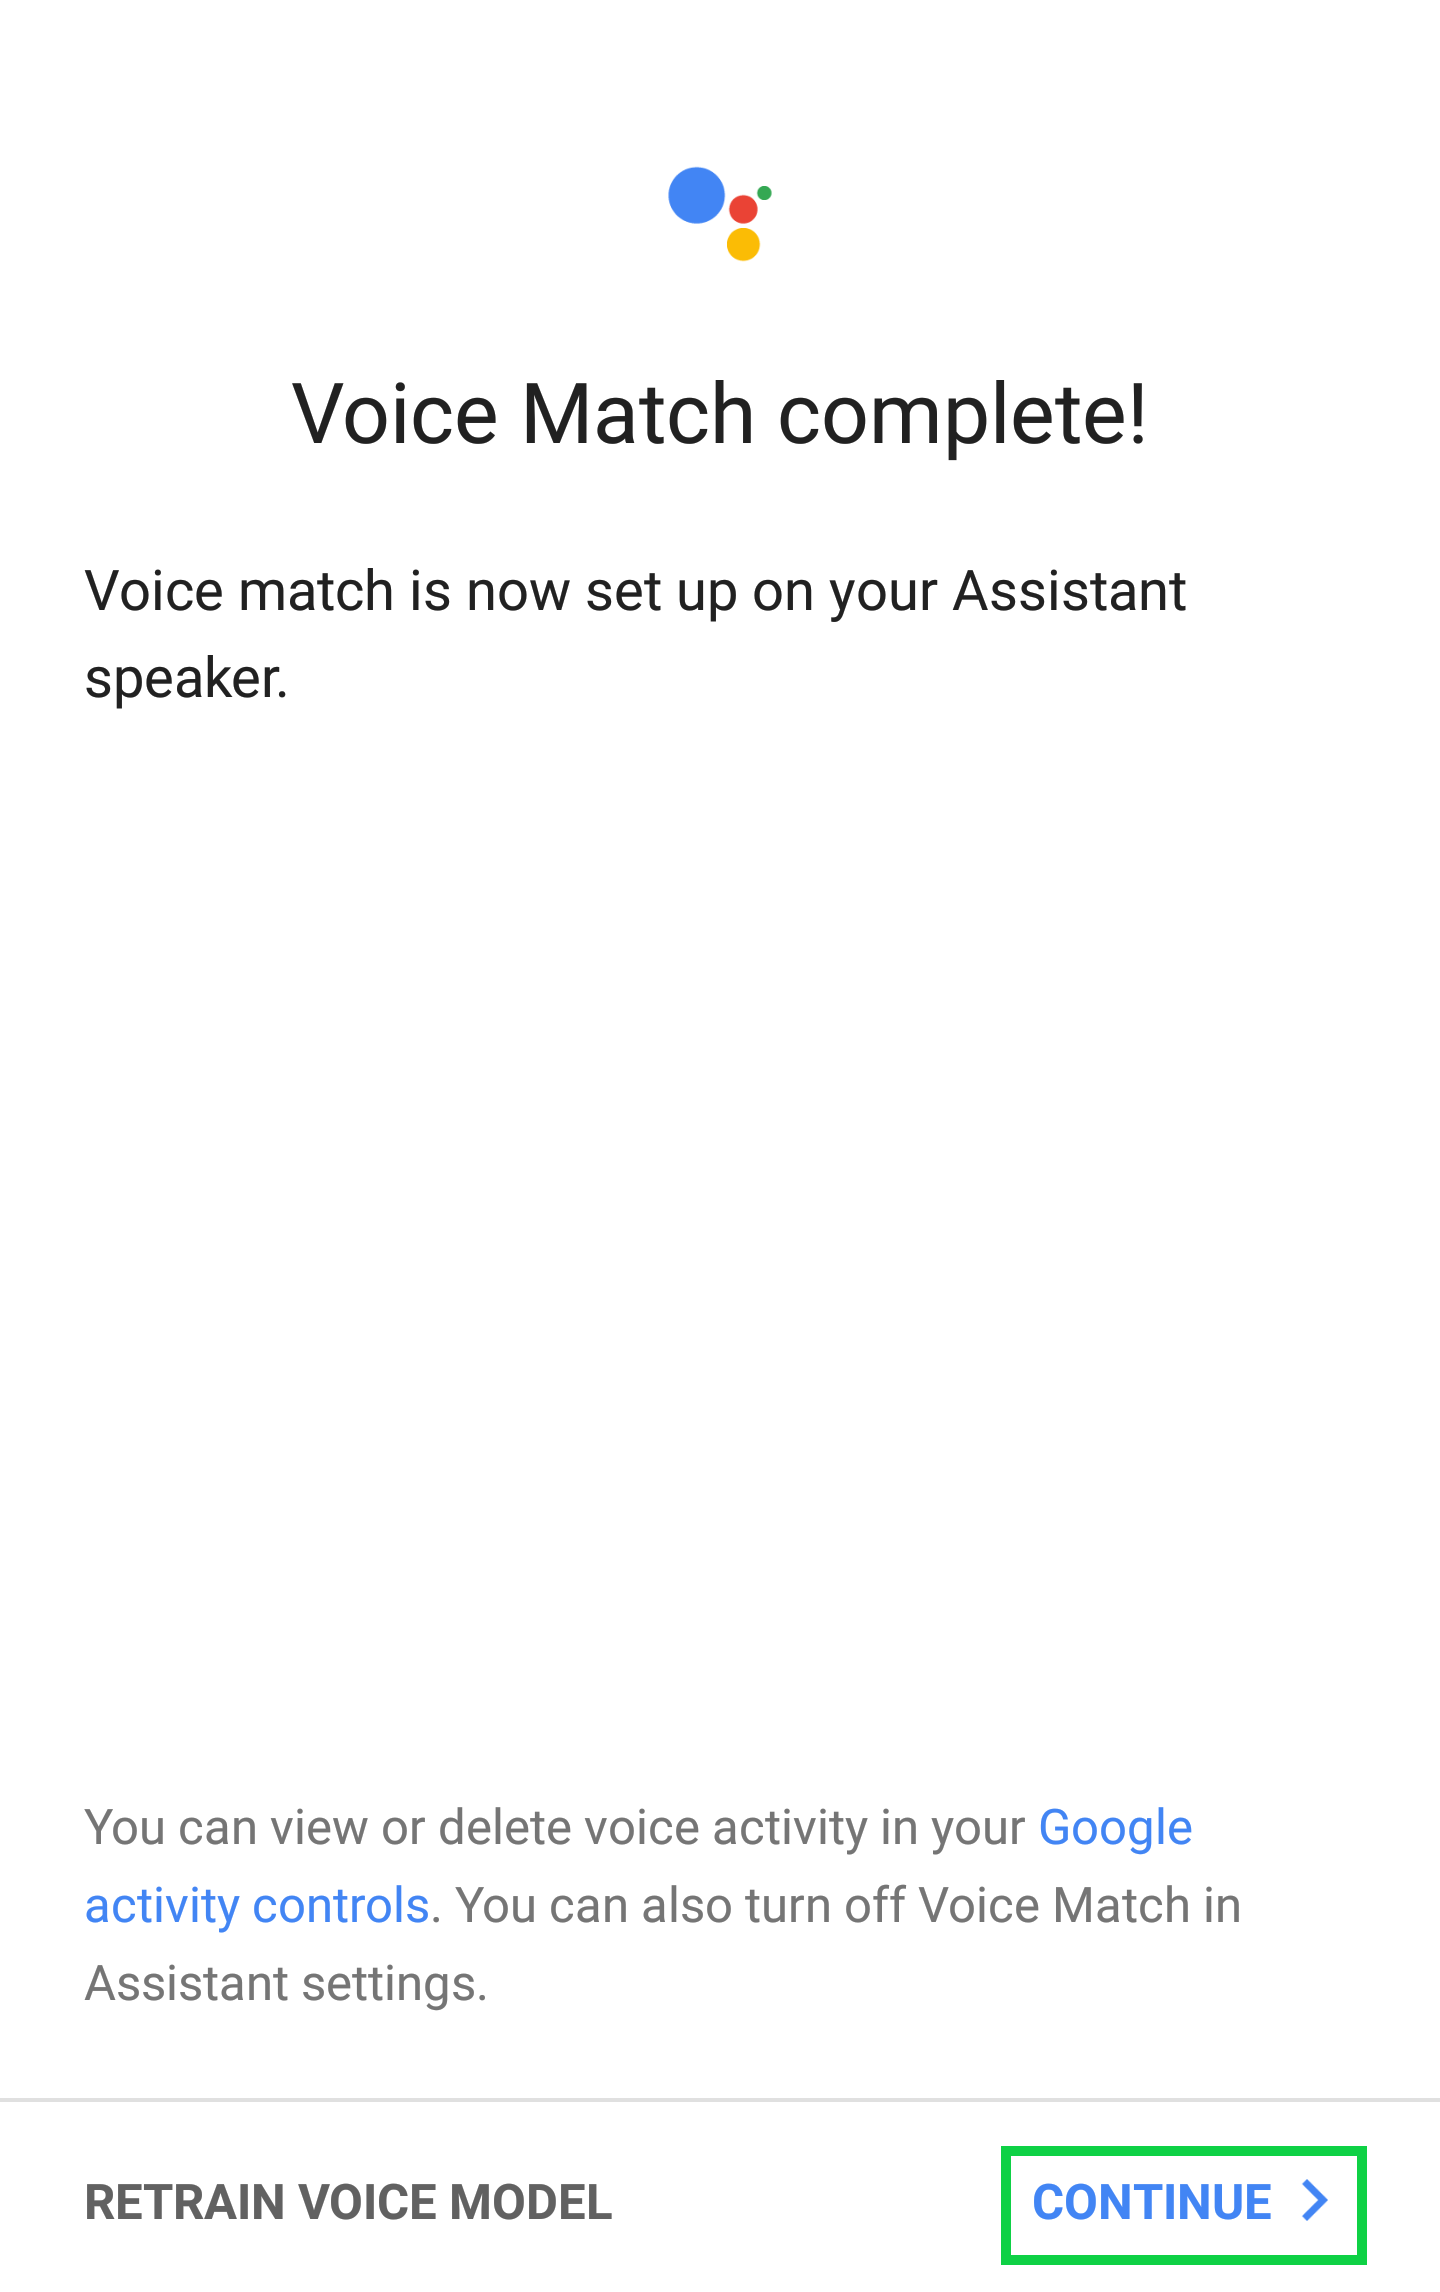
Speak the phrases on the screen and tap Continue when finished.
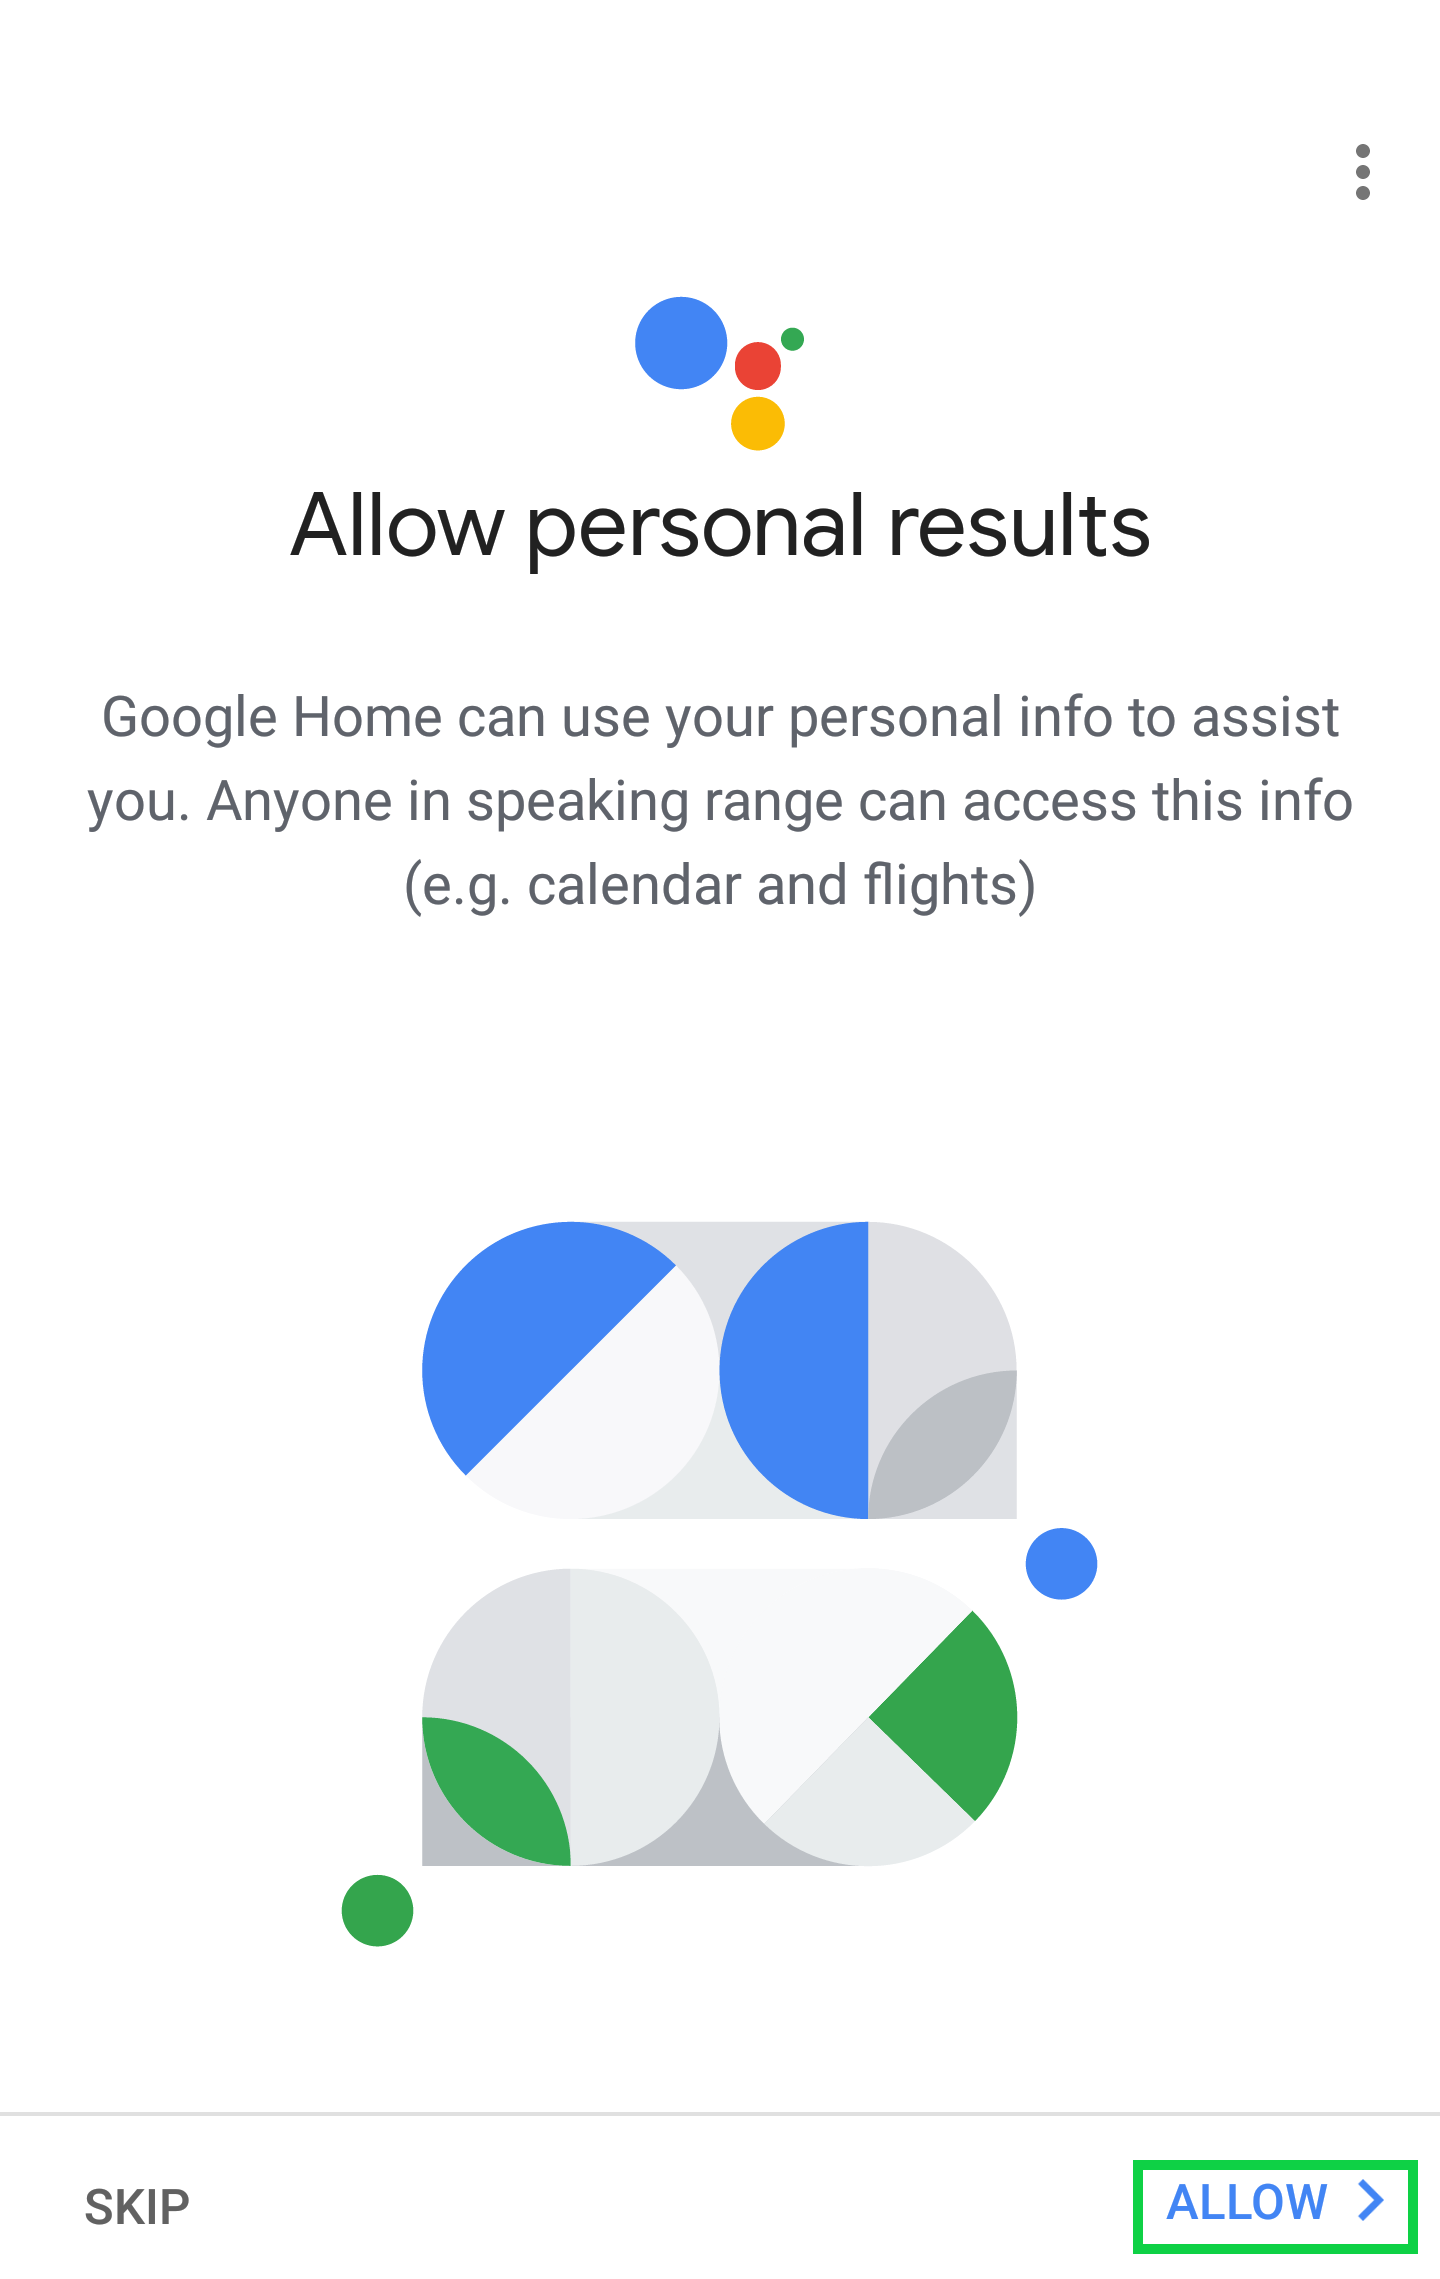
Tap Allow if you wish to allow the use of personal results.
Enter your address and tap Next.
A summary will appear with options to link media services and payment methods to link to your Google Home. Select which you would like to use and tap Next.
Tap Continue to proceed to the next page.
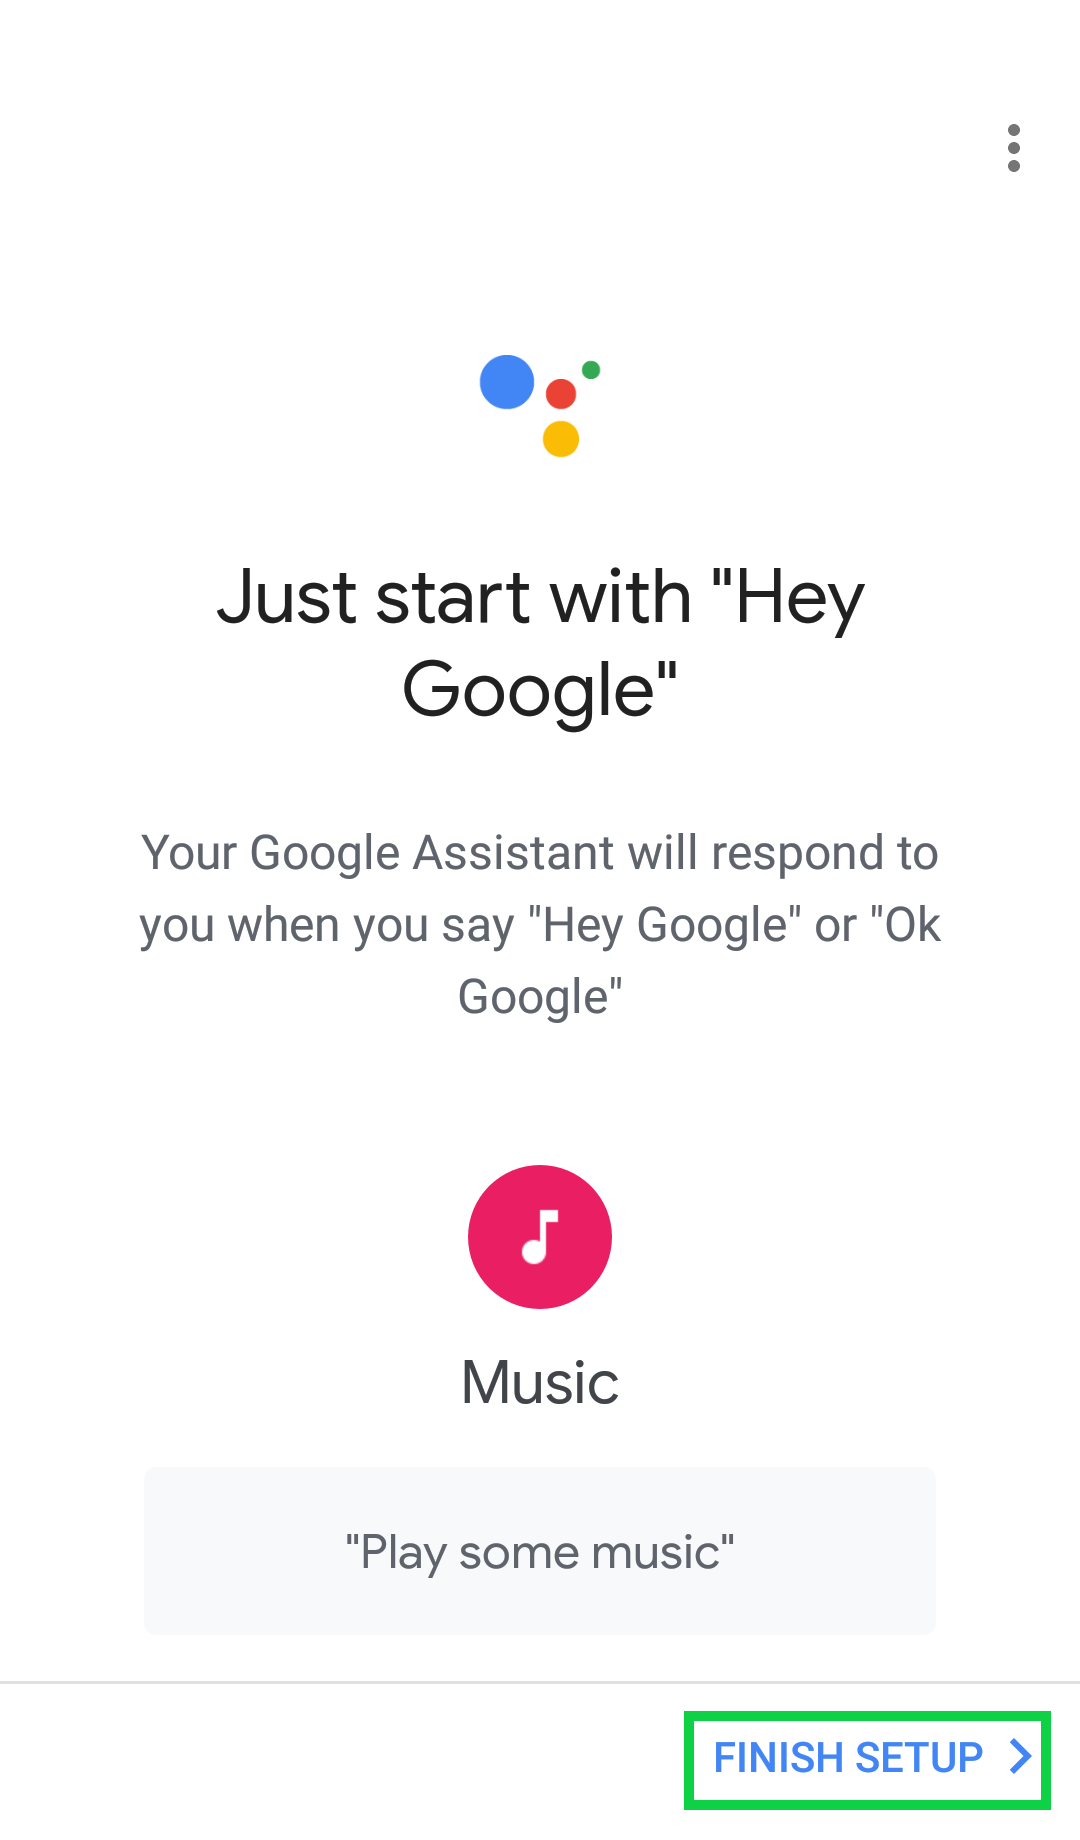
Tap Finish Setup to complete setup.
11. Mobile: Connect to Wireless
In the next steps, we will guide you through connecting your device to the wireless network. We must start by figuring out what type of operating system your device is running (iOS or Android).
12. Android: Connect Wi-Fi
Depending on what device (Smartphone or Tablet) and which generation you have, the menu theme and options might look slightly different on your screen. However, the steps should be similar across all Android devices and generations.
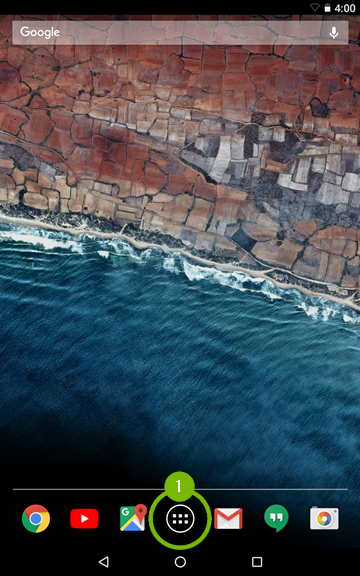
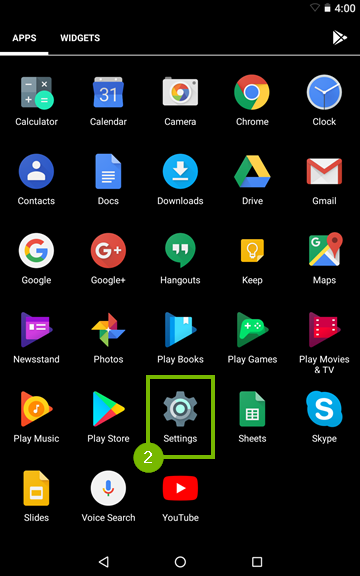
From the main screen of your Android device, tap on the Apps button.
Then look for and tap on Settings.
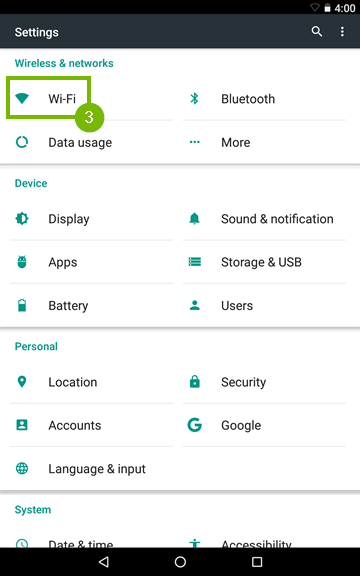
Go to Wi-Fi.
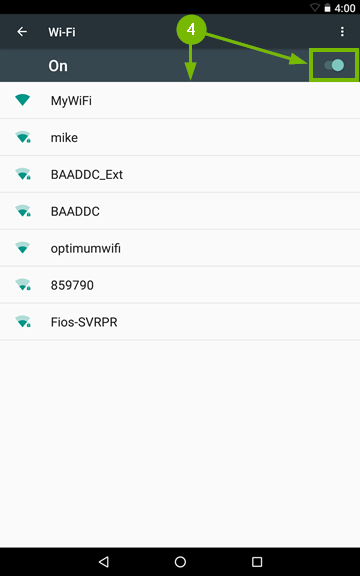
Make sure the Wi-Fi feature is enabled by flipping the On / Off switch to the On position then wait for the network list to populate and tap on the Wi-Fi network that you want to connect to.
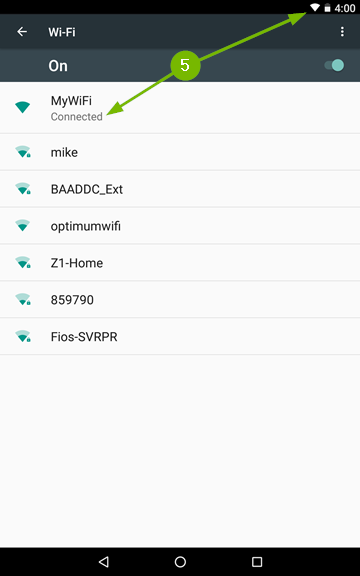
Your Android device will automatically connect to the network if there is no security enabled, or you have connected to it in the past. The Wi-Fi network name will show Connected underneath and the Wi-Fi symbol will fill up in the top right corner of the screen.
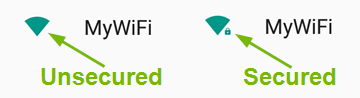
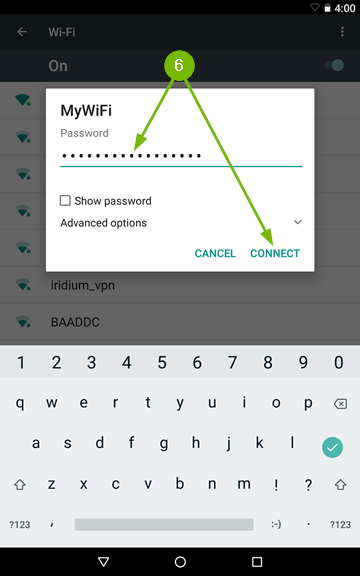
If the Wi-Fi network requires a password, then you will see a small padlock next to the Wi-Fi symbol, which also means the connection is secure. Tapping on a secured Wi-Fi networks name will prompt you to enter the password. Passwords are always case sensitive. Type it in using the on screen keyboard then tap Connect.
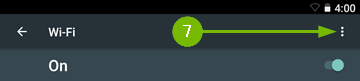
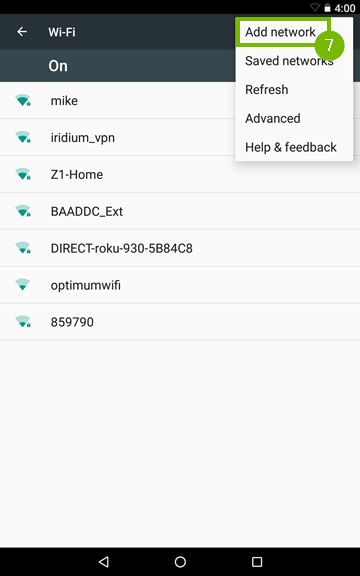
If the Wi-Fi network you are trying to connect to is hidden, then tap the More option which looks like three dots positioned vertically, on the top right corner of the screen, then tap Add network.
Enter the Wi-Fi networks name using the on screen keyboard and tap Save if no password is required to connect. If a password is needed to connect to the Wi-Fi network then tap on Security and select the security type. Type in the password, then tap Save.
At this point your Android device should be connected to Wi-Fi.
As an alternate way you can also try the following method:
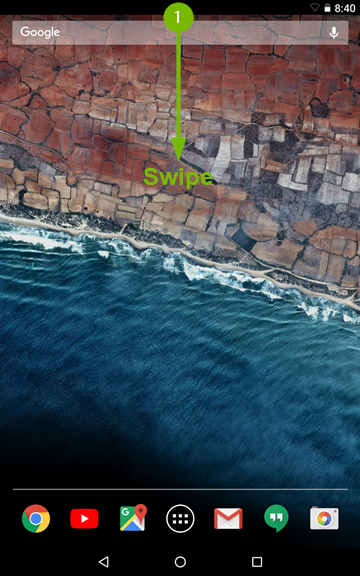
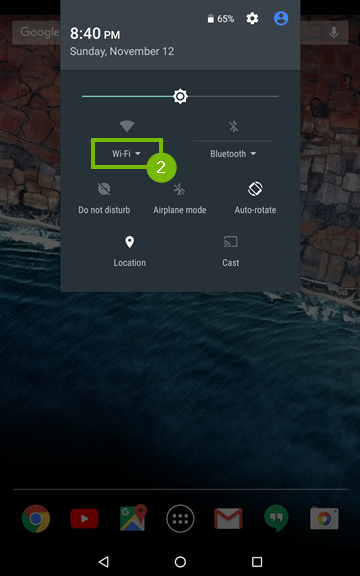
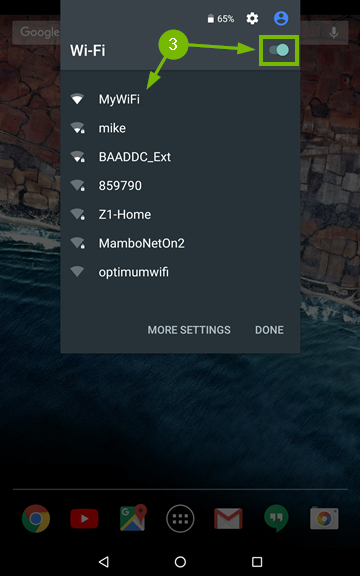
Swipe downwards from the top side of the screen.
Look for the Wi-Fi symbol in the drop down menu and tap on the word below it. If you're not connected to any network, it will say Wi-Fi. If you're already connected to a network, it will show its name.
Make sure the Wi-Fi feature is enabled by flipping the On / Off switch to the On position then wait for the network list to populate and tap on the Wi-Fi network that you want to connect to.
13. iOS: Connect Wi-Fi
Depending on what device (iPhone, iPad or iPod Touch) and which generation you have, the menu theme and options might look slightly different on your screen. However, the steps should be the same across all iOS devices and generations.
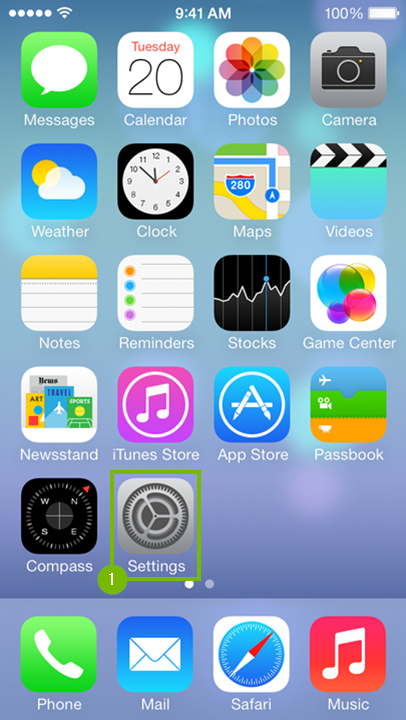
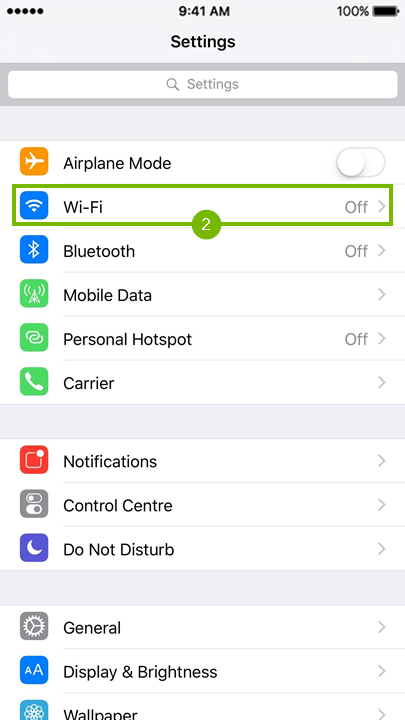
From the main screen of your device, look for and open Settings.
After that, go to Wi-Fi. You will see that this option also shows one of three statuses to the right:
Off - the Wi-Fi feature is disabled
Not Connected - there is no Wi-Fi connection establishe
the Wi-Fi connections name - there is a Wi-Fi connection already established.
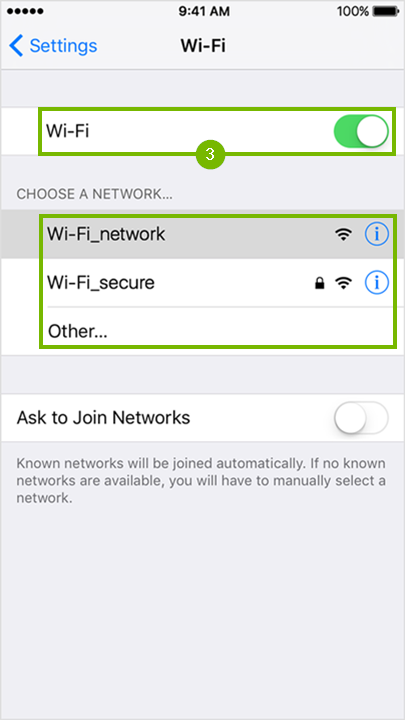
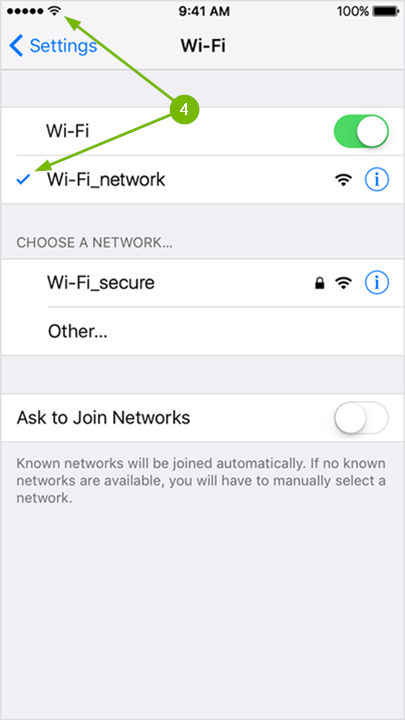
Make sure that the Wi-Fi feature is enabled by flipping the On/Off switch to the green position. Locate and tap the Wi-Fi networks name that you wish to connect to from the list.
Your iOS device will automatically connect to the network if there is no security enabled, or you have connected to it in the past. The checkmark and Wi-Fi symbol indicate you are connected.
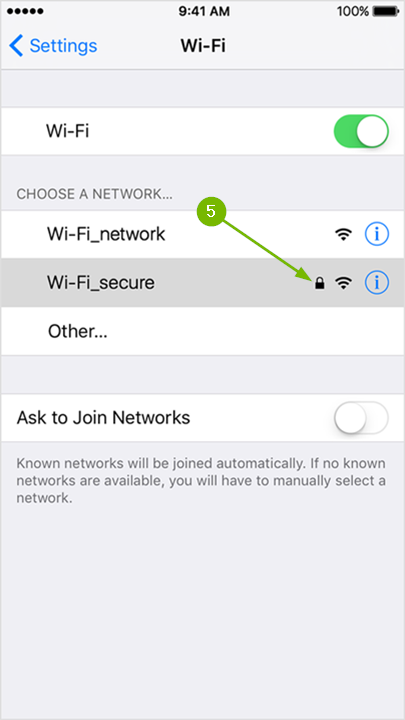
If the Wi-Fi network requires a password, then you will see a small padlock to the right of its name, which also means the connection is secure.
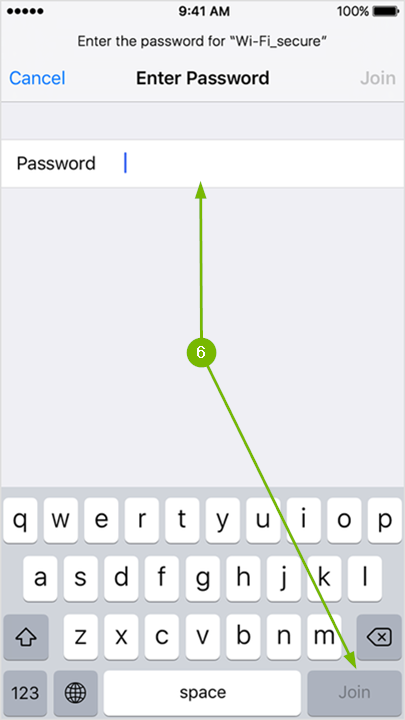
Tapping on a secured Wi-Fi networks name will prompt you to enter the password. Passwords are always case sensitive. Type it in using the on screen keyboard then tap Join on the bottom right corner. If tapping it does nothing, then it means the password you typed in is too short.
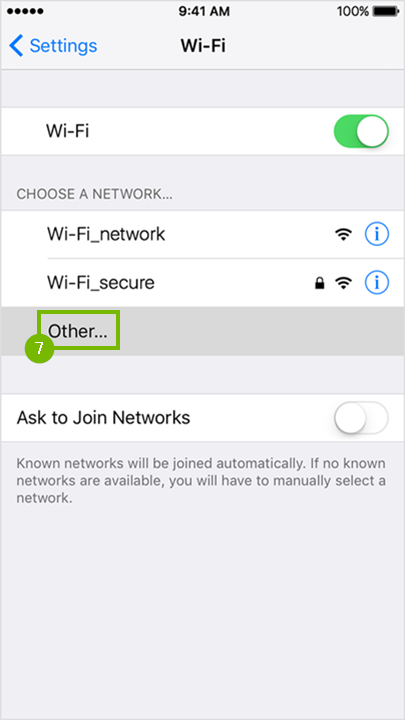
If the Wi-Fi network you are trying to connect to is hidden, then tap the Other... option.
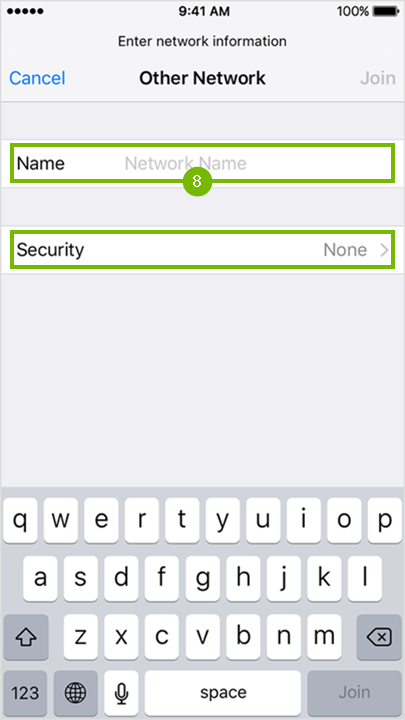
Enter the Wi-Fi networks name using the on screen keyboard and tap Join at the bottom right if no password is required to connect. If a password is needed to connect to the Wi-Fi network then tap on Security.
Choose the type of security the Wi-Fi network has by tapping on it.
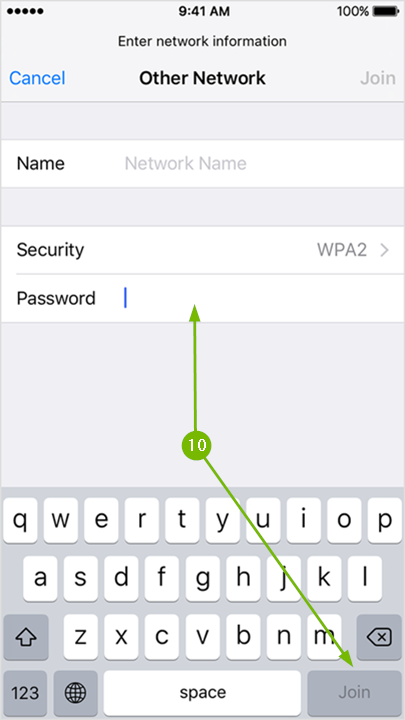
Finally, type in the required Wi-Fi password and tap Join at the bottom right corner to connect.
At this point your iOS device should be connected to Wi-Fi.
14. Google Home: Install
The Google Home app is available for both Android, and iOS (Apple) smartphones and tablets. You can download it directly from the appropriate App Store.
15. Google Home: Install Android App
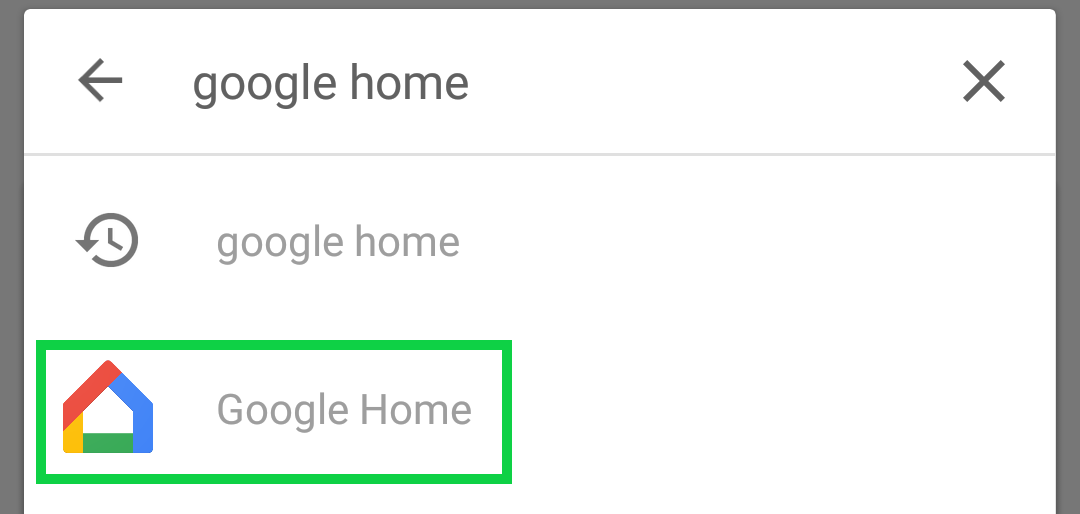
Open Play Store.
Type "Google Home" in the search bar and select Google Home.
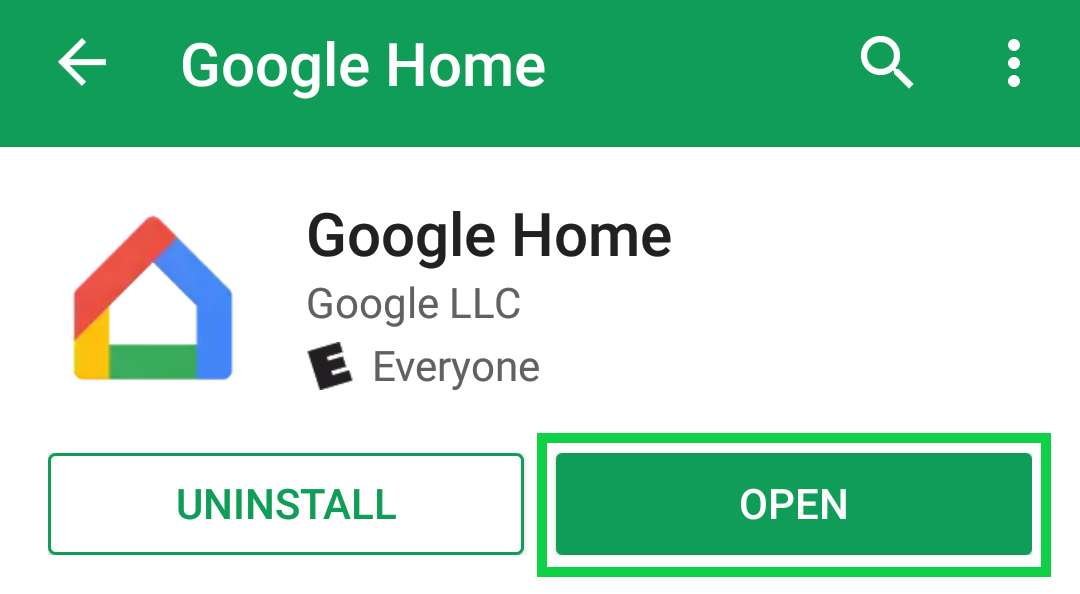
Tap Install to start downloading the app.
Once installed, tap Open to proceed to the setup.
16. Google Home: Install iOS App
Open the App Store.
Type in "Google Home" in the search bar.
Find Google Home in the search results and tap on GET.
Tap on Install to start download.
17. Google Chromecast: Power
Make sure the power cable is connected to the back of the speaker, and to the power outlet or a nearby powered USB port (such as on the back of some TVs and Stereo Systems).
Also, make sure the HDMI (for Chromecast Ultra and Chromecast) cable, or audio cable (for Chromecast Audio), is connected to your TV, speakers, or stereo system.
Remove Hidden Spyware In Minutes For Free
Detect and remove spyware, keyloggers, tracking cookies, and other
threats that slow down your PC or steal your data.
65+ Million Downloads
Spyware scanner with AI-powered detection engine + database
.png)