How-To Troubleshoot a Slow or Freezing Mac Computer
Troubleshooting a slow or freezing Mac computer can help restore its performance and responsiveness. Here's a comprehensive step-by-step guide to identify and resolve common issues causing slowdowns or freezes on your Mac:
Step 1: Check for Insufficient Free Disk Space
Click the Apple menu and select "About This Mac."
Go to the "Storage" tab to see if your disk is almost full.
If your disk is running low on space, delete unnecessary files or move them to an external drive.
Step 2: Quit Unresponsive Applications
Press "Command + Option + Esc" to open the Force Quit Applications window.
Select any unresponsive applications and click "Force Quit" to close them.
Step 3: Manage Startup Items
Go to "System Preferences" > "Users & Groups."
Click your username, then select the "Login Items" tab.
Remove unnecessary startup items by selecting them and clicking the "-" button.
Step 4: Check for macOS Updates
Click the Apple menu and select "About This Mac."
Go to the "Software Update" tab to check for and install any available macOS updates.
Step 5: Check for Software Conflicts
Try running your Mac in Safe Mode to check for software conflicts:
Restart your Mac and hold down the "Shift" key until the Apple logo appears.
Release the "Shift" key when the login screen appears.
If the issue is resolved in Safe Mode, it may be caused by a third-party app or extension.
Step 6: Reset SMC (System Management Controller)
Shut down your Mac.
If it has a removable battery, remove it.
Press and hold the "Shift," "Control," "Option," and "Power" keys for 10 seconds.
Release the keys, reconnect the battery (if applicable), and start your Mac.
Step 7: Reset NVRAM/PRAM
Shut down your Mac.
Turn it on and immediately press and hold "Option + Command + P + R" keys.
Hold these keys for about 20 seconds, then release them.
Step 8: Check Activity Monitor
Open "Activity Monitor" from the "Utilities" folder (found in the "Applications" folder).
Sort processes by CPU or memory usage to identify any resource-intensive tasks or applications.
Quit or force quit any misbehaving processes.
Step 9: Repair Disk Permissions
Open "Disk Utility" from the "Utilities" folder.
Select your startup disk and click "First Aid."
Click "Run" to repair disk permissions.
Step 10: Clear Browser Cache
If your web browser is slow or freezing, clear its cache and browsing history.
Follow the browser-specific instructions to clear cache and history.
Step 11: Create a New User Account
Create a new user account and log in to it.
Check if the problem persists. If not, the issue may be specific to your user account.
Step 12: Check for Malware
Use reputable anti-malware software to scan your Mac for malware and remove any threats.
Step 13: Consider Hardware Upgrades
If your Mac is old and struggles with modern tasks, consider upgrading hardware components like RAM or switching to a solid-state drive (SSD) for improved performance.
Step 14: Backup and Reinstall macOS
If all else fails, consider backing up your data and reinstalling macOS:
Use Time Machine or another backup method to create a full backup of your data.
Reboot your Mac in Recovery Mode (hold down "Command + R" while starting).
Use Disk Utility to erase your startup disk.
Reinstall macOS using the on-screen instructions.
Restore your data from the backup.
By following these steps, you can effectively troubleshoot and resolve issues causing a slow or freezing Mac computer. Begin with the initial steps and progress to more advanced solutions as needed to address the specific issues affecting your Mac's performance.
Contact Support.Com
If you are still having trouble, refer to the Step-By-Step Guide below, or Contact Support.Com for Personalized Assistance.
1. Introduction: Apple MacBook: Resolve Freezing Issues
It can be irritating when your Mac freezes. Although it might happen quite rarely, you should know what to do when your Mac becomes unresponsive.
In this guide, we will help you troubleshoot issues with you Mac becoming unresponsive.
2. macOS: Force Power Off
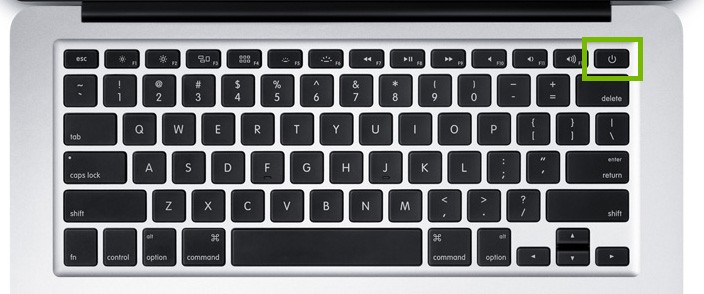
If you computer will not respond to any input and appears frozen, press and hold on the Power button until the computer shuts off.
The power button on a Macbook is typically located on or near the keyboard while the power button on a Mac Pro will vary depending on the model.
Any unsaved work will be lost.
3. macOS: Boot to Recovery
Power on the computer.
Immediately after your Mac turns on (some Mac computers play a startup sound), press and hold the command ⌘ and R keys until the Apple logo appears, then release the keys.
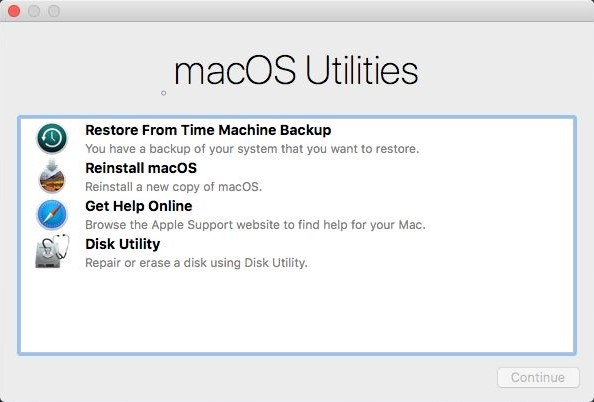
You will see a macOS Utilities page once recovery mode loads.
4. macOS: Recovery Mode: Disk Utility
Disk Utility is designed to be easy to run, and help fix many small issues with your Mac's storage disk. Keep in mind, though, it is also designed to do major repairs and has the capabilities to cause problems if not used correctly. This guide will walk you through the proper options to select to use it safely.
Running Disk Utility can take a long time, especially on larger hard drives. Please make sure you won't need your computer for at least 1 hour before beginning this step.
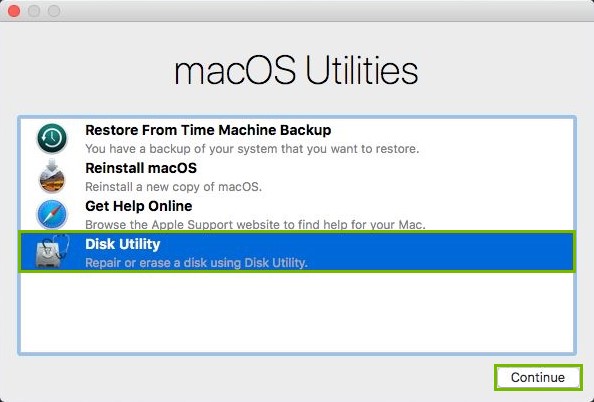
Click Disk Utility, then Continue.
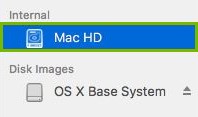
In the bar on the left, highlight your hard disk.
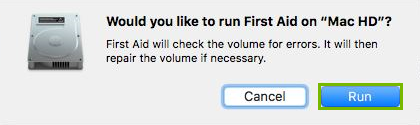
Click the First Aid button at the top.
Click Run.
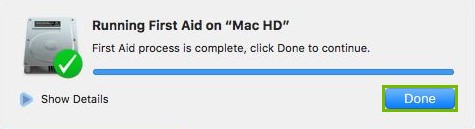
Disk Utility will scan your hard drive, and attempt to repair any issues it has.If you are prompted to complete the repairs yourself, or get an error about disk failure, reach out to Apple Support immediately.
Click Done to finish.
5. macOS: Restart
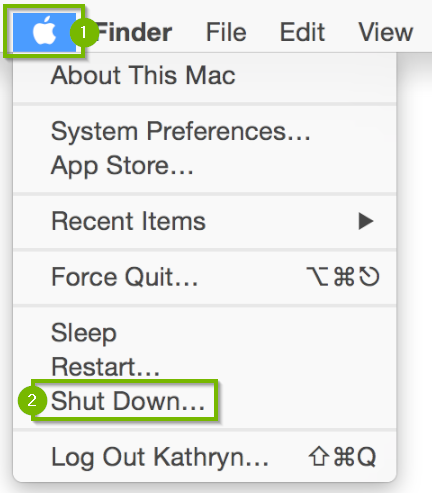
From the menu bar across the top of the screen, select the Apple menu (1), then select Restart... (2).
Any unsaved work will be lost.
6. MacOS: Reset NVRAM
NVRAM (nonvolatile random-access memory) is a cache of settings specific to your Mac. Resetting NVRAM is safe, however you will need to reset some of your minor customizations, such as volume, time zone, or screen resolution.
From the menu bar across the top of the screen, select the Apple menu (1), then select Shut Down... (2).
Wait for your computer to shut down, and turn off.
Turn your Mac back on by pushing the Power button.
Immediately push and hold the option, command ⌘, P, and R keys on your keyboard.
If your Mac plays a startup sound, release the keys after the second time it plays.
If there is no startup sound, release the keys after the second time the Apple logo disappears.
7. macOS: Reboot to Safe Mode
From the menu bar across the top of the screen, select the Apple menu (1), then select Restart... (2).
Immediately press and hold the Shift key on your keyboard.
Release the Shift key when you see the login window.
8. macOS: Check Startup Programs
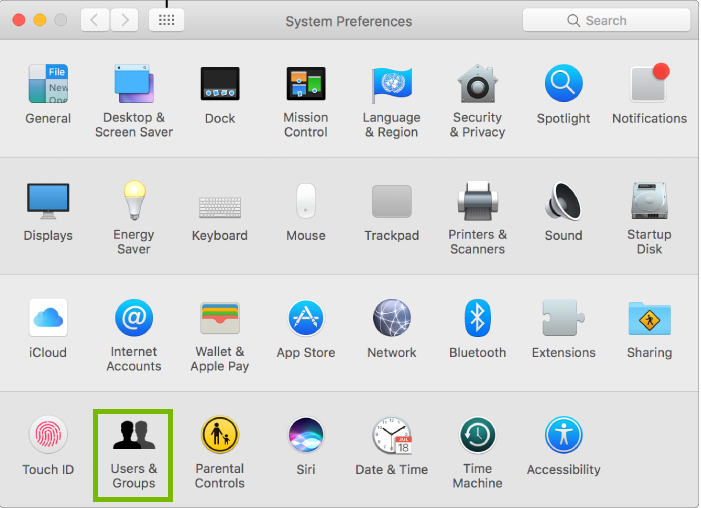
Click on the Apple Menu, then click System Preferences.
Choose Users & Groups.
Choose Login Items at the top. Then, choose your username on the left. Then, click the Lock icon at the bottom. You may need to type in your Mac password to unlock this screen.
Look through the list on the right. If you see an item you don't recognize, or an item you don't use frequently, highlight it by clicking its name, then click the Remove – button below to remove it.
9. macOS: Check Drive Space
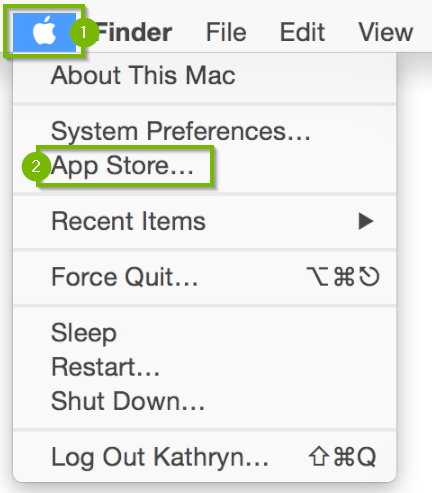
Click the Apple menu, then click on App Store.
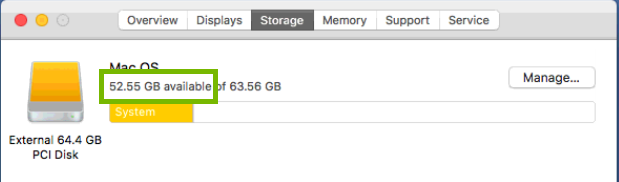
Click the Storage tab.
Free space is the first number you see below the name of your hard drive.
Disk space needs will vary depending on how you use your computer. In general, if you have over 15 GB of free space, you should be fine for updates and upgrades. Only proceed if you have less than 15 GB of free space.
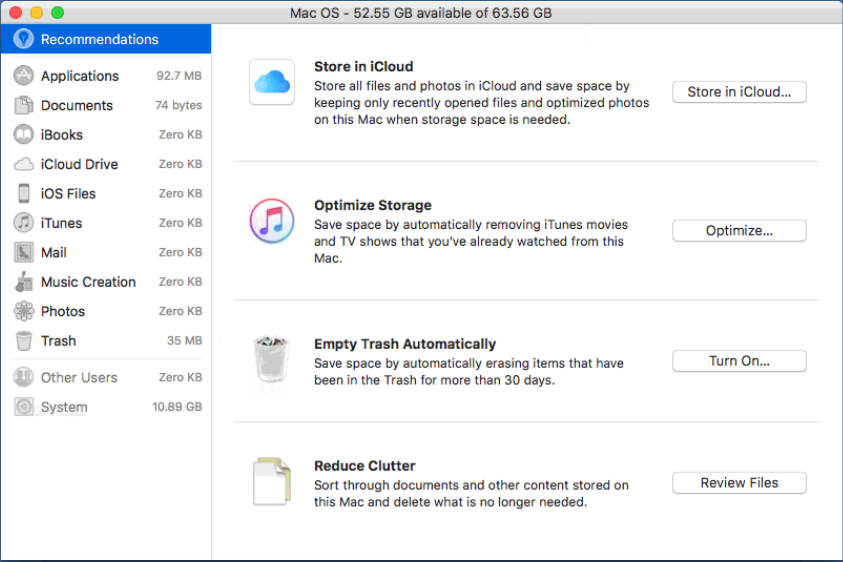
Click Manage... to the right of your hard drive.
Under Recommendations on the left, you'll see some very easy-to-use tools to help optimize and clean up your disk space, such as optimizing the files already stored in iCloud, removing items from iTunes you've already watched or listened to, emptying the Trash automatically, and reviewing the files stored on your Mac to delete unused or old ones.
10. macOS: Restart
From the menu bar across the top of the screen, select the Apple menu (1), then select Restart... (2).
Any unsaved work will be lost.
11. Go To: How to Factory Reset Your Mac
If your computer is still not working correctly, a last effort you can try is factory resetting your Mac. If you wish to know more information about this you can click the button below.
Performing a factory reset will erase all your content and revert it to a state as if you just purchased it. If you do not want to perform this step, you will want to contact Apple for further support.
Clicking this button will open a new guide that will provide you with steps to resolve your issue.
12. What's next?
13. Go To: How to Factory Reset Your Mac
If your computer is still not working correctly, a last effort you can try is factory resetting your Mac. If you wish to know more information about this you can click the button below.
Performing a factory reset will erase all your content and revert it to a state as if you just purchased it. If you do not want to perform this step, you will want to contact Apple for further support.
Clicking this button will open a new guide that will provide you with steps to resolve your issue.
14. What's next?
15. MacOS: Quit and Restart Program
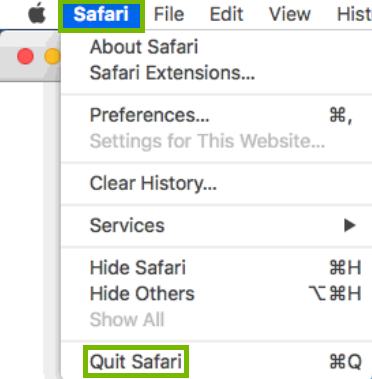
To quit an application, click the application menu at top, then choose Quit Safari at the bottom.
Make sure the application leaves your Dock at the bottom or no longer has a dot underneath it.Running ApplicationClosed Application
If the program does not quit properly:
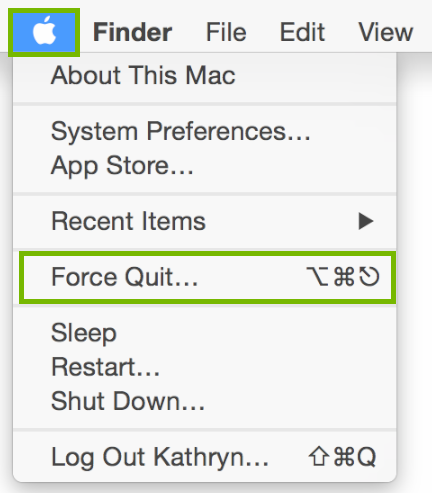
Click on the Apple menu, then click Force Quit.
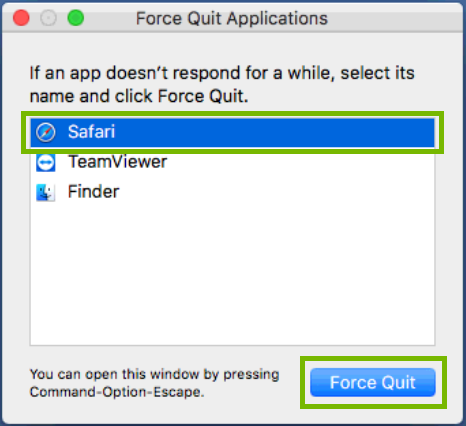
Select the app you want to force close, then click Force Quit.
Click Force Quit when prompted.
To restart the program, click its icon on the Dock or from the Applications folder.
16. macOS: Check for Updates
Click the Apple menu, then click onApp Store.
Select Updates on the bar at the top.
Any pending updates for your Mac will be listed here. Select Update All to apply these updates.
MacBook, MacBook Pro, and MacBook Air must have the power adapter plugged in to automatically download updates.
17. macOS: Disk Utility
Disk Utility is designed to be easy to run, and help fix many small issues with your Mac's storage disk. Keep in mind, though, it is also designed to do major repairs and has the capabilities to cause problems if not used correctly. This guide will walk you through the proper options to select to use it safely.
Running Disk Utility can take a long time, especially on larger hard drives. Please make sure you won't need your computer for at least 1 hour before beginning this step.
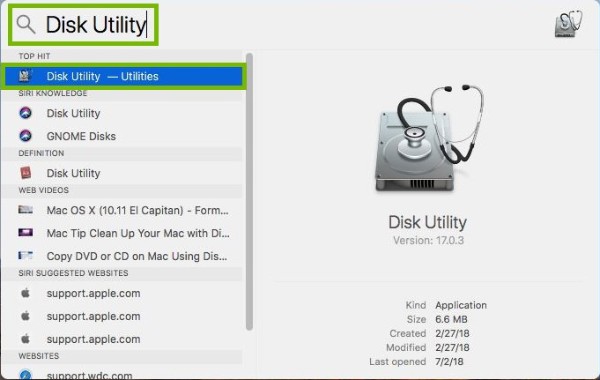
Click on spotlight icon.
Type Disk Utility in the Search bar and click on Disk Utility from the search results.
In the bar on the left, highlight your hard disk.
Click the First Aid button at the top.
Click Run.
Disk Utility will scan your hard drive, and attempt to repair any issues it has.If you are prompted to complete the repairs yourself, or get an error about disk failure, reach out to Apple Support immediately.
Click Done to finish
18. macOS: Check Drive Space
Click the Apple menu, then click on App Store.
Click the Storage tab.
Free space is the first number you see below the name of your hard drive.
Disk space needs will vary depending on how you use your computer. In general, if you have over 15 GB of free space, you should be fine for updates and upgrades. Only proceed if you have less than 15 GB of free space.
Click Manage... to the right of your hard drive.
Under Recommendations on the left, you'll see some very easy-to-use tools to help optimize and clean up your disk space, such as optimizing the files already stored in iCloud, removing items from iTunes you've already watched or listened to, emptying the Trash automatically, and reviewing the files stored on your Mac to delete unused or old ones.
19. macOS: Remove App
This step involves removing the app having an issue.
Removing an app may also remove all data for that app. Make sure you have any information you need backed up before removing an app for your Mac.
Installed from the App Store
Open the Launchpad from the dock.
Click and hold on an icon until all icons start to jiggle.
Click the "x" on the top left of the icon you want to remove.
Click Delete to confirm removal.
Installed from other sources
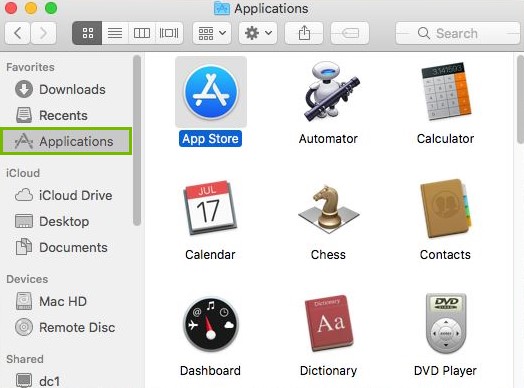
Open the Finder from the dock.
Click on Applications on the left.
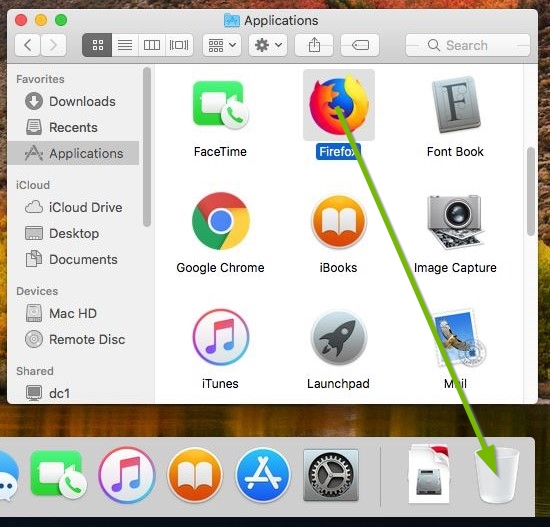
Drag the app you wish to remove to the trash can.
Right click on the trashcan and click Empty Trash.
20. macOS: Install App
From the App Store
Open the app store
Search for the app you want to install
Click on Get or Price next to the app you wish to download Free App
Paid App
Click on Install App or Buy App. Free App
Paid App
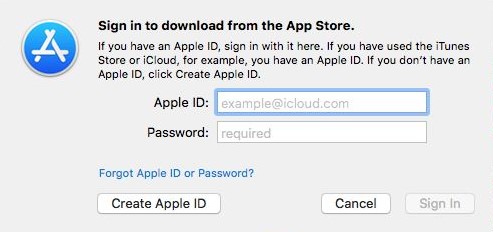
If asked, sign into your Apple ID account to start download.
From other sources
Open the Installer or CD Drive that contains the program
Follow the directions on the installation media regarding how to install the application. Depending on the application, the installation process will vary.
21. What's next?
22. macOS: Check Startup Programs
Click on the Apple Menu, then click System Preferences.
Choose Users & Groups.
Choose Login Items at the top. Then, choose your username on the left. Then, click the Lock icon at the bottom. You may need to type in your Mac password to unlock this screen.
Look through the list on the right. If you see an item you don't recognize, or an item you don't use frequently, highlight it by clicking its name, then click the Remove – button below to remove it.
23. macOS: Check Drive Space
Click the Apple menu, then click on App Store.
Click the Storage tab.
Free space is the first number you see below the name of your hard drive.
Disk space needs will vary depending on how you use your computer. In general, if you have over 15 GB of free space, you should be fine for updates and upgrades. Only proceed if you have less than 15 GB of free space.
Click Manage... to the right of your hard drive.
Under Recommendations on the left, you'll see some very easy-to-use tools to help optimize and clean up your disk space, such as optimizing the files already stored in iCloud, removing items from iTunes you've already watched or listened to, emptying the Trash automatically, and reviewing the files stored on your Mac to delete unused or old ones.
24. macOS: Check for Updates
Click the Apple menu, then click onApp Store.
Select Updates on the bar at the top.
Any pending updates for your Mac will be listed here. Select Update All to apply these updates.
MacBook, MacBook Pro, and MacBook Air must have the power adapter plugged in to automatically download updates.
25. macOS: Restart
From the menu bar across the top of the screen, select the Apple menu (1), then select Restart... (2).
Any unsaved work will be lost.
26. macOS: Disk Utility
Disk Utility is designed to be easy to run, and help fix many small issues with your Mac's storage disk. Keep in mind, though, it is also designed to do major repairs and has the capabilities to cause problems if not used correctly. This guide will walk you through the proper options to select to use it safely.
Running Disk Utility can take a long time, especially on larger hard drives. Please make sure you won't need your computer for at least 1 hour before beginning this step.
Click on spotlight icon.
Type Disk Utility in the Search bar and click on Disk Utility from the search results.
In the bar on the left, highlight your hard disk.
Click the First Aid button at the top.
Click Run.
Disk Utility will scan your hard drive, and attempt to repair any issues it has.If you are prompted to complete the repairs yourself, or get an error about disk failure, reach out to Apple Support immediately.
Click Done to finish
27. MacOS: Reset NVRAM
NVRAM (nonvolatile random-access memory) is a cache of settings specific to your Mac. Resetting NVRAM is safe, however you will need to reset some of your minor customizations, such as volume, time zone, or screen resolution.
From the menu bar across the top of the screen, select the Apple menu (1), then select Shut Down... (2).
Wait for your computer to shut down, and turn off.
Turn your Mac back on by pushing the Power button.
Immediately push and hold the option, command ⌘, P, and R keys on your keyboard.
If your Mac plays a startup sound, release the keys after the second time it plays.
If there is no startup sound, release the keys after the second time the Apple logo disappears.
28. Go To: How to Factory Reset Your Mac
If your computer is still not working correctly, a last effort you can try is factory resetting your Mac. If you wish to know more information about this you can click the button below.
Performing a factory reset will erase all your content and revert it to a state as if you just purchased it. If you do not want to perform this step, you will want to contact Apple for further support.
.png)