Printers can instantly go from being lifesavers to infinitely frustrating if they stop working in the middle of an important print job. There are dozens of reasons why your printer may not be printing, which can make diagnosing the root cause difficult. This guide will take you through troubleshooting solutions for some of the most common printer problems, so you can skip the headache and get your printer back on track.
Printers are essential peripherals for Mac users, but they can sometimes be a source of frustration when they encounter issues. This comprehensive guide will help you diagnose and resolve common printer problems on your Mac, ensuring a smooth and trouble-free printing experience.
Understanding Common Printer Issues:
Check Printer Hardware and Connections:
Verify that the printer is powered on and properly connected to your Mac.
Inspect cables, USB ports, and wireless connections.
Update Printer Drivers and Firmware:
Ensure you have the latest printer drivers and firmware installed.
Download and install updates from the printer manufacturer's website.
Check Printer Queue and Jobs:
Open the Print Queue to monitor and manage print jobs.
Cancel stuck or pending print jobs.
Reset the Printing System:
As a last resort, reset the printing system to clear any configuration issues.
Go to "System Preferences" > "Printers & Scanners," right-click in the printer list, and choose "Reset printing system."
Reinstall the Printer:
Remove and reinstall the printer in "System Preferences" > "Printers & Scanners."
Ensure the correct printer is selected as the default.
Troubleshoot Wireless and Network Printers:
Ensure your Mac and printer are on the same Wi-Fi network.
Check the printer's network settings.
Restart your router or wireless access point if necessary.
Resolve Printing Errors and Quality Issues:
Troubleshoot specific issues like paper jams, ink or toner problems, and faded prints.
Adjust print settings for better quality.
By following these troubleshooting steps, you can ensure a reliable and hassle-free printing experience.
Contact Support.Com
If you are still having trouble, refer to the Step-By-Step Guide below, or Contact Support.Com for Personalized Assistance.
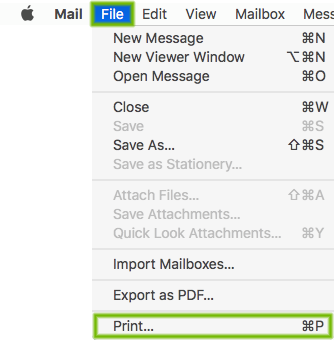
2. macOS: Printer: Select Proper Printer
Sometimes, macOS could simply select the wrong printer.
Open the document, mail, web page, or image you wanted to print.
Select File > Print.
In the Print menu, make sure your printer is selected at the top.
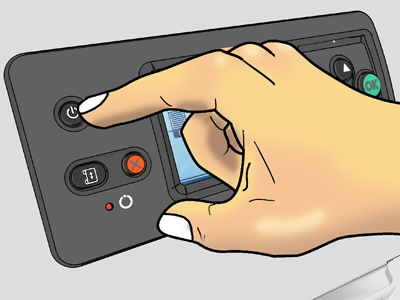
3. Printer: Reboot
The following illustrations are a general representation of what your printer's power button/switch may look like. Your power button/switch will vary depending on the manufacturer and model printer you have.
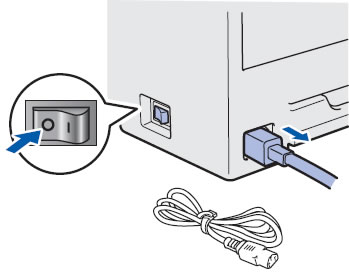
Press the Power button on the front panel to turn the printer off. Wait a few moments, and then press the Power button again. This should restart the printer.
If the power button will not turn the printer off, turn off the printer by using the power switch at the rear of the printer, if your printer has one.
Remove the power cords from the power sockets.
Wait for 10 seconds.
Reinsert the power cords into the power sockets and turn on the power switch if necessary.
Press the Power button to turn on the printer on again.
4. macOS: Restart
From the menu bar across the top of the screen, select the Apple menu (1), then select Restart... (2).
Any unsaved work will be lost.
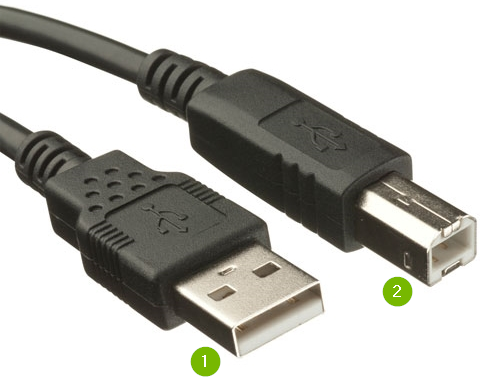
5. Printer: Check Connection
This only applies if you have a USB, or Wired printer. It is safe to skip this step if you are using a Wi-Fi connected printer.
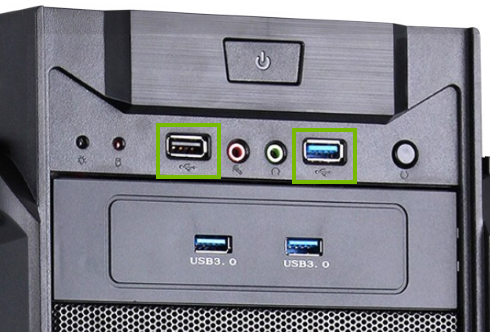
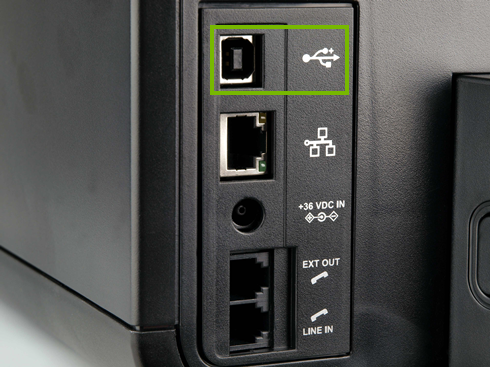
The following illustrations are a general representation of what your USB ports may look like. The location of your USB ports will vary depending on the manufacturer and model printer and computer you have.
If your printer does not connect via Wi-Fi, it will connect directly to a computer with a USB cable. One end (1) goes into the computer and the other end (2) goes into the printer.
Locate the USB cable that connects the printer to the computer. Ensure the flat end is plugged into the computer correctly and securely.
Locate the USB port on the side or back of the printer. Make sure not to confuse it with the any other ports that might be next to it. Look for the USB symbol next to the port. The number and layout of the ports varies by printer. Ensure this end of the USB cable is plugged into the printer correctly and securely.
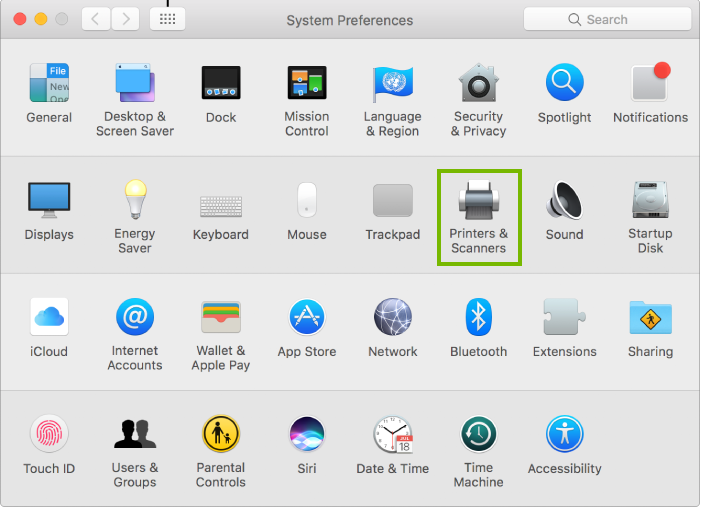
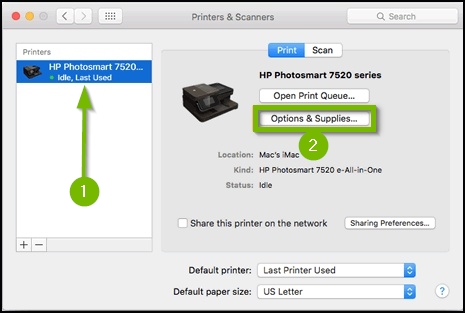
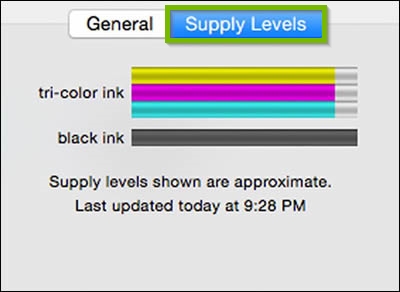
6. macOS: Printer: Check Ink/Toner
On Your macOS Computer
Click on the Apple Menu and click on System Preferences.
Click Printers and Scanners.
Select the name of your printer in the printers list, click Options & Supplies.
Click the Supply Levels tab.
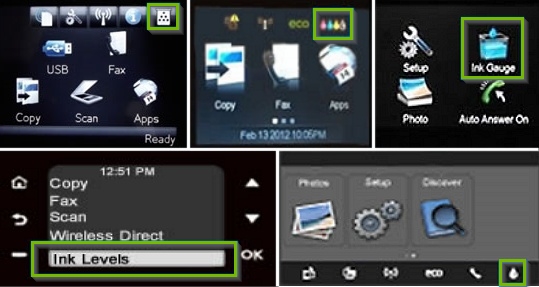
On Your Printer
Every printer is different and the following steps are generalized. For explicit instructions on checking ink levels, consult your printer's documentation.
Locate the Menu button of your printer and use the appropriate navigation keys to find a Status or Reports section.
Print a Printer Information or Status page to see current toner levels.
If it has one, your printer's screen may display ink/toner levels regularly.
Replace any cartridges that are flagged as being low or in a precautionary state.
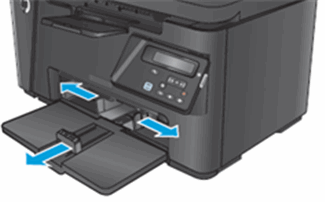
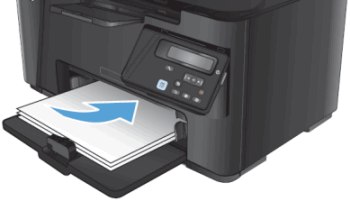
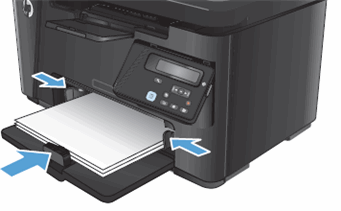
7. Printer: Check Paper
The following illustrations are a general representation of what your printer's paper tray may look like. Your actual paper tray will vary depending on the manufacturer and model printer you have. However, most paper trays are made in a similar fashion.
Slide the paper guides to their outermost positions.
Load a stack of plain paper with the print-side facing up into the input tray, and then slide the stack forward until it stops.
Slide the paper length and width guides so that they are resting against the stack of paper.
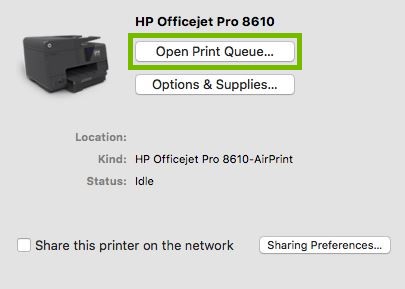
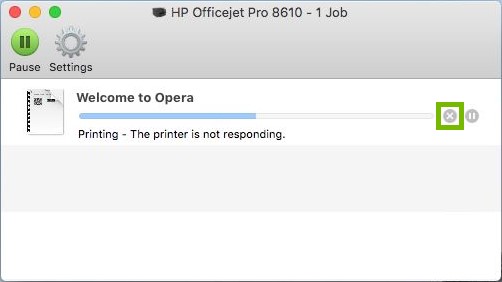
8. macOS: Printer: Clear Print Queue
Click on the Apple Menu and click on System Preferences.
Click Printers and Scanners.
Click Open Print Queue.
To clear a stuck print job, click the x to the right of the print job.
Remove Hidden Spyware In Minutes For Free
Detect and remove spyware, keyloggers, tracking cookies, and other
threats that slow down your PC or steal your data.
65+ Million Downloads
Spyware scanner with AI-powered detection engine + database
.png)