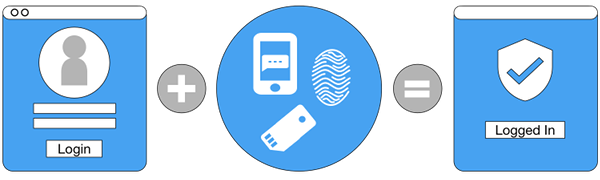
Two-step verification, also known as two-factor authentication (2FA), is a security process that adds an extra layer of protection to your online accounts. It requires not only your password but also a second piece of information or verification method to access your accounts. This significantly enhances security by making it much harder for unauthorized individuals to gain access. Here's a step-by-step guide on what 2-step verification is and how to use it:
2-Step Verification combines two different types of authentication factors:
Something You Know: This is your password or PIN.
Something You Have: This is typically a temporary code sent to your mobile device or email.
The idea is that even if someone obtains your password (the first factor), they won't be able to access your account without the second factor, which changes frequently and is known only to you.
How to Set Up 2-Step Verification:
Choose a Service: Start by selecting an online service or account where you want to enable 2-Step Verification. Popular choices include Google, Apple, Facebook, and various banking and email services.
Access Your Account Settings:
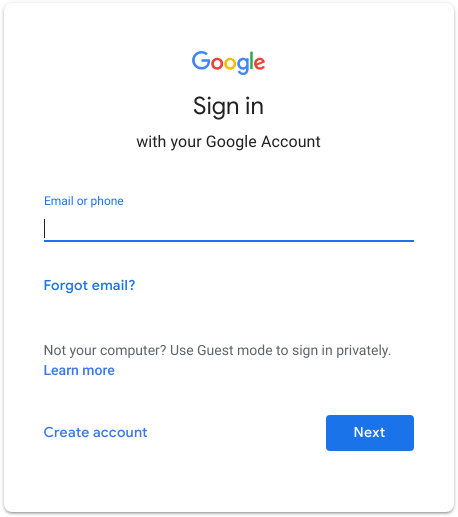
For Google:
Go to your Google Account settings (myaccount.google.com).
Click on "Security" in the left sidebar.
Scroll down to "2-Step Verification" and click "Get started."
Enable 2-Step Verification:
Follow the on-screen instructions to enable 2-Step Verification.
You may be asked to enter your password to proceed.
Choose Verification Methods:
Most services offer multiple verification methods, such as:
Text Message (SMS): You'll receive a text with a verification code.
Authenticator App: Use a time-based code generated by an app like Google Authenticator or Authy.
Backup Codes: Print or save one-time use codes for emergencies.
Security Key: Some services support physical USB or NFC security keys.
Verify Your Phone Number: If you choose SMS or phone call verification, you'll need to provide and verify your phone number.
Set Up Backup Options: It's important to set up backup options in case you can't access your primary verification method.
Review and Confirm:
Review the setup information and click "Turn On" or "Enable."
Follow any additional prompts to complete the process.
How to Use 2-Step Verification:
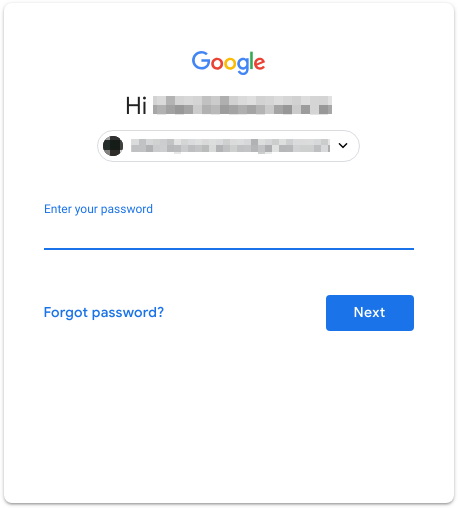
Login as Usual: When you log in to your account, enter your username and password as you normally would.
Enter the Verification Code:
Depending on your chosen method, you'll receive a verification code via text message, email, or through your authenticator app.
Enter the code into the prompted field on the login page.
Access Your Account: Once you've entered the correct code, you'll gain access to your account.
Tips for Using 2-Step Verification:
Use an Authenticator App: Authenticator apps like Google Authenticator or Authy are more secure than SMS codes because they aren't susceptible to SIM swapping attacks.
Save Backup Codes: Keep a copy of your backup codes in a secure place, like a physical safe or a secure digital vault.
Don't Share Codes: Never share your verification codes or backup codes with anyone, even if they claim to be from the service provider.
Update Contact Information: Make sure your phone number and email address associated with 2-Step Verification are up to date.
Use Security Keys: If available, consider using a physical security key for the highest level of security.
Enabling 2-Step Verification enhances the security of your online accounts and protects your sensitive information from unauthorized access. It's a simple yet highly effective way to bolster your online security.
Contact Support.Com
If you are still having trouble, refer to the Step-By-Step Guide below, or Contact Support.Com for Personalized Assistance.
1. Introduction: Multi-Factor Authentication
Protecting your online services and identity on the internet is becoming increasingly important in our modern world. In many ways, the various services and devices we use are simply extensions of ourselves.
Keeping your accounts safe is tricky, though. Computers aren't all that smart, and require you tell them who you are. Then, they challenge you to prove it.
When it comes to your digital accounts, adding an extra layer of security, in the form of extra challenges that are more difficult or specific to you, makes it easier for the various services to know, with confidence, that you and only you could be accessing your account.
This guide will give you the basics on what multi-factor authentication is, what two-step verification is, and generally how to set it up for common services you may use.
To understand Two-Factor Authentication, it's best to understand how a computer handles authentication in the first place, using just your password.
Single-Factor Authentication
Remember, for the most part, your computer is blind and deaf when it comes to passwords; it can't see you (and even if it could, it doesn't understand faces like people do), and it can't hear your voice (nor really recognize it as yours like humans do).
The first thing your computer or online account does is ask who you are. This is your Username, or Email address. This is usually considered, by the computer, 'common knowledge'. In other words, it is shown to you directly, and the computer assumes other people will know your username. In many cases, this is your Email address anyway, and that's how other people reach you!
Now, the computer knows what account to look under. So it asks you to prove that you are that person. It asks for your password.
Think of it a bit like a lock and key. Your account has a lock on it, when you put in your password, it's just like putting in the key and unlocking everything that's in your account.
But, there's the problem: Keys. Keys can be easily copied if they're digital; and in the case of your password, it's just text. Plus, people can eavesdrop over your shoulder to see your password, they can guess it from knowing a little bit about you, or they can get your password from another compromised account.
Just like in the real world; a lock and key system will keep honest people out. Dishonest people, though, have little-to-no qualms about bypassing a lock entirely, or stealing a key. Given that your online accounts are, by their very nature, exposed and made available to billions of people online, it's safe to assume a few of them are dishonest.
When it comes to your most important online accounts, a lock and key may not be enough. This is where Multi-Factor Authentication comes in.
For your most important digital accounts, you want more than lock and key security. You'd rather have a security guard, or bouncer, checking everyone's ID as they come in and making sure they're who they say they are.
Two-Factor Authentication
Two-Factor Authentication provides an extra layer of security. Instead of a simple password, your computer or online service knows about a couple different things and can verify that the person who signs in is, in fact, you.
In Single-Factor Authentication, there's only the username and password. Everyone knows what your username is, so the only piece of 'secret' information is the password. In two-factor authentication, there's a second step, usually verification through another type of communication, to make sure you are the one using that password.
Example
When logging into a Google account, the first thing asked for is your username. This is so the computer knows who is trying to sign in.
Next, it will ask for your password.
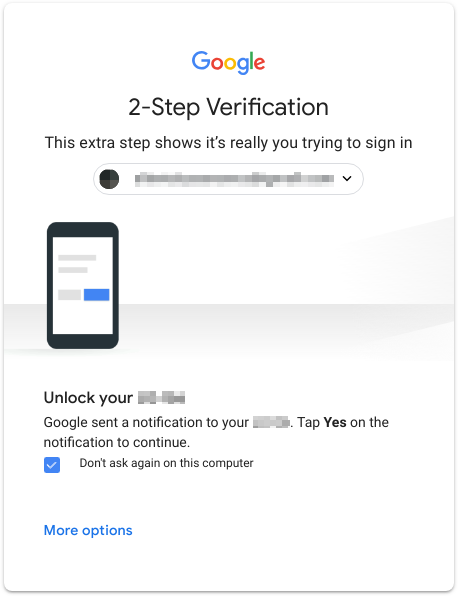
When Two-Factor Authentication is turned on, it double-checks that attempt to log on.
On Your Computer
Your computer displays a notice, telling you an extra verification is on your phone.
On Your Smartphone
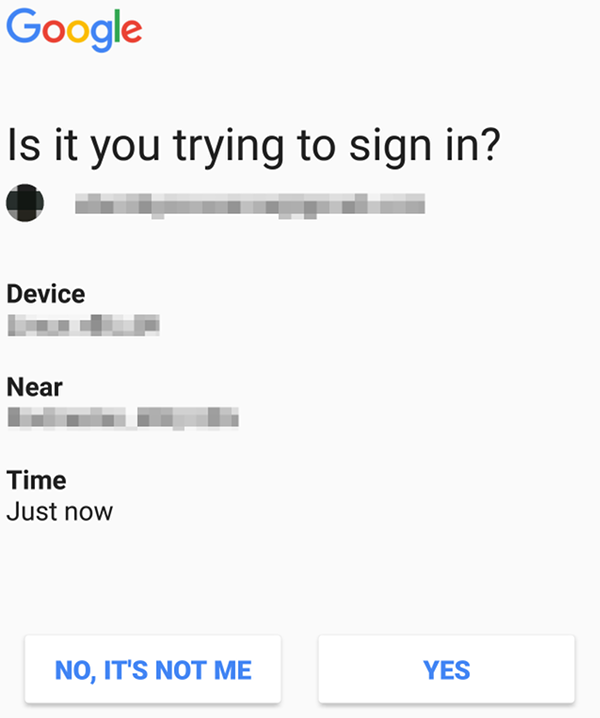
Your phone asks if you recognize and allow the login to continue.
Finally, you are allowed to sign on and use your Google Account.
Multi-Factor Authentication, in this case Two-Step Verification, provides an extra check at the door. In this case, anyone who wanted access to your account would need to know your username (easy), your password (hard), and have possession of your unlocked smartphone (very, very difficult).
Keep in mind that this is just one example of how Two-Factor Authentication works with one service. Many different online accounts offer Two-Factor authentication, and their process for authentication may vary. Most services will make it very clear what the login requirements will be upon enabling Two-Factor authentication to prepare you for future login attempts.
4. Multi-Factor Authentication: Password management best practices
Before continuing, it's best to mention immediately that Multi-Factor Authentication does not make a weak password strong. The best practice is still using complex and hard-to-guess passwords.
Always keep the following password management best practices in mind:
Longer is better.
More complex is better.
Do not only use readily available or easily guessable information, such as your phone number, address or birthday.
Include numbers, uppercase letters and special characters.
Change your passwords frequently. This is why most companies and some services will prompt you to change your password after a certain amount of time.
Do not use the same password on multiple accounts.
Never enter your password when someone is within viewing distance or viewable angle of your screen. This is especially important to keep in mind when on planes, trains, buses or anything else with rows of seats.
Never check the box to show the password when logging into a site or service. You are better off missing a potential typo than exposing your password.
Never give anyone else your password.
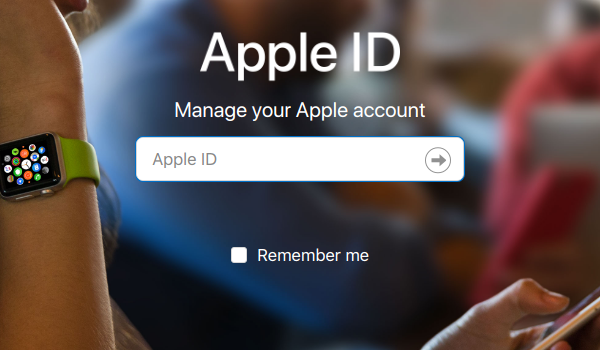
5. Apple ID: Setup Two-Factor Authentication
Two-factor authentication is an extra layer of security for your Apple ID. The first layer is your password, this second layer is a special code or prompt displayed on your iPhone. Enabling Two-Factor Authentication for your Apple ID helps prevent unauthorized use of your account.
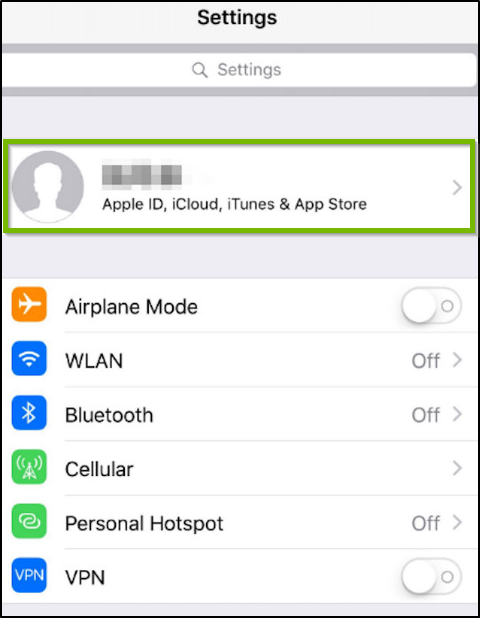
Turn on two-factor authentication in Settings
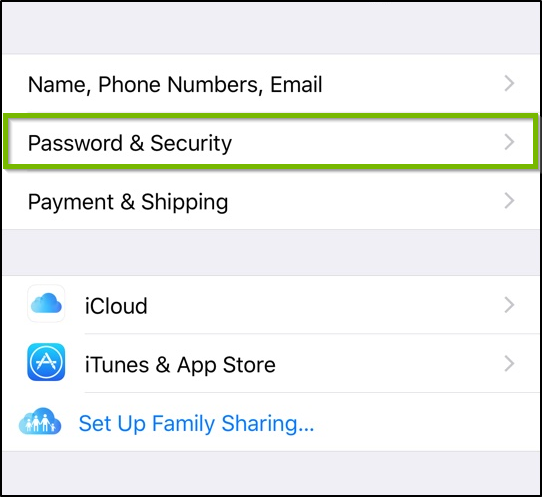
Go to Settings.
Tap on Your Name.
Tap Password & Security.
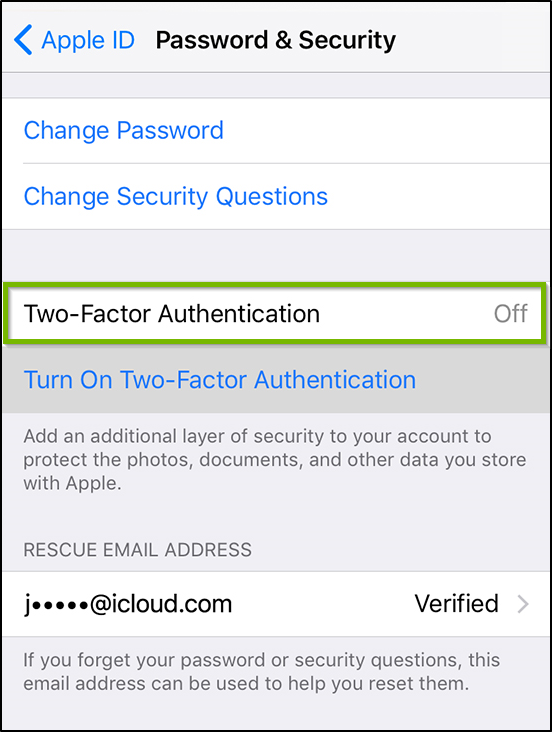
To turn on, tap Two-Factor Authentication.
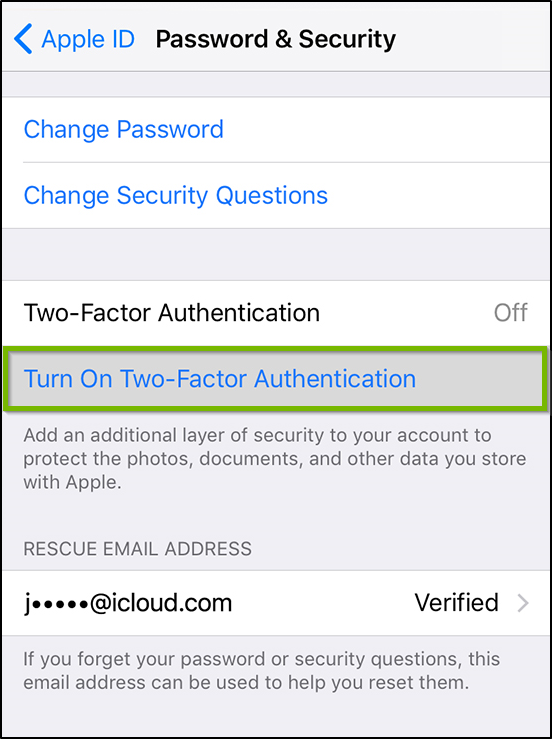
Then, tap Turn On Two-Factor Authentication.
You may be asked to verify your Apple account with security questions or device passcode.
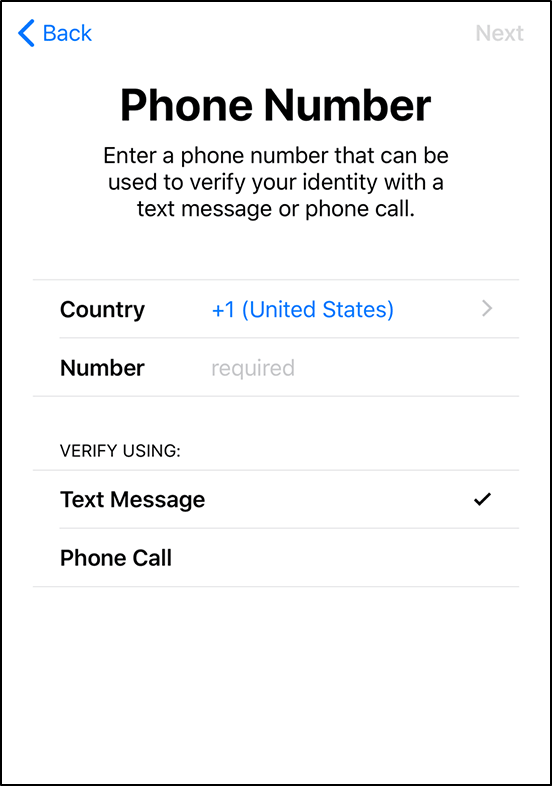
On the following screen, enter the phone number where you would like to receive verification codes. Tap Next to proceed.
Apple will send a verification code to the phone number you provided for verification.
Enter the verification code received to verify your phone number and turn on two-factor authentication.
6. Go To: Enable 2-Step Verification for Google
We have a detailed, step-by-step guide to help you setup 2-Step Verification on your Google account.
.png)